Cámara Wi-Fi · que no empleen el aparato como juguete. No extraiga la tarjeta micro SD mientras...
44
Cámara Wi-Fi Manual de instrucciones V0.0/0318v
Transcript of Cámara Wi-Fi · que no empleen el aparato como juguete. No extraiga la tarjeta micro SD mientras...

Cámara Wi-Fi
Manual de instruccionesV0.0/0318v
2
Antes de utilizar el producto, lea cuidadosamente este manual para evitar cualquier mal funcionamiento.La información presentada sirve únicamente como referencia sobre el producto. Consulte nuestra página web
www.steren.com para obtener la versión más reciente de este manual.
Los niños deben supervisarse para asegurar que no empleen el aparato como juguete.
No extraiga la tarjeta micro SD mientras la cámara está grabando; puede provocarmal funcionamiento y pérdida de datos.
La operación de este equipo está sujeta a las siguientes dos condiciones: (1) es posible que este equipo o dispositivo no cause interferencia perjudicial y (2) este equipo o dispositivo debe aceptar cualquier interferencia, incluyendo la que pueda causar su operación no deseada
Cualquier reparación no autorizada puede ocasionar mal funcionamiento y anularála garantía.
PRECAUCIONES

3
ÍNDICE
PARTES.......................................................................4
PREPARATIVOS.........................................................5 Conecte la cámara..................................................5 Reinicie la cámara...................................................5 Descargue la app ...................................................6
MODO DE USO...........................................................7 Paso 1: Conexión directa (Access point).............7 Paso 2: Conexión Wi-Fi .........................................7
CONFIGURACIÓN......................................................8 Conexión directa (Access point)...........................8 Conexión Wi-Fi......................................................11
MONITOREO.............................................................14
CONFIGURACIÓN DE ALERTAS.............................16
VISUALIZACIÓN DE ARCHIVOS.............................17
CONFIGURACIÓN GENERAL..................................18
INSTALACIÓN...........................................................19

4
PARTES
1. Sensor de iluminación
2. Lente
3. Altavoz
4. Ranura para tarjeta micro SD
5. Entrada de alimenta-ción micro USB
6. Botón de reinicio (Reset)

5
PREPARATIVOS
Inserte una tarjeta de memoria micro SD.
Conecte la cámara
Conecte el cable de alimenta-ción a la cámara y el converti-dor a un contacto eléctrico.La cámara comenzará a grabar automáticamente en cuanto se conecte a la energía eléctrica
Reinicie la cámara
Para asegurar la correcta configuración de la cámara, se recomienda reiniciarla. Mantenga presionado el botón Reset hasta que la cámara emita el mensaje de voz: “Restore factory default settings”.La cámara emitirá mensajes de voz (en inglés) mien-tras se prepara para la conexión

6
Descargue la app
Para gestionar y monitorear el funciona-miento de la cámara, debe instalar una aplicación .
Descargue la aplicación V380s desde la tienda correspondiente al sistema operativo de su dispositivo móvil
Esta aplicación no es propiedad de Steren; la empresa no se hace responsable por su funcionamiento ni actualizaciones.
7
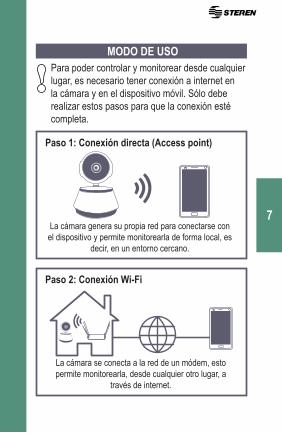
MODO DE USO
La cámara se conecta a la red de un módem, esto permite monitorearla, desde cualquier otro lugar, a
través de internet.
La cámara genera su propia red para conectarse con el dispositivo y permite monitorearla de forma local, es
decir, en un entorno cercano.
Para poder controlar y monitorear desde cualquier lugar, es necesario tener conexión a internet en la cámara y en el dispositivo móvil. Sólo debe realizar estos pasos para que la conexión esté completa.
Paso 1: Conexión directa (Access point)
Paso 2: Conexión Wi-Fi

8
CONFIGURACIÓN
1. En el dispositivo móvil ingrese a las opciones de configuración Wi-Fi. Busque y seleccione la red cuyo nombre está conformado por el prefijo “MV” y el número de identificación de la cámara. Ejemplo: MV30802803
2. Abra la aplicación V380s. Seleccione +
Conexión directa (Access point)
Las imágenes presentadas corresponden a un dispositivo con sistema operativo Android 5.0 y aplicación V380s (5.9). Los iconos, la configuración de la interfaz y las funciones pueden variar según la versión de la aplicación y el sistema operativo utilizados.

9
3. Seleccione Añadir dispositivo de red.
4. Identifique en la etique-ta que viene pegada en la base de la cámara los datos de identificación.
Introduzca el número de iden-tificación (ID). También puede escanear el código QRDeje este campo vacío

10
En la lista de dispositivos encontrados, aparecerá la cámara en línea, y podrá monitorearla de forma local.
Si desea saber cómo configurarla para controlarla de forma remota, diríjase a la siguiente sección de este instructivo (Conexión Wi-Fi).
Presione para visualizar
Se recomienda establecer una constraseña
5. Seleccione Añadir a la lista.

11
Conexión Wi-Fi
1. Una vez realizado el procedimiento de conexión directa entre el móvil y la cámara, ingrese a la opción Ajustes.
2. Elija Configuración de red.

12
3. Cambie el modo de conexión.
4. Seleccione la red a la cual desea conectarse. Ingrese la contraseña.

13
La cámara emitirá un par de mensajes de voz.
Cuando emita el siguiente mensaje, significa que se ha conectado correcta-mente.
5. Presione Guardar. Espere hasta que se establezca la conexión.
14
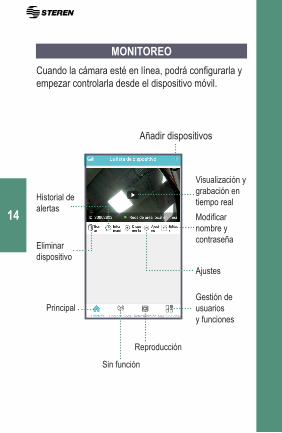
MONITOREOCuando la cámara esté en línea, podrá configurarla y empezar controlarla desde el dispositivo móvil.
Añadir dispositivos
Visualización ygrabación en tiempo realModificar nombre y contraseña
Gestión de usuariosy funciones
Principal
Eliminar dispositivo
Historial dealertas
Reproducción
Sin función
Ajustes

15
En la pantalla principal presione ► para visualizar en tiempo real.
En caso de que aparezca una advertencia de seguridad, se recomienda crear una contraseña para la cámara.
Activar/desac-tivar sonido
Grabar
Tomar una fotografía
Controles demovimiento
Sin función
Girar la imagen horizontalmente
Activar/desactivarmicrófono
16
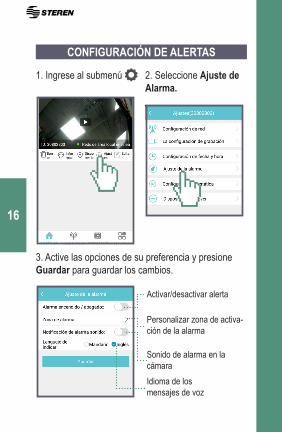
CONFIGURACIÓN DE ALERTAS
1. Ingrese al submenú 2. Seleccione Ajuste de Alarma.
3. Active las opciones de su preferencia y presione Guardar para guardar los cambios.
Activar/desactivar alerta
Personalizar zona de activa-ción de la alarma
Sonido de alarma en la cámaraIdioma de losmensajes de voz
17
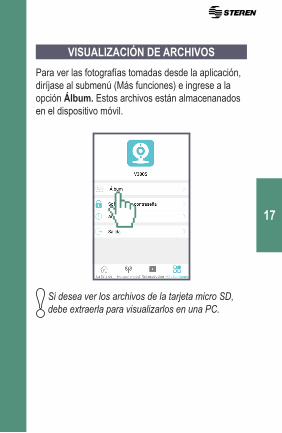
VISUALIZACIÓN DE ARCHIVOSPara ver las fotografías tomadas desde la aplicación, diríjase al submenú (Más funciones) e ingrese a la opción Álbum. Estos archivos están almacenanados en el dispositivo móvil.
Si desea ver los archivos de la tarjeta micro SD, debe extraerla para visualizarlos en una PC.

18
CONFIGURACIÓN GENERALIngrese al submenú para editar preferencias generales en la cámara.
Información del modo deconexión establecido
Opciones de grabación
Fecha y hora*
Configuración de alertas
Configuración de IP
Información de la aplicación
* Asegúrese de tener configuradas correctamente la fecha, la hora y la zona horaria para que la grabación y el monitoreo funcionen adecuadamente

19
INSTALACIÓNElija una superficie sólida y estable para instalar la cámara.
Tome en cuenta el largo del cable de alimentación al hacer la instalación
20
ESPECIFICACIONES
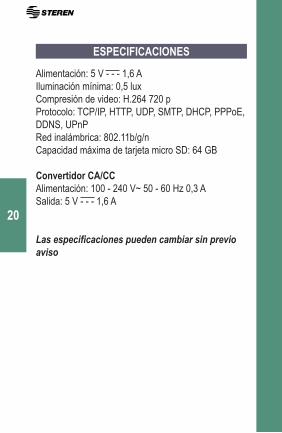
Alimentación: 5 V - - - 1,6 AIluminación mínima: 0,5 luxCompresión de video: H.264 720 pProtocolo: TCP/IP, HTTP, UDP, SMTP, DHCP, PPPoE, DDNS, UPnPRed inalámbrica: 802.11b/g/nCapacidad máxima de tarjeta micro SD: 64 GB
Convertidor CA/CCAlimentación: 100 - 240 V~ 50 - 60 Hz 0,3 ASalida: 5 V - - - 1,6 A
Las especificaciones pueden cambiar sin previo aviso

Producto: Cámara Wi-FiModelo: CCTV-216Marca: Steren
Esta póliza garantiza el producto por el término de un año en todas sus partes y mano de obra, contra cualquier defecto de fabricación y funcionamiento, a partir de la fecha de entrega.CONDICIONES1.- Para hacer efectiva la garantía, presente esta póliza y el producto, en donde fue adquirido o en Electrónica Steren S.A. de C.V.2.- Electrónica Steren S.A de C.V. se compromete a reparar el producto en caso de estar defectuoso sin ningún cargo al consumidor. Los gastos de transportación serán cubiertos por el proveedor.3.- El tiempo de reparación en ningún caso será mayor a 30 días,contados a partir de la recepción del producto en cualquiera de los sitios donde pueda hacerse efectiva la garantía.4.- El lugar donde puede adquirir partes, componentes, consumibles y accesorios, así como hacer válida esta garantía es en cualquiera de las direcciones mencionadas posteriormente.
ESTA PÓLIZA NO SE HARÁ EFECTIVA EN LOS SIGUIENTES CASOS:1.- Cuando el producto ha sido utilizado en condiciones distintas a las normales.2.- Cuando el producto no ha sido operado de acuerdo con el instructivo de uso.3.- Cuando el producto ha sido alterado o reparado por personal no autorizado por Electró-nica Steren S.A. de C.V. El consumidor podrá solicitar que se haga efectiva la garantía ante la propia casa comercial donde adquirió el producto. Si la presente garantía se extraviara, el consumidor puede recurrir a su proveedor para que le expida otra póliza, previa presentación de la nota de compra o factura respectiva.
DATOS DEL DISTRIBUIDORNombre del DistribuidorDomicilio Producto Marca ModeloNúmero de serie Fecha de entrega
ELECTRÓNICA STEREN, S.A. DE C.V.Biólogo Maximino Martínez No. 3408 San Salvador Xochimanca, Del. Azcapot-zalco, Ciudad de México, 02870, RFC: EST850628-K51
STEREN PRODUCTO EMPACADO S.A. DE C.V.Autopista México-Querétaro. Km 26.5 Sin número, Nave Industrial 3-A, Col. Lomas de Boulevares, Tlalnepantla de Baz, Estado de México, C.P. 54020, RFC: SPE-941215-H43
CENTRO DE ATENCIÓN
A CLIENTES
01 800 500 9000
Wi-Fi camera
User ManualV0.0/0318v

23
Before to use the product, please read carefully this manual to avoid any malfunction. The info in this manual is shown as reference. Consult our website www.steren.com to obtain the current version of this manual.
The children should be supervised to ensure that don’t use it like a toy.
Don’t remove the micro SD card while the camera is recording; it may cause malfunction and data lose.
The operation of this equipment is subject to the following two conditions: (1) it is possible that this equipment or device may not cause harmful interferen-ce and (2) this equipment or device must accept any interference, including interference that may cause its undesired operation
Any reparation not authorized may cause malfunction and avoid the warranty.
CAUTIONS

24
INDEX
PARTS.......................................................................25
BEFORE TO USE.....................................................26 Connect the camera.............................................26 Restart the camera...............................................26 App download.......................................................27
HOW TO USE............................................................28 Step 1: Direct connection (Access point)...........28 Step 2: Wi-Fi connection .....................................28
CONFIGURATION.....................................................29 Direct connection (Access point)........................29 Wi-Fi connection...................................................32
MONITORING...........................................................35
ALERT SETTINGS...................................................37
FILE PREVIEW..........................................................38
GENERAL SETTINGS...............................................39
INSTALLATION.........................................................40

25
PARTS
1. Night vision sensor
2. Lens
3. Speaker
4. Micro SD slot
5. Micro USB power input
6. Reset button
26
BEFORE TO USE
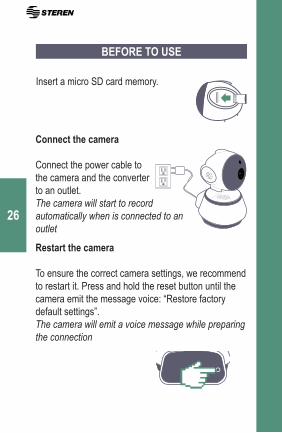
Insert a micro SD card memory.
Connect the camera
Connect the power cable to the camera and the converter to an outlet.The camera will start to record automatically when is connected to an outlet
Restart the camera
To ensure the correct camera settings, we recommend to restart it. Press and hold the reset button until the camera emit the message voice: “Restore factory default settings”.The camera will emit a voice message while preparing the connection
27
App download
To manage and monitor the camera function, you must install the app.
Download the V380s app from your app store.
This app is not a property of Steren; the company is not responsible by their function or updates.

28
HOW TO USE
The camera is connected to a modem, this allows to monitor remotely, via internet.
The camera generates their own network to connect with the device and allow local monitoring.
To control and monitor remotely, is necessary to have internet connection in the camera and the mobile device. You must follow this steps to complete the connection.
Step 1: Direct connection (Access point)
Step 2: Wi-Fi connection

29
CONFIGURATION
1. In the mobile device enter to WiFi settings op-tions. Search and select the network with the prefix “MV” and the ID number of the camera. Example:MV30802803
2. Open the app. Select +
Direct connection (Access point)
The displayed images corresponding to an Android 5.0 device and the V380s app (5.9). The icons, the interface and the functions may vary according with the app version and OS used.

30
3. Select Add network device.
4. Identify the label in the camera base with the data ID or QR.
Enter the ID number or scan the QR code
Leave this field empty
31
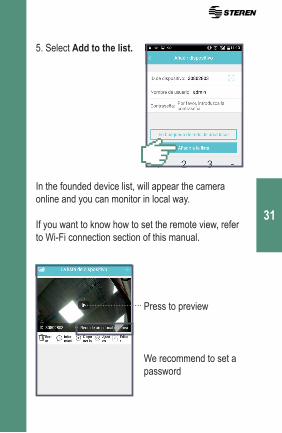
In the founded device list, will appear the camera online and you can monitor in local way.
If you want to know how to set the remote view, refer to Wi-Fi connection section of this manual.
Press to preview
We recommend to set a password
5. Select Add to the list.
32
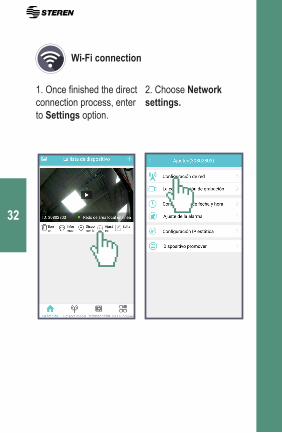
Wi-Fi connection
1. Once finished the direct connection process, enter to Settings option.
2. Choose Network settings.

33
3. Change the connection mode.
4. Select the network what you want to connect. Enter the password.
34
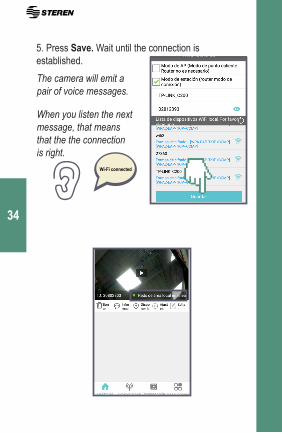
The camera will emit a pair of voice messages.
When you listen the next message, that means that the the connection is right.
5. Press Save. Wait until the connection is established.

35
MONITORINGWhen the camera is online, you can configure it and control it from your mobile device.
Add devices
Visualizing and monitoring in real timeModify name and password
Users and functions manage
Mainscreen
Deletedevice
Alerthistory
Playback
Withoutfunction
Settings
36
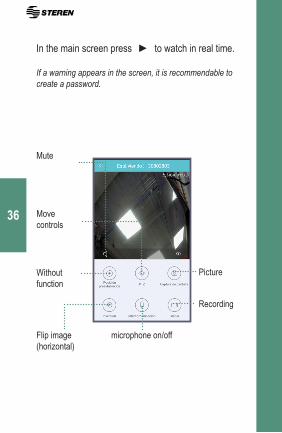
In the main screen press ► to watch in real time.
If a warning appears in the screen, it is recommendable to create a password.
Mute
Recording
Picture
Movecontrols
Withoutfunction
Flip image(horizontal)
microphone on/off
37
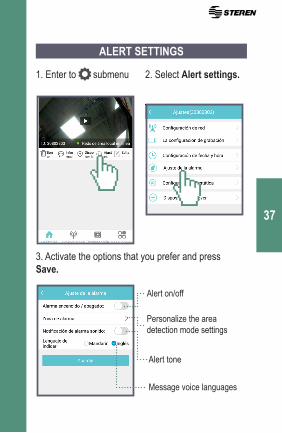
ALERT SETTINGS
1. Enter to submenu 2. Select Alert settings.
3. Activate the options that you prefer and press Save.
Alert on/off
Personalize the area detection mode settings
Alert tone
Message voice languages

38
FILE PREVIEWTo display stored photos from the app, enter to sub-menu (more functions) and choose the Album option. This files are stored in the mobile device.
If you want to watch the files stored in the micro SD card you must to take out the memory to can watch it in a PC

39
GENERAL SETTINGSEnter to submenu to edit the general preferences of the camera
Connection mode info
Recording options
Date and hour*
Alarm settings
IP settings
App info
* Ensure that have configured the date, hour and time zone to the recording and the monitoring works correctly

40
INSTALLATIONChoose a solid and stable surface to install the camera.
Have in mind the power cord length before installation
41
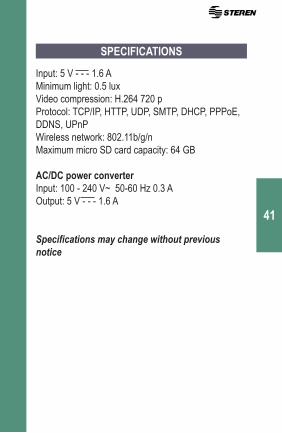
SPECIFICATIONS
Input: 5 V - - - 1.6 AMinimum light: 0.5 luxVideo compression: H.264 720 pProtocol: TCP/IP, HTTP, UDP, SMTP, DHCP, PPPoE, DDNS, UPnPWireless network: 802.11b/g/nMaximum micro SD card capacity: 64 GB
AC/DC power converterInput: 100 - 240 V~ 50-60 Hz 0.3 AOutput: 5 V - - - 1.6 A
Specifications may change without previous notice

42

Product: Wi-Fi cameraNumber part: CCTV-216Brand: Steren
This Steren product is warranted under normal usage against defects in workmanship and materials to the original purchaser for one year from the date of purchase.CONDITIONS1. This warranty card with all the required information, invoice or purchase ticket, product box or package, and product, must be presented when warranty service is required.2. If the product is in the warranty time, the company will repair it free of charge.3. The repairing time will not exceed 30 natural days, from the day the claim was received.4. Steren sell parts, components, consumables and accessories to custo-mer, as well as warranty service, at any of the addresses mentioned later.THIS WARRANTY IS VOID IN THE NEXT CASES:If the product has been damaged by an accident, acts of God, mishandling, leaky batteries, failure to follow enclosed instructions, improper repair by unauthorized personnel, improper safe keeping, among others.a) The consumer can also claim the warranty service in the purchase establishment.b) If you lose the warranty card, we can reissue it, if you show the invoice or purchase ticket.
RETAILER INFORMATION
Name of the retailer______________Address _______________________Product ________________________Brand _________________________Serial number ___________________
Date of delivery __________________
CUSTOM SERVICE CENTER 01 800 500 9000