
IMPORTANTE - steren.com.mxPuede elegir un punto de acceso remoto inalámbrico o ruteador para...
35
Transcript of IMPORTANTE - steren.com.mxPuede elegir un punto de acceso remoto inalámbrico o ruteador para...


2
COM-843Gracias por la compra de este producto Steren.
Este manual contiene todas las indicaciones necesarias para manejar su nueva Tarjeta de red inalámbrica USB 2,0 de 300 Mbps.
Por favor, revíselo completamente para estar seguro de cómo utilizar apropiadamente el producto.
Para apoyo, compras y todo lo nuevo que tiene Steren, visite nuestro sitio web:
www.steren.com
Tarjeta de red inalámbrica USB 2,0de 300 Mbps
La información que se muestra en este manual sirve únicamente como referencia sobre el producto. Debido a actualizaciones pueden existir diferencias.
Por favor, consulte nuestra página web (www.steren.com) para obtener la versión más reciente del instructivo.
“La operación de este equipo está sujeta a las siguientes dos condiciones: (1) es posible que este equipo o dispositivo no cause interferencia perjudicial y (2) este equipo o dispositivo debe aceptar cualquier interferencia, incluyendo la que pueda causar su operación no deseada.”

3
IMPORTANTE
• No intente abrir el equipo, puede ocasionar un mal funcionamiento y anular la garantía.
• No exponga el equipo a temperaturas extremas.
• Para evitar incendios o el riesgo de electrocución, no exponga el equipo a la lluvia ni a la humedad.
• No exponga el equipo ni sus accesorios al polvo, humo o vapor.
• Los productos eléctricos y electrónicos no deben mezclarse con la basura doméstica general. Contribuya a evitar efectos negativos en la salud de las personas y en el medio ambiente. Póngase en contacto con su autoridad local para informes detallados sobre la recolección de equipos eléctricos y electrónicos.
• Siempre utilice un paño suave y seco para limpiar el equipo.

4
1. CARACTERÍSTICAS La tarjeta de red inalámbrica USB 2,0 de rango extendido le permite conectar su computadora de escritorio o portátil, a una red local de forma inalámbrica.
Cumple con los protocolos estándar IEEE802,11n / IEEE802,11g / IEEE802,11b de autentifi cación y seguridad, esto le permite acceder a una red local inalámbrica por medio de un punto de acceso o ruteador, con su PC o laptop.
- Conexión a puerto USB.
- Tecnología MIMO para transferencias de hasta 300 Mbps.
- Instalación, monitoreo y confi guración rápida y segura.
- Compatible con WPS de seguridad inalámbrica.
- Soporta seguridad en datos WPA, autentifi cación por medio de protocolo IEEE802,1x, cifrado por medio de TKIP/AES y cifrado 64/128/152bit WEP.

5
2. INSTALACIÓN DE DRIVERS Y HARDWARE EN WINDOWS 7Encienda la computadora e inserte el CD incluido dentro de la unidad de CD-ROM. La pan-talla de instalación aparecerá. En caso contrario, presione el botón de Inicio, elija Ejecutar e introduzca D:\setup.exe (si la unidad D es su unidad de CD-ROM, en caso contrario, escriba la unidad correcta).
• Presione Siguiente.
Siga las instrucciones de instalación.
A continuación se muestra la instalación en Windows 7. Los pasos y las pantallas son similares en otros sistemas operativos de Windows.
• Después de que la instalación esté completa, el sistema le preguntará si desea reiniciar la computadora.
Puede hacerlo inmediatamente o después. Conecte el adaptador cuando el programa de instalación lo requiera.
En Windows 8 no necesitará instalar drivers o software adicionales.

6
3. CONFIGURACIÓN DE SISTEMAEste adaptador inalámbrico tiene dos modos de uso: Estación y Punto de acceso. El modo predeterminado es Estación. Puede elegir un punto de acceso remoto inalámbrico o ruteador para conectarse en modo Estación. En modo Punto de Acceso, el adaptador USB actúa como un Punto de Acceso inalámbrico al que clientes inalámbricos pueden conectarse y compartir una conexión.
Utilice la utilidad LAN inalámbrica para buscar redes inalámbricas disponibles, revise información de conexión o cree perfi les que contengan los diferentes parámetros de confi guración. Puede dar doble clic al ícono en su escritorio para ejecutarlo.
De manera alternativa, presione Inicio > Programas > REALTEK 11n USB Wireless LAN Utility > REALTEK 11n USB Wireless LAN Utility.
La opción General muestra información básica de la conexión inalámbrica.
3.1 General

7
• Información general
-Estado: Red inalámbrica asociada, Modo Ad Hoc o no Asociado. -Velocidad: Muestra la velocidad de transmisión y recepción de datos de la conexión actual. -Tipo: Tipo de conexión inalámbrica actual – Infraestructura o Ad Hoc. -Cifrado: Tipo de encriptación de la conexión actual. -SSID: Nombre de la red inalámbrica del adaptador inalámbrico que está conectado. -Intensidad de la señal: Indica la calidad de la señal en la conexión. -Calidad de enlace: Se refi ere a la calidad de enlace en la conexión actual.
• Dirección de red
-Dirección MAC: Se refi ere a la dirección MAC del adaptador. -Dirección IP: Se refi ere a la dirección IP del adaptador. -Máscara de subred: Se refi ere a la máscara subred del adaptador. -Puerta de enlace: La puerta de enlace predeterminada del adaptador. -Presione Renovar IP para cambiar la dirección IP del adaptador.
• Otros
-Mostrar ícono de la bandeja: Muestra el ícono USB Wireless LAN en la barra de tareas de Windows. -Deshabilitar adaptador: Deshabilita la tarjeta de red inalámbrica. -Radio desactivada: Enciende la transmisión de radio del adaptador inalámbrico.-Virtual WiFi allowed: Permite el uso del adaptador como punto de acceso.

8
Puede utilizar este ajuste de perfi l para agregar, eliminar, editar y duplicar los perfi les, así como establecer un perfi l predeterminado.
Útil para crear un nuevo perfi l.
• Seleccione el botón Agregar para generar un nuevo perfi l.
Cuando la ventana de información de red aparezca, escriba el nombre del nuevo perfi l que generará.
Introduzca el nombre de SSID de red, seleccione el modo de autenticación de red y el tipo de introducción de datos, confi rme la clave de la red. Seleccione Aceptar.
3.2. Perfi l
3.2.1 Agregar

9
• Crear un nuevo perfi l ad hoc.
Si desea que sus equipos inalámbricos se comuniquen directamente entre sí, seleccione el botón Add para crear un nuevo perfi l ad hoc, después seleccione esta ventana:
Seleccione el perfi l no deseado y elimínelo con el botón “Quitar”.
3.2.2. Quitar
y seleccione el canal de operación para la red desde el menú de canal drop-down.
Seleccione el modo de autenticación de red y el tipo de introducción de datos, confi rme la clave de la red. Seleccione Aceptar.
3.2.3. Editar Seleccione el perfi l y presione el botón “Edit” para comenzar la edición. Realice los cambios que necesite y confi rme con Aceptar.

10
3.2.4. Duplicar Seleccione el perfi l que desea copiar y dé clic en el botón “Duplicate”. Introduzca el nombre del nuevo perfi l en la caja de texto.
3.2.5. Establecer valores predeterminados
Cuando desee establecer un perfi l de conexión inalámbrica como predeterminado, deberá seleccionar el perfi l y dar clic en el botón “Establecer valores predeterminados”. De este modo la tarjeta de red inalámbrica usará este perfi l (luego de ejecutar nuevamente las aplicaciones) para conectarse automáticamente.
3.4. Estado
La ventana Estado muestra los datos del adaptador.
3.3. Red disponible
Aquí podrá ver todas las redes inalámbricas disponibles. Si quiere agregar alguna como perfi l, haga doble clic sobre ella o use el botón “Agregar a perfi l”. Para renovar la lista presione “Actualizar”

11
3.5. Estadísticas La tabla de estadísticas muestra datos de paquetes transmitidos y recibidos durante esta sesión. Puede hacer clic en el botón “Reset” para borrar estos valores y restaurar la cuenta.
3.6. Confi guración de protección WiFi Nota: Puede utilizar WPS sólo si el ruteador también tiene la función WPS.
A: Por NIP Seleccione la pestaña de “Confi guración de protección WiFi” en la utilidad del adaptador. Para elegir el NIP WPS seleccione la caja “Input PIN from AP”, proporcione un NIP WPS y haga clic en Confi guración de entrada NIP. Este NIP generalmen-te se imprime en una etiqueta en el ruteador. Si no se encuentra en el ruteador o ha sido cambiado, es posible que tenga que acceder a la interfaz del ruteador. Si lo prefi ere, puede optar por utilizar el NIP que ofrece este adaptador inalámbrico, haga clic en Confi guración de entrada NIP (PIN Input Confi g) e introduzca el NIP en la interfaz del ruteador.
B: Por botón Presione y mantenga presionado el botón WPS en la parte posterior del ruteador hasta que el LED parpadee (o como se indique en el manual del fabricante) Presione el botón WPS en el adaptador de red inalámbrica y mantenga pulsado durante 3-5 segundos.
Una conexión segura se establecerá automáticamente. También se puede utilizar de forma inversa - mantenga pulsado el botón WPS en el adaptador brevemente, a continuación, pulse y mantenga pulsado el botón WPS en el ruteador.
Si hay más de un punto de acceso cuando se utiliza el método botón, puede haber confl icto de sesiones. Por favor, utilice el método de NIP o espere para presionar el botón de nuevo.

12
El adaptador USB puede ser utilizado como un punto de acceso por visitantes inalámbricos para conectarse si se confi gura en Modo de Punto de acceso. Puede compartir el acceso a Internet con otros dispositivos. Hay dos opciones para iniciar este modo:
A: Seleccione la casilla “Virtual WiFi allowed”. Se activará la pestaña Virtual WiFi.
Para iniciar el modo de punto de acceso, active la casilla “Start Virtual WiFi PA fl exible”. Use el botón “Confi guración” para asignar el nombre de la red y la clave. Pulse aceptar para guardar los datos.
Active la casilla “Establecer el uso compartido de la conexión a Internet (ICS)” para compartir una conexión a Internet de la computadora. Por defecto se seleccionará el modo automático Red pública. Si desea compartir otra conexión, desactive la casilla “Automático Red pública” y seleccione la conexión del menú desplegable.
B: Haga clic en Modo en la barra de menú y seleccione Punto de Acceso. Cambiará a Modo de Punto de Acceso automáticamente.
4. MODO DE PUNTO DE ACCESO
3.7. Easy SharingPuede confi gurar carpetas para que se compartan fácilmente de manera inalámbrica con otros dispositivos de la red. Seleccione “Manage Shared Folder(s)”. Seleccione la carpeta que desee compartir con el botón “Select” y agrégela a la lista con “Add”. Utilice el botón “Delete” para borrar una carpeta de la lista y presione “OK” para cerrar los ajustes.

13
PROBLEMA SOLUCIÓN
El adaptador no trabaja adecuadamente.
Vuelva a conectar el Adaptador USB Inalámbrico 11N en la entrada para USB de su computadora. Haga clic Derecho en Mi computadora y seleccione Propiedades. Seleccione el administrador de dispositivos y haga clic en el Adaptador de Red. Encontrará el Adaptador si es instalado exitosamente. Si observa la marca de exclamación amarilla, los recursos están en confl icto.Observará el estado del Adaptador. Si hay una marca de interrogación amarilla, por favor revise lo siguiente: - Asegúrese de que su PC tiene un libre IRQ (Interrupt ReQuest) (Solicitud Interrumpida) (un hardware interrumpido en una PC). - Asegúrese de que ha insertado el adaptador correcto e instale el disco adecuado. Si el Adaptador no funciona después de intentar los pasos anteriores, remueva el adaptador y realice lo siguiente: - Desinstale el software del disco de su PC. - Reinicie su PC y repita el hardware y la instalación del software como se especifi ca en esta Guía de Usuario.
No se puede comunicar con otras
computadoras vinculadas en la
confi guración de la infraestructura.
- Asegúrese de que todos los dispositivos relacionados están encendidos. - Asegúrese de que su adaptador está confi gurado en el mismo canal y con las mismas opciones de seguridad como con las otras computadoras en la Confi guración de la Infraestructura.
5. PROBLEMAS Y SOLUCIONES

14
¿Qué puede hacer cuando la computadora
con el adaptador instalado no está
conectado a la red inalámbrica y/o el
Internet?
- Revise que los indicadores del LED para el módem de banda ancha estén indicando una actividad normal. Si no, hay un problema con la conexión de banda ancha. - Revise que los indicadores del LED en el ruteador inalámbrico están funcionando adecuadamente. Si no es así, revise que el cable de corriente y los cables de Ethernet estén fi rmemente conectados. - Revise que la dirección IP, la máscara de subred, la puerta de entrada y los ajustes del DNS están correctamente introducidos en la red. En el modo de Infraestructura, asegúrese de que el mismo SSID está especifi cado en los ajustes para los visitantes inalámbricos y los puntos de acceso. En el modo ad hoc, ambos visitantes inalámbricos necesitarán tener el mismo SSID. Por favor, note que será necesario confi gurar un cliente para establecer un BSS (Basic service Set) (Ajuste de Servicio Básico) y espere brevemente antes de confi gurar otros visitantes. Esto previene a varios visitantes para tratar de establecer un BSS al mismo tiempo, el cual puede resultar en un múltiple BSS siendo establecido en lugar de un BSS individual con múltiples visitantes asociados. Revise que la conexión de red para los visitantes inalámbricos esté confi gurada adecuadamente. Si la seguridad está activada, asegúrese de que las coincidencias de las claves de cifra están introducidas tanto en el adaptador como en el punto de acceso.

15
6. ESPECIFICACIONESEstándares: IEEE 802,11n (draft 2,0); IEEE 802,11g;
IEEE 802,11b; CSMA/CA con ACK
Promedio de señal inalámbrica con respuesta automática:
11n: 270/243/216/162/108/54/27 Mbps135/121,5/108/81/54/40,5/27/13,5 Mbps130/117/104/78/52/39/26/13 Mbps65/58,5/52/39/26/19,5/13/6,5 Mbps11g: 54/48/36/24/18/12/11/9/6 Mbps (adaptable)11b: 11/5,5/2/1 Mbps (adaptable)
Rango de frecuencia: 2,4-2, 484 GHz
Poder de transmisión inalámbrica: 17 dBm (máx)
Tecnología de modulación: OFDM/CCK/16-QAM/64-QAM/BPSK/QPSR/DQPSR/DBPSK
Sensibilidad del receptor:
270 M: -68 dmM@10% PER, 130 M: -68 dBm@10% PER, 108 M: -68 dBm@10% PER,54 M: -68 dBm@10% PER,11 M: -85 dBm@8% PER,6 M: -88 dBm@10% PER,1 m: -90 dBm@8% PER
Seguridad: 64/128 bit WEP, WPA/WPA2, WPA-PSK/WPA2-PSK (TKIP/AES)
Sistemas operativos compatibles: Windows 2000/XP/Vista
Interfaz: USB 2,0 Alta velocidad

16
Tipo de antena: Antenas internas omni-direccionales
Certifi caciones: CE, FCC
Temperatura de operación: 0°C~40° C (32° F~104° F)
Temperatura de almacenamiento: -20° C~70° C (- 4° F~158° F)
Humedad relativa: 10% ~ 90%, no condensada
Humedad de almacenamiento: 5%~95% no condensada
El diseño del producto y las especifi caciones pueden cambiar sin previo aviso.

17
Producto: Tarjeta de red inalámbrica USB 2,0 de 300 MbpsModelo: COM-843Marca: Steren
PÓLIZA DE GARANTÍAEsta póliza garantiza el producto por el término de un año en todas sus partes y mano de obra, contra cualquier defecto de fabricación y funcionamiento, a partir de la fecha de entrega.
CONDICIONES1.- Para hacer efectiva la garantía, presente esta póliza y el producto, en donde fue adquirido o en Electrónica Steren S.A. de C.V.2.- Electrónica Steren S.A de C.V. se compromete a reparar el producto en caso de estar defectuoso sin ningún cargo al consumidor. Los gastos de transportación serán cubiertos por el proveedor.3.- El tiempo de reparación en ningún caso será mayor a 30 días, contados a partir de la recepción del producto en cualquiera de los sitios donde pueda hacerse efectiva la garantía.4.- El lugar donde puede adquirir partes, componentes, consumibles y accesorios, así como hacer válida esta garantía es en cualquiera de las direcciones mencionadas posteriormente.
ESTA PÓLIZA NO SE HARÁ EFECTIVA EN LOS SIGUIENTES CASOS:1.- Cuando el producto ha sido utilizado en condiciones distintas a las normales.2.- Cuando el producto no ha sido operado de acuerdo con el instructivo de uso.3.- Cuando el producto ha sido alterado o reparado por personal no autorizado por Electrónica Steren S.A. de C.V.El consumidor podrá solicitar que se haga efectiva la garantía ante la propia casa comercial donde adquirió el producto. Si la presente garantía se extraviara, el consumidor puede recurrir a su proveedor para que le expida otra póliza, previa presentación de la nota de compra o factura respectiva.
DATOS DEL DISTRIBUIDORNombre del Distribuidor __________________________Domicilio ______________________________________Producto ______________________________________Marca ________________________________________Modelo _______________________________________Número de serie ________________________________Fecha de entrega ________________________________
ELECTRÓNICA STEREN S.A. DE C.V.Camarones 112, Obrero Popular, 02840, Del. Azcapotzalco, México, D.F. RFC: EST850628-K51STEREN PRODUCTO EMPACADO S.A. DE C.V.Biólogo Maximino Martínez No. 3408 Int. 2, 3 y 4, San Salvador Xochimanca, Del. Azcapotzalco, México, D.F. 02870, RFC: SPE941215H43ELECTRÓNICA STEREN DEL CENTRO, S.A. DE C.V.Rep. del Salvador 20 A y B, Centro, 06000, Del. Cuauhtémoc, México. D.F. RFC: ESC9610259N4ELECTRÓNICA STEREN DE GUADALAJARA, S.A.López Cotilla No. 51, Centro, 44100, Guadalajara, Jal. RFC: ESG810511HT6ELECTRÓNICA STEREN DE MONTERREY, S.A.Colón 130 Pte., Centro, 64000, Monterrey, N.L. RFC: ESM830202MF8ELECTRÓNICA STEREN DE TIJUANA, S.A. de C.V.Calle 2a, Juárez 7636, Centro, 22000, Tijuana, B.C.N. RFC: EST980909NU5
En caso de que su producto presente alguna falla, acuda al centro de distribución más cercano a su domicilio y en caso de tener alguna duda o pregunta por favor llame a nuestro Centro de Atención a Clientes, en donde con gusto le atenderemos en todo lo relacionado con su producto Steren.
Centro de Atención a Clientes01 800 500 9000


22
Thank You on purchasing your new Steren product.
This manual includes all the feature operations and troubleshooting necessary to install and operate your new Steren´s 300 Mbps wireless
USB adapter.
Please review this manual thoroughly to ensure proper installation and operation of this product. For support, shopping,
and everything new at Steren, visit our website:
www.steren.com
COM-843
300 Mbps WIRELESSUSB ADAPTER
The instructions of this manual are for reference about the product. There may be differences due to updates.
Please check our website (www.steren.com) to obtain the latest version of the instruction manual.
“The operation of this equipment is subject to the following two conditions: (1) it is possible that this equipment or device may not cause harmful interference, and (2) this device or device must accept any interference, including interference that may cause undesired operation .”

33
IMPORTANT
• Do not try to open the device, may cause damages and warranty will be void.
• Do not expose to extreme temperatures.
• To prevent fi re or shock hazard, do not expose the device to rain or moisture.
• Do not expose the device or accessories to dust, smoke or steam.
• Do not mix electric and electronics products with domestic garbage. Help to avoid adverse effects on human health and the environment. Contact your local authority for detailed reports on the collection of electrical and electronic equipment.
• Clean with a soft, dry cloth.

44
1. HIGHLIGHTS The Wireless –N USB 2.0 adapter allows you to connect your desktop or laptop to a local network, wirelessly.
It complies with EEE802.11n / IEEE802.11g / IEEE802.11b standards, allowing you to get access to a wireless local network through an access point or router, with your desktopor laptop.
- USB port.
- MIMO technology for data transfers up to 300 Mbps.
- Easy and secure installation, monitoring and confi guration.
- Compatible with WPS wireless security.
- Supports WPA data security, IEEE802.1x authentication, TKIP/AES encryption, and 64/128/152bit WEP advanced data security.

55
2. DRIVERS AND HARDWARE INSTALLATION WINDOWS 7Turn on the computer and insert the included CD into your CD-ROM drive. The installation screen appears. Otherwise, press the Start button and choose Run, enter D:\setup.exe (if drive D is your CD-ROM drive if not, enter the correct drive).
• Press Next.
Follow the install instructions.
Below is the installation on Windows 7. Steps and screens are similar in other Windows operating systems.
Once the installation is complete, the system will ask you if you want to restart the computer.
This can be done immediately or later. Connect the adapter when setup program requires it.
In Windows 8 you don’t need to install aditional drivers or software.

66
3. SYSTEM CONFIGURATIONThis wireless adapter has two modes of use: station and access point. The default mode is station. You can choose a router or wireless remote access point to connect in station mode. In access point mode, the USB adapter acts as a wireless access point that wireless clients can connect and share a connection.
Use the wireless LAN utility to search for available wireless networks, check connection information or create profi les that contain different confi guration parameters. You can give double clicking the icon on your desktop to run it.
Alternatively, press start > programs > COM-844 USB Wireless LAN Utility > COM-844 USB wireless LAN utility.
The General option displays basic information of the wireless connection.
3.1 General

77
• General information
-Status: Associated wireless network, Ad Hoc mode or not associated. -Speed: Shows the speed of transmission and reception of data for the current connection. -Type: Current wireless connection type - infrastructure or Ad Hoc. -Encryption: Encryption type of the current connection. -SSID: Name of the wireless network in which the wireless adapter is connected. -Signal strength: Indicates the quality of the connection signal. -Link quality: Refers to the link quality in the current connection.
• Network address
-MAC address: Refers to the MAC address of the adapter. -IP address: Refers to the IP address of the adapter. -Subnet mask: Refers to the adapter subnet mask. -Gateway: The default gateway of the adapter. -Press “Renew IP” to change the IP address of the adapter.
• Other
-Show tray icon: Shows the USB Wireless LAN icon in the Windows taskbar. -Disable adapter: Disable the wireless network card. -Radio disabled: Turn on the wireless adapter radio transmission.-Virtual WiFi allowed: Allows the use of the adaptor as access point.

88
You can use this profi le setting to add, delete, edit and duplicate profi les, as well as set a default profi le.
Useful to create a new profi le.
• Select the Add button to create a new profi le.
When the network information window appears, type the name of the new profi le that will be generated.
Enter the network SSID, select network authentication mode and entry the data type, confi rm the network key.
Select OK.
3.2 Profi le
3.2.1 Add

99
• Create a new ad hoc profi le. If you want your wireless computers to communicate directly with each other, select the Add button to create a new ad hoc profi le, then select this window:
Select the unwanted profi le and delete it with the “Remove” button.
3.2.2 Remove
and select the operation channel for the network from the channel drop-down menu.
Select network authentication mode and the type of data entry, confi rm the network key. Select OK.
3.2.3 Edit Select profi le and press the “Edit” button to start editing. Make the changes you require and confi rm with OK.
1010
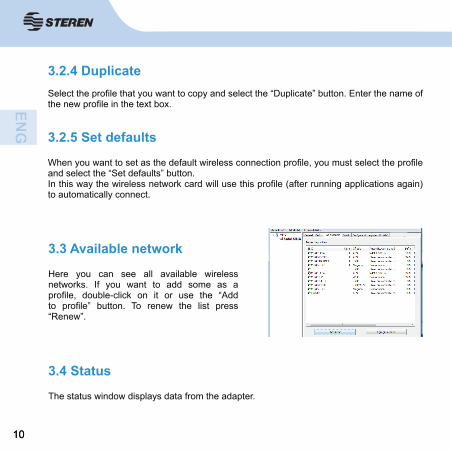
3.2.4 Duplicate Select the profi le that you want to copy and select the “Duplicate” button. Enter the name of the new profi le in the text box.
3.2.5 Set defaults
When you want to set as the default wireless connection profi le, you must select the profi le and select the “Set defaults” button. In this way the wireless network card will use this profi le (after running applications again) to automatically connect.
3.4 Status
The status window displays data from the adapter.
3.3 Available network
Here you can see all available wireless networks. If you want to add some as a profi le, double-click on it or use the “Add to profi le” button. To renew the list press “Renew”.

1111
3.5 Statistics The statistics table shows data packets transmitted and received during this session. You can click the “Reset” button to clear these values and restore the account.
3.6 WiFi security settings Note: You can use WPS only if the router also has the WPS feature.
A: By NIP Select the “Protection WiFi settings” tab in the adaptor utility. To choose the WPS NIP select “Input NIP from AP” box, provide WPS NIP and click “Input pin confi guration”. This PIN is usually printed on a label on the router. If it is not on the router or has been changed, it is possible you may need to access the router interface. If you prefer, you can choose to use the NIP that offers this wireless adapter, click input pin confi guration (PIN Input Confi g) and insert the PIN in the router interface.
B: By button Press and hold the WPS button on the back of the router until the LED blinks (or as marked on the manufacturer’s manual).
Press the WPS button on your wireless network adapter and hold for 3-5 seconds.
A secure connection is established automatically.
It can also be used in reverse order - press and hold the WPS button on the adapter briefl y, then press and hold the WPS button on the router.
If there is more than one access point when using the method button, it can be session confl ict. Please use the PIN method or wait to press the button again.

1212
The USB adapter can be used as an access point for wireless visitors to connect if confi gured in access point mode. You can share Internet access with other devices. There are two options to initiate this mode:
A: Select the “Virtual WiFi allowed”checkbox. The Virtual WiFi tab will appear.
To start the access point mode, select the “Start fl exible Virtual WiFi AP” box. Use the “Settings” button to assign the network name and key. Click OK to save the data.
Check the “Set Internet connection sharing (ICS)” box to share a connection to the Internet from your computer. The public network automatic mode is selected by default. If you want to share another connection, uncheck “Automatic public network” and select the connection from the drop-down menu.
B: Click on mode in the menu bar and select access point. Automatically switches to access point mode.
4. ACCESS POINT MODE
3.7 Easy SharingYou can confi gure folders so that they are easily shared wirelessly with other devices on the network. Select “Manage Shared Folder(s)”. Select the folder that you want to share with the “Select” button and confi rm with “Add”. Use the “Delete” button to delete a folder from the list and press “OK” to close the settings.

1313
PROBLEM SOLUTION
The adapter does not work properly.
Reconnect the wireless USB adapter 11N to your computer’s USB.
Then right click on my Properties. Select the Device Manager and click on the network adapter. You will fi nd the adapter if it is successfully installed. If you notice the yellow exclamation mark, the resources are in confl ict.
You will see the status of the adapter. If a yellow interrogation mark appears, please check the following:
-Make sure that your PC has a free IRQ (Interrupt ReQuest) (interrupted request) (a hardware interrupted in a PC).
- Make sure that you have inserted the correct adapter and install the appropriate disk. If the adapter is not working after trying the above steps, remove the adapter and do the following:
-Uninstall the software from your PC’s drive.
-Restart your computer and repeat the hardware and the software installation as described in this user guide.
You can not communicate with other computers linked in the
infrastructure confi guration.
-Make sure that all related devices are switched on.
-Make sure that your adapter is confi gured on the same channel and the same security options as with the other computers in the confi guration of the infrastructure.
5. TROUBLESHOOTING

1414
What can you do when the computer with the
installed adapter is not connected to the
wireless network or the Internet?
-Check that LED indicators to the broadband MODEM are indicating normal activity. If there is a problem with band connection broadband.
-Check that the LED on the wireless router indicators is functioning properly. If it is not, check that the power cord and Ethernet cables are securely connected.
-Check that the IP address, subnet mask, gateway and DNS settings are correctly entered in the network.
In infrastructure mode, make sure that the SSID is specifi ed in the settings for wireless visitors and access points.
In ad hoc mode, both wireless visitors will need to have the same SSID. Please note that it will be necessary to confi gure a client to establish a BSS (Basic service Set) (basic service set) and wait briefl y before confi guring other visitors. This prevents several visitors to try to establish a BSS at the same time, which can result in a multiple BSS being established instead of a single BSS with multiple associated visitors.
Check that the network connection for the wireless visitors are properly confi gured.
If security is enabled, ensure that occurrences of the number keys are entered both the adapter and the access point.

1515
6. SPECIFICATIONSStandards: IEEE 802.11n (draft 2.0); IEEE 802.11g;
IEEE 802.11b; CSMA/CA with ACK
Wireless signalrates with automatic fallback:
11n: 270/243/216/162/108/54/27 Mbps135/121.5/108/81/54/40.5/27/13.5 Mbps130/117/104/78/52/39/26/13 Mbps65/58.5/52/39/26/19.5/13/6.5 Mbps11g: 54/48/36/24/18/12/11/9/6 Mbps (adaptive)11b: 11/5.5/2/1 Mbps (adaptive)
Frequency range: 2.4-2, 484 GHz
Wireless transmit power: 17 dBm (max)
Modulation type: OFDM/CCK/16-QAM/64-QAM/BPSK/QPSR/DQPSR/DBPSK
Receiver sensitivity:
270 M: -68 dmM@10% PER, 130 M: -68 dBm@10% PER, 108 M: -68 dBm@10% PER,54 M: -68 dBm@10% PER,11 M: -85 dBm@8% PER,6 M: -88 dBm@10% PER,1 m: -90 dBm@8% PER
Security: 64/128 bit WEP, WPA/WPA2, WPA-PSK/WPA2-PSK (TKIP/AES)
Support operating system: Windows 2000/XP/Vista
Interface: USB 2.0 Hi-Speed

1616
Antenna type: Internal omni-directional antennas
Certifi cations: CE, FCC
Operating temperature: 0°C~40° C (32° F~104° F)
Storage temperature: -20° C~70° C (- 4° F~158° F)
Relative humidity: 10% ~ 90%, non condensation
Storage humidity: 5%~95% non-condensing
Product design and specifi cations are subject to change, without notice.
1717
WARRANTY
This Steren product is warranted under normal usage against defects in workmanship and materials to the original purchaser for one year from the date of purchase.
CONDITIONS
1. This warranty card with all the required information, invoice, product box or package, and product, must be presented when warranty service is required.2. If the product is in the warranty time, the company will repair it free of charge.3. The repairing time will not exceed 30 natural days, from the day the claim was received.4. Steren sell parts, components, consumables and accessories to customer, as well as warranty service, at any of the addresses mentioned later.
THIS WARRANTY IS VOID IN THE NEXT CASES:
If the product has been damaged by an accident, acts of God, mishandling, leaky batteries, failure to follow enclosed instructions, improper repair by unauthorized personnel, improper safe keeping, among others.
a) The consumer can also claim the warranty service in the purchase establishment.b) If you lose the warranty card, we can reissue it, if you show the invoice or purchase ticket.
RETAILER INFORMATIONName of the retailerAddressProductBrandPart numberSerial numberDate of delivery
Product: 300 Mbps wireless USB 2.0 adapterPart number: COM-843Brand: Steren
In case your product fails or have questions, please
contact your nearest dealer. If you are in Mexico, please
call to our Call Center.
01 800 500 9000


![pUNto Limpio [Modo de compatibilidad] - Extremaduraextremambiente.juntaex.es/files/residuos/2018/jornadas...BALANCE TOTAL GESTIÓN PUNTO LIMPIO Tipo de residuo Total gestionado (2012/2017)](https://static.fdocuments.es/doc/165x107/5f8c6326fa1b8a10c47a174b/punto-limpio-modo-de-compatibilidad-extre-balance-total-gestin-punto-limpio.jpg)


![5 Fonetica Articulatoria Modo, Punto y Sonoridad c.vocales[1]](https://static.fdocuments.es/doc/165x107/55cf9dc2550346d033af10b4/5-fonetica-articulatoria-modo-punto-y-sonoridad-cvocales1.jpg)


