MANUAL DE INSTRUCCIONES NEVERA DE 2 …€¦ · • Las personas y/o Marcas registradas en este...
22
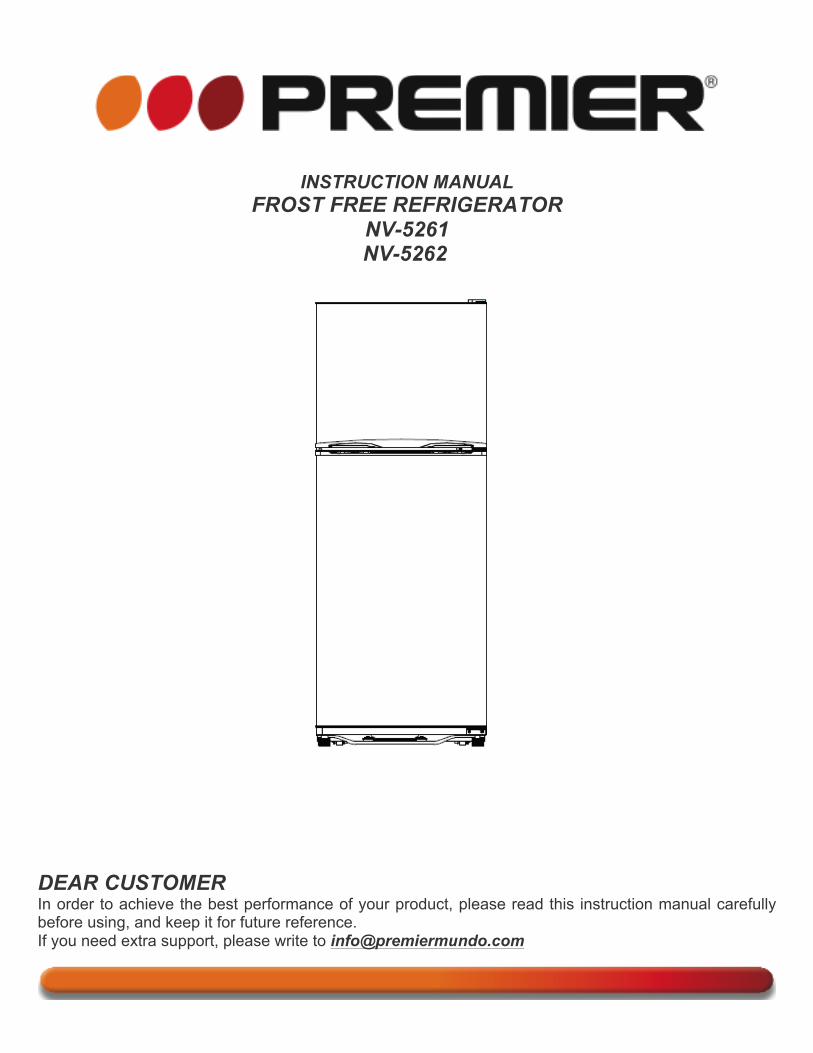
MANUAL DE INSTRUCCIONES NEVERA DE 2 PUERTAS NV-5261, NV-5262 ESTIMADO CLIENTE Con el fin de que obtenga el mayor desempeño de su producto, por favor lea este manual de instrucciones cuidadosamente antes de comenzar a utilizarlo, y guárdelo para su futura referencia. Si necesita soporte adicional, no dude en escribir a: [email protected]
Transcript of MANUAL DE INSTRUCCIONES NEVERA DE 2 …€¦ · • Las personas y/o Marcas registradas en este...
MANUAL DE INSTRUCCIONES NEVERA DE 2 PUERTAS
NV-5261, NV-5262
ESTIMADO CLIENTE Con el fin de que obtenga el mayor desempeño de su producto, por favor lea este manual de instrucciones cuidadosamente antes de comenzar a utilizarlo, y guárdelo para su futura referencia. Si necesita soporte adicional, no dude en escribir a: [email protected]
P-1
ÍNDICE DESCRIPCIÓN .......................................................................................................................................... 2 PREPARACIÓN ......................................................................................................................................... 3 INSTRUCCIONES DE OPERACIÓN ......................................................................................................... 3 AUSENCIAS PROLONGADAS ................................................................................................................. 4 REEMPLAZAR EL BOMBILLO ................................................................................................................. 4 CAMBIAR LA PUERTA REVERSIBLE ..................................................................................................... 5 INSTRUCCIONES DE SEGURIDAD ......................................................................................................... 7 RESOLUCIÓN DE PROBLEMAS ............................................................................................................. 7 DIAGRAMA DE CIRCUITOS ..................................................................................................................... 8
PRECAUCIÓN
RIESGO DE CHOQUE
ELÉCTRICO , NO ABRA
Precaución: Para reducir el riesgo de choque eléctrico, no retire la cubierta, no hay partes manipulables por el usuario al interior de la unidad. Refiera todo mantenimiento o intervención técnica a personal técnico calificado.
Este símbolo indica la existencia de voltaje peligroso al interior de esta unidad, que constituye un riesgo de choque eléctrico.
Este símbolo indica que hay importantes instrucciones de operación y mantenimiento en la literatura que acompaña a esta unidad.
LÍNEAS DE SERVICIO AL CLIENTE PREMIER Venezuela: 0800 – ELECTRIC (353-2874) Panamá: 300-5185 Sitio Web: www.premiermundo.com E-mail: [email protected] NOTA Nos reservamos el derecho de modificar las especificaciones, características y/u operación de este producto sin previo aviso, con el fin de continuar las mejoras y desarrollo del mismo.
P-2
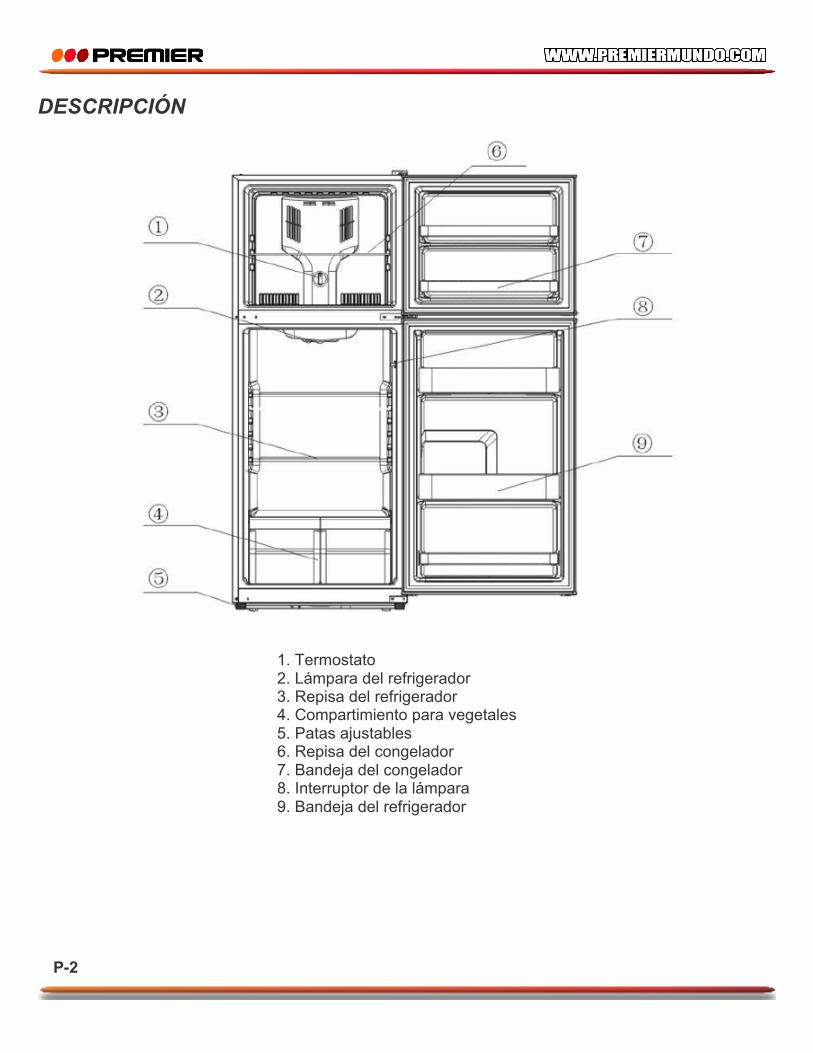
DESCRIPCIÓN
1. Termostato 2. Lámpara del refrigerador 3. Repisa del refrigerador 4. Compartimiento para vegetales 5. Patas ajustables 6. Repisa del congelador 7. Bandeja del congelador 8. Interruptor de la lámpara 9. Bandeja del refrigerador
P-3
PREPARACIÓN • Retire todo el empaque y las cintas de la unidad. • No utilice objetos afilados o líquidos inflamables para retirar el pegante a la cinta para evitar dañar la
superficie. • Al mover la unidad de un lugar a otro, no la incline más de 45º desde la posición vertical. • Limpie la unidad completamente antes de utilizarlas por vez primera. • Ubique la unidad en un espacio libre de agentes explosivos. • Para asegurar una buena ventilación, mantenga un espacio libre alrededor de la unidad al menos de
20 cm por los lados y 30 cm en la parte superior. • No coloque la unidad cerca de fuentes de calor ni la exponga a los rayos directos del sol. • El enchufe del cable de poder tiene una pata para la conexión a polo a tierra. No elimine esta pata
para que el enchufe entre al tomacorriente. Por el contrario, también el tomacorriente 100 necesario. • La unidad funciona con un voltaje AC 115V/60Hz y un fusible de 10 amperios. • Antes de llevar a cabo cualquier instalación, desconecte el cable de poder de la unidad. • Si la unidad no está nivelada, las puertas pueden no cerrar bien. Es muy importante que la unidad
quede bien nivelada para un correcto funcionamiento. Utilice las patas niveladores según sea necesario. Puede solicitar la ayuda de una persona para que mueva un lado del refrigerador y así el peso quede mejor distribuido al hacer el ajuste de las patas.
INSTRUCCIONES DE OPERACIÓN Para obtener los mejores resultados posibles de su refrigerador, es importante que siga las instrucciones de operación. CONTROL DE TEMPERATURA La temperatura en el refrigerador se controla por medio del termostato ubicado en el compartimiento del refrigerador. Gire el termostato hacia arriba y hacia abajo para regular la temperatura. El termostato tiene niveles de 1 a 7. 1 es la temperatura menos fría y 7 la más fría. Por lo general se recomienda la posición 3. ALMACENAMIENTO DE ALIMENTOS FRESCOS Envuelva o almacene los alimentos en el refrigerador con un material adecuado. Esto evita que el olor y el sabor se transfiera a través del refrigerador. • Frutas: Lave, seque y guarde en el refrigerador en bolsas plásticas o en el compartimiento para
vegetales. • Vegetales con hojas: Retire la envoltura y corte las áreas dañadas o descoloridas. Lave con agua
fría y drene. Colóquelas una bolsa plástica o en un contenedor plástico y almacene en el compartimiento para vegetales.
• Pescado: Utilice pescado fresco del mismo día de la compra. • Carne: Almacene la carne en la envoltura original siempre y cuando el empaque sea hermético y
libre de humedad. Envuelva de nuevo si es necesario. • Sobrantes: Cubra con envoltura plástica o papel de aluminio. También se pueden utilizar
contenedores plásticos herméticos.
P-4
ALMACENAMIENTO DE ALIMENTOS CONGELADOS Al utilizar el refrigerador por vez primera o después de descongelar, coloque el control de temperatura en la posición máxima al menos por dos horas antes de introducir los alimentos que se van a guardar. Todos los productos congelados que usted adquiera deben ser colocados en el congelador tan pronto como sea posible para mantener su buen estado. El tiempo de almacenamiento se encuentra impreso en los productos por parte del fabricante y se debe seguir. CONGELAR ALIMENTOS • Asegúrese de que las operaciones de congelamiento se lleven a cabo bajo condiciones higiénicas
ya que sólo congelar los alimentos no los esteriliza. • Se recomienda congelar los alimentos colocándolos de forma separada en porciones pequeñas. • No coloque alimentos calientes en el congelador. • Antes de almacenar los alimentos colóquelos en bolsas plásticas, papel aluminio o contenedores
especiales. • Observe la parte posterior del congelador para conocer el volumen de alimentos permitidos para
colocar en el congelador. No coloque más cantidad de la permitida. • No coloque botellas ni bebidas en el congelador. • Para un mejor funcionamiento, permita suficiente espacio en el congelador para que el aire circule. LIMPIEZA DEL REFRIGERADOR • Antes de limpiar el refrigerador y desconecte el cable de poder. • Utilice una esponja suave y detergente con agua tibia. No utilice productos abrasivos. Lave a mano,
enjuague y seque todas las superficies. • No utilice ceras limpiadoras, detergentes concentrados, blanqueadores o limpiadores a base de
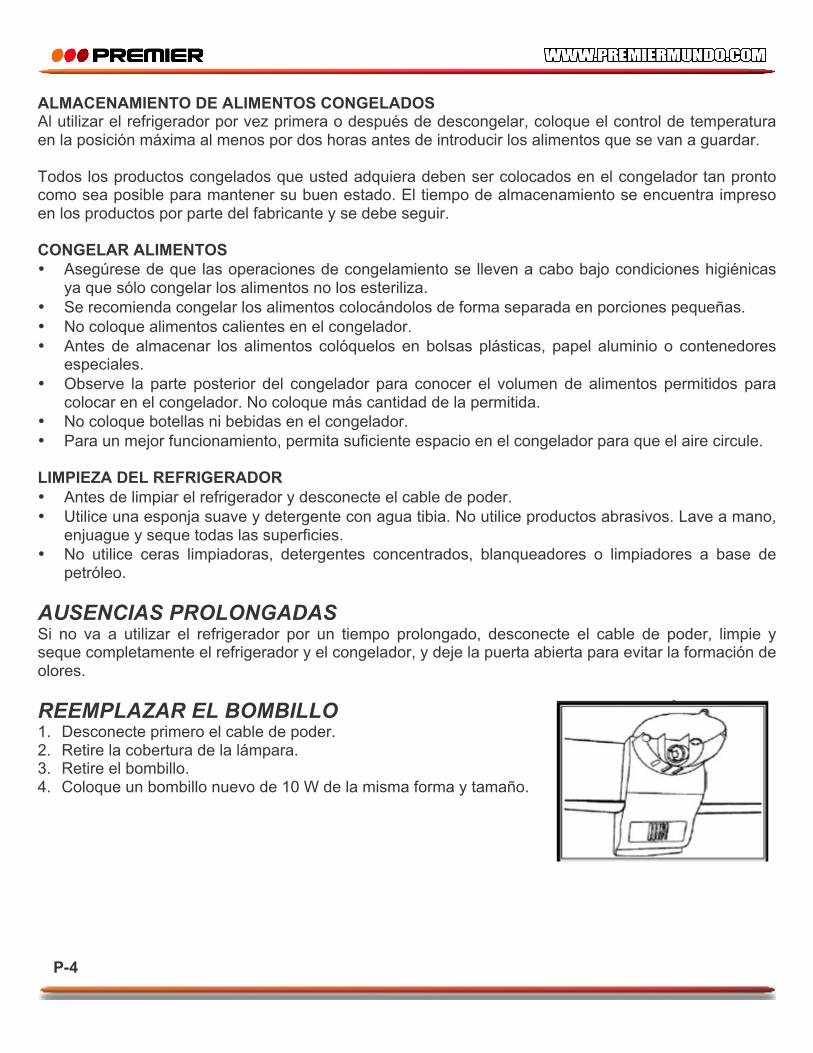
petróleo. AUSENCIAS PROLONGADAS Si no va a utilizar el refrigerador por un tiempo prolongado, desconecte el cable de poder, limpie y seque completamente el refrigerador y el congelador, y deje la puerta abierta para evitar la formación de olores. REEMPLAZAR EL BOMBILLO 1. Desconecte primero el cable de poder. 2. Retire la cobertura de la lámpara. 3. Retire el bombillo. 4. Coloque un bombillo nuevo de 10 W de la misma forma y tamaño.
P-5
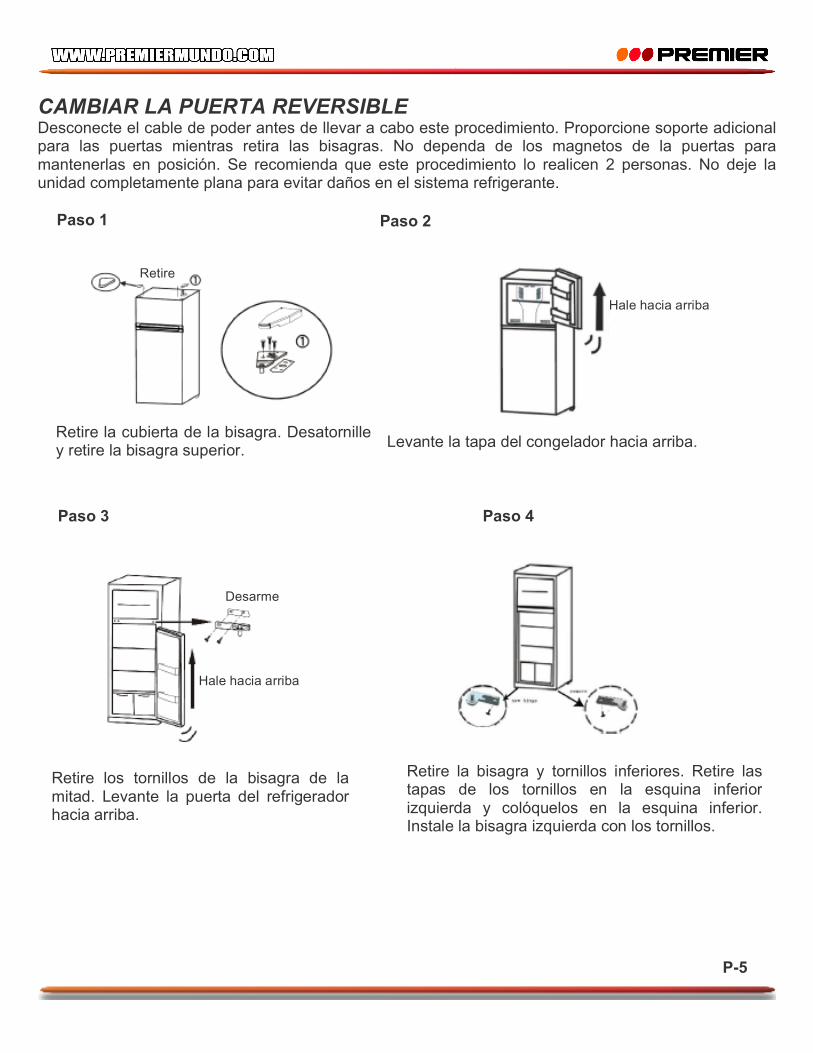
CAMBIAR LA PUERTA REVERSIBLE Desconecte el cable de poder antes de llevar a cabo este procedimiento. Proporcione soporte adicional para las puertas mientras retira las bisagras. No dependa de los magnetos de la puertas para mantenerlas en posición. Se recomienda que este procedimiento lo realicen 2 personas. No deje la unidad completamente plana para evitar daños en el sistema refrigerante.
Paso 1 Paso 2
Paso 3 Paso 4
Retire la cubierta de la bisagra. Desatornille y retire la bisagra superior. Levante la tapa del congelador hacia arriba.
Retire los tornillos de la bisagra de la mitad. Levante la puerta del refrigerador hacia arriba.
Retire la bisagra y tornillos inferiores. Retire las tapas de los tornillos en la esquina inferior izquierda y colóquelos en la esquina inferior. Instale la bisagra izquierda con los tornillos.
Retire
Hale hacia arriba
Desarme
Hale hacia arriba
P-6
Paso 5 Paso 6
Paso 7
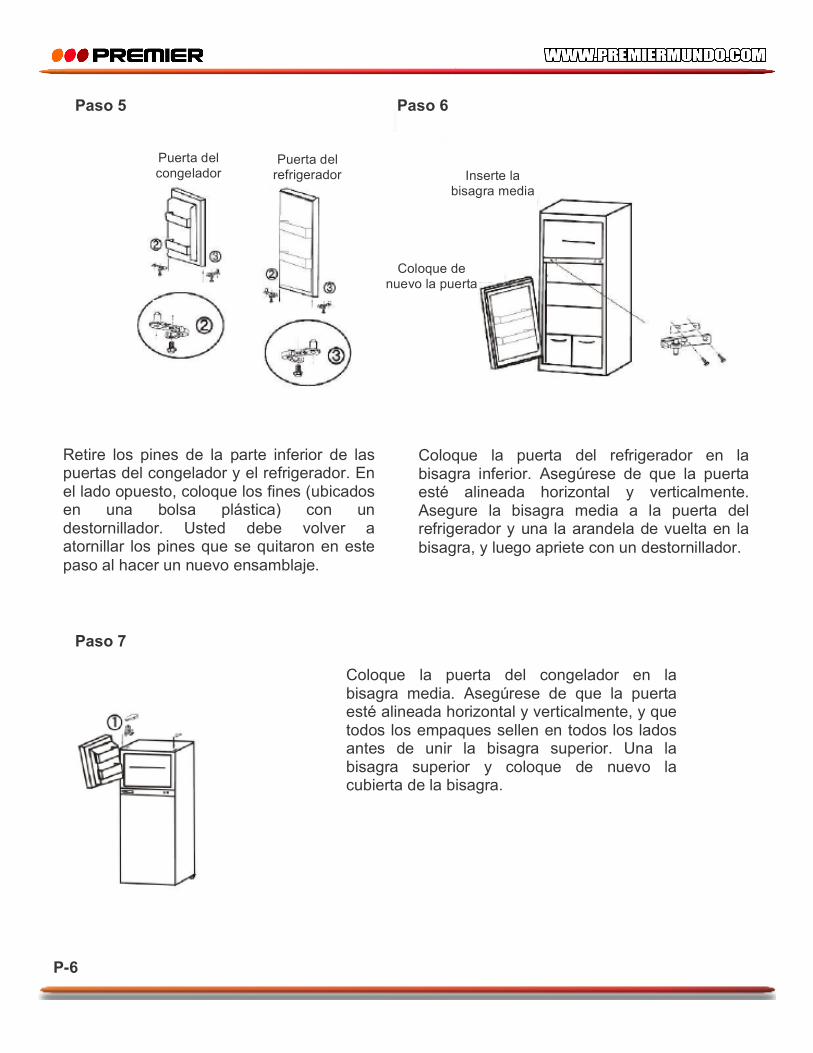
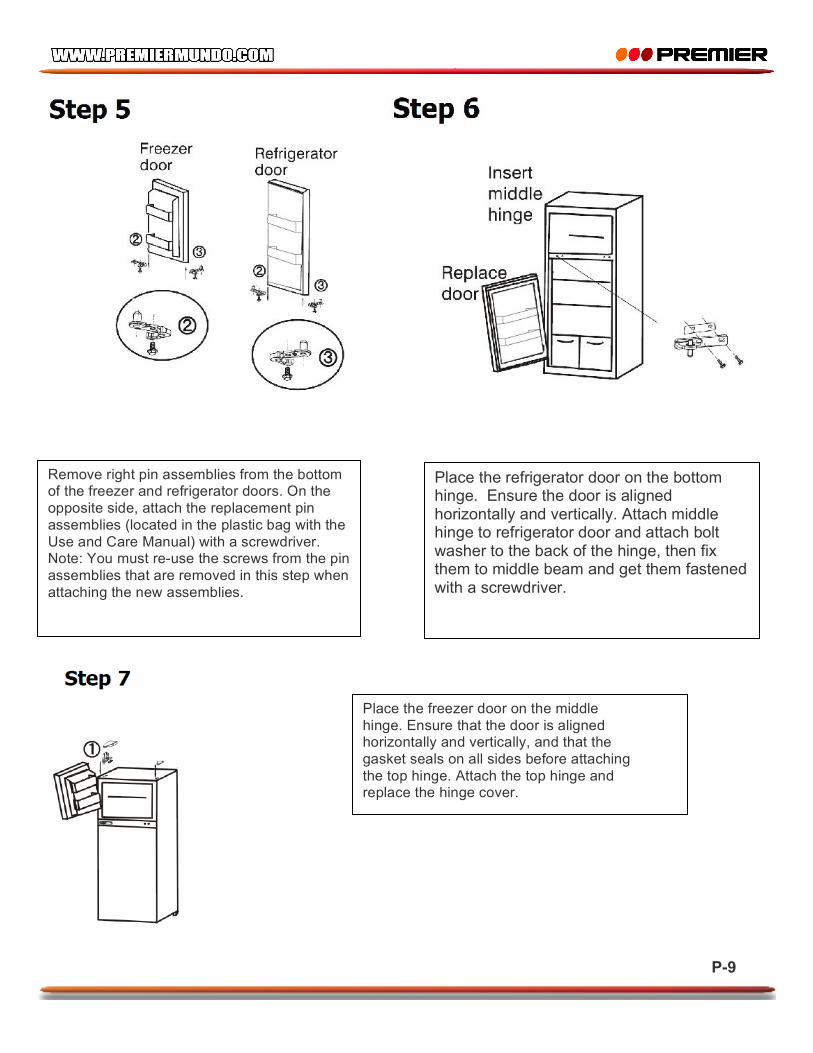
Retire los pines de la parte inferior de las puertas del congelador y el refrigerador. En el lado opuesto, coloque los fines (ubicados en una bolsa plástica) con un destornillador. Usted debe volver a atornillar los pines que se quitaron en este paso al hacer un nuevo ensamblaje.
Coloque la puerta del refrigerador en la bisagra inferior. Asegúrese de que la puerta esté alineada horizontal y verticalmente. Asegure la bisagra media a la puerta del refrigerador y una la arandela de vuelta en la bisagra, y luego apriete con un destornillador.
Coloque la puerta del congelador en la bisagra media. Asegúrese de que la puerta esté alineada horizontal y verticalmente, y que todos los empaques sellen en todos los lados antes de unir la bisagra superior. Una la bisagra superior y coloque de nuevo la cubierta de la bisagra.
Puerta del congelador
Puerta del refrigerador Inserte la
bisagra media
Coloque de nuevo la puerta

P-7
INSTRUCCIONES DE SEGURIDAD
• Mantenga las rejillas de ventilación libres. • No utilice dispositivos mecánicos u otros medios para acelerar el proceso de descongelamiento. • No utilice dispositivos eléctricos dentro del refrigerador, a menos que sean recomendados por el
fabricante. • La unidad debe ser siempre desconectada antes de llevar a cabo cualquier acción de
mantenimiento. • Observe que los niños no jueguen con la unidad. • Si el cable de poder se daña, haga que sea reparado por personal calificado. • Cuando la unidad cumpla su vida útil siga las normas de su localidad en cuanto al desecho de
electrodomésticos. • No intente reparar la unidad usted mismo. Remita toda revisión, mantenimiento y reparación a
personal de servicio técnico calificado. RESOLUCIÓN DE PROBLEMAS Esta lista es para ayudarle a resolver problemas simples que pueden presentarse en el uso del producto. Por favor léala y verifique estos puntos antes de solicitar ayuda de personal de servicio técnico autorizado.
PROBLEMA CAUSA Y SOLUCIÓN El refrigerador no funciona Verifique la conexión del cable de poder. Las puertas no cierran bien. Verifique que las repisas no estén mal colocadas, que
los empaques no estén sucios, y revise que el refrigerador esté nivelado.
El refrigerador hace mucho ruido Verifique que la unidad este nivelada y que no esté en contacto con otros objetos y el ruido sea por vibración.
El refrigerador no enfría lo suficiente Observe si la puerta se está abriendo con demasiada frecuencia. Verifique la cantidad de alimentos que se han puesto y que haya espacio para la circulación del aire.
P-8
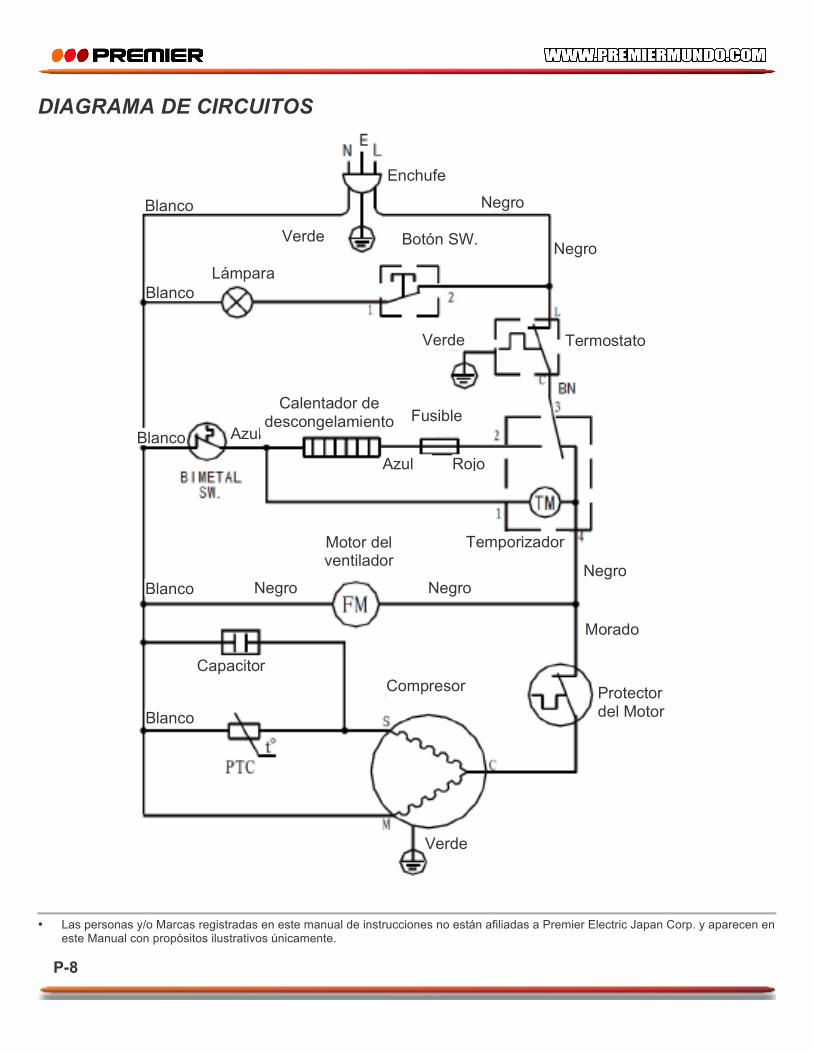
DIAGRAMA DE CIRCUITOS
• Las personas y/o Marcas registradas en este manual de instrucciones no están afiliadas a Premier Electric Japan Corp. y aparecen en
este Manual con propósitos ilustrativos únicamente.
Blanco
Blanco
Blanco
Blanco
Blanco
Negro Negro Negro
Morado
Protector del Motor
Compresor Capacitor
Motor del ventilador
Temporizador
Azul
Azul Rojo
Calentador de
descongelamiento Fusible
Enchufe
Negro
Negro Verde Botón SW.
Lámpara
Termostato Verde
Verde

INSTRUCTION MANUAL
FROST FREE REFRIGERATOR NV-5261
NV-5262
DEAR CUSTOMER In order to achieve the best performance of your product, please read this instruction manual carefully before using, and keep it for future reference. If you need extra support, please write to [email protected]
P-1
CAUTION
RISK OF ELECTRIC SHOCK, DO NOT
OPEN
Caution: To reduce the risk of electric shock do not open this device, there are not serviceable parts for customers. Please refer any maintenance or repair to qualified personnel.
This sign means the existence of dangerous voltage at the inside of the unit, which states a risk of electric shock.
This sign means that there are important instructions of operation and handling in the manual that comes with this device.
PREMIER CUSTOMER SERVICE Venezuela: 0800 – ELECTRIC (353-2874) Panama: 300-5185 Website www.premiermundo.com E-mail: [email protected] NOTE This unit may be submitted to changes in specifications, characteristics and/or operation without prior notice to the user, in order to continue improving and developing its technology.
P-2
Thank you for buying this refrigerator-freezer. To ensure that you get the best results from your new refrigerator-freezer, please take time to read through the simple instructions in this booklet. Please ensure that the packing material is disposed of in accordance with the current environmental requirements. When disposing of any refrigerator-freezer equipment please contact your local waste disposal department for advice on safe disposal. This appliance must be only used for its intended purpose. CAUTION :
The appliance is not intended for use by young children or infirm persons without supervision.
Young children should be supervised to ensure that they do not play with the appliance. General� This type of refrigerator-freezer is widely used in places such as hotels ,offices, student dormitories and houses. It is mostly suitable for refrigerating and preserving foods such as fruits and beverage. It enjoys the advantages of small size, Lightweight, Low electric consumption and easy use.
P-3
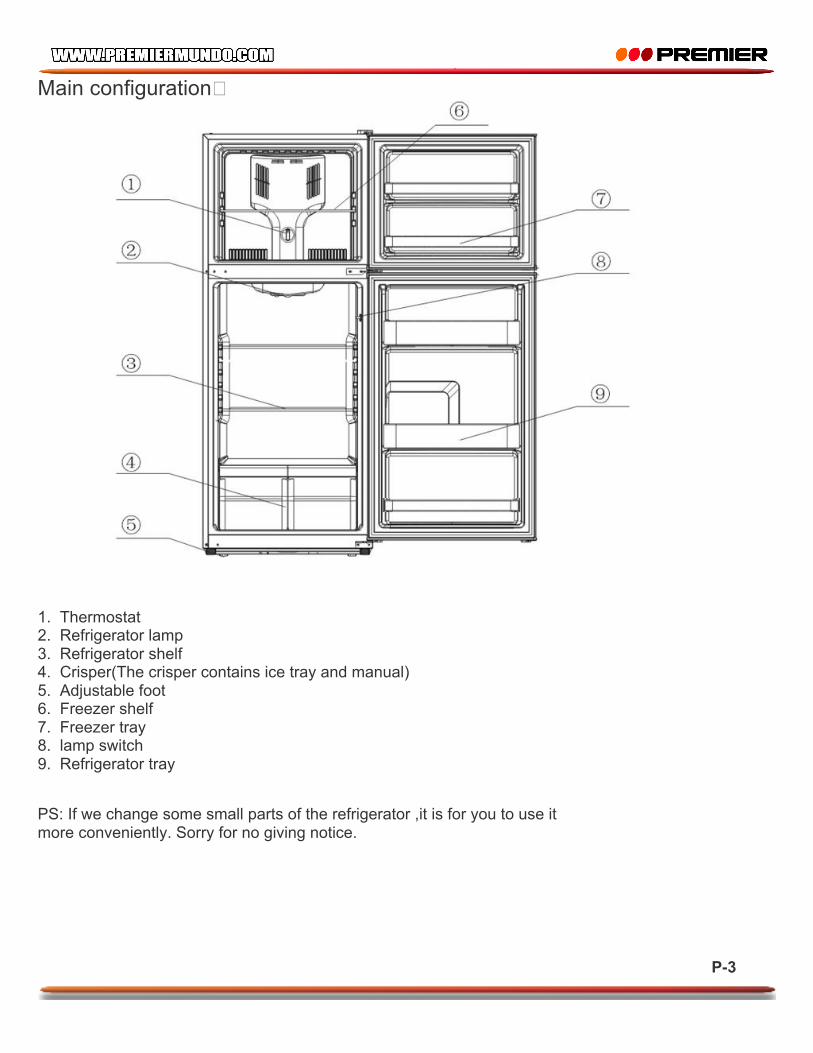
Main configuration�
1. Thermostat 2. Refrigerator lamp 3. Refrigerator shelf 4. Crisper(The crisper contains ice tray and manual) 5. Adjustable foot 6. Freezer shelf 7. Freezer tray 8. lamp switch 9. Refrigerator tray
PS: If we change some small parts of the refrigerator ,it is for you to use it more conveniently. Sorry for no giving notice.
P-4
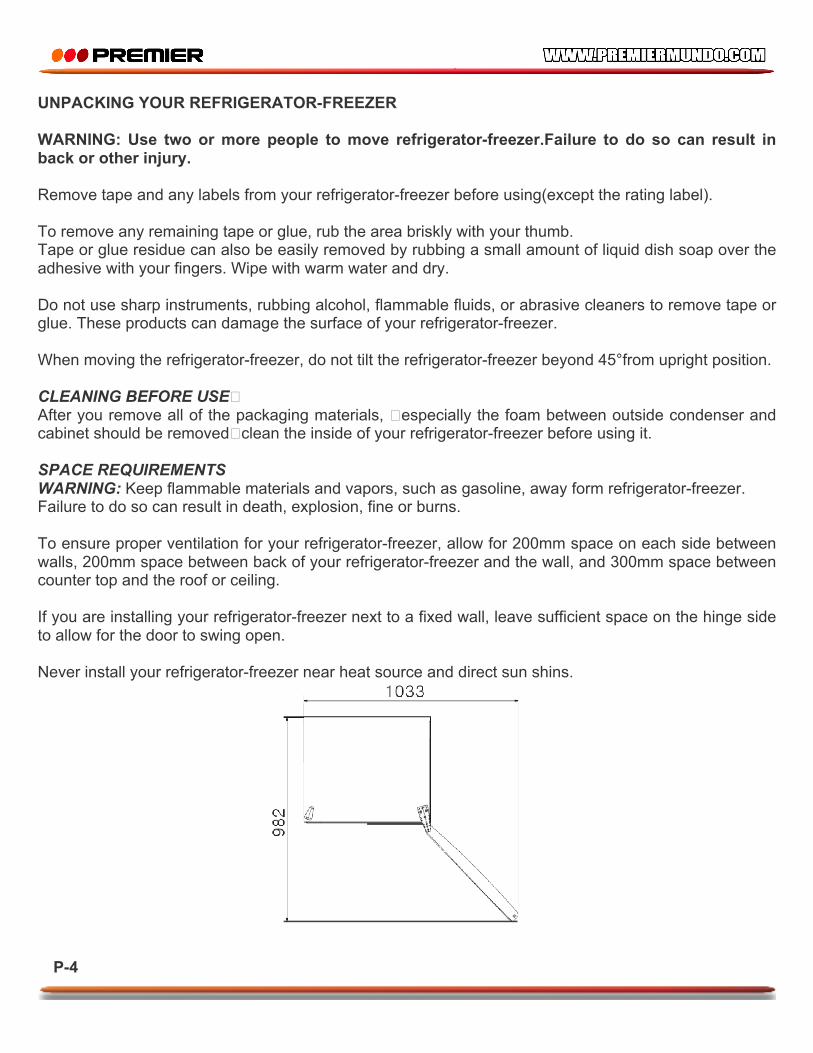
UNPACKING YOUR REFRIGERATOR-FREEZER WARNING: Use two or more people to move refrigerator-freezer.Failure to do so can result in back or other injury. Remove tape and any labels from your refrigerator-freezer before using(except the rating label). To remove any remaining tape or glue, rub the area briskly with your thumb. Tape or glue residue can also be easily removed by rubbing a small amount of liquid dish soap over the adhesive with your fingers. Wipe with warm water and dry. Do not use sharp instruments, rubbing alcohol, flammable fluids, or abrasive cleaners to remove tape or glue. These products can damage the surface of your refrigerator-freezer. When moving the refrigerator-freezer, do not tilt the refrigerator-freezer beyond 45°from upright position. CLEANING BEFORE USE� After you remove all of the packaging materials, �especially the foam between outside condenser and cabinet should be removed�clean the inside of your refrigerator-freezer before using it. SPACE REQUIREMENTS WARNING: Keep flammable materials and vapors, such as gasoline, away form refrigerator-freezer. Failure to do so can result in death, explosion, fine or burns. To ensure proper ventilation for your refrigerator-freezer, allow for 200mm space on each side between walls, 200mm space between back of your refrigerator-freezer and the wall, and 300mm space between counter top and the roof or ceiling. If you are installing your refrigerator-freezer next to a fixed wall, leave sufficient space on the hinge side to allow for the door to swing open. Never install your refrigerator-freezer near heat source and direct sun shins.
P-5
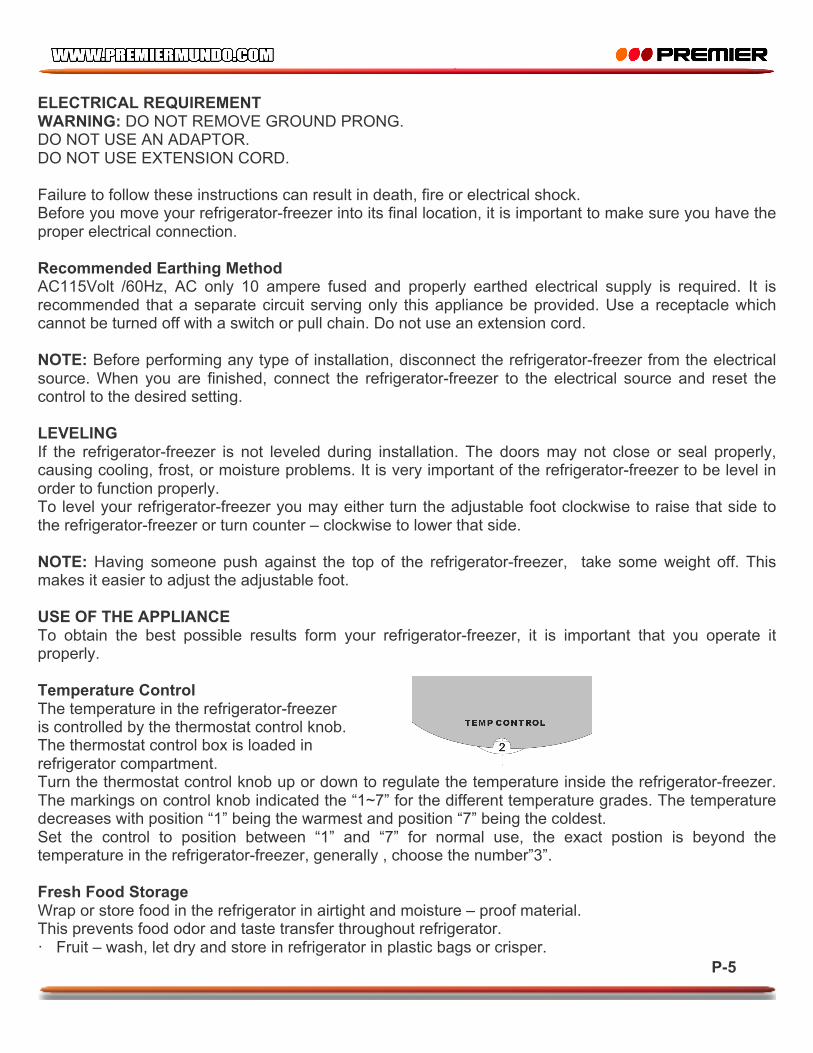
ELECTRICAL REQUIREMENT WARNING: DO NOT REMOVE GROUND PRONG. DO NOT USE AN ADAPTOR. DO NOT USE EXTENSION CORD. Failure to follow these instructions can result in death, fire or electrical shock. Before you move your refrigerator-freezer into its final location, it is important to make sure you have the proper electrical connection. Recommended Earthing Method AC115Volt /60Hz, AC only 10 ampere fused and properly earthed electrical supply is required. It is recommended that a separate circuit serving only this appliance be provided. Use a receptacle which cannot be turned off with a switch or pull chain. Do not use an extension cord. NOTE: Before performing any type of installation, disconnect the refrigerator-freezer from the electrical source. When you are finished, connect the refrigerator-freezer to the electrical source and reset the control to the desired setting. LEVELING If the refrigerator-freezer is not leveled during installation. The doors may not close or seal properly, causing cooling, frost, or moisture problems. It is very important of the refrigerator-freezer to be level in order to function properly. To level your refrigerator-freezer you may either turn the adjustable foot clockwise to raise that side to the refrigerator-freezer or turn counter – clockwise to lower that side. NOTE: Having someone push against the top of the refrigerator-freezer, take some weight off. This makes it easier to adjust the adjustable foot. USE OF THE APPLIANCE To obtain the best possible results form your refrigerator-freezer, it is important that you operate it properly. Temperature Control The temperature in the refrigerator-freezer is controlled by the thermostat control knob. The thermostat control box is loaded in refrigerator compartment. Turn the thermostat control knob up or down to regulate the temperature inside the refrigerator-freezer. The markings on control knob indicated the “1~7” for the different temperature grades. The temperature decreases with position “1” being the warmest and position “7” being the coldest. Set the control to position between “1” and “7” for normal use, the exact postion is beyond the temperature in the refrigerator-freezer, generally , choose the number”3”. Fresh Food Storage Wrap or store food in the refrigerator in airtight and moisture – proof material. This prevents food odor and taste transfer throughout refrigerator. · Fruit – wash, let dry and store in refrigerator in plastic bags or crisper.
P-6
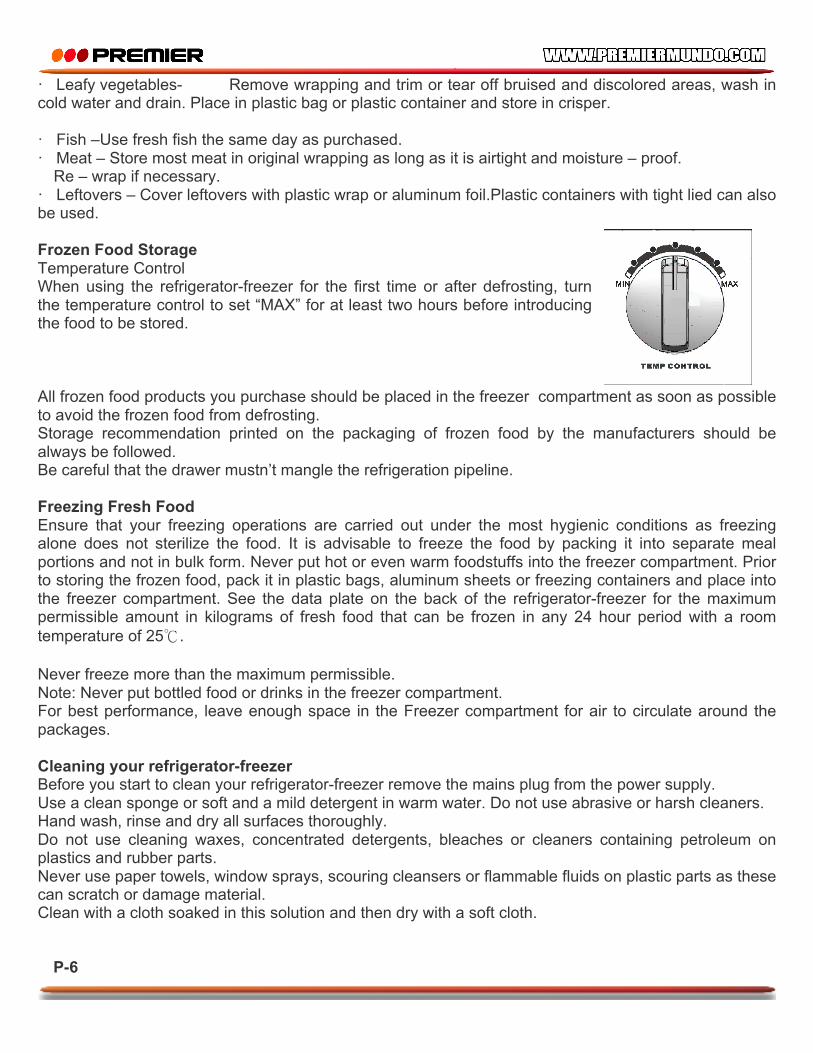
· Leafy vegetables- Remove wrapping and trim or tear off bruised and discolored areas, wash in cold water and drain. Place in plastic bag or plastic container and store in crisper. · Fish –Use fresh fish the same day as purchased. · Meat – Store most meat in original wrapping as long as it is airtight and moisture – proof.
Re – wrap if necessary. · Leftovers – Cover leftovers with plastic wrap or aluminum foil.Plastic containers with tight lied can also be used. Frozen Food Storage Temperature Control When using the refrigerator-freezer for the first time or after defrosting, turn the temperature control to set “MAX” for at least two hours before introducing the food to be stored. All frozen food products you purchase should be placed in the freezer compartment as soon as possible to avoid the frozen food from defrosting. Storage recommendation printed on the packaging of frozen food by the manufacturers should be always be followed. Be careful that the drawer mustn’t mangle the refrigeration pipeline. Freezing Fresh Food Ensure that your freezing operations are carried out under the most hygienic conditions as freezing alone does not sterilize the food. It is advisable to freeze the food by packing it into separate meal portions and not in bulk form. Never put hot or even warm foodstuffs into the freezer compartment. Prior to storing the frozen food, pack it in plastic bags, aluminum sheets or freezing containers and place into the freezer compartment. See the data plate on the back of the refrigerator-freezer for the maximum permissible amount in kilograms of fresh food that can be frozen in any 24 hour period with a room temperature of 25℃. Never freeze more than the maximum permissible. Note: Never put bottled food or drinks in the freezer compartment. For best performance, leave enough space in the Freezer compartment for air to circulate around the packages. Cleaning your refrigerator-freezer Before you start to clean your refrigerator-freezer remove the mains plug from the power supply. Use a clean sponge or soft and a mild detergent in warm water. Do not use abrasive or harsh cleaners. Hand wash, rinse and dry all surfaces thoroughly. Do not use cleaning waxes, concentrated detergents, bleaches or cleaners containing petroleum on plastics and rubber parts. Never use paper towels, window sprays, scouring cleansers or flammable fluids on plastic parts as these can scratch or damage material. Clean with a cloth soaked in this solution and then dry with a soft cloth.
P-7
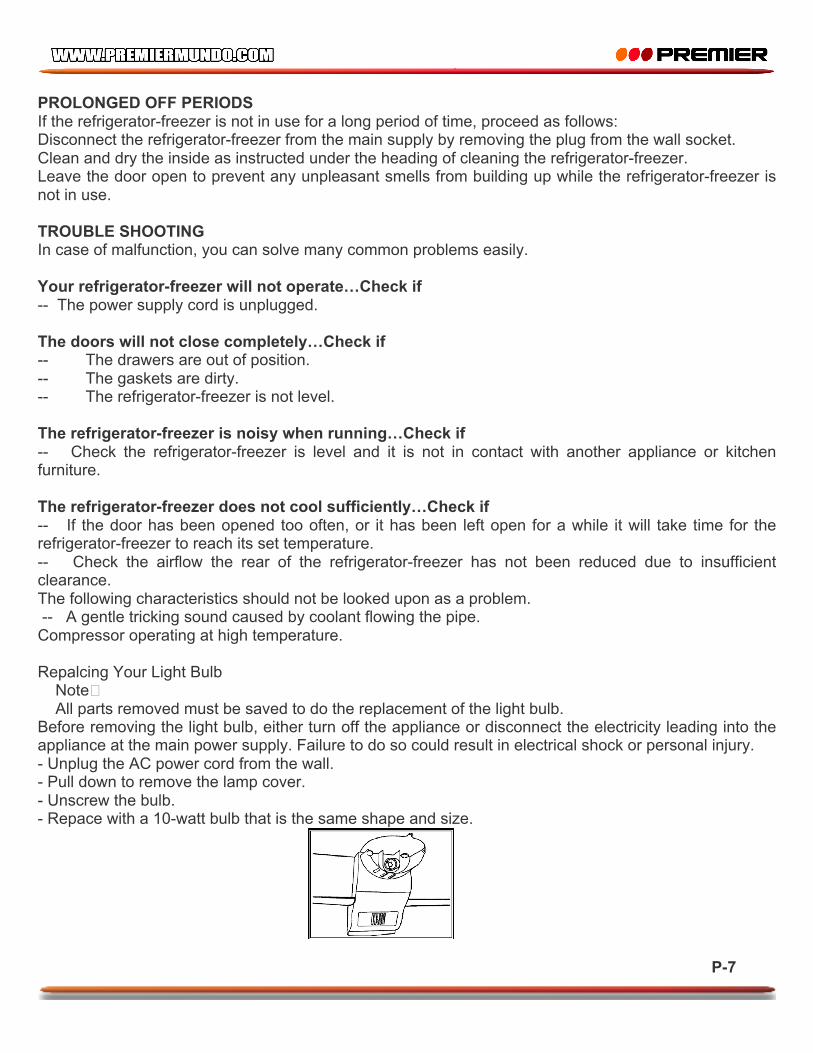
PROLONGED OFF PERIODS If the refrigerator-freezer is not in use for a long period of time, proceed as follows: Disconnect the refrigerator-freezer from the main supply by removing the plug from the wall socket. Clean and dry the inside as instructed under the heading of cleaning the refrigerator-freezer. Leave the door open to prevent any unpleasant smells from building up while the refrigerator-freezer is not in use. TROUBLE SHOOTING In case of malfunction, you can solve many common problems easily. Your refrigerator-freezer will not operate…Check if -- The power supply cord is unplugged. The doors will not close completely…Check if -- The drawers are out of position. -- The gaskets are dirty. -- The refrigerator-freezer is not level. The refrigerator-freezer is noisy when running…Check if -- Check the refrigerator-freezer is level and it is not in contact with another appliance or kitchen furniture. The refrigerator-freezer does not cool sufficiently…Check if -- If the door has been opened too often, or it has been left open for a while it will take time for the refrigerator-freezer to reach its set temperature. -- Check the airflow the rear of the refrigerator-freezer has not been reduced due to insufficient clearance. The following characteristics should not be looked upon as a problem. -- A gentle tricking sound caused by coolant flowing the pipe. Compressor operating at high temperature. Repalcing Your Light Bulb Note� All parts removed must be saved to do the replacement of the light bulb. Before removing the light bulb, either turn off the appliance or disconnect the electricity leading into the appliance at the main power supply. Failure to do so could result in electrical shock or personal injury. - Unplug the AC power cord from the wall. - Pull down to remove the lamp cover. - Unscrew the bulb. - Repace with a 10-watt bulb that is the same shape and size.
P-8
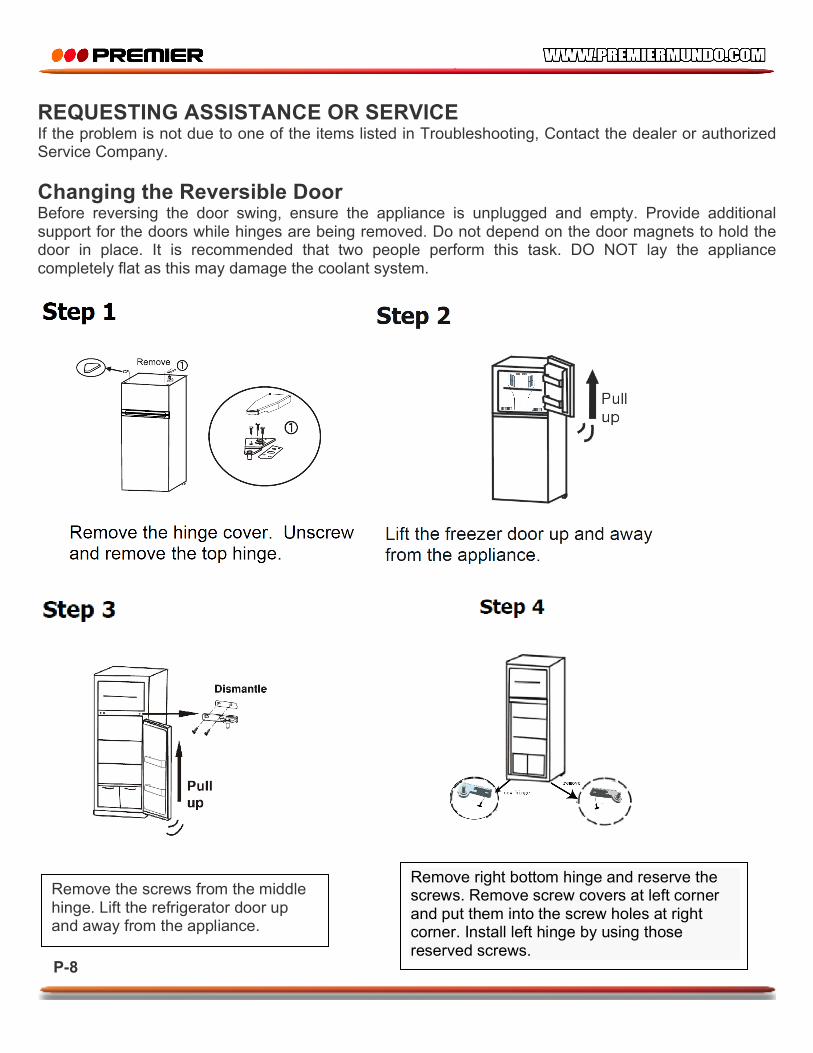
REQUESTING ASSISTANCE OR SERVICE If the problem is not due to one of the items listed in Troubleshooting, Contact the dealer or authorized Service Company. Changing the Reversible Door Before reversing the door swing, ensure the appliance is unplugged and empty. Provide additional support for the doors while hinges are being removed. Do not depend on the door magnets to hold the door in place. It is recommended that two people perform this task. DO NOT lay the appliance completely flat as this may damage the coolant system.
Remove the screws from the middle hinge. Lift the refrigerator door up and away from the appliance.
Remove right bottom hinge and reserve the screws. Remove screw covers at left corner and put them into the screw holes at right corner. Install left hinge by using those reserved screws.
P-9
Remove right pin assemblies from the bottom of the freezer and refrigerator doors. On the opposite side, attach the replacement pin assemblies (located in the plastic bag with the Use and Care Manual) with a screwdriver. Note: You must re-use the screws from the pin assemblies that are removed in this step when attaching the new assemblies.
Place the refrigerator door on the bottom hinge. Ensure the door is aligned horizontally and vertically. Attach middle hinge to refrigerator door and attach bolt washer to the back of the hinge, then fix them to middle beam and get them fastened with a screwdriver.
Place the freezer door on the middle hinge. Ensure that the door is aligned horizontally and vertically, and that the gasket seals on all sides before attaching the top hinge. Attach the top hinge and replace the hinge cover.
P-10
WARNNING RECOMMENDATIONS� 1) WARNING – Keep ventilation openings, in the appliance enclosure or in the built-in structure, clear of obstruction. 2) WARNING – Do not use mechanical devices or other means to accelerate the defrosting process, other than those recommended by the manufacturer. 3) WARNING – Do not damage the refrigerant circuit. 4) WARNING – Do not use electrical appliances inside the food storage compartments of the appliance, unless they are of the type recommended by the manufacturer. 5) The appliance has to be unplugged after use and before carrying out user maintenance on the
appliance. 6) This appliance is not intended for use by persons (including children) with reduced physical, sensory or mental capabilities, or lack of experience and knowledge, unless they have been given supervision or instruction concerning use of the appliance by a person responsible for their safety. 7) Children should be supervised to ensure that they do not play with the appliance. 8) If the supply cord is damaged, it must be replaced by the manufacturer, its service agent or similarly qualified persons in order to avoid a hazard. 9) Please abandon the refrigerator-freezer according to local regulators for it use flammable blowing
gas and refrigerant. 10) Please according to local regulations regarding disposal of the appliance for its flammable refrigerant and blowing gas. Before you scrap the appliance, please take off the doors to prevent children trapped.
P-11
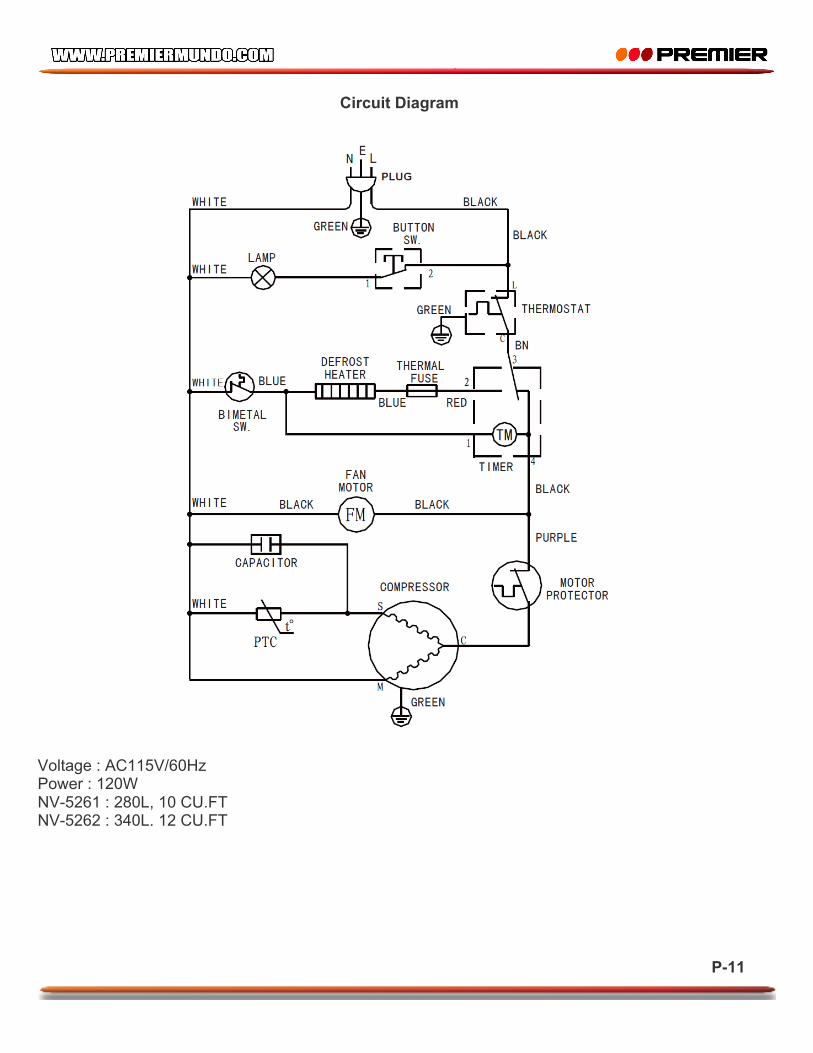
Circuit Diagram
Voltage : AC115V/60Hz Power : 120W NV-5261 : 280L, 10 CU.FT NV-5262 : 340L. 12 CU.FT


![portada ovni [Modo de compatibilidad] - cdn.manomano.fr · instrucciones de seguridad / instruction de sÉcuritÉ / safety instructions / instruÇÕes de seguranÇa / sicherheitshinweise](https://static.fdocuments.es/doc/165x107/5b9ad1de09d3f2d06f8bbf5a/portada-ovni-modo-de-compatibilidad-cdn-instrucciones-de-seguridad-instruction.jpg)