RCWave - Haverland UK · RCWave MANUAL DE INSTALACIÓN Y USO ... Manutençao ES Pag. 3 FR E P 2...
10
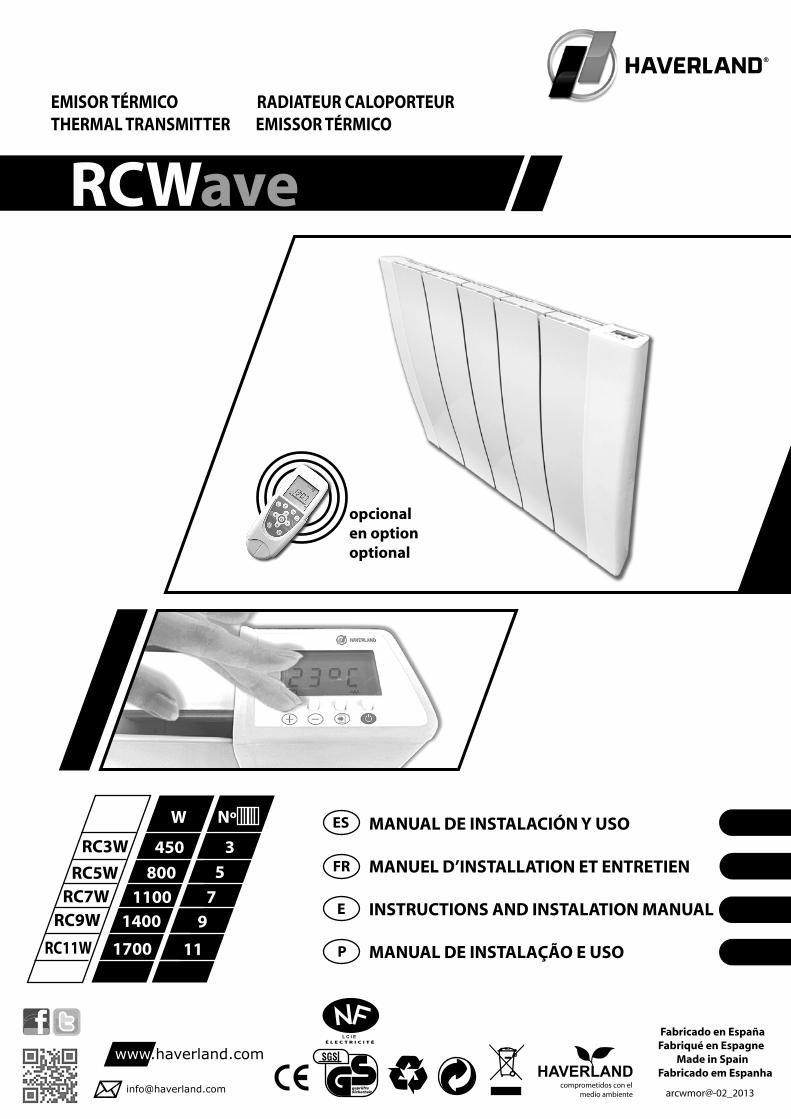
RCW ave MANUAL DE INSTALACIÓN Y USO MANUEL D’INSTALLATION ET ENTRETIEN INSTRUCTIONS AND INSTALATION MANUAL MANUAL DE INSTALAÇÃO E USO ES FR E P arcwmor@-02_2013 RC5W RC3W RC7W RC9W 5 3 Nº 7 9 800 W 1100 1400 RC11W 11 1700 450
Transcript of RCWave - Haverland UK · RCWave MANUAL DE INSTALACIÓN Y USO ... Manutençao ES Pag. 3 FR E P 2...
RCWave
MANUAL DE INSTALACIÓN Y USO
MANUEL D’INSTALLATION ET ENTRETIEN
INSTRUCTIONS AND INSTALATION MANUAL
MANUAL DE INSTALAÇÃO E USO
ES
FR
E
P
arcwmor@-02_2013
RC5W
RC3W
RC7WRC9W
5
3
Nº
7
9
800
W
11001400
RC11W 111700
450

ESPAÑOL
FRANÇAIS
ENGLISH
PORTUGUÊS
Muchas gracias por elegir los emisores térmicos digitales de bajo consumo RCW, con un exclusivo programadorelectrónico de temperatura y horario.Antes de comenzar a usar los radiadores eléctricos digitales de bajo consumo RCW le recomendamos que lea con atención este manual, para poder obtener su correcto funcionamiento con las máximas garantías.
Merci beaucoup d’avoir choisi les radiateurs électriques digitaux de basse-consommation du modèle RCW, avecun programmateur électrique de températura et d’horaire exclusif.Avant de commencer à utiliser les radiateurs électriques digitaux de basse-consommation RCW, nous vous recommandons de lire attentivement ce manuel pour pouvoir obtenir un fonctionnement correct avec lesgaranties maximales.
Thank you very much for choosing the low consumption RCW digital electric radiators with an exclusive electronic time and temperature programmer.Before using the low consumption RCW digital electric radiators, we recommend that you read thisinstruction manual in order to ensure correct operation.
Agradecemos sua escolha pelos radiadores eléctricos digitais de baixo consumo do modelo RCW. Nosso aparelhos são dotados de um exclusivo programador eletrônico de temperatura e horário.Antes de começar a utilizar os radiadores elétricos digitais de baixo consumo RCW lhe recomendamos queleia com atenção este manual para assegurar seu correto funcionamento com a máxima garantia.
ÍNDICE DE CONTENIDOS0. Advertencias generales ..................................1. Descripción del emisor 1.1. Teclado y pantalla LCD 1.1.1. Partes de la pantalla 1.2. Operación inicial (primera conexión) 1.3. Programar hora y día actual 1.4. Modos funcionamiento: Confort / Economía / Automático. Selección de temperatura 1.5. Modo Anti-hielo 1.6. Bloqueo de teclado 1.7. Programación 1.8 Desviación permanente de temperatura (Offset) 1.9 Modo Stand-by 1.10 Desconectar el emisor de la red eléctrica2. Instalación y montaje3. Mantenimiento
TABLE DES MATIÈRES0. Advertissements généraux ...........................1. Description du radiateur1.1. Clavier et ecran LCD-1.1.1. Parties de l’ecran1.2. Opération initiale (première connexion)1.3. Programmer heure et jours actuel1.4. Mode Confort / Économie / Automatique. Sélection de la température1.5. Mode Hors-gel1.6. Blocage du clavier1.7. Programmation1.8 Ecart permanent de température (Offset)1.9 Mode Veille1.10 Déconnexion du radiateur1.11 Mode Fil Pilote (exclusive pour la France)2. Instructions d’installation (exclusive pour la France)3. Maintient
TABLE OF CONTENTS0. General warnings ............................................1. Heater description1.1. Keyboard and LCD display1.1.1. Display parts1.2. Initial operation (First switch-on)1.3. Programming the current day and time1.4. Operating modes: Comfort / Economy / Automatic. Temperature selection1.5. Anti-frost Mode1.6. Keypad blocking1.7. Programmation1.8 Temperature Offset1.9 Stand-by Mode1.10 Switch the heater off of a power supply socket2. Instructions for the installation3. Maintainance
ÍNDICE0. Advertencias gerais ..........................................1. Descrição do emissor1.1. Teclado e ecrá LCD1.1.1. Elementos do ecrá1.2. Operação inicial (primeira ligação)1.3. Programar hora e dia actual1.4. Modos funcionamiento: Conforto / Economía / Automático. Seleção da temperatura1.5. Modo Antigelo1.6. Bloqueio do teclado1.7. Programação1.8 Desvio permanente da temperatura (Offset)1.9 Modo Stand-by1.10 Desligar o emissor da rede eléctrica2. Instruções de instalação3. Manutençao
ES
Pag. 3
FR
E P
2
Pag. 9
Pag. 15 Pag. 21

ENGLISH
* This heater is a unit for fixing to a wall. Please, carefully read the explanatory instructions for installation.* To disconnect the heater form the mains supply, remove the mains plug from the wall socket. NEVER by pulling on the cable.* Do not leave the cable in contact with the heater while it is switched on.* During operation, take the precaution of keeping the unit away from combustible materials, such as curtains, carpets and furniture etc.* DO NOT COVER THE UNIT. DO NOT USE IT TO DRY CLOTHES. If it is covered, there is a risk of causing over-heating.
* DANGER: If the power cable is damaged, it must be replaced by the manufacturer or its after-sales service or by similar qualified personnel in order to remove the danger.* If the unit is to be installed in a bathroom, it shall be positioned so that it cannot be touched by somebody in the bath or the shower.* The unit must not be located under or in front of a wall socket.* When the heater is finally discarded, all requirements established by legislation shall be taken into account for the processing and recycling of such waste.* The installation shall be carried out in accordance with current electrical legislation. This unit shall be earthed.* The heater shall be installed so that the mains plug is always accessible.* This unit shall not be installed embedded in a wall. Safety distances shall always be respected.* The heater is fitted with blocking to prevent children changing the programming.* This unit is not designed to be used by physically or mentally handicapped persons or children or persons with little experience or knowledge, unless they are under the supervision of a person, who is responsible for their safety, with the instructions on using the unit. Children shall not be allowed to play with the unit.* Children of less than 3 years should be kept away unless continuously supervised.Children aged from 3 years and less than 8 years shall only switch on/off the appliance provided that it has been placed or installed in its intended normal operating position and they have been given supervision or instruction concerning use of the appliance in a safe way and understand the hazards involved. Children aged from 3 years and less than 8 years shall not plug in, regulate and clean the appliance or perform user maintenance. CAUTION — Some parts of this product can become very hot and cause burns. Particular attention has to be given where children and vulnerable people are present. * This heater can operate with external programmable control centres or any other exterior control device, provided that the electrical switch-off period does not exceed four hours.* Heat convection effects and other environmental factors may cause discolouration of metal and plastic surfaces.* Temperature differences can produce “crackling” or other noises in the unit. This is normal and does not indicate a heater problem. * The unit warranty does not cover any damage caused by not reading these instructions.
1.1. Keyboard and LCD display
0. GENERAL WARNINGS
1. HEATER DESCRIPTION
1.1.1. Display parts
NUMBER INDICATION1
2
3
4
5
6
7
8
SELECTED TEMPERATURE/TIME
RADIATOR “ON”
COMFORT MODE
ECONOMY MODE
ANTI-FROST MODE
HOURS
DAYS OF THE WEEK
PROGRAMMING BANDS
15
1234567
0h 4h 8h 12h 16h 20h 24h
INCREASE
MODE / OK
STAND-BYPROGRAMMINGTIME
REDUCE
54
6
8
2
17
1234567
0h 4h 8h 12h 16h 20h 24h
3
E
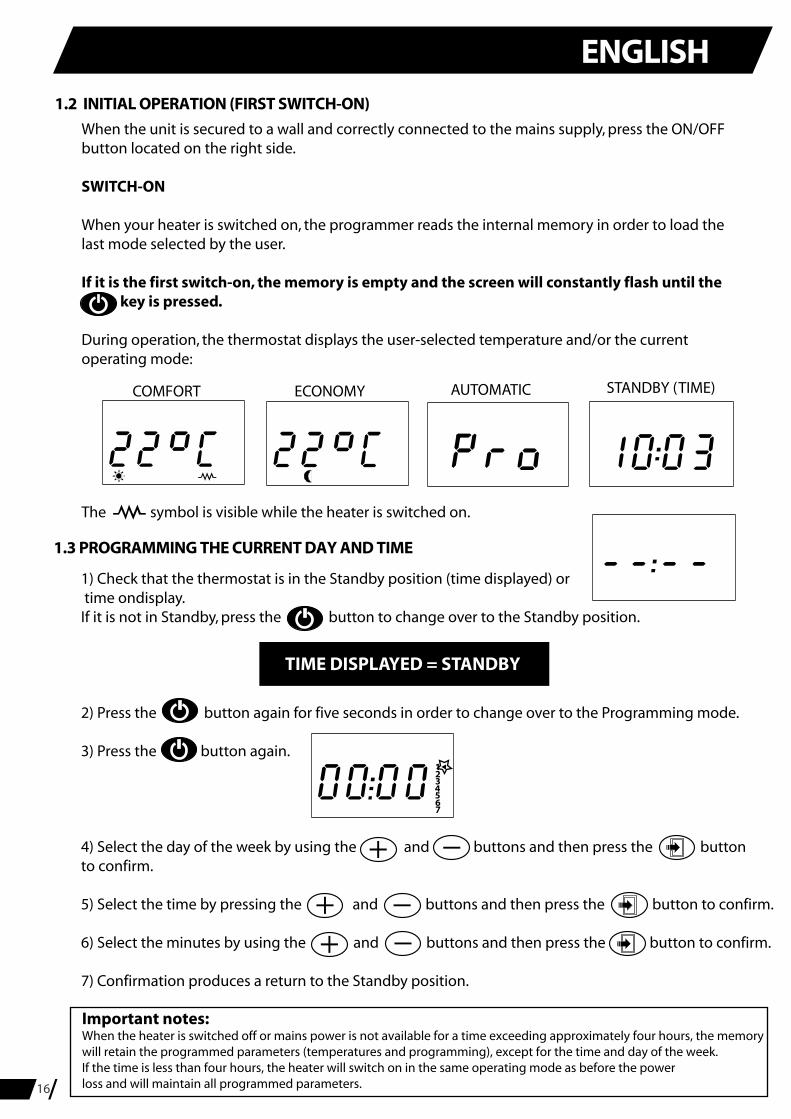
When the unit is secured to a wall and correctly connected to the mains supply, press the ON/OFF button located on the right side.
SWITCH-ON
When your heater is switched on, the programmer reads the internal memory in order to load the last mode selected by the user.
If it is the first switch-on, the memory is empty and the screen will constantly flash until the key is pressed.
During operation, the thermostat displays the user-selected temperature and/or the current operating mode:
The symbol is visible while the heater is switched on.
1.3 PROGRAMMING THE CURRENT DAY AND TIME
1.2 INITIAL OPERATION (FIRST SWITCH-ON)
Important notes:When the heater is switched off or mains power is not available for a time exceeding approximately four hours, the memory will retain the programmed parameters (temperatures and programming), except for the time and day of the week.If the time is less than four hours, the heater will switch on in the same operating mode as before the power loss and will maintain all programmed parameters.
COMFORT ECONOMY AUTOMATIC STANDBY (TIME)
1) Check that the thermostat is in the Standby position (time displayed) or time ondisplay. If it is not in Standby, press the button to change over to the Standby position.
2) Press the button again for five seconds in order to change over to the Programming mode.
3) Press the button again.
4) Select the day of the week by using the and buttons and then press the button to confirm.
5) Select the time by pressing the and buttons and then press the button to confirm.
6) Select the minutes by using the and buttons and then press the button to confirm.
7) Confirmation produces a return to the Standby position.
TIME DISPLAYED = STANDBY
1234567
ENGLISH
16
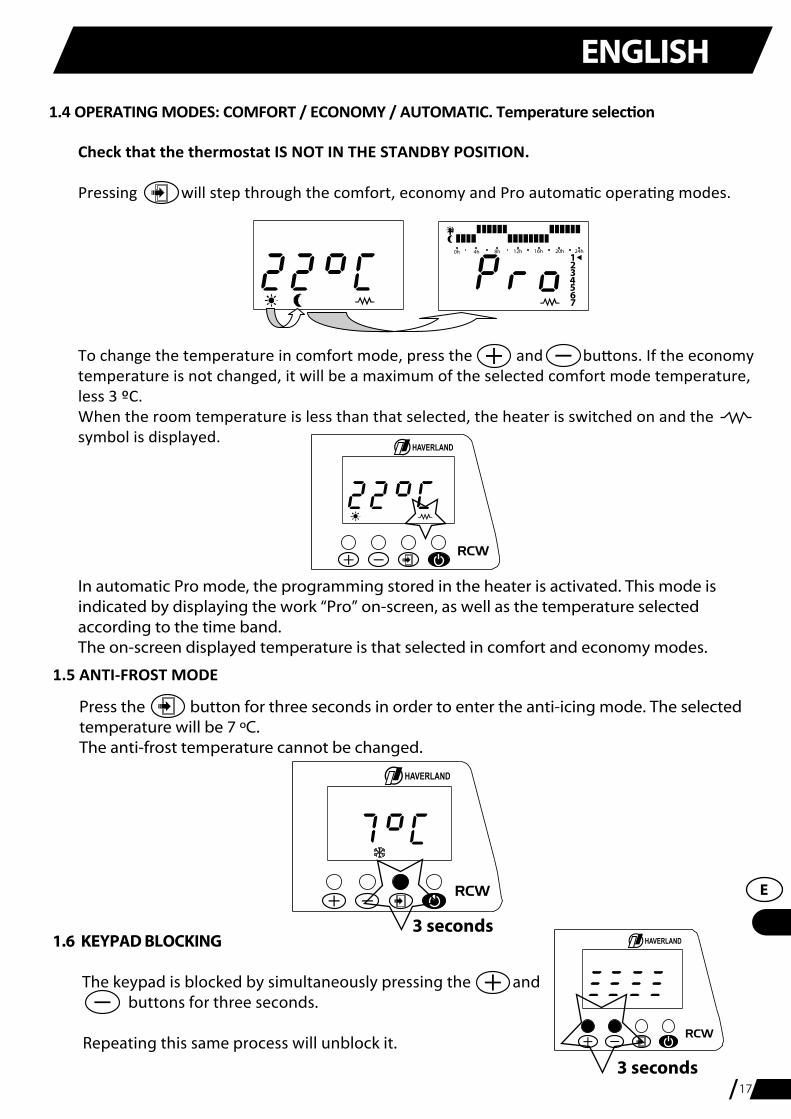
Check that the thermostat IS NOT IN THE STANDBY POSITION.
Pressing will step through the comfort, economy and Pro automatic operating modes.
To change the temperature in comfort mode, press the and buttons. If the economy temperature is not changed, it will be a maximum of the selected comfort mode temperature, less 3 ºC.When the room temperature is less than that selected, the heater is switched on and the symbol is displayed.
1234567
0h 4h 8h 12h 16h 20h 24h
In automatic Pro mode, the programming stored in the heater is activated. This mode is indicated by displaying the work “Pro” on-screen, as well as the temperature selected according to the time band.The on-screen displayed temperature is that selected in comfort and economy modes.
Press the button for three seconds in order to enter the anti-icing mode. The selected temperature will be 7 ºC.The anti-frost temperature cannot be changed.
3 seconds1.6 KEYPAD BLOCKING
The keypad is blocked by simultaneously pressing the and buttons for three seconds.
Repeating this same process will unblock it.
1.5 ANTI-FROST MODE
1.4 OPERATING MODES: COMFORT / ECONOMY / AUTOMATIC. Temperature selection
3 seconds
ENGLISH
17
E

1.7 PROGRAMMING
1) Check that the thermostat is in the Standby position.
2) Press the button for five seconds in order to change over to the Programming mode.
3) Select the hourly operating mode by pressing the button.
4) Press the button to move on to the next hour or to move through the bands without changing the programming. Note: the operating mode for the previous hour can be copied by pressing the button.
5) Repeat the operation for each hour of each day of the week.
On completion of the programming for day 7, the thermostat will automatically save the parameters.
6) Press the button to (the time is displayed + the day on-screen).
7) Press the button again to return to the Standby position (TIME).
8) Switch the heater on by pressing the button.
9) Check that the heater is in the automatic Pro mode. Press the button until Pro is displayed on-screen.
Note: Check that the time is correctly adjusted.
1234567
0h 4h 8h 12h 16h 20h 24h
Upper segment: COMFORT
Lower segment: ECONOMY
No segment: ANTI-FROST
Important notes:
- In the automatic Pro mode, the selected temperature and the word “Pro” are alternatively displayed on-screen.
- The comfort temperature in automatic Pro will have the value selected in comfort mode. Note: remember that the economy temperature will always be a maximum of the comfort temperature less 3 ºC. The anti-frost mode temperature is fixed at 7 ºC.
- In automatic mode, the programmed temperature can be changed for any desired length of time, without changing the programming, by pressing the and buttons. Remember to return to the previously selected temperature.
- The factory-set program is from Monday to Friday, Comfort from 06:00 to 23:00 and Economy from 23:00 until 06:00.
1234567
ENGLISH
18
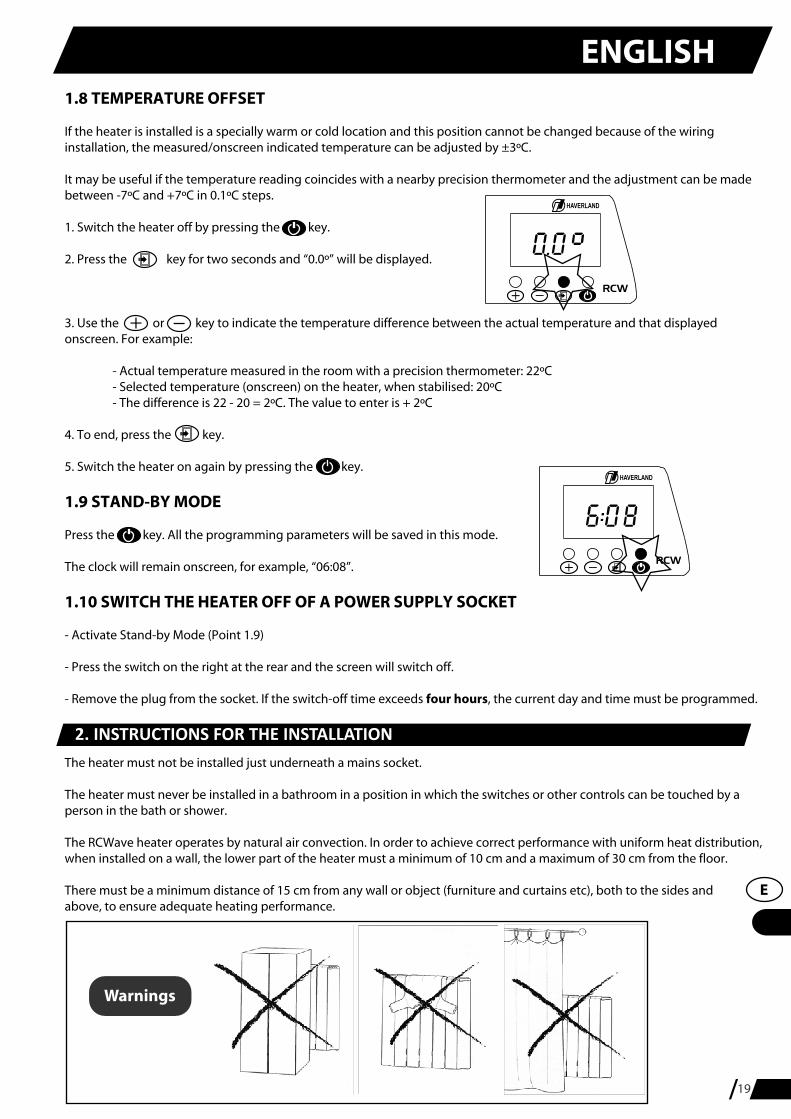
1.8 TEMPERATURE OFFSET
If the heater is installed is a specially warm or cold location and this position cannot be changed because of the wiring installation, the measured/onscreen indicated temperature can be adjusted by ±3ºC.
It may be useful if the temperature reading coincides with a nearby precision thermometer and the adjustment can be made between -7ºC and +7ºC in 0.1ºC steps.
1. Switch the heater off by pressing the key.
2. Press the key for two seconds and “0.0º” will be displayed.
3. Use the or key to indicate the temperature difference between the actual temperature and that displayed onscreen. For example:
- Actual temperature measured in the room with a precision thermometer: 22ºC - Selected temperature (onscreen) on the heater, when stabilised: 20ºC - The difference is 22 - 20 = 2ºC. The value to enter is + 2ºC
4. To end, press the key.
5. Switch the heater on again by pressing the key.
1.9 STAND-BY MODE
Press the key. All the programming parameters will be saved in this mode.
The clock will remain onscreen, for example, “06:08”.
1.10 SWITCH THE HEATER OFF OF A POWER SUPPLY SOCKET
- Activate Stand-by Mode (Point 1.9)
- Press the switch on the right at the rear and the screen will switch off.
- Remove the plug from the socket. If the switch-off time exceeds four hours, the current day and time must be programmed.
The heater must not be installed just underneath a mains socket.
The heater must never be installed in a bathroom in a position in which the switches or other controls can be touched by a person in the bath or shower.
The RCWave heater operates by natural air convection. In order to achieve correct performance with uniform heat distribution, when installed on a wall, the lower part of the heater must a minimum of 10 cm and a maximum of 30 cm from the floor.
There must be a minimum distance of 15 cm from any wall or object (furniture and curtains etc), both to the sides and above, to ensure adequate heating performance.
19
2. INSTRUCTIONS FOR THE INSTALLATION
Warnings
ENGLISH
E

20
3 413
21. TO PLACE
2. TO LET
3. TO PLACE
2 SCREWS
SCREW THE2 SCREWS
1
4 SCREWS
2
PLACE THETRANSMITTER
1. A suitable location on the wall must be selected. This wall shall be strong and level. Check that there is a mains socket available nearby.
2. Place the installation template on the wall and mark the locations for the drill holes.
3. Remove the template and drill the required holes in the wall.
4. Install the brackets:
5. Plug the heater into the nearby mains socket.
Only you can to install the radiator inZONE 3. DO NOT USE THIS HEATER IN THE IMMEDIATE OF A BATH, A SHOWER OR A SWIMMING POOL (zone 0, 1 andzone 2).
Marsan Industrial, S.A. reserves the right to modify without previous warning.
RCW2_2013_MOOR@ESPFRUK2013
- We recommend that all parts of the radiator are kept clean (behind, underneath, upper fins etc.).
- Dust it with a dry and soft cloth when the transmitter is disconnected and is cold.
- Never use disolvents or abrasive products.
- It is convenient to clean the surface of the transmitter at the beginning of the heating season (ALWAYSBEFORE CONNECTING IT).
3. MAINTAINANCE
ENGLISH
DANGER
27
Marsan Industrial, S.A.Avda. San Martín de Valdeiglesias, Km. 2,228925 Alcorcón. Madrid. Españainfo@ haverland.com
FranceF: +33 01 76 50 02 88 [email protected]

Fabricado en EspañaFabriqué en EspagneMade in SpainFabricado em Espanha
RCWave
RC5W
RC3W
RC7W
RC9W
800
W
1100
1400
5
450 3
Nº
7
9
230 V 50 HzCLASE I / CLASS I IP20
ES FR
E P