TV LCD TDT y USB Lector de tarjetas NVR-7080TTG-26 · 2 Introducción Muchas gracias por comprar...
58
TV LCD TDT y USB Lector de tarjetas NVR-7080TTG-26 MANUAL DE INSTRUCCIONES
Transcript of TV LCD TDT y USB Lector de tarjetas NVR-7080TTG-26 · 2 Introducción Muchas gracias por comprar...
TV LCD TDT y USB Lector de tarjetas
NVR-7080TTG-26
MANUAL DE INSTRUCCIONES
1
Índice
• Introducción
• Advertencia
• Precaución
• Descripción de la unidad principal
• Mando a distancia
•
•
Configuración básica de C.I (Interfaz Común)
• Funciones de DTV
• Especificaciones
• Resolución de problemas
Función Hotel visualización en pantalla
2
Introducción
Muchas gracias por comprar nuestro televisor LCD, que puede usarse como
televisor en color o monitor para el ordenador. Para sacar el máximo partido al
televisor desde el principio, lea detenidamente este manual de instrucciones y
guárdelo por si tuviera que consultarlo en un momento dado.
INSTALACIÓN
q Coloque el televisor en la habitación en un lugar donde la luz directa no
incida en la pantalla. La oscuridad total y los reflejos sobre la pantalla obligan
a forzar la vista. Para una visión confortable, se recomienda una iluminación
suave e indirecta.
w Deje suficiente espacio entre el televisor y la pared para permitir una
ventilación adecuada.
e Evite los lugares excesivamente cálidos para prevenir posibles daños en la
carcasa, así como el fallo de los componentes.
r Este receptor de televisión puede conectarse a una toma de corriente de
100-240 V CA y 50/60 Hz.
t No coloque el receptor de televisión cerca de fuentes de calor como
radiadores, conductos de aire ni tampoco bajo la luz directa del sol ni espacios
cerrados o confinados. No tape los orificios de ventilación cuando el aparato
esté encendido.
3
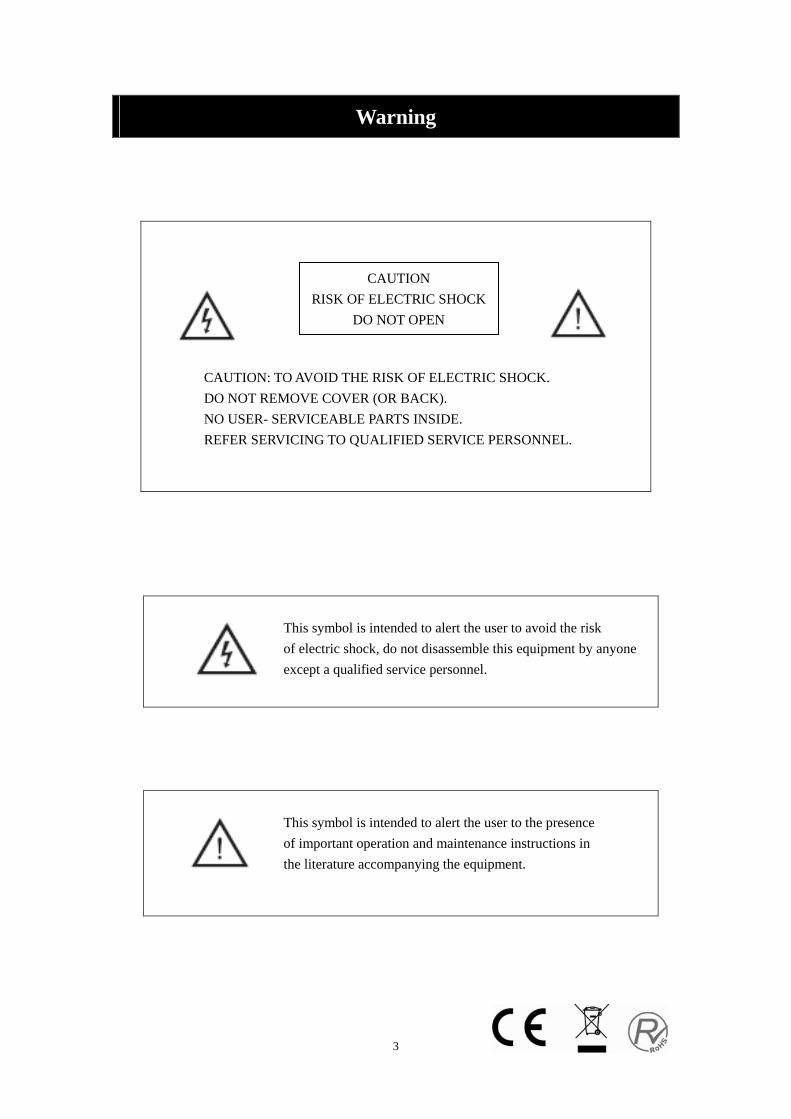
Advertencia
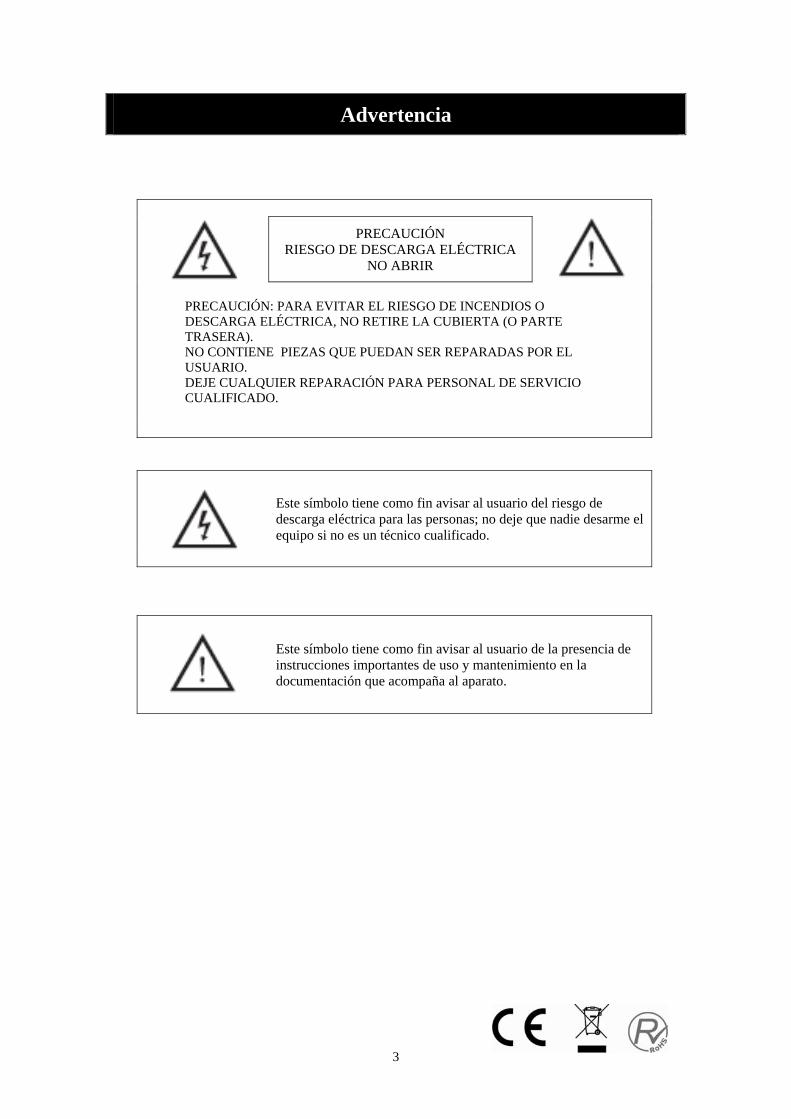
PRECAUCIÓN RIESGO DE DESCARGA ELÉCTRICA
NO ABRIR
PRECAUCIÓN: PARA EVITAR EL RIESGO DE INCENDIOS O DESCARGA ELÉCTRICA, NO RETIRE LA CUBIERTA (O PARTE TRASERA). NO CONTIENE PIEZAS QUE PUEDAN SER REPARADAS POR EL USUARIO. DEJE CUALQUIER REPARACIÓN PARA PERSONAL DE SERVICIO CUALIFICADO.
Este símbolo tiene como fin avisar al usuario del riesgo de descarga eléctrica para las personas; no deje que nadie desarme el equipo si no es un técnico cualificado.
Este símbolo tiene como fin avisar al usuario de la presencia de instrucciones importantes de uso y mantenimiento en la documentación que acompaña al aparato.
4
Precaución
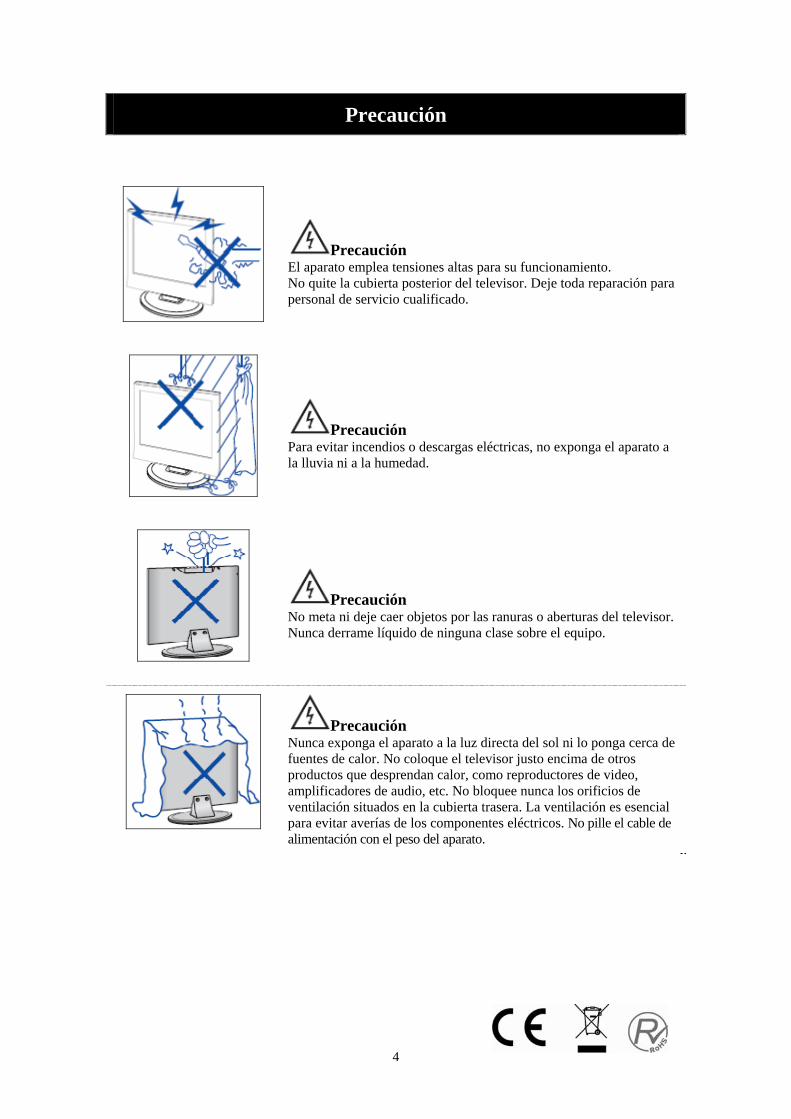
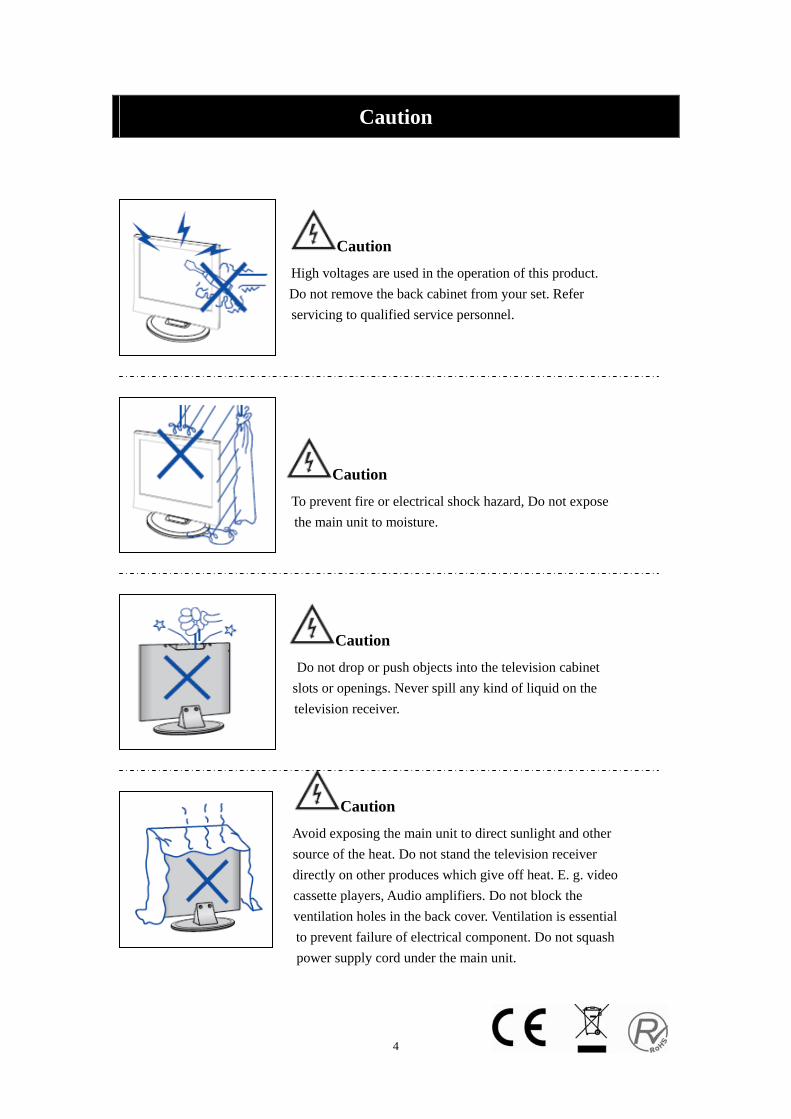
Precaución El aparato emplea tensiones altas para su funcionamiento. No quite la cubierta posterior del televisor. Deje toda reparación para personal de servicio cualificado.
Precaución Para evitar incendios o descargas eléctricas, no exponga el aparato a la lluvia ni a la humedad.
Precaución No meta ni deje caer objetos por las ranuras o aberturas del televisor. Nunca derrame líquido de ninguna clase sobre el equipo.
Precaución Nunca exponga el aparato a la luz directa del sol ni lo ponga cerca de fuentes de calor. No coloque el televisor justo encima de otros productos que desprendan calor, como reproductores de video, amplificadores de audio, etc. No bloquee nunca los orificios de ventilación situados en la cubierta trasera. La ventilación es esencial para evitar averías de los componentes eléctricos. No pille el cable de alimentación con el peso del aparato.
5
Precaución
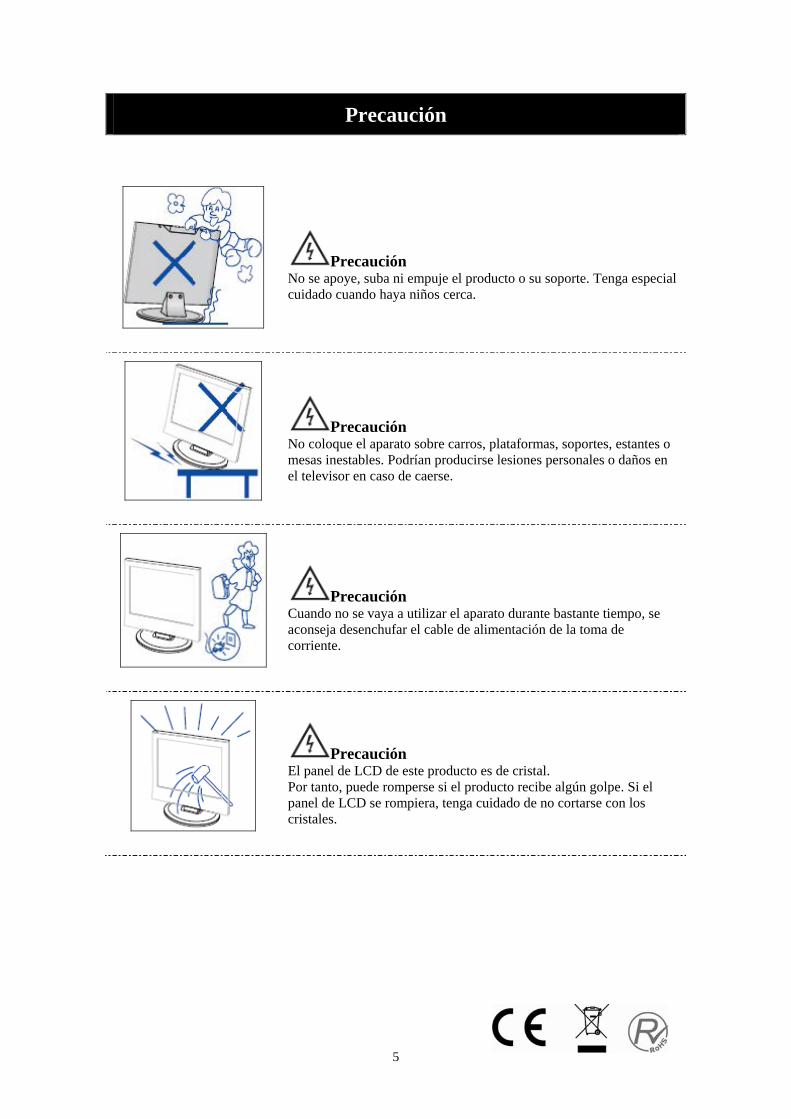
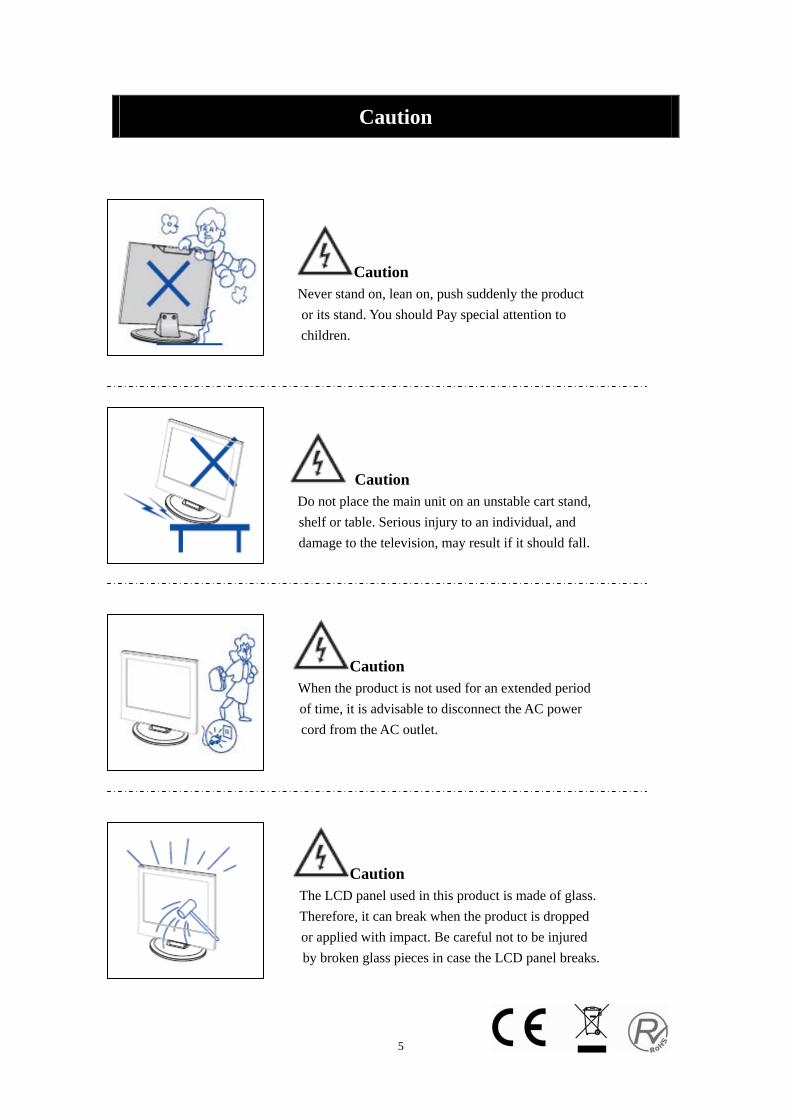
Precaución No se apoye, suba ni empuje el producto o su soporte. Tenga especial cuidado cuando haya niños cerca.
Precaución No coloque el aparato sobre carros, plataformas, soportes, estantes o mesas inestables. Podrían producirse lesiones personales o daños en el televisor en caso de caerse.
Precaución Cuando no se vaya a utilizar el aparato durante bastante tiempo, se aconseja desenchufar el cable de alimentación de la toma de corriente.
Precaución El panel de LCD de este producto es de cristal. Por tanto, puede romperse si el producto recibe algún golpe. Si el panel de LCD se rompiera, tenga cuidado de no cortarse con los cristales.
6
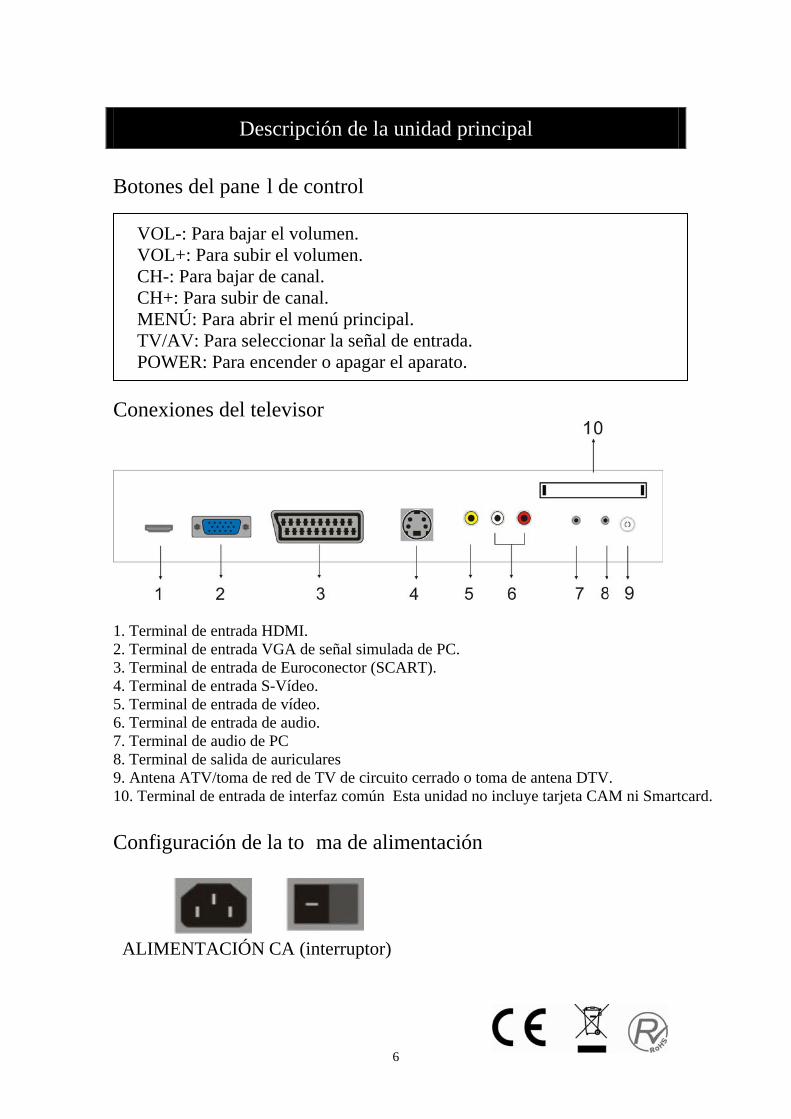
Descripción de la unidad principal Botones del pane l de control
VOL-: Para bajar el volumen. VOL+: Para subir el volumen. CH-: Para bajar de canal. CH+: Para subir de canal. MENÚ: Para abrir el menú principal. TV/AV: Para seleccionar la señal de entrada. POWER: Para encender o apagar el aparato.
Conexiones del televisor
1. Terminal de entrada HDMI. 2. Terminal de entrada VGA de señal simulada de PC. 3. Terminal de entrada de Euroconector (SCART). 4. Terminal de entrada S-Vídeo. 5. Terminal de entrada de vídeo. 6. Terminal de entrada de audio. 7. Terminal de audio de PC 8. Terminal de salida de auriculares 9. Antena ATV/toma de red de TV de circuito cerrado o toma de antena DTV. 10. Terminal de entrada de interfaz común Esta unidad no incluye tarjeta CAM ni Smartcard. Configuración de la to ma de alimentación
ALIMENTACIÓN CA (interruptor)

7
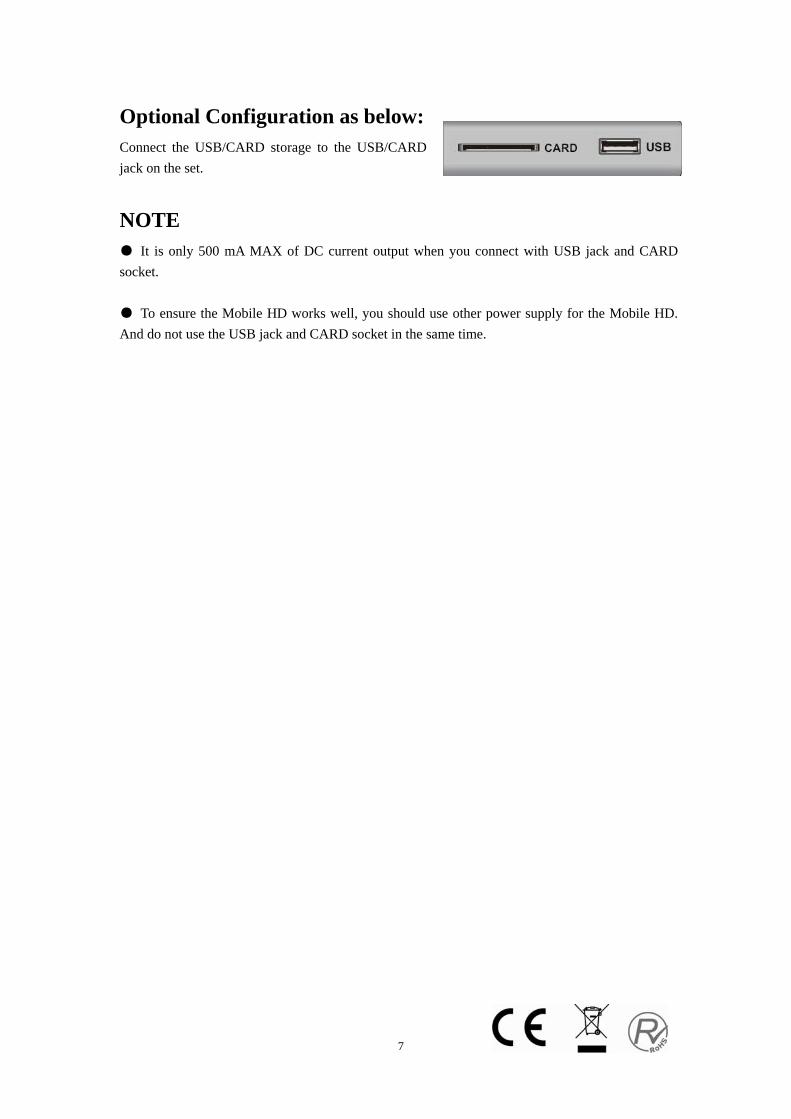
Configuración opcional: Introduzca el dispositivo USB en la ranura USB y la tarjeta de memoria en la ranura CARD.
NOTA ● Al usar las tomas de USB y de tarjeta, sólo se utilizan 500 mA de CC como máximo. ● Para asegurarse de que el disco duro móvil funcione correctamente, use la fuente de alimentación del mismo. No utilice la toma USB ni CARD al mismo tiempo.
8
Mando a distancia
POWER (ENCENDIDO): Pulse este botón para encender el televisor cuando esté en modalidad de “en espera” o para entrar en la modalidad de “en espera”. MUTE (SILENCIO): Pulse este botón para silenciar el sonido o restablecerlo. NICAM/A2: En modo TV, pulse este botón para seleccionar la modalidad de estéreo. SLEEP (SUSPENSIÓN): Establece el programador de suspensión. ASPECT (ASPECTO): Pulse para seleccionar los diferentes tamaños de la imagen. USB/CR (USB/TARJETA): Pulse para seleccionar la fuente de señal de MEDIO. (Únicamente para modelos con la función USB/CR) DISPLAY (VISUALIZAR): Muestra información de TV en la pantalla LCD del televisor, como por ejemplo la de los canales y la etiqueta del canal. AUTO: Pulse para ajustar la imagen de manera automática en la modalidad de PC. PMODE: Para seleccionar la modalidad de la imagen. SMODE: Para seleccionar la modalidad del sonido. DTV: Pulse para introducir el canal DTV. (Sólo para modelos con la función DTV) SOURCE (FUENTE): Pulse para cambiar la fuente de señal. ENTER (ACEPTAR): Para aceptar la opción seleccionada o realizar la operación seleccionada. MENÚ: Pulse este botón para acceder al menú principal y los diversos valores de configuración opcionales. EXIT (SALIR): Para salir de OSD (Visualización por pantalla). 0-9: Para seleccionar y cambiar un canal utilizando 0 - 9. -/--: Para cambiar los dígitos del programa.
: Para alternar hacia atrás y hacia adelante entre el canal actual y los anteriores. CH-/CH+: Para ir al canal siguiente o al anterior. VOL-/VOL+: Para ajustar el volumen.
9
INFO: Muestra información sobre el programa actual en la modalidad DTV o muestra el proceso de grabación en la modalidad MEDIO. (Sólo para modelos con la función DTV) AUDIO: Pulse para seleccionar la salida de sonido de DTV. (Sólo para modelos con la función DTV) FAV: Pasa a la configuración personalizada de la "Lista de favoritos". (Sólo para modelos con la función DTV) TV/RADIO: Cambia entre programas de DTV y programas de radio (sólo sonido, sin imagen). (Sólo para modelos con la función DTV) EPG: Accede a la guía de programación electrónica. (Sólo para modelos con la función DTV)
: Detiene la reproducción de MEDIO o detiene la grabación. (Únicamente para modelos con la función USB/CR) SUBTITLE (SUBTÍTULOS): Activa o desactiva los subtítulos. (Sólo para modelos con la función DTV) TEXT (TEXTO): Pulse para acceder a la modalidad de teletexto. (Sólo para la región europea)
:Pulse para iniciar la reproducción de MEDIO o para detener momentáneamente la reproducción. (Únicamente para modelos con la función USB/CR) HOLD (MANTENER): Congela en pantalla un pasaje de una página múltiple en la modalidad de teletexto. (Sólo para la región europea)
: Inicia la grabación. INDEX (ÍNDICE): Pulse este botón para ir a la página del índice del teletexto o para visualizar la lista de “Agrupación de canales” en la modalidad DTV. (Sólo para la región europea)
:Pulse para retroceder. (Únicamente para modelos con la función USB/CR) SIZE (TAMAÑO): Muestra la parte superior, inferior o toda una página para facilitar la lectura del teletexto. (Sólo para la región europea)
:Pulse para avanzar. (Únicamente para modelos con la función USB/CR) REVEAL (REVELAR): Pulse este botón para mostrar la información oculta de la página de teletexto.Pulse de nuevo para ocultar la página de información.

10
SUBPAGINA: Realiza la función de sub code en el texto al introducir el texto en modo display. (Uso exclusivo para zonas europeas) ROJO, VERDE, AMARILLO, AZUL: Corresponden a diferentes funciones según su color. (Usado en zonas europeas solo función USB/CR,La tecla amari lla tiene funcion de repeticion.)
11
Configuración básica de visualización en pantalla
Imagen Puede seleccionar el tipo de imagen que prefiera. 1. Pulse el botón “MENU” para acceder al
menú de visualización en pantalla. A continuación, pulse “ / ” para
seleccionar el menú “Picture” (imagen). Para entrar en dicho menú, pulse el botón “ ”.
2. Pulse “ / ” para seleccionar “Picture Mode” (modo de imagen) y pulse “ / ” para seleccionar entre User (usuario), Standard (estándar), Vivid (intenso), Soft (suave) y Optimal (óptimo).
3. Pulse los botones “ / ” para seleccionar “Brightness” (brillo) y “ / ” para acceder al menú de ajuste de brillo y modificar su valores.
4. Pulse los botones “ / ” para seleccionar “Contrast” (contraste) y “ / ” para acceder al menú de ajuste de contraste y modificar su valores.
5. Pulse los botones “ / ” para seleccionar “Sharpness” (nitidez) y “ / ” para acceder al menú de ajuste de nitidez y modificar su valores.
6. Pulse los botones “ / ” para seleccionar “Colour” (color) y “ / ” para acceder al menú de ajuste de color y modificar su valores.
7. Pulse los botones “ / ” para seleccionar “Hue” (matiz) y “ / ” para acceder al menú de ajuste de tono y modificar su valores.
Nota: La opción de tono sólo es para el sistema NTSC estadounidense. 8. Pulse los botones “ / ” para seleccionar “Colour Temp” (temperatura del color) y “ / ” para
acceder al menú de ajuste de temperatura del color y elegir Cool (fría), Warm (cálida) y Standard.
Sonido Puede seleccionar el tipo de sonido que prefiera. 1. Pulse el botón “MENU” para acceder al menú
de visualización en pantalla. A continuación, pulse “ / ” para seleccionar el menú “Sound” (sonido). Para entrar en dicho menú, pulse el botón “ ”.
2. Pulse “ / ” para seleccionar “Sound Mode” (modo de sonido) y pulse “ / ” para seleccionar entre User (usuario), Standard (estándar), Music (música), Movie (película) y Speech (discurso).
3. Pulse los botones “ / ” para seleccionar “Balance” y “ / ” para acceder al menú de ajuste de balance y modificar su valores.
4. Pulse los botones “ / ” para seleccionar “Treble” (agudos) y “ / ” para acceder al menú de ajuste de agudos y modificar su valores.
5. Pulse los botones “ / ” para seleccionar “Bass” (graves) y “ / ” para acceder al menú de ajuste de graves y modificar su valores.
6. Pulse “ / ” para seleccionar “AVC” y “ / ” para activar o desactivar la función de control automático del volumen.
Administrator
Note
None set by Administrator
12
CANAL ATV En modo TV se pueden hacer diversos ajustes. 1. Pulse el botón “MENU” para acceder al
menú de visualización en pantalla. A continuación, pulse “ / ” para seleccionar el menú “ATV” (televisión avanzada). Para entrar en dicho menú, pulse el botón “ ”.
2. Pulse “ / ” para seleccionar el menú “Área” y “ / ” para seleccionar un área entre: Australia / Rusia / Irlanda / Dinamarca / Portugal / Polonia / Turquía / Suiza / Alemania / Reino Unido / Italia / Francia / España (Spain) / Países Bajos / Taiwán / China / Noruega / Suecia / Finlandia / Grecia.
3. Pulse “ / ” para seleccionar el menú “Colour System” (sistema de color) y “ / ” para seleccionar entre AUTO (automático), PAL y SECAM.
4. Pulse “ / ” para seleccionar el menú “Sound System” (sistema de sonido) y “ / ” para elegir entre BG / DK / I / AUTO.
Nota: Cuando el sistema de sonido esté en modo automático (AUTO) y la imagen o el sonido no funcionen bien, seleccione el sistema de sonido local.
5. Pulse “ / ” para seleccionar el menú “Búsqueda Auto” y el botón “ ” para hacer una búsqueda automática. Pulse el botón “MENU” o “EXIT” para salir.
6. Pulse “ / ” para seleccionar “Búsqueda Manual” y el botón “ ” para hacer una búsqueda manual hacia delante; pulse “ ” para buscar hacia atrás.
7. Pulse “ / ” para seleccionar el menú “Sintonía Fina” (sintonización precisa) y “ / ”para seleccionar la frecuencia adecuada.
8. Pulse “ / ” para seleccionar el menú (saltar) y “ / ” para activar o desactivar la función de saltarse un canal.
9. Pulse “ / ” para seleccionar el menú “Channel Editor” (editor de canales) y el botón “ ” para acceder a la función de edición.
Configuración
1. Pulse el botón “MENU” para acceder al menú de visualización en pantalla. A continuación, pulse “ / ” para seleccionar el menú “Setup” (configuración). Para entrar en dicho menú, pulse el botón “ ”.
2. Pulse “ / ” para seleccionar el menú “Language” (idioma) y “ / ” para seleccionar el idioma en que desee que aparezca la visualización en pantalla.
3. Pulse “ / ” para seleccionar el menú “TXT Language” (idioma de teletexto) y “ / ” para seleccionar el idioma en que desee que aparezca el teletexto local.
4. Pulse “ / ” para seleccionar “Reset” (restablecer) y pulse el botón “ ” para ejecutar la función reinicio.
5. Pulse “ / ” para seleccionar “tiempo del OSD” y “ / ” para seleccionar el tiempo que desee que aparezca la visualización en pantalla.
13
6. Pulse “ / ” para seleccionar “Aspect” y el botón “ / ”para seleccionar la relación de aspecto
deseada. 7. Pulse “ / ” para seleccionar “ segundo plano y “ / ”para activar o desactivar el fondo
azul. 8. Pulse “ / ” para seleccionar “Hotel Mode” (modo de hotel) y pulse el botón “ ” para acceder a
dicha opción. La contraseña predeterminada es "8888".
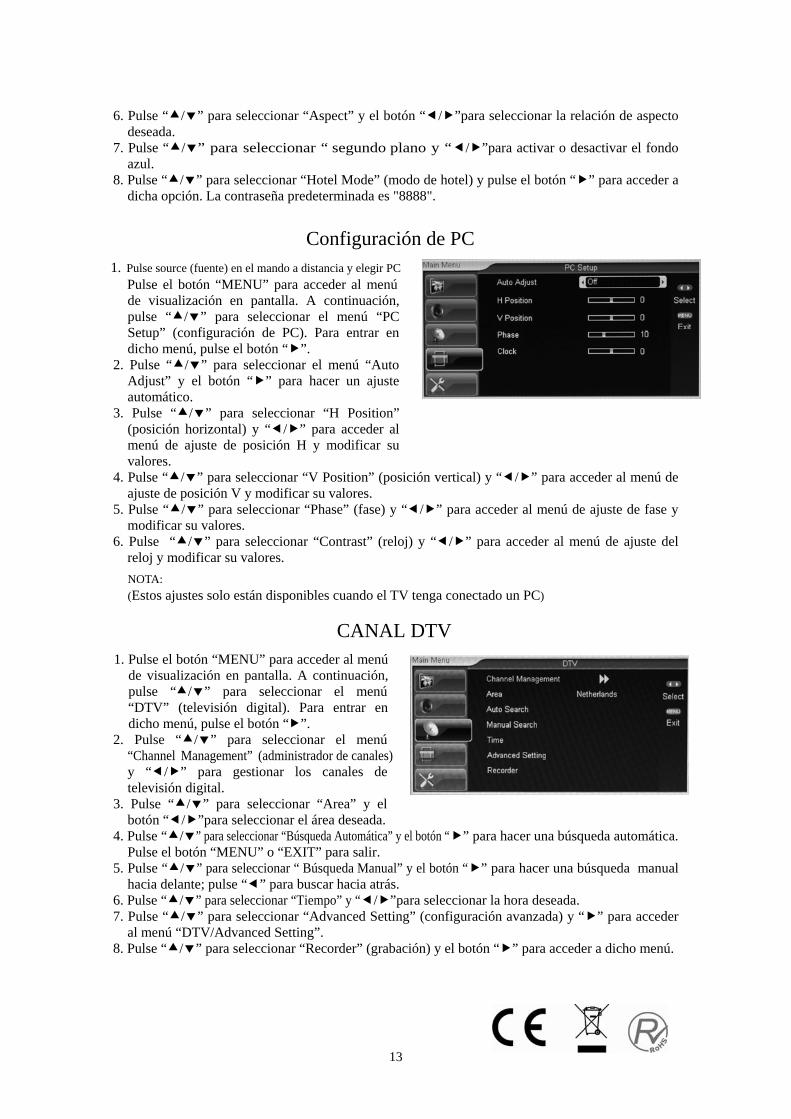
Configuración de PC
Pulse el botón “MENU” para acceder al menú de visualización en pantalla. A continuación, pulse “ / ” para seleccionar el menú “PC Setup” (configuración de PC). Para entrar en dicho menú, pulse el botón “ ”.
2. Pulse “ / ” para seleccionar el menú “Auto Adjust” y el botón “ ” para hacer un ajuste automático.
3. Pulse “ / ” para seleccionar “H Position” (posición horizontal) y “ / ” para acceder al menú de ajuste de posición H y modificar su valores.
4. Pulse “ / ” para seleccionar “V Position” (posición vertical) y “ / ” para acceder al menú de ajuste de posición V y modificar su valores.
5. Pulse “ / ” para seleccionar “Phase” (fase) y “ / ” para acceder al menú de ajuste de fase y modificar su valores.
6. Pulse “ / ” para seleccionar “Contrast” (reloj) y “ / ” para acceder al menú de ajuste del reloj y modificar su valores.
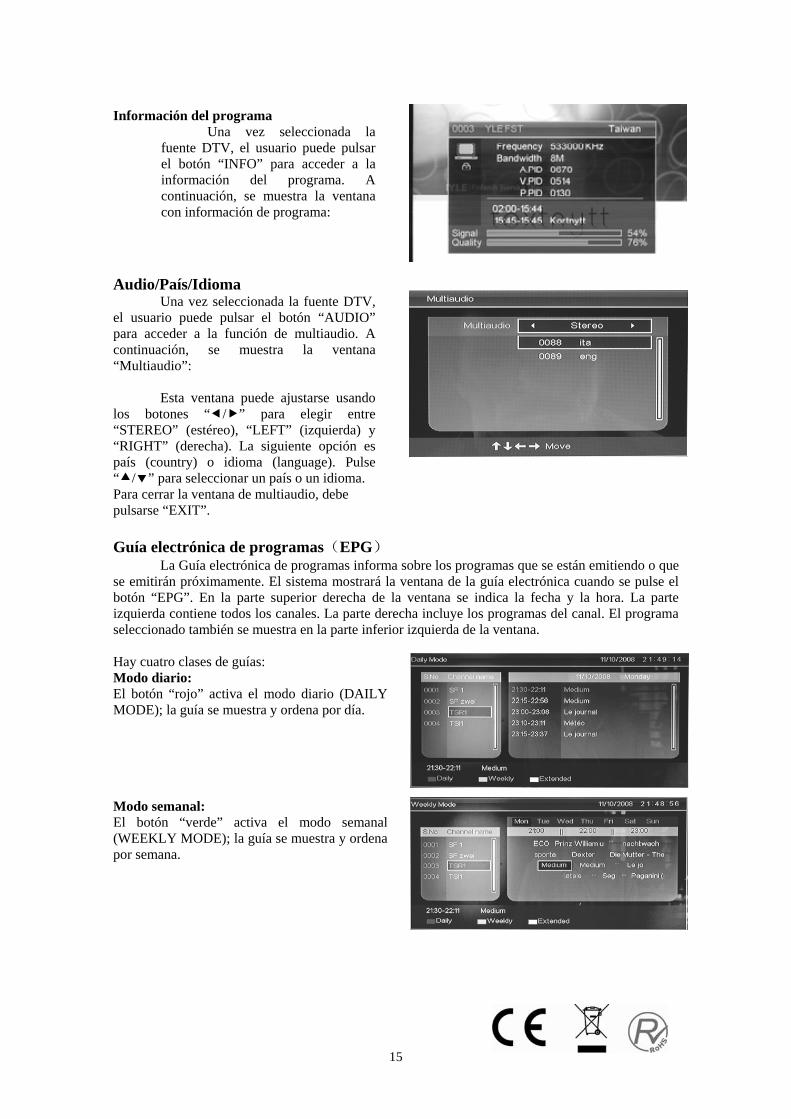
CANAL DTV
1. Pulse el botón “MENU” para acceder al menú de visualización en pantalla. A continuación, pulse “ / ” para seleccionar el menú “DTV” (televisión digital). Para entrar en dicho menú, pulse el botón “ ”. 2. Pulse “ / ” para seleccionar el menú
“Channel Management” (administrador de canales) y “ / ” para gestionar los canales de televisión digital.
3. Pulse “ / ” para seleccionar “Area” y el botón “ / ”para seleccionar el área deseada.
4. Pulse “ / ” para seleccionar “Búsqueda Automática” y el botón “ ” para hacer una búsqueda automática. Pulse el botón “MENU” o “EXIT” para salir.
5. Pulse “ / ” para seleccionar “ Búsqueda Manual” y el botón “ ” para hacer una búsqueda manual hacia delante; pulse “ ” para buscar hacia atrás.
6. Pulse “ / ” para seleccionar “Tiempo” y “ / ”para seleccionar la hora deseada. 7. Pulse “ / ” para seleccionar “Advanced Setting” (configuración avanzada) y “ ” para acceder
al menú “DTV/Advanced Setting”. 8. Pulse “ / ” para seleccionar “Recorder” (grabación) y el botón “ ” para acceder a dicho menú.
1. Pulse source (fuente) en el mando a distancia y elegir PC
NOTA:(Estos ajustes solo están disponibles cuando el TV tenga conectado un PC)
cv
Subrayado

14
FUNCIONES DE DTV Búsqueda de canales
Una vez seleccionada la fuente DTV, el usuario puede pulsar el botón “MENU” para acceder a la configuración de la televisión digital. Entre en el submenú y seleccione “Auto Search” (búsqueda automática); a continuación, pulse el botón “ ”. Se mostrará una venta donde habrá
El sistema buscará en toda la frecuencia del área. El alcance de la búsqueda depende del área o del país seleccionado por el usuario.
Las áreas/países que admite el sistema son: Alemania / Reino Unido / Italia / Francia / España / Países Bajos / Taiwán / China / Noruega / Suecia / Finlandia / Grecia / Australia / Rusia / Irlanda / Dinamarca / Portugal / Polonia / Turquía / Suiza, etc.
El sistema busca automáticamente todas las frecuencias y canales disponibles en el área/país seleccionado.
Cuando el sistema está buscando canales, el usuario puede salir o detener la función pulsando “MENU” o “EXIT”.
Al terminar, el sistema sale solo de la función de búsqueda de canales. Los canales se guardarán y mostrarán en el televisor. Lista de favoritos
Una vez seleccionada la fuente DTV, el usuario puede pulsar el botón “FAV” para acceder a la lista de favoritos. A continuación, se muestra la ventana con la lista de favoritos:
Esta ventana muestra los canales que el usuario ha marcado como favoritos. Para ver un canal, hay que resaltarlo y pulsar el botón “ENTER”. Para cerrar la ventana con la lista de favoritos, debe pulsarse “EXIT”.
que elegir LCN ON (si/no) para inicar la búsqueda de canal.
15
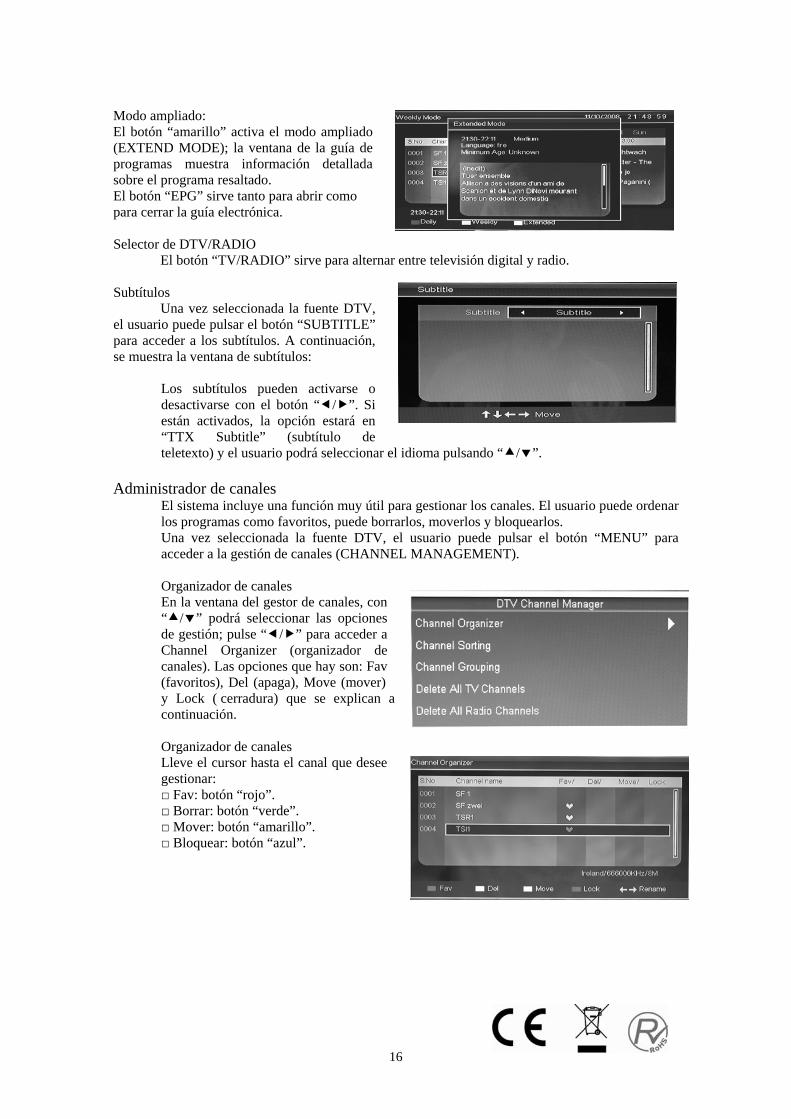
Información del programa
Una vez seleccionada la fuente DTV, el usuario puede pulsar el botón “INFO” para acceder a la información del programa. A continuación, se muestra la ventana con información de programa:
Audio/País/Idioma
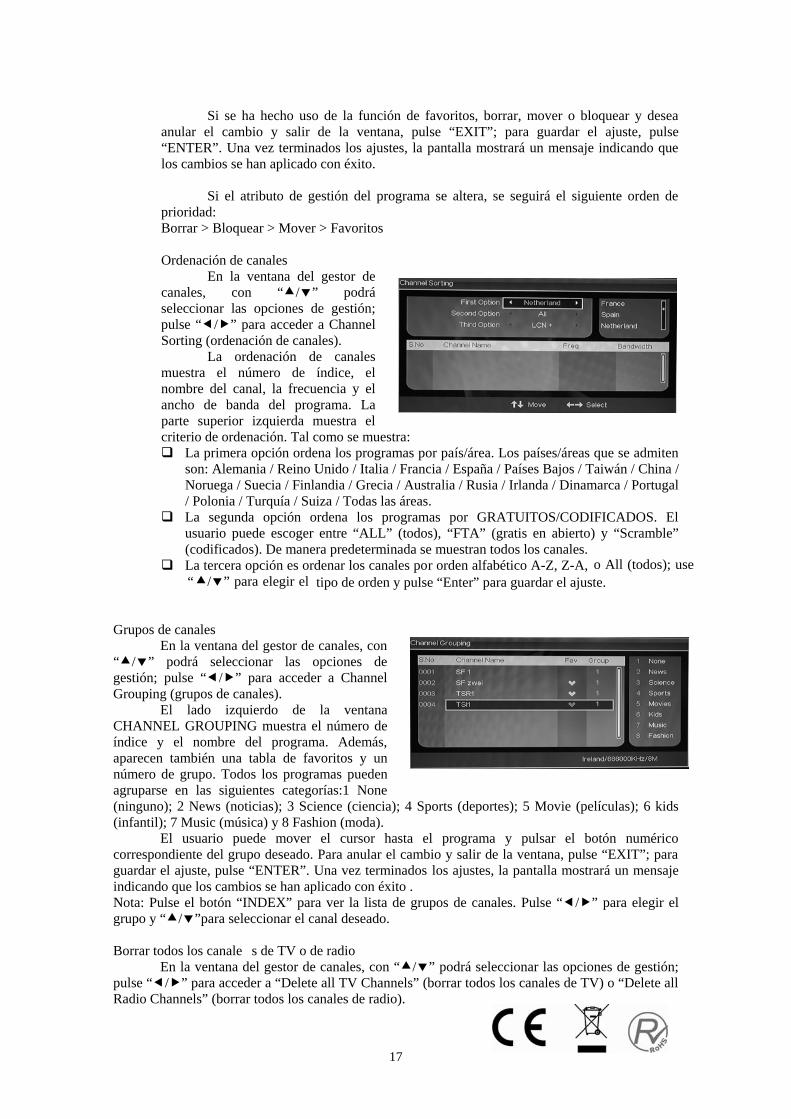
Una vez seleccionada la fuente DTV, el usuario puede pulsar el botón “AUDIO” para acceder a la función de multiaudio. A continuación, se muestra la ventana “Multiaudio”:
Esta ventana puede ajustarse usando los botones “ / ” para elegir entre “STEREO” (estéreo), “LEFT” (izquierda) y “RIGHT” (derecha). La siguiente opción es país (country) o idioma (language). Pulse “ / ” para seleccionar un país o un idioma. Para cerrar la ventana de multiaudio, debe pulsarse “EXIT”. Guía electrónica de programas(EPG)
La Guía electrónica de programas informa sobre los programas que se están emitiendo o que se emitirán próximamente. El sistema mostrará la ventana de la guía electrónica cuando se pulse el botón “EPG”. En la parte superior derecha de la ventana se indica la fecha y la hora. La parte izquierda contiene todos los canales. La parte derecha incluye los programas del canal. El programa seleccionado también se muestra en la parte inferior izquierda de la ventana. Hay cuatro clases de guías: Modo diario: El botón “rojo” activa el modo diario (DAILY MODE); la guía se muestra y ordena por día. Modo semanal: El botón “verde” activa el modo semanal (WEEKLY MODE); la guía se muestra y ordena por semana.
16
Modo ampliado: El botón “amarillo” activa el modo ampliado (EXTEND MODE); la ventana de la guía de programas muestra información detallada sobre el programa resaltado. El botón “EPG” sirve tanto para abrir como para cerrar la guía electrónica. Selector de DTV/RADIO
El botón “TV/RADIO” sirve para alternar entre televisión digital y radio. Subtítulos
Una vez seleccionada la fuente DTV, el usuario puede pulsar el botón “SUBTITLE” para acceder a los subtítulos. A continuación, se muestra la ventana de subtítulos:
Los subtítulos pueden activarse o desactivarse con el botón “ / ”. Si están activados, la opción estará en “TTX Subtitle” (subtítulo de teletexto) y el usuario podrá seleccionar el idioma pulsando “ / ”.
Administrador de canales
El sistema incluye una función muy útil para gestionar los canales. El usuario puede ordenar los programas como favoritos, puede borrarlos, moverlos y bloquearlos. Una vez seleccionada la fuente DTV, el usuario puede pulsar el botón “MENU” para acceder a la gestión de canales (CHANNEL MANAGEMENT).
Organizador de canales En la ventana del gestor de canales, con “ / ” podrá seleccionar las opciones de gestión; pulse “ / ” para acceder a Channel Organizer (organizador de canales). Las opciones que hay son: Fav (favoritos), Del (apaga), Move (mover) y Lock ( cerradura) que se explican a continuación. Organizador de canales Lleve el cursor hasta el canal que desee gestionar: □ Fav: botón “rojo”. □ Borrar: botón “verde”. □ Mover: botón “amarillo”. □ Bloquear: botón “azul”.
17
Si se ha hecho uso de la función de favoritos, borrar, mover o bloquear y desea anular el cambio y salir de la ventana, pulse “EXIT”; para guardar el ajuste, pulse “ENTER”. Una vez terminados los ajustes, la pantalla mostrará un mensaje indicando que los cambios se han aplicado con éxito. Si el atributo de gestión del programa se altera, se seguirá el siguiente orden de prioridad: Borrar > Bloquear > Mover > Favoritos Ordenación de canales En la ventana del gestor de canales, con “ / ” podrá seleccionar las opciones de gestión; pulse “ / ” para acceder a Channel Sorting (ordenación de canales). La ordenación de canales muestra el número de índice, el nombre del canal, la frecuencia y el ancho de banda del programa. La parte superior izquierda muestra el criterio de ordenación. Tal como se muestra:
La primera opción ordena los programas por país/área. Los países/áreas que se admiten son: Alemania / Reino Unido / Italia / Francia / España / Países Bajos / Taiwán / China / Noruega / Suecia / Finlandia / Grecia / Australia / Rusia / Irlanda / Dinamarca / Portugal / Polonia / Turquía / Suiza / Todas las áreas.
La segunda opción ordena los programas por GRATUITOS/CODIFICADOS. El usuario puede escoger entre “ALL” (todos), “FTA” (gratis en abierto) y “Scramble” (codificados). De manera predeterminada se muestran todos los canales.
La tercera opción es ordenar los canales por orden alfabético A-Z, Z-A, o All (todos); use/ ” para elegir el tipo de orden y pulse “Enter” para guardar el ajuste.
Grupos de canales
En la ventana del gestor de canales, con “ / ” podrá seleccionar las opciones de gestión; pulse “ / ” para acceder a Channel Grouping (grupos de canales).
El lado izquierdo de la ventana CHANNEL GROUPING muestra el número de índice y el nombre del programa. Además, aparecen también una tabla de favoritos y un número de grupo. Todos los programas pueden agruparse en las siguientes categorías:1 None (ninguno); 2 News (noticias); 3 Science (ciencia); 4 Sports (deportes); 5 Movie (películas); 6 kids (infantil); 7 Music (música) y 8 Fashion (moda).
El usuario puede mover el cursor hasta el programa y pulsar el botón numérico correspondiente del grupo deseado. Para anular el cambio y salir de la ventana, pulse “EXIT”; para guardar el ajuste, pulse “ENTER”. Una vez terminados los ajustes, la pantalla mostrará un mensaje indicando que los cambios se han aplicado con éxito . Nota: Pulse el botón “INDEX” para ver la lista de grupos de canales. Pulse “ / ” para elegir el grupo y “ / ”para seleccionar el canal deseado. Borrar todos los canale s de TV o de radio
En la ventana del gestor de canales, con “ / ” podrá seleccionar las opciones de gestión; pulse “ / ” para acceder a “Delete all TV Channels” (borrar todos los canales de TV) o “Delete all Radio Channels” (borrar todos los canales de radio).
“
18
Borrar todos los canales de TV: para borrar todos los canales de TV, ponga el cursor en “Delete all TV Channels” y pulse el botón “►”. Borrar todos los ca nales de radio: para borrar todos los canales de radio, ponga el cursor en “Delete all Radio Channels” y pulse el botón “►”. Hora
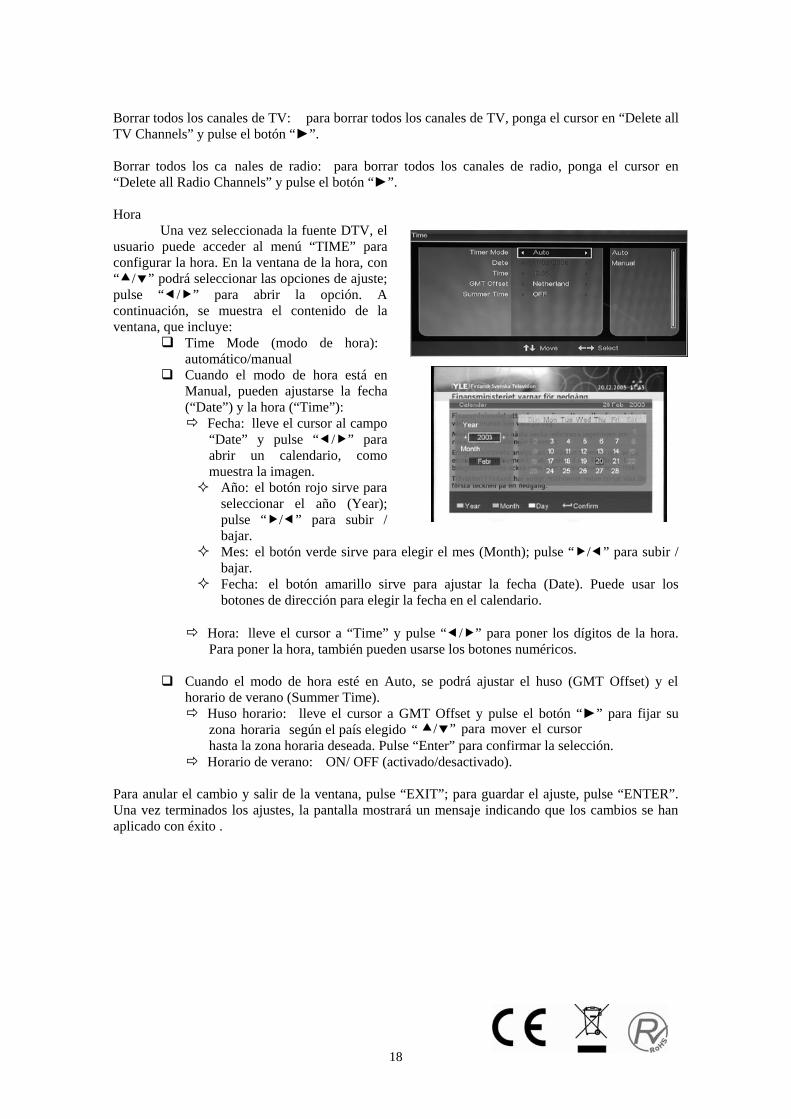
Una vez seleccionada la fuente DTV, el usuario puede acceder al menú “TIME” para configurar la hora. En la ventana de la hora, con “ / ” podrá seleccionar las opciones de ajuste; pulse “ / ” para abrir la opción. A continuación, se muestra el contenido de la ventana, que incluye:
Time Mode (modo de hora): automático/manual
Cuando el modo de hora está en Manual, pueden ajustarse la fecha (“Date”) y la hora (“Time”):
Fecha: lleve el cursor al campo “Date” y pulse “ / ” para abrir un calendario, como muestra la imagen. Año: el botón rojo sirve para
seleccionar el año (Year); pulse “ / ” para subir / bajar.
Mes: el botón verde sirve para elegir el mes (Month); pulse “ / ” para subir / bajar.
Fecha: el botón amarillo sirve para ajustar la fecha (Date). Puede usar los botones de dirección para elegir la fecha en el calendario.
Hora: lleve el cursor a “Time” y pulse “ / ” para poner los dígitos de la hora.
Para poner la hora, también pueden usarse los botones numéricos.
Cuando el modo de hora esté en Auto, se podrá ajustar el huso (GMT Offset) y el horario de verano (Summer Time).
Huso horario: lleve el cursor a GMT Offset y pulse el botón “►” para fijar su zona horaria según el país elegido “ / ” para mover el cursor hasta la zona horaria deseada. Pulse “Enter” para confirmar la selección.
Horario de verano: ON/ OFF (activado/desactivado). Para anular el cambio y salir de la ventana, pulse “EXIT”; para guardar el ajuste, pulse “ENTER”. Una vez terminados los ajustes, la pantalla mostrará un mensaje indicando que los cambios se han aplicado con éxito .
19
Configuración avanzada Una vez seleccionada la fuente DTV,
el usuario puede pulsar el botón “MENU” para acceder a la configuración de la televisión digital. Seleccione “Advanced Setting” (configuración avanzada) y pulse el botón “ ” para acceder a algunos de los siguientes ajustes: Audio preferido
Lleve el cursor hasta “Preferred Audio” y pulse “ / ” para seleccionar el idioma en que prefiera escuchar el audio: Inglés / Francés / Alemán / Italiano / Español / Portugués / Danés / Checo. Subtítulos preferidos
Lleve el cursor hasta “Preferred Subtitle” y pulse “ / ” para seleccionar el idioma en que prefiera leer los subtítulos: Inglés / Francés / Alemán / Italiano / Español / Portugués / Danés / Checo o ninguno (off). Interfaz común (CI)
Pulse “ / ” para seleccionar “CI” y el botón “ ” para acceder a dicho campo. Programa CA/CI
Pulse “ / ” hasta seleccionar “CA/CI Program” y pulse “ / ” para seleccionar “Yes” (sí) o “No”. Bloqueo paterno
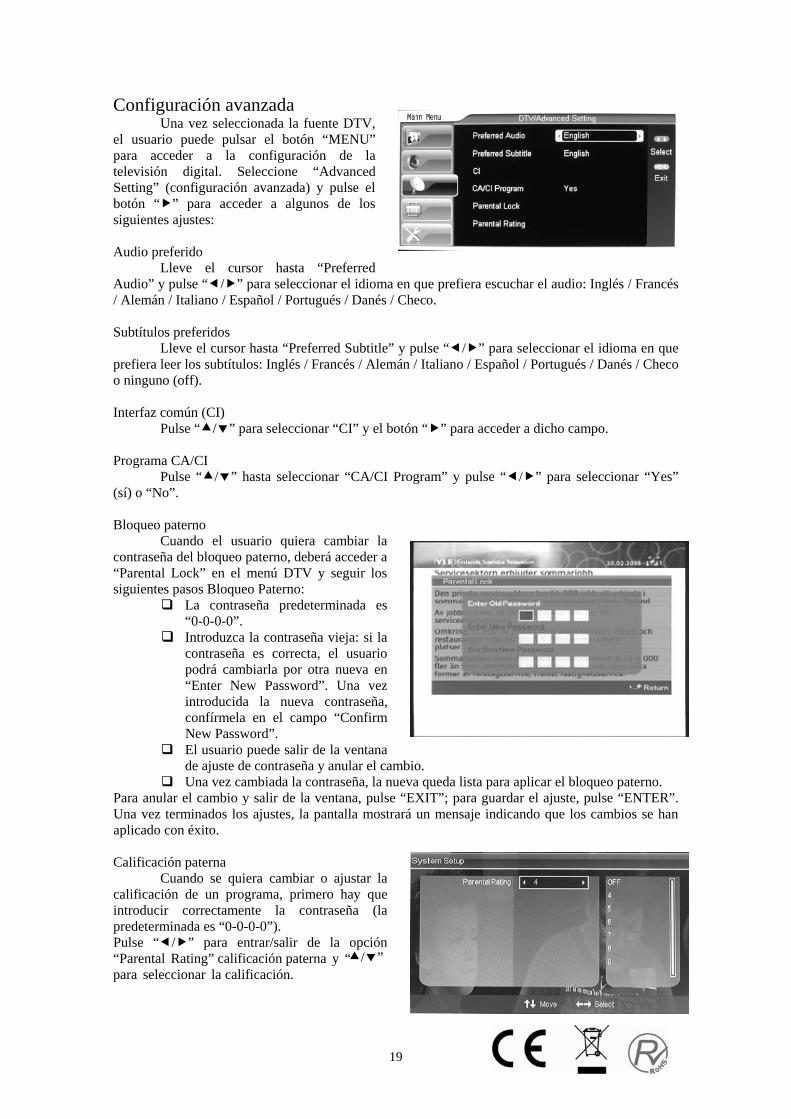
Cuando el usuario quiera cambiar la contraseña del bloqueo paterno, deberá acceder a “Parental Lock” en el menú DTV y seguir los siguientes pasos Bloqueo Paterno:
La contraseña predeterminada es “0-0-0-0”.
Introduzca la contraseña vieja: si la contraseña es correcta, el usuario podrá cambiarla por otra nueva en “Enter New Password”. Una vez introducida la nueva contraseña, confírmela en el campo “Confirm New Password”.
El usuario puede salir de la ventana de ajuste de contraseña y anular el cambio.
Una vez cambiada la contraseña, la nueva queda lista para aplicar el bloqueo paterno. Para anular el cambio y salir de la ventana, pulse “EXIT”; para guardar el ajuste, pulse “ENTER”. Una vez terminados los ajustes, la pantalla mostrará un mensaje indicando que los cambios se han aplicado con éxito. Calificación paterna Cuando se quiera cambiar o ajustar la calificación de un programa, primero hay que introducir correctamente la contraseña (la predeterminada es “0-0-0-0”). Pulse “ / ” para entrar/salir de la opción “Parental Rating” calificación paterna y “ / ” para seleccionar la calificación.
20
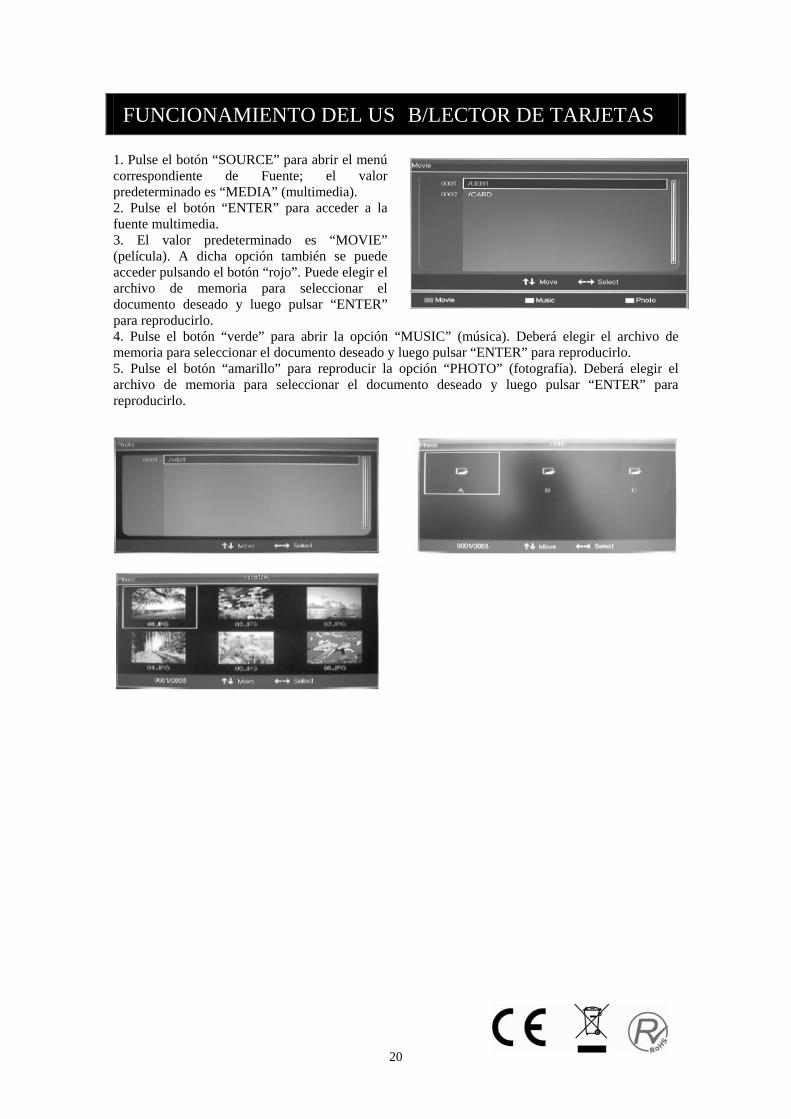
FUNCIONAMIENTO DEL US B/LECTOR DE TARJETAS 1. Pulse el botón “SOURCE” para abrir el menú correspondiente de Fuente; el valor predeterminado es “MEDIA” (multimedia). 2. Pulse el botón “ENTER” para acceder a la fuente multimedia. 3. El valor predeterminado es “MOVIE” (película). A dicha opción también se puede acceder pulsando el botón “rojo”. Puede elegir el archivo de memoria para seleccionar el documento deseado y luego pulsar “ENTER” para reproducirlo. 4. Pulse el botón “verde” para abrir la opción “MUSIC” (música). Deberá elegir el archivo de memoria para seleccionar el documento deseado y luego pulsar “ENTER” para reproducirlo. 5. Pulse el botón “amarillo” para reproducir la opción “PHOTO” (fotografía). Deberá elegir el archivo de memoria para seleccionar el documento deseado y luego pulsar “ENTER” para reproducirlo.
21
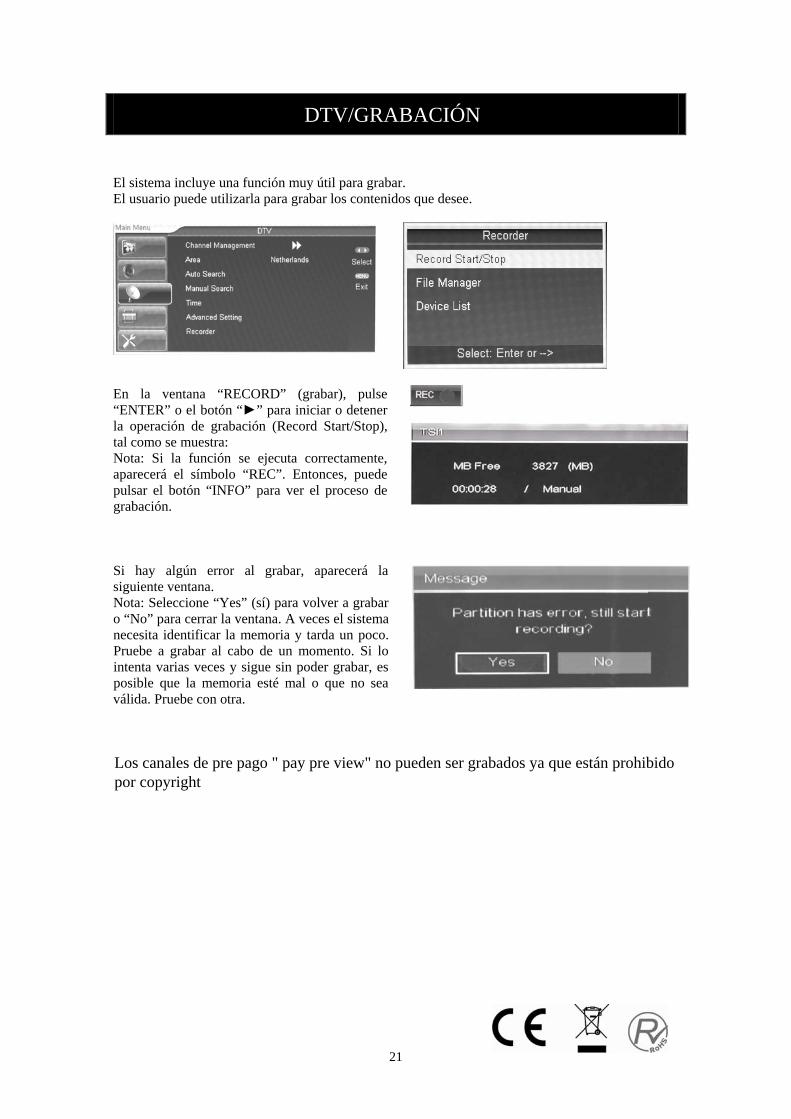
DTV/GRABACIÓN El sistema incluye una función muy útil para grabar. El usuario puede utilizarla para grabar los contenidos que desee.
En la ventana “RECORD” (grabar), pulse “ENTER” o el botón “►” para iniciar o detener la operación de grabación (Record Start/Stop), tal como se muestra: Nota: Si la función se ejecuta correctamente, aparecerá el símbolo “REC”. Entonces, puede pulsar el botón “INFO” para ver el proceso de grabación. Si hay algún error al grabar, aparecerá la siguiente ventana. Nota: Seleccione “Yes” (sí) para volver a grabar o “No” para cerrar la ventana. A veces el sistema necesita identificar la memoria y tarda un poco. Pruebe a grabar al cabo de un momento. Si lo intenta varias veces y sigue sin poder grabar, es posible que la memoria esté mal o que no sea válida. Pruebe con otra.
Los canales de pre pago " pay pre view" no pueden ser grabados ya que están prohibido por copyright
22
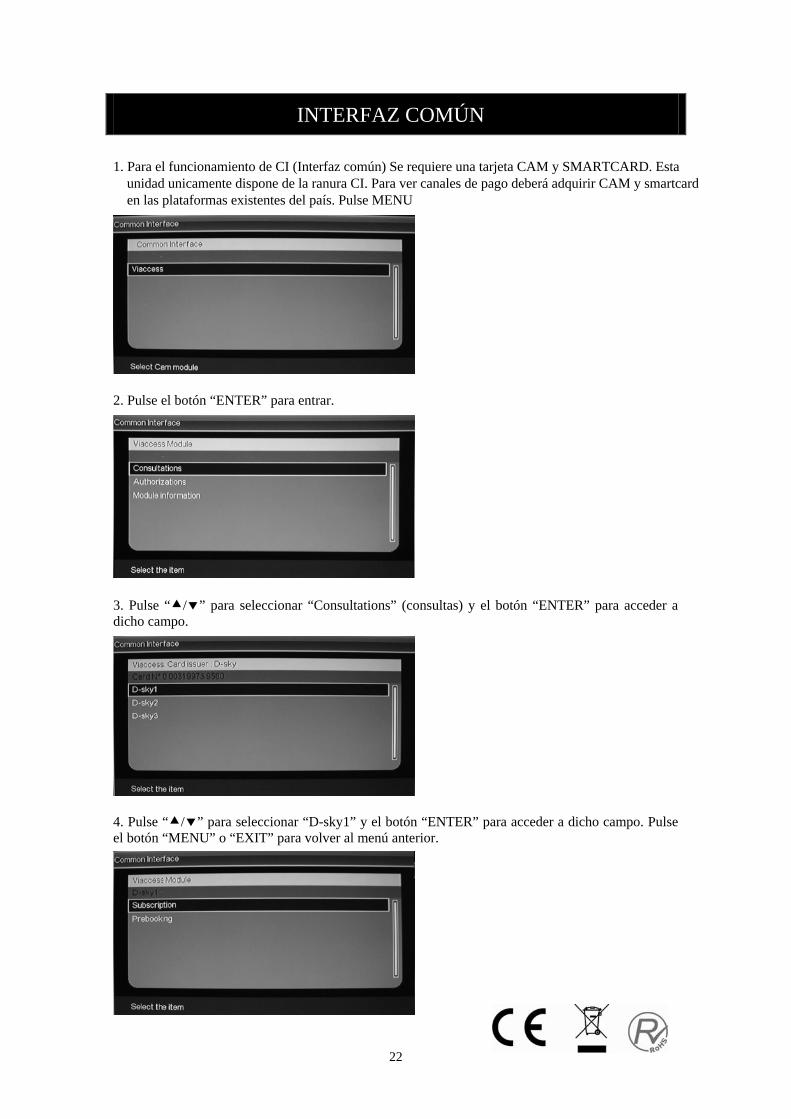
INTERFAZ COMÚN 1. Para el funcionamiento de CI (Interfaz común) Se requiere una tarjeta CAM y SMARTCARD. Esta unidad unicamente dispone de la ranura CI. Para ver canales de pago deberá adquirir CAM y smartcard en las plataformas existentes del país. Pulse MENU
2. Pulse el botón “ENTER” para entrar.
3. Pulse “ / ” para seleccionar “Consultations” (consultas) y el botón “ENTER” para acceder a dicho campo.
4. Pulse “ / ” para seleccionar “D-sky1” y el botón “ENTER” para acceder a dicho campo. Pulse el botón “MENU” o “EXIT” para volver al menú anterior.
23
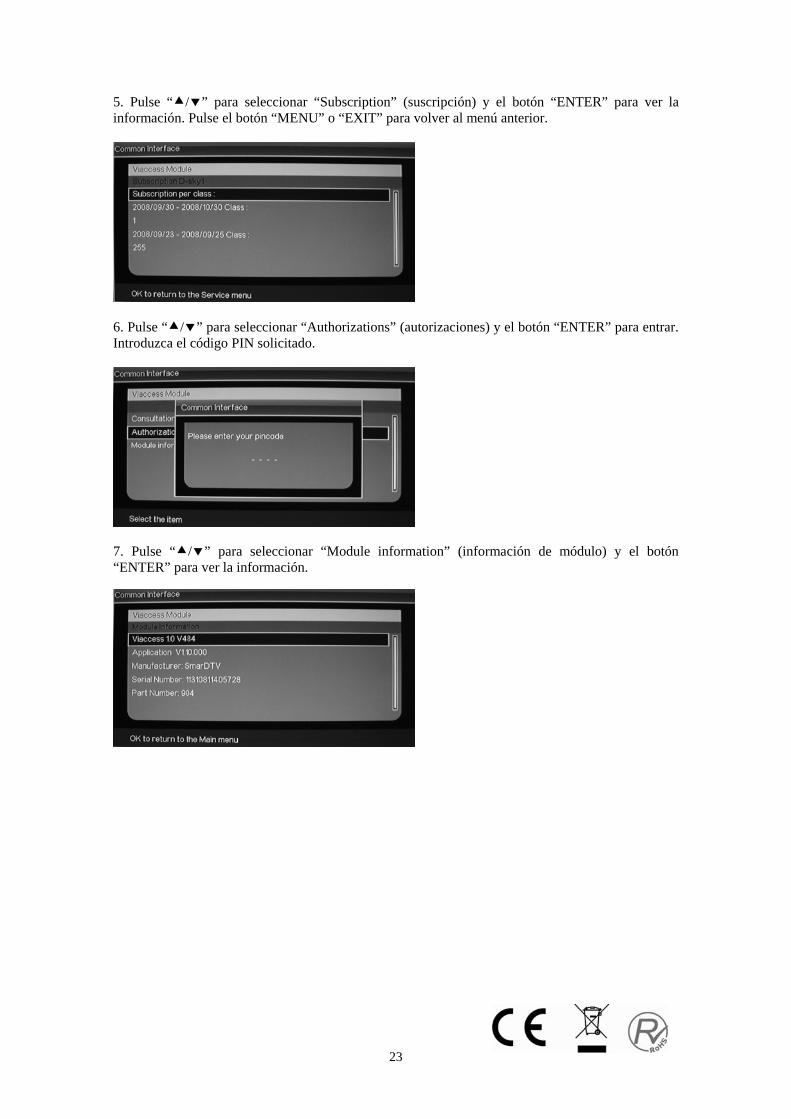
5. Pulse “ / ” para seleccionar “Subscription” (suscripción) y el botón “ENTER” para ver la información. Pulse el botón “MENU” o “EXIT” para volver al menú anterior.
6. Pulse “ / ” para seleccionar “Authorizations” (autorizaciones) y el botón “ENTER” para entrar. Introduzca el código PIN solicitado.
7. Pulse “ / ” para seleccionar “Module information” (información de módulo) y el botón “ENTER” para ver la información.
24
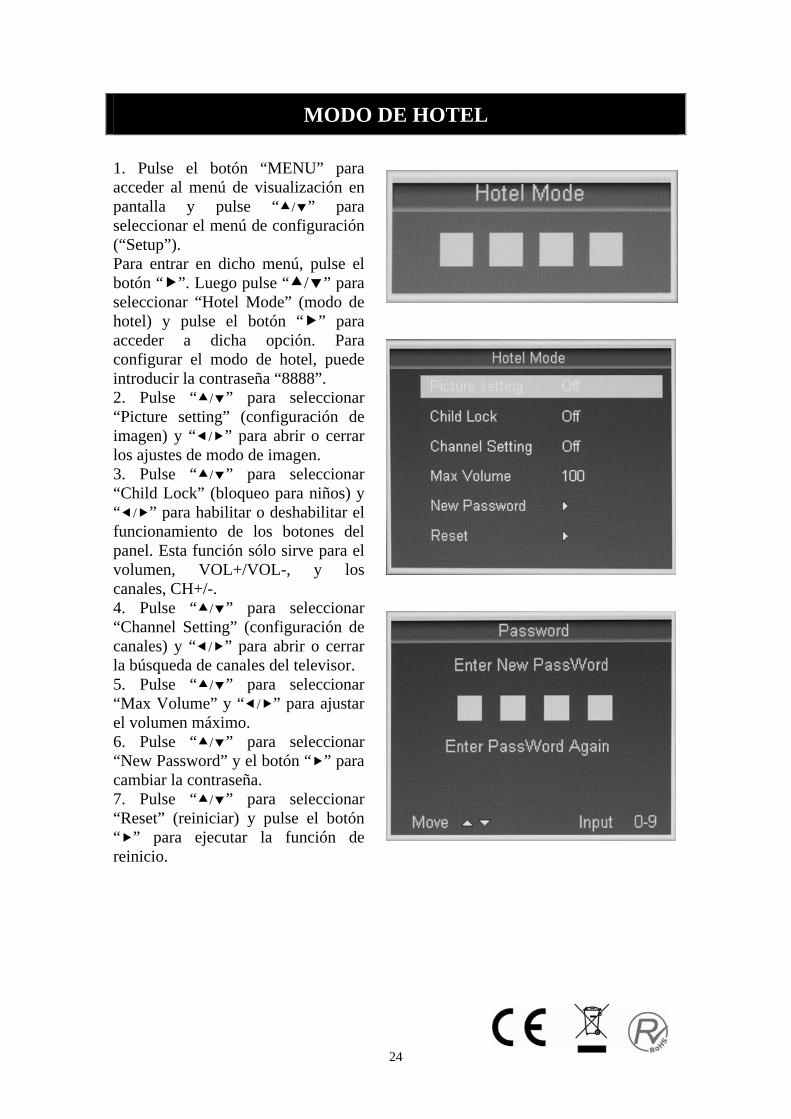
MODO DE HOTEL 1. Pulse el botón “MENU” para acceder al menú de visualización en pantalla y pulse “ / ” para seleccionar el menú de configuración (“Setup”). Para entrar en dicho menú, pulse el botón “ ”. Luego pulse “ / ” para seleccionar “Hotel Mode” (modo de hotel) y pulse el botón “ ” para acceder a dicha opción. Para configurar el modo de hotel, puede introducir la contraseña “8888”. 2. Pulse “ / ” para seleccionar “Picture setting” (configuración de imagen) y “ / ” para abrir o cerrar los ajustes de modo de imagen. 3. Pulse “ / ” para seleccionar “Child Lock” (bloqueo para niños) y “ / ” para habilitar o deshabilitar el funcionamiento de los botones del panel. Esta función sólo sirve para el volumen, VOL+/VOL-, y los canales, CH+/-. 4. Pulse “ / ” para seleccionar “Channel Setting” (configuración de canales) y “ / ” para abrir o cerrar la búsqueda de canales del televisor. 5. Pulse “ / ” para seleccionar “Max Volume” y “ / ” para ajustar el volumen máximo. 6. Pulse “ / ” para seleccionar “New Password” y el botón “ ” para cambiar la contraseña. 7. Pulse “ / ” para seleccionar “Reset” (reiniciar) y pulse el botón “ ” para ejecutar la función de reinicio.
25
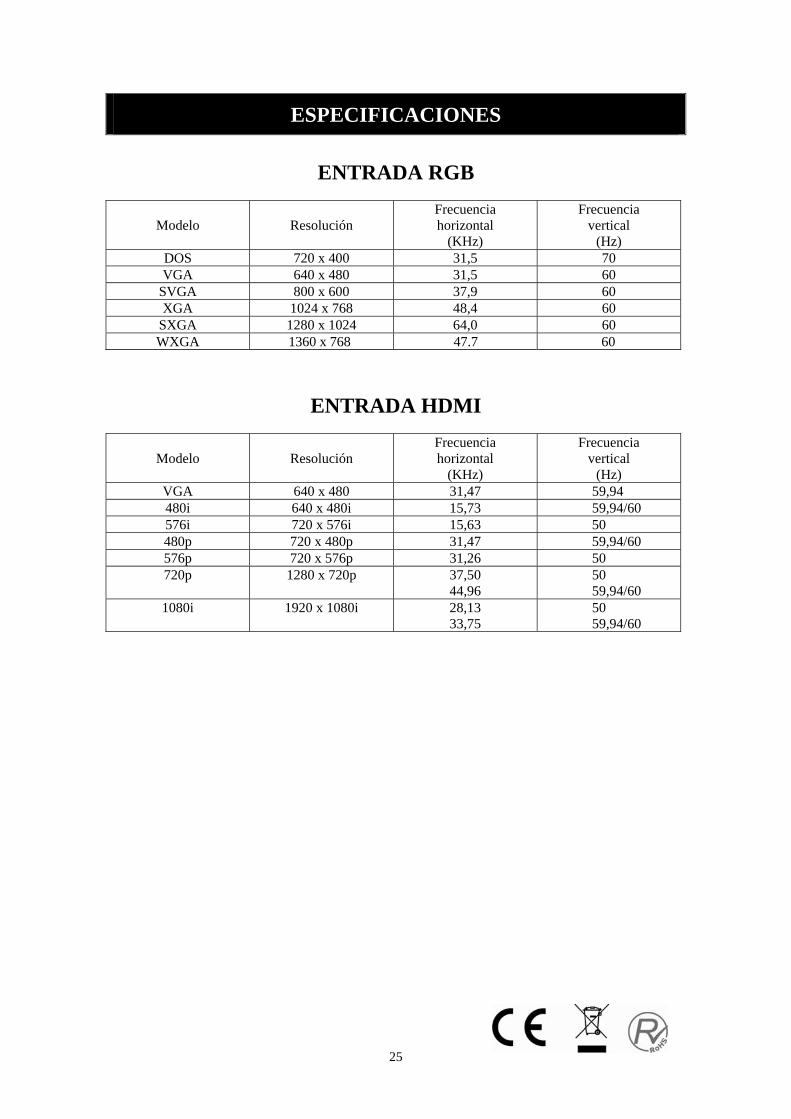
ESPECIFICACIONES
ENTRADA RGB
Modelo Resolución Frecuencia horizontal
(KHz)
Frecuencia vertical
(Hz) DOS 720 x 400 31,5 70 VGA 640 x 480 31,5 60
SVGA 800 x 600 37,9 60 XGA 1024 x 768 48,4 60
SXGA 1280 x 1024 64,0 60 WXGA 1360 x 768 47.7 60
ENTRADA HDMI
Modelo Resolución Frecuencia horizontal
(KHz)
Frecuencia vertical
(Hz) VGA 640 x 480 31,47 59,94 480i 640 x 480i 15,73 59,94/60 576i 720 x 576i 15,63 50 480p 720 x 480p 31,47 59,94/60 576p 720 x 576p 31,26 50 720p 1280 x 720p 37,50
44,96 50 59,94/60
1080i 1920 x 1080i 28,13 33,75
50 59,94/60

26
Resolución de problemas Antes de contactar con personal de servicio, compruebe la siguiente tabla por si localiza la posible causa y solución de un problema.
PROBLEMA SOLUCIÓN
El televisor no se enciende
● Asegúrese de que el cable de alimentación está bien enchufado.
● Es posible que se hayan agotado las pilas del mando a distancia; cambie las pilas.
No hay imagen ni sonido
● Compruebe el cable de conexión entre el televisor y la antena/toma de TV por cable.
● Pulse el botón de encendido del mando a distancia.
● Pulse el botón SOURCE del mando a distancia y luego pulse “▲/▼” hasta seleccionar la fuente de TV.
Imagen deficiente, sonido correcto
● Compruebe el cable de conexión entre el televisor y la antena/toma de TV por cable.
● Pruebe con otro canal, puede que esa cadena esté experimentando dificultades técnicas.
● Ajuste el brillo/contraste en el menú de Vídeo.
Ruido en la señal de audio ● Aleje del televisor los equipos que usen infrarrojos.
El panel LCD TFT está compuesto de subpíxeles que precisan de una tecnología muy sofisticada para funcionar. No obstante, puede que la pantalla presente píxeles más brillantes u oscuros que no afectan al rendimiento del producto.
27
ESPECIFICACIONES DEL DISPOSITIVO DE GRABACIÓN
A: Película:
1 Extensión de archivo: *.MPG,*.DAT Decodificador:
(1)MPEG-1/2 2. Extensión de archivo: *.VOB
Decodificador: (1)MPEG-2 MP@ML
3. Extensión de archivo: *.AVI Decodificador:
(1)ISO MPEG4 (2)Xvid
B: Formato de música:
1 MP3, WMA, WAV (por el momento, sin licencia) C: Fotografía
1)*.jpg 2)*.bmp 3)*.jif
D: Formato de dispositivo de grabac ión (sistema de archivos FAT32) 1. El sistema FAT32 admite archivos de 4 GB como máximo. Una vez llegados a los 4 GB, se
crea automáticamente un archivo nuevo y se sigu e grabando hasta que el disco duro se queda
sin espacio libre.
2. El sistema de gestión de archivos FAT32 ad mite hasta 4 particione s; el espacio máximo
depende del tamaño de la partic ión del disco duro. Por lo gene ral, Windows 2000 (y sistemas
operativos posteriores) admite particiones de no más de 32 GB y de 2 TB como máximo.
3. Al grabar, el formato de grabación usado será Mpeg2 TS, que puede reproducirse en este
aparato y en un PC.
4. La tasa de transferencia de Mpeg2 es variabl e y el máximo de la MP@ML es de 15 Mbps.
La capacidad de un DVD suele ser de 4,7 GB y puede contener alrededor de 1 hora de
grabación. El formato más usado de DVD es Mpeg-2 mp@ml.
5. Ya tiene función de grabación.
6. Sólo puede verse el mism o canal que se graba. No pueden verse otros canales al mismo tiempo.
Para dar cumplimiento a la Norma UNE EN-60065, indicamos que si el cable flexible se daña, únicamente puede ser sustituido por un taller de reparación reconocido por el fabricante NEVIR, S.A., ya que se necesitan herramientas especiales
28
Servicio posventa
En caso de problemas, como alguna avería que se produzca mientas utiliza el televisor LCD, póngase en contacto con la tienda donde compró el aparato o con el departamento de servicio.

TV LCD TDT y USB Lector de tarjetas
MANUAL DE INSTRUCCIONES
NVR-7080TTG-26
1
Contents
Introduction
Warning
Caution
Main Unit Description
Remote Control
OSD basic adjustment
DTV Features
CI (Common Interface)
Hotel function
Specifications
Trouble Shooting
2
Introduction
Thank you very much for your purchase of our product of LCD TV. It serves as
a normal color TV and PC monitor. To enjoy your set to the full from the very
beginning, read this manual carefully and keep it handy for ready reference.
INSTALLATION
① Locate the receiver in the room where direct light does not strike the screen. Total
darkness or a reflection on the picture screen can cause eyestrain. Soft and indirect
lighting is recommended for comfortable viewing.
② Allow enough space between the receiver and the wall to permit ventilation.
③ Avoid excessively warm locations to prevent possible damage to the cabinet or
premature component failure.
④ This TV receiver can be connected to AC100-240V 50/60HZ.
⑤ Do not install the receiver in a location near heat sources such as radiator, air ducts,
direct sunlight, or in a place somewhere like close compartment and close area. Do not
cover the ventilation openings when using the set.
3
Warning
This symbol is intended to alert the user to avoid the risk of electric shock, do not disassemble this equipment by anyone except a qualified service personnel.
This symbol is intended to alert the user to the presence of important operation and maintenance instructions in the literature accompanying the equipment.
CAUTION: TO AVOID THE RISK OF ELECTRIC SHOCK. DO NOT REMOVE COVER (OR BACK). NO USER- SERVICEABLE PARTS INSIDE. REFER SERVICING TO QUALIFIED SERVICE PERSONNEL.
CAUTION RISK OF ELECTRIC SHOCK
DO NOT OPEN
4
Caution
Caution
High voltages are used in the operation of this product. - Do not remove the back cabinet from your set. Refer
servicing to qualified service personnel.
Caution
To prevent fire or electrical shock hazard, Do not expose the main unit to moisture.
Caution
Do not drop or push objects into the television cabinet slots or openings. Never spill any kind of liquid on the
television receiver.
Caution
Avoid exposing the main unit to direct sunlight and other source of the heat. Do not stand the television receiver
directly on other produces which give off heat. E. g. video cassette players, Audio amplifiers. Do not block the
ventilation holes in the back cover. Ventilation is essential to prevent failure of electrical component. Do not squash
power supply cord under the main unit.
5
Caution
Caution Never stand on, lean on, push suddenly the product
or its stand. You should Pay special attention to children.
Caution Do not place the main unit on an unstable cart stand,
shelf or table. Serious injury to an individual, and damage to the television, may result if it should fall.
Caution When the product is not used for an extended period
of time, it is advisable to disconnect the AC power cord from the AC outlet.
Caution The LCD panel used in this product is made of glass.
Therefore, it can break when the product is dropped or applied with impact. Be careful not to be injured
by broken glass pieces in case the LCD panel breaks.

6
Main unit description
Control Panel Button Function
TV Terminal Connections
1. HDMI input terminal. 2. VGA input terminal of simulation signal of PC. 3. SCART input terminal. 4. S-video input terminal. 5. Video input terminal. 6. AUDIO input terminal. 7. PC AUDIO terminal. 8. HEADPHONE output terminal. 9. ATV antenna/close circuit TV network port or DTV antenna port. 10. CI input terminal. (This unit does not include neither CAM nor Smartcard. )
Power Input Configuration
AC POWER
VOL- : Volume down. VOL+ : Volume up. CH- : TV channel down. CH+ : TV channel up. MENU : Press to select the main menu. TV/AV : Select the input signal. POWER : Switch on when at standby mode or enter the standby mode.
7
Optional Configuration as below: Connect the USB/CARD storage to the USB/CARD jack on the set.
NOTE ● It is only 500 mA MAX of DC current output when you connect with USB jack and CARD socket. ● To ensure the Mobile HD works well, you should use other power supply for the Mobile HD. And do not use the USB jack and CARD socket in the same time.
8
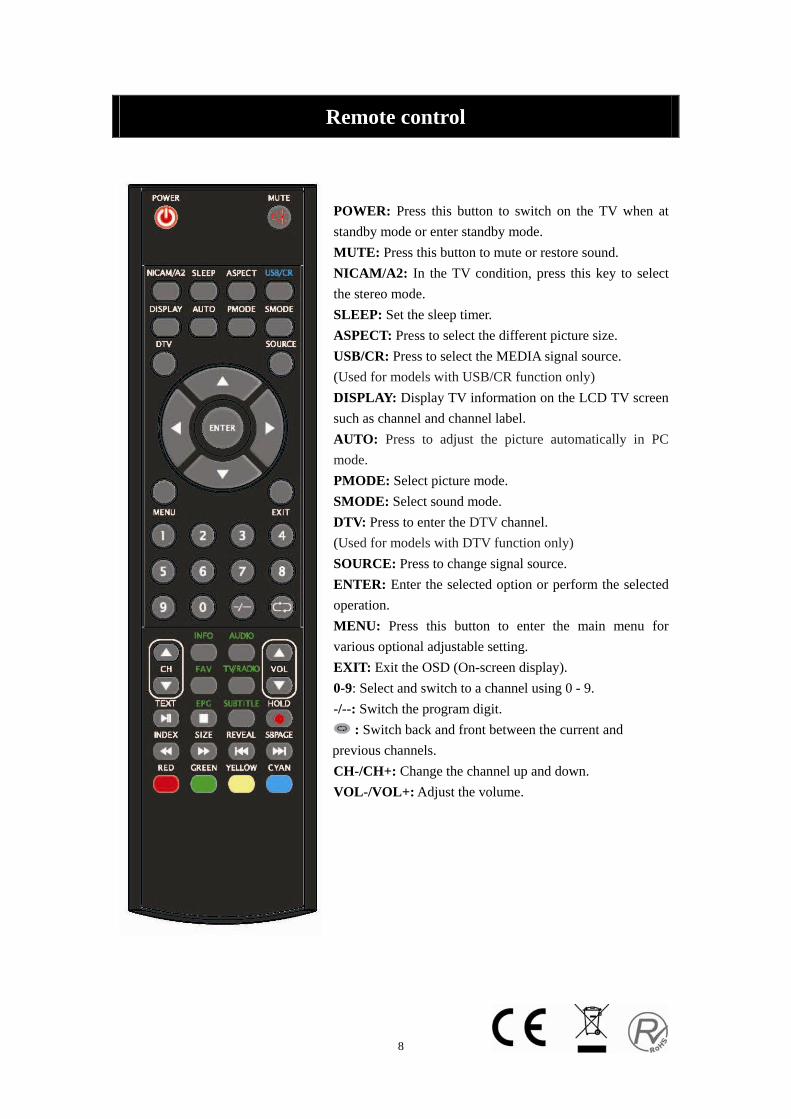
Remote control
POWER: Press this button to switch on the TV when at standby mode or enter standby mode. MUTE: Press this button to mute or restore sound. NICAM/A2: In the TV condition, press this key to select the stereo mode. SLEEP: Set the sleep timer. ASPECT: Press to select the different picture size. USB/CR: Press to select the MEDIA signal source. (Used for models with USB/CR function only) DISPLAY: Display TV information on the LCD TV screen such as channel and channel label. AUTO: Press to adjust the picture automatically in PC mode. PMODE: Select picture mode. SMODE: Select sound mode. DTV: Press to enter the DTV channel. (Used for models with DTV function only) SOURCE: Press to change signal source. ENTER: Enter the selected option or perform the selected operation. MENU: Press this button to enter the main menu for various optional adjustable setting. EXIT: Exit the OSD (On-screen display). 0-9: Select and switch to a channel using 0 - 9. -/--: Switch the program digit.
: Switch back and front between the current and previous channels. CH-/CH+: Change the channel up and down. VOL-/VOL+: Adjust the volume.
9
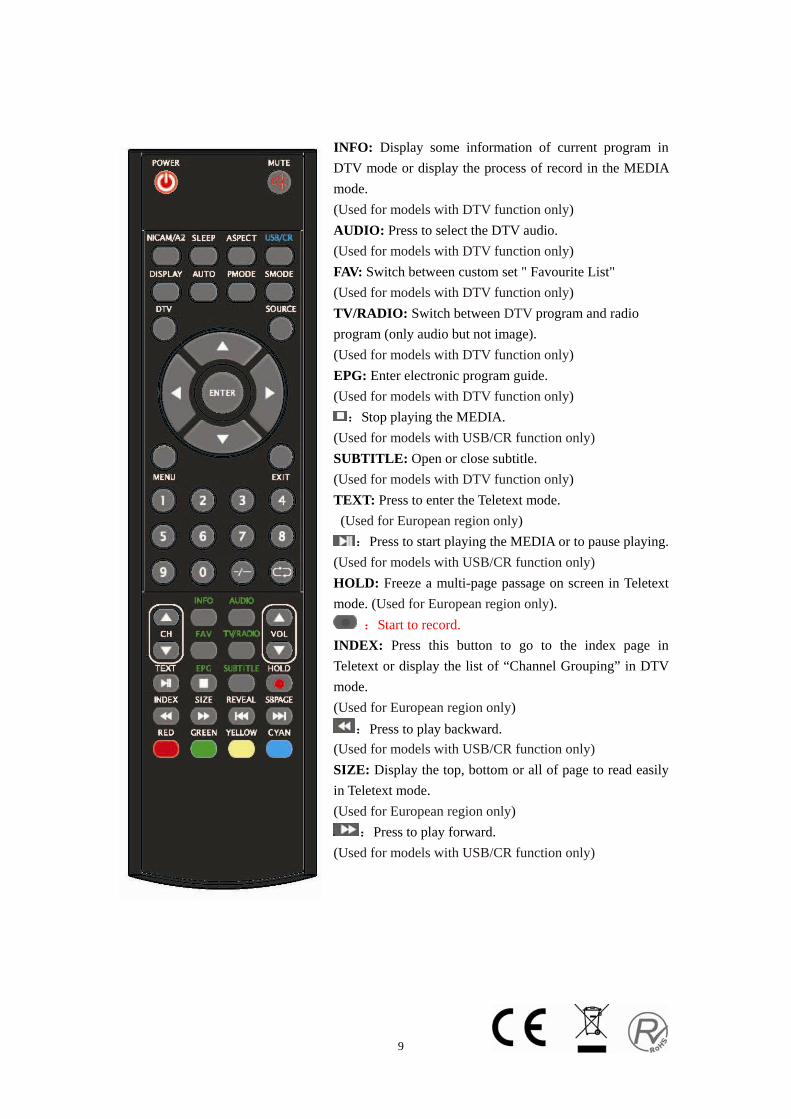
INFO: Display some information of current program in DTV mode or display the process of record in the MEDIA mode. (Used for models with DTV function only) AUDIO: Press to select the DTV audio. (Used for models with DTV function only) FAV: Switch between custom set " Favourite List" (Used for models with DTV function only) TV/RADIO: Switch between DTV program and radio program (only audio but not image). (Used for models with DTV function only) EPG: Enter electronic program guide. (Used for models with DTV function only)
:Stop playing the MEDIA. (Used for models with USB/CR function only) SUBTITLE: Open or close subtitle. (Used for models with DTV function only) TEXT: Press to enter the Teletext mode. (Used for European region only)
:Press to start playing the MEDIA or to pause playing. (Used for models with USB/CR function only) HOLD: Freeze a multi-page passage on screen in Teletext mode. (Used for European region only).
:Start to record. INDEX: Press this button to go to the index page in Teletext or display the list of “Channel Grouping” in DTV mode. (Used for European region only)
:Press to play backward. (Used for models with USB/CR function only) SIZE: Display the top, bottom or all of page to read easily in Teletext mode. (Used for European region only)
:Press to play forward. (Used for models with USB/CR function only)
10
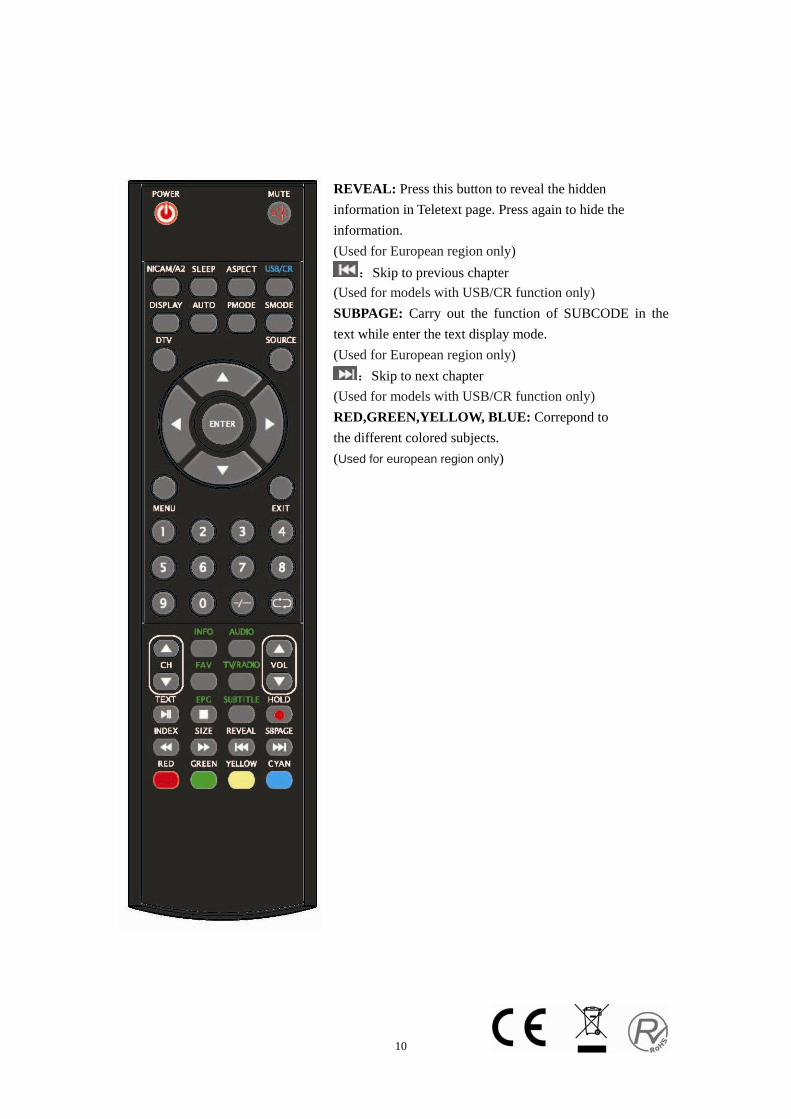
REVEAL: Press this button to reveal the hidden information in Teletext page. Press again to hide the information. (Used for European region only)
:Skip to previous chapter (Used for models with USB/CR function only) SUBPAGE: Carry out the function of SUBCODE in the text while enter the text display mode. (Used for European region only)
:Skip to next chapter (Used for models with USB/CR function only) RED,GREEN,YELLOW, BLUE: Correpond to the different colored subjects. (Used for european region only)
11
OSD basic adjustment
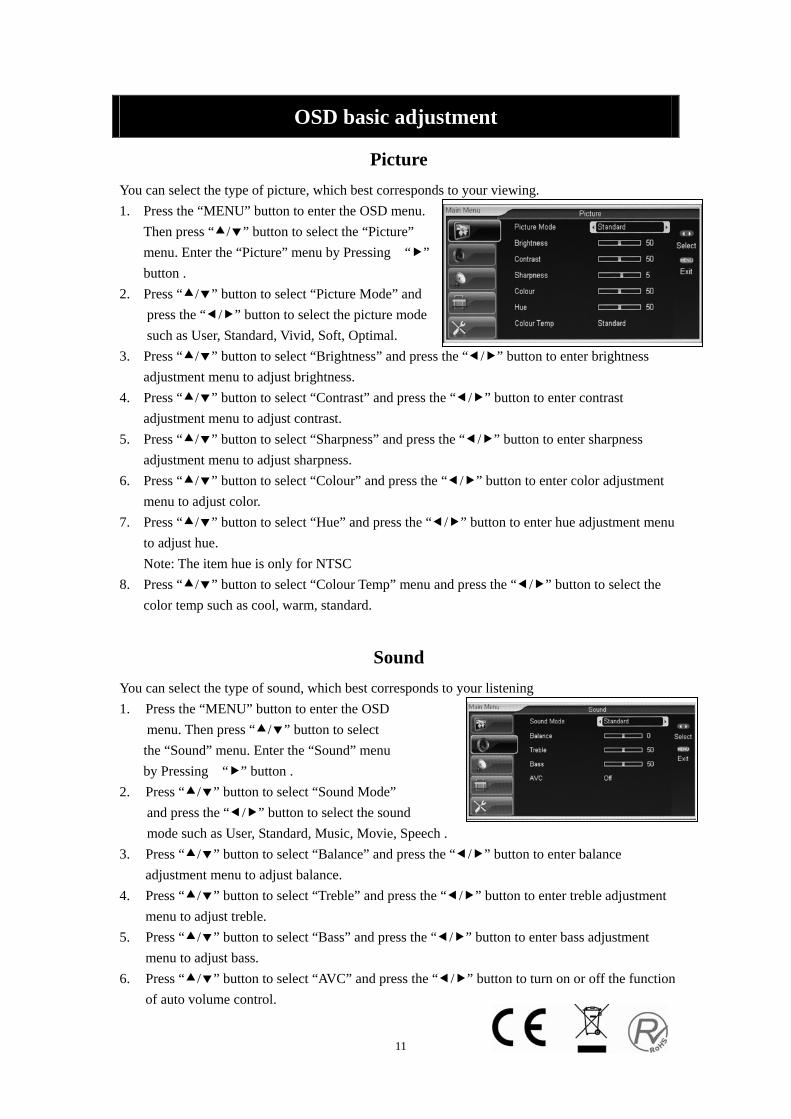
Picture You can select the type of picture, which best corresponds to your viewing. 1. Press the “MENU” button to enter the OSD menu.
Then press “ / ” button to select the “Picture” menu. Enter the “Picture” menu by Pressing “ ” button .
2. Press “ / ” button to select “Picture Mode” and press the “ / ” button to select the picture mode such as User, Standard, Vivid, Soft, Optimal.
3. Press “ / ” button to select “Brightness” and press the “ / ” button to enter brightness adjustment menu to adjust brightness.
4. Press “ / ” button to select “Contrast” and press the “ / ” button to enter contrast adjustment menu to adjust contrast.
5. Press “ / ” button to select “Sharpness” and press the “ / ” button to enter sharpness adjustment menu to adjust sharpness.
6. Press “ / ” button to select “Colour” and press the “ / ” button to enter color adjustment menu to adjust color.
7. Press “ / ” button to select “Hue” and press the “ / ” button to enter hue adjustment menu to adjust hue. Note: The item hue is only for NTSC
8. Press “ / ” button to select “Colour Temp” menu and press the “ / ” button to select the color temp such as cool, warm, standard.
Sound You can select the type of sound, which best corresponds to your listening 1. Press the “MENU” button to enter the OSD
menu. Then press “ / ” button to select the “Sound” menu. Enter the “Sound” menu by Pressing “ ” button .
2. Press “ / ” button to select “Sound Mode” and press the “ / ” button to select the sound mode such as User, Standard, Music, Movie, Speech .
3. Press “ / ” button to select “Balance” and press the “ / ” button to enter balance adjustment menu to adjust balance.
4. Press “ / ” button to select “Treble” and press the “ / ” button to enter treble adjustment menu to adjust treble.
5. Press “ / ” button to select “Bass” and press the “ / ” button to enter bass adjustment menu to adjust bass.
6. Press “ / ” button to select “AVC” and press the “ / ” button to turn on or off the function of auto volume control.
12
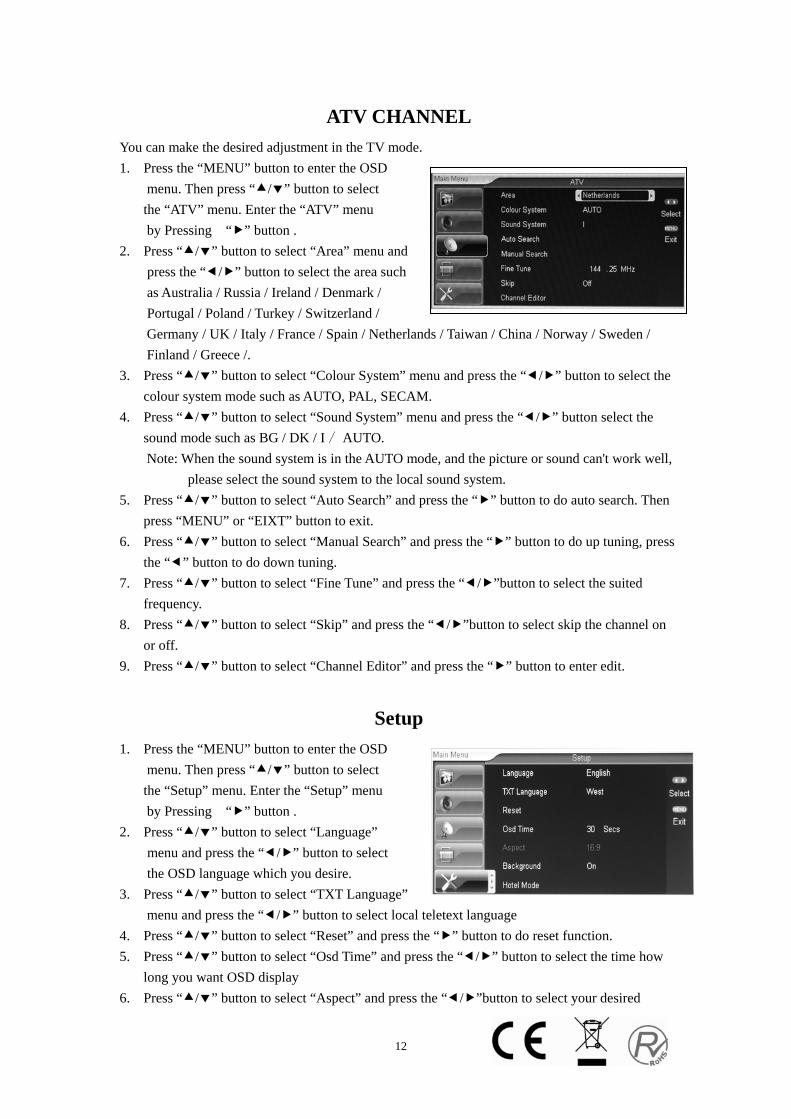
ATV CHANNEL You can make the desired adjustment in the TV mode. 1. Press the “MENU” button to enter the OSD
menu. Then press “ / ” button to select the “ATV” menu. Enter the “ATV” menu by Pressing “ ” button .
2. Press “ / ” button to select “Area” menu and press the “ / ” button to select the area such as Australia / Russia / Ireland / Denmark / Portugal / Poland / Turkey / Switzerland / Germany / UK / Italy / France / Spain / Netherlands / Taiwan / China / Norway / Sweden / Finland / Greece /.
3. Press “ / ” button to select “Colour System” menu and press the “ / ” button to select the colour system mode such as AUTO, PAL, SECAM.
4. Press “ / ” button to select “Sound System” menu and press the “ / ” button select the sound mode such as BG / DK / I / AUTO. Note: When the sound system is in the AUTO mode, and the picture or sound can't work well,
please select the sound system to the local sound system. 5. Press “ / ” button to select “Auto Search” and press the “ ” button to do auto search. Then
press “MENU” or “EIXT” button to exit. 6. Press “ / ” button to select “Manual Search” and press the “ ” button to do up tuning, press
the “ ” button to do down tuning. 7. Press “ / ” button to select “Fine Tune” and press the “ / ”button to select the suited
frequency. 8. Press “ / ” button to select “Skip” and press the “ / ”button to select skip the channel on
or off. 9. Press “ / ” button to select “Channel Editor” and press the “ ” button to enter edit.
Setup 1. Press the “MENU” button to enter the OSD
menu. Then press “ / ” button to select the “Setup” menu. Enter the “Setup” menu by Pressing “ ” button .
2. Press “ / ” button to select “Language” menu and press the “ / ” button to select the OSD language which you desire.
3. Press “ / ” button to select “TXT Language” menu and press the “ / ” button to select local teletext language
4. Press “ / ” button to select “Reset” and press the “ ” button to do reset function. 5. Press “ / ” button to select “Osd Time” and press the “ / ” button to select the time how
long you want OSD display 6. Press “ / ” button to select “Aspect” and press the “ / ”button to select your desired
13
aspect. 7. Press “ / ” button to select “Background” and press the “ / ”button to select the blue
background on or off. 8. Press “ / ” button to select “Hotel Mode” and press the “ ” button to enter. The default
password is “8888”.
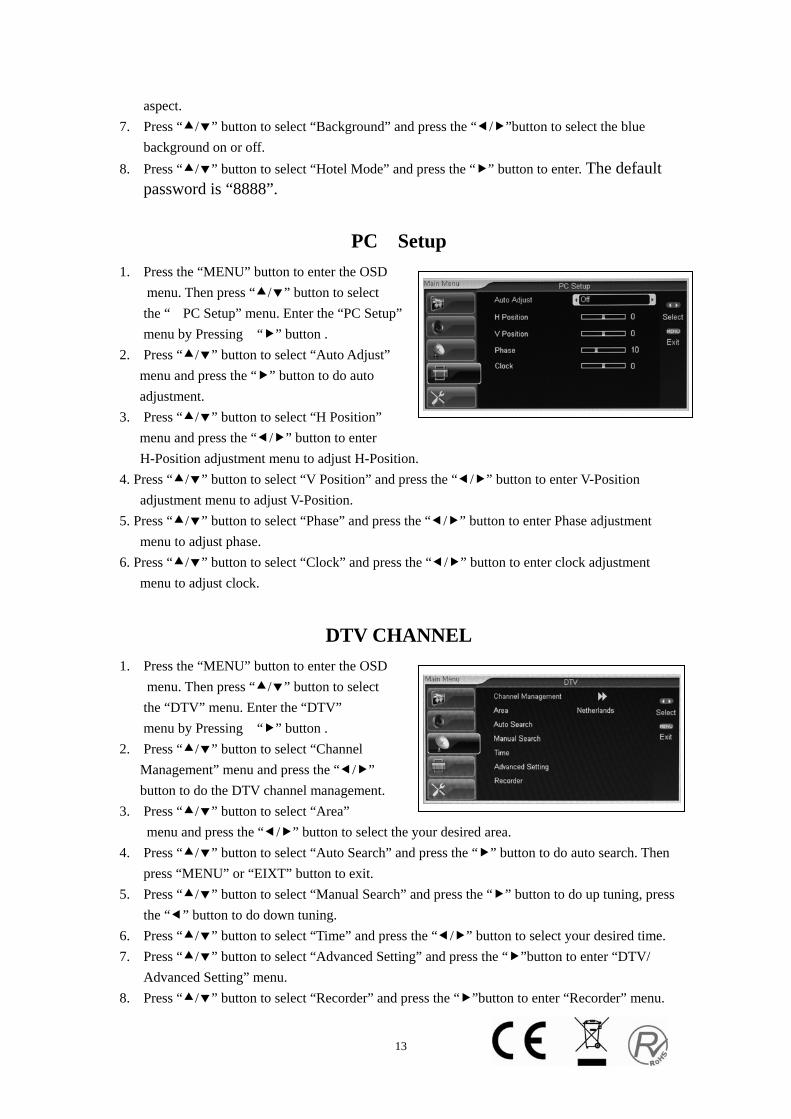
PC Setup 1. Press the “MENU” button to enter the OSD
menu. Then press “ / ” button to select the “ PC Setup” menu. Enter the “PC Setup” menu by Pressing “ ” button .
2. Press “ / ” button to select “Auto Adjust” menu and press the “ ” button to do auto adjustment.
3. Press “ / ” button to select “H Position” menu and press the “ / ” button to enter H-Position adjustment menu to adjust H-Position.
4. Press “ / ” button to select “V Position” and press the “ / ” button to enter V-Position adjustment menu to adjust V-Position.
5. Press “ / ” button to select “Phase” and press the “ / ” button to enter Phase adjustment menu to adjust phase.
6. Press “ / ” button to select “Clock” and press the “ / ” button to enter clock adjustment menu to adjust clock.
DTV CHANNEL 1. Press the “MENU” button to enter the OSD
menu. Then press “ / ” button to select the “DTV” menu. Enter the “DTV” menu by Pressing “ ” button .
2. Press “ / ” button to select “Channel Management” menu and press the “ / ” button to do the DTV channel management.
3. Press “ / ” button to select “Area” menu and press the “ / ” button to select the your desired area.
4. Press “ / ” button to select “Auto Search” and press the “ ” button to do auto search. Then press “MENU” or “EIXT” button to exit.
5. Press “ / ” button to select “Manual Search” and press the “ ” button to do up tuning, press the “ ” button to do down tuning.
6. Press “ / ” button to select “Time” and press the “ / ” button to select your desired time. 7. Press “ / ” button to select “Advanced Setting” and press the “ ”button to enter “DTV/
Advanced Setting” menu. 8. Press “ / ” button to select “Recorder” and press the “ ”button to enter “Recorder” menu.
14
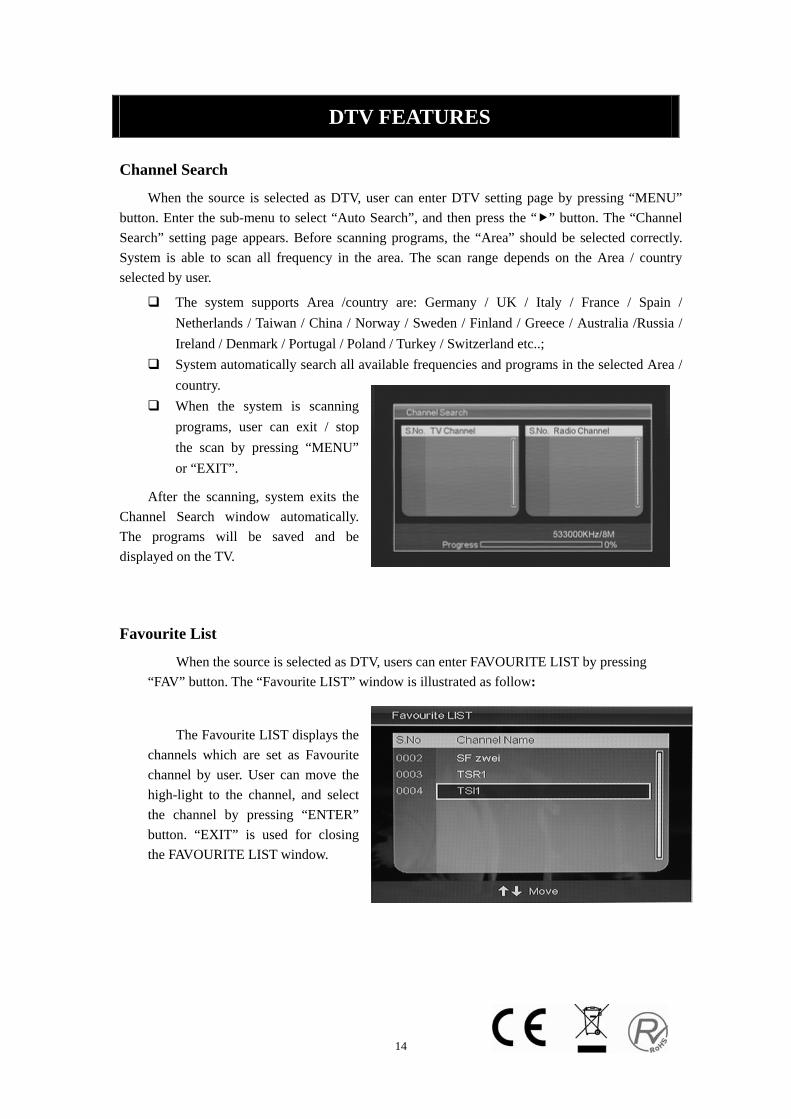
DTV FEATURES Channel Search
When the source is selected as DTV, user can enter DTV setting page by pressing “MENU” button. Enter the sub-menu to select “Auto Search”, and then press the “ ” button. The “Channel Search” setting page appears. Before scanning programs, the “Area” should be selected correctly. System is able to scan all frequency in the area. The scan range depends on the Area / country selected by user.
The system supports Area /country are: Germany / UK / Italy / France / Spain / Netherlands / Taiwan / China / Norway / Sweden / Finland / Greece / Australia /Russia / Ireland / Denmark / Portugal / Poland / Turkey / Switzerland etc..;
System automatically search all available frequencies and programs in the selected Area / country.
When the system is scanning programs, user can exit / stop the scan by pressing “MENU” or “EXIT”.
After the scanning, system exits the Channel Search window automatically. The programs will be saved and be displayed on the TV.
Favourite List
When the source is selected as DTV, users can enter FAVOURITE LIST by pressing “FAV” button. The “Favourite LIST” window is illustrated as follow:
The Favourite LIST displays the channels which are set as Favourite channel by user. User can move the high-light to the channel, and select the channel by pressing “ENTER” button. “EXIT” is used for closing the FAVOURITE LIST window.
15
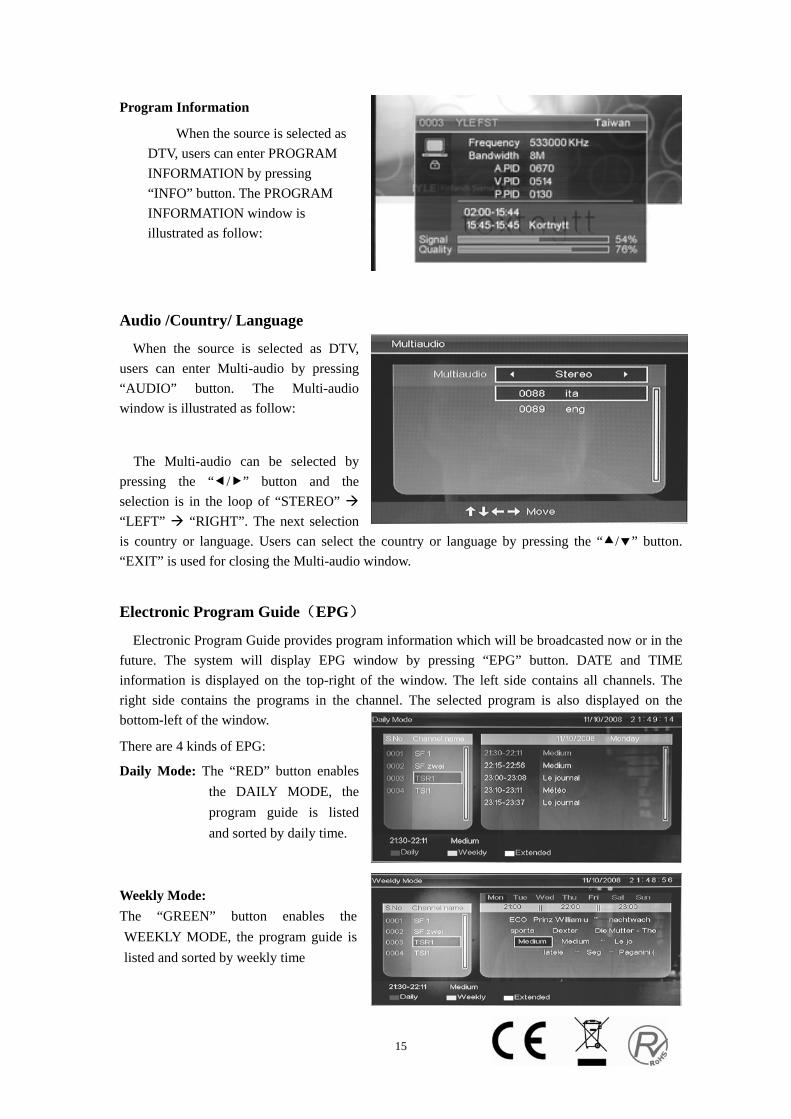
Program Information
When the source is selected as DTV, users can enter PROGRAM INFORMATION by pressing “INFO” button. The PROGRAM INFORMATION window is illustrated as follow:
Audio /Country/ Language
When the source is selected as DTV, users can enter Multi-audio by pressing “AUDIO” button. The Multi-audio window is illustrated as follow:
The Multi-audio can be selected by pressing the “ / ” button and the selection is in the loop of “STEREO” “LEFT” “RIGHT”. The next selection is country or language. Users can select the country or language by pressing the “ / ” button. “EXIT” is used for closing the Multi-audio window.
Electronic Program Guide(EPG)
Electronic Program Guide provides program information which will be broadcasted now or in the future. The system will display EPG window by pressing “EPG” button. DATE and TIME information is displayed on the top-right of the window. The left side contains all channels. The right side contains the programs in the channel. The selected program is also displayed on the bottom-left of the window.
There are 4 kinds of EPG:
Daily Mode: The “RED” button enables the DAILY MODE, the program guide is listed and sorted by daily time.
Weekly Mode: The “GREEN” button enables the WEEKLY MODE, the program guide is listed and sorted by weekly time
16
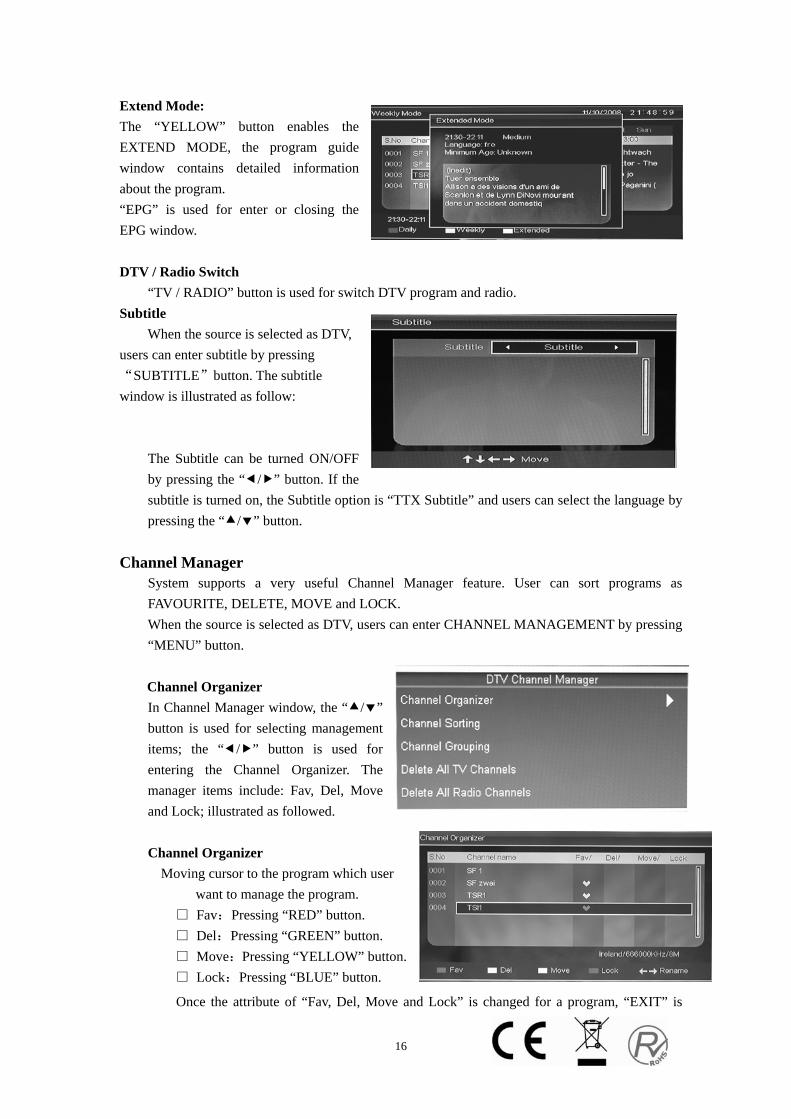
Extend Mode: The “YELLOW” button enables the EXTEND MODE, the program guide window contains detailed information about the program. “EPG” is used for enter or closing the EPG window.
DTV / Radio Switch
“TV / RADIO” button is used for switch DTV program and radio. Subtitle When the source is selected as DTV, users can enter subtitle by pressing“SUBTITLE”button. The subtitle window is illustrated as follow:
The Subtitle can be turned ON/OFF by pressing the “ / ” button. If the subtitle is turned on, the Subtitle option is “TTX Subtitle” and users can select the language by pressing the “ / ” button.
Channel Manager System supports a very useful Channel Manager feature. User can sort programs as FAVOURITE, DELETE, MOVE and LOCK. When the source is selected as DTV, users can enter CHANNEL MANAGEMENT by pressing “MENU” button.
Channel Organizer In Channel Manager window, the “ / ” button is used for selecting management items; the “ / ” button is used for entering the Channel Organizer. The manager items include: Fav, Del, Move and Lock; illustrated as followed. Channel Organizer
Moving cursor to the program which user want to manage the program.
□ Fav:Pressing “RED” button. □ Del:Pressing “GREEN” button. □ Move:Pressing “YELLOW” button. □ Lock:Pressing “BLUE” button.
Once the attribute of “Fav, Del, Move and Lock” is changed for a program, “EXIT” is

17
used for ignoring the change and exit the window, while “ENTER” is used for saving the setting. When the setting is successful, “Successfully updated…” will be displayed on the screen.
If the management attribute of the program is over-set, the priority of management will followed:
Del > Lock > Move > Fav Channel Sorting
In Channel Manager window, the “ / ” button is used for selecting management items, and the “ / ” button is used for entering the Channel Sorting.
Channel Sorting lists index number, channel name, frequency and bandwidth of the program. The top-left quarter displays the condition for sorting. Illustrated as followed:
The First Option is sorted by country / Area . The supported country / AREA are : Germany / England / Italy / France / Spain / Netherland / Taiwan / China / Norway / Sweden / Finland / Greece / Australia / Russia / Ireland / Denmark / Portugal / Turbutton / Poland / Switzerland / All Area.
The Second Option is sorted by the FREE / ENCRYPTED program. User can sort programs as “ALL”, “FTA(Free to Air)” and “Scramble”. “ALL” is default option.
The Third Option is sorted by alphabetic order A-Z, Z-A,LCN+,LCN- or All; the “ / ” button is used for choose the order and “Enter” is for save the setting.
Channel Grouping
In CHANNEL MANAGER window, the “ / ” button is used for selecting manager items; the “ / ” button is used for entering the CHANNEL GROUPING; illustrated as followed:
The left side of CHANNEL GROUPING window lists index number and program name. Besides, the FAVOURITE table and GROUP NUMBER are also listed. All programs can be grouped as:1 None; 2 News; 3 Science; 4 Sports; 5 Movie; 6 kids; 7 Music and 8 Fashion.
User can move cursor to the program and press the number button to set the group number. DTV “EXIT” is used for ignoring the change and exit the window, however “ENTER” is used for saving the setting. When the setting is successful, “Successfully updated…”will be displayed on the screen. Note: Press the “INDEX” button to display the list of “Channel Grouping”. Press the “ / ” button to select the group and press the “ / ” button to select the channel you want. Delete All TV Channels/ Delete All Radio Channels
In Channel Manager window, the “ / ” button is used for selecting management items; the “ / ” button is used for entering “Delete all TV Channels” or “Delete all Radio Channels”.

18
Delete all TV Channels: When the cursor is on “Delete all TV Channels”, user can delete all TV channels by pressing the “►” button.
Delete all Radio Channels: When the cursor is on “Delete all Radio Channels”, user can delete all radio channels by pressing the “►” button.
Time
When the SOURCE is selected as DTV, user can enter TIME setting window in DTV menu. In TIME window, the “ / ” button is allowed for selecting setting items; the “ / ” button is used for entering the setting item. The window is illustrated as followed:
Items on Time setting include: Time Mode : Auto / Manual When Time Mode is set as Manual, “Date”
and “Time” are available for setting : Date: Move the cursor to “Date” and
press the “ / ” buttons to pop-up calendar; illustrated as follow picture:.
Year : RED button is used for adjusting year and press the “ / ” button for increasing / decreasing;
Month : GREEN button is used for adjusting Month and press the “ / ” button for increasing / decreasing ;
Date : YELLOW button is used for adjusting Date. Direction buttons are used for choosing the right date on the calendar.
Time: Move the cursor to “Time” and press the “ / ” button to the digit. User can
adjust the time by number button.
When Time Mode is set as Auto, GMT Offset and Summer Time are available for adjust. GMT Offset: Move cursor to GMT Offset and press the “►” button to the offset area.
Then, the “ / ” button is used for moving cursor to the offset time area. Pressing “Enter” to confirm the selection.
Summer Time: ON / OFF.
“EXIT” is used for ignoring the change and exit the window, while “ENTER” is used for saving the setting. When the setting is successful, “Successfully updated…” will be displayed on the screen.
19
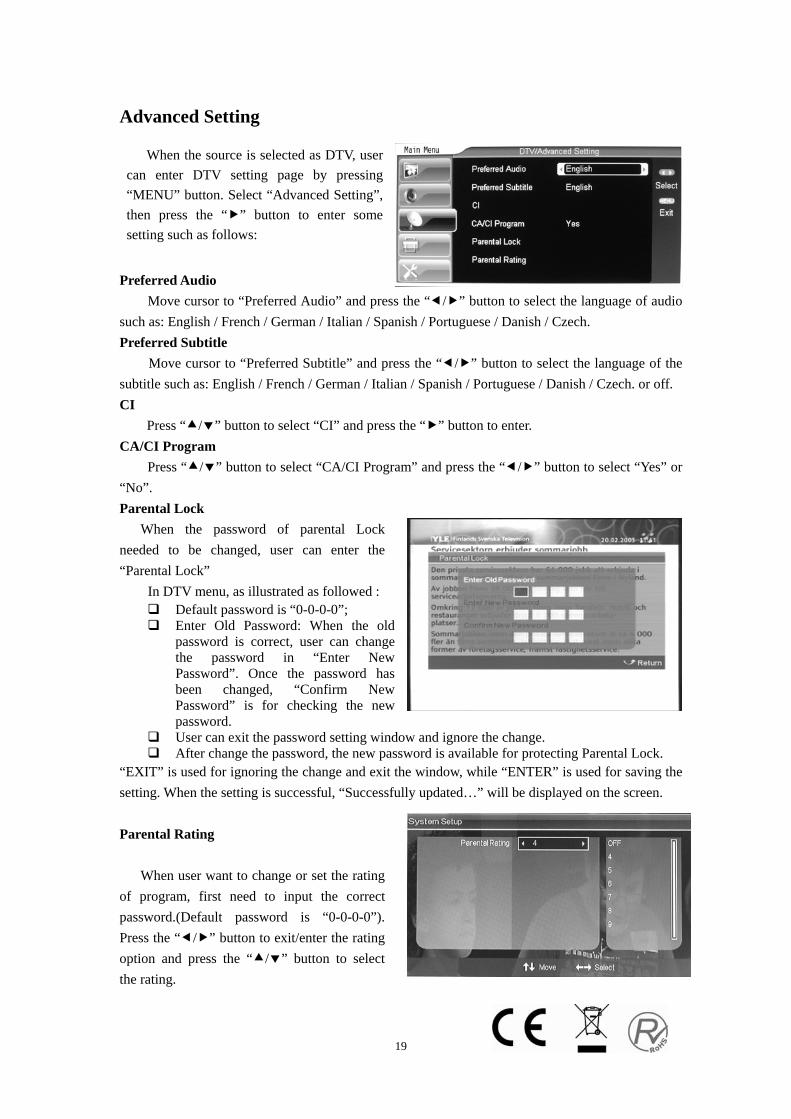
Advanced Setting
When the source is selected as DTV, user can enter DTV setting page by pressing “MENU” button. Select “Advanced Setting”, then press the “ ” button to enter some setting such as follows:
Preferred Audio Move cursor to “Preferred Audio” and press the “ / ” button to select the language of audio such as: English / French / German / Italian / Spanish / Portuguese / Danish / Czech. Preferred Subtitle
Move cursor to “Preferred Subtitle” and press the “ / ” button to select the language of the subtitle such as: English / French / German / Italian / Spanish / Portuguese / Danish / Czech. or off. CI
Press “ / ” button to select “CI” and press the “ ” button to enter. CA/CI Program
Press “ / ” button to select “CA/CI Program” and press the “ / ” button to select “Yes” or “No”. Parental Lock When the password of parental Lock needed to be changed, user can enter the “Parental Lock”
In DTV menu, as illustrated as followed : Default password is “0-0-0-0”; Enter Old Password: When the old
password is correct, user can change the password in “Enter New Password”. Once the password has been changed, “Confirm New Password” is for checking the new password.
User can exit the password setting window and ignore the change. After change the password, the new password is available for protecting Parental Lock.
“EXIT” is used for ignoring the change and exit the window, while “ENTER” is used for saving the setting. When the setting is successful, “Successfully updated…” will be displayed on the screen. Parental Rating
When user want to change or set the rating of program, first need to input the correct password.(Default password is “0-0-0-0”). Press the “ / ” button to exit/enter the rating option and press the “ / ” button to select the rating.
20
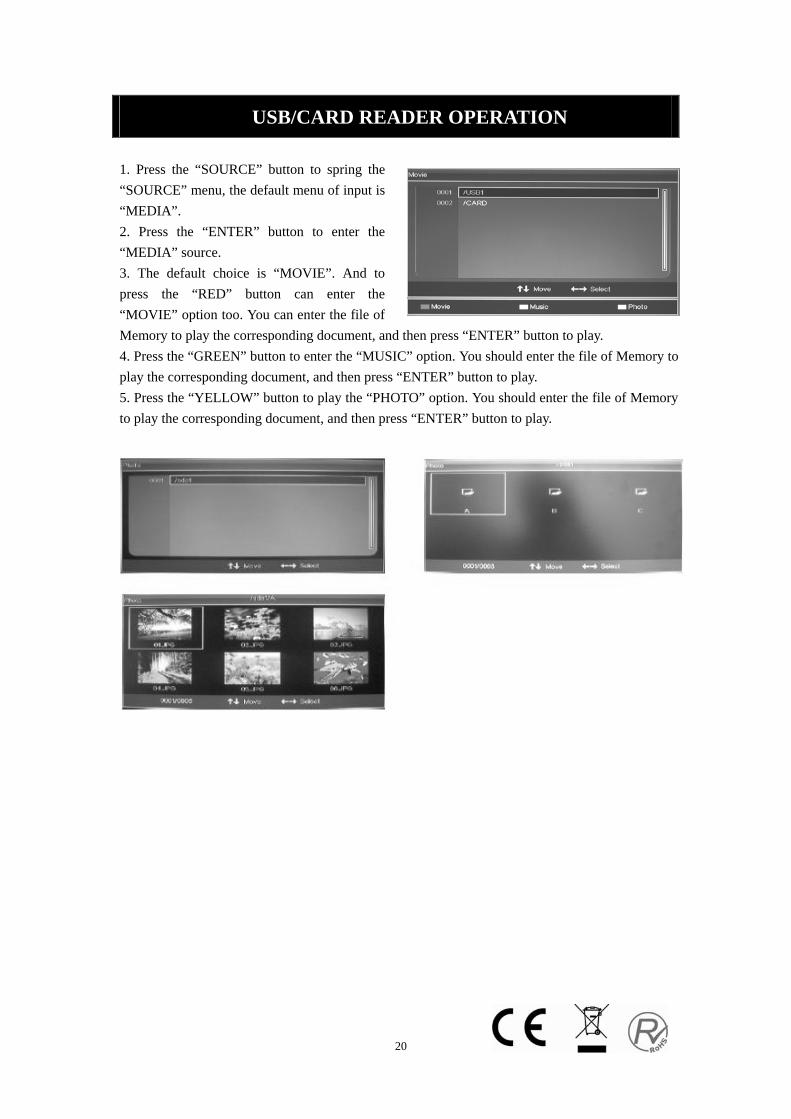
USB/CARD READER OPERATION 1. Press the “SOURCE” button to spring the “SOURCE” menu, the default menu of input is “MEDIA”. 2. Press the “ENTER” button to enter the “MEDIA” source. 3. The default choice is “MOVIE”. And to press the “RED” button can enter the “MOVIE” option too. You can enter the file of Memory to play the corresponding document, and then press “ENTER” button to play. 4. Press the “GREEN” button to enter the “MUSIC” option. You should enter the file of Memory to play the corresponding document, and then press “ENTER” button to play. 5. Press the “YELLOW” button to play the “PHOTO” option. You should enter the file of Memory to play the corresponding document, and then press “ENTER” button to play.
12
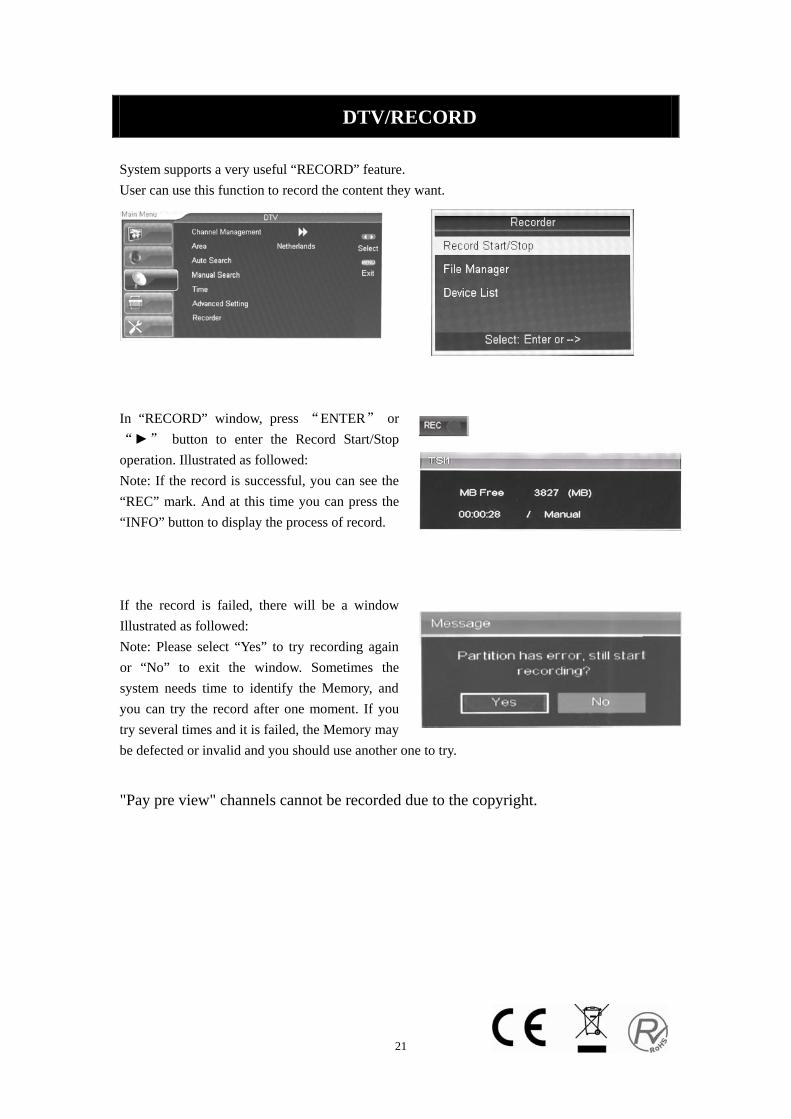
DTV/RECORD System supports a very useful “RECORD” feature. User can use this function to record the content they want.
In “RECORD” window, press “ENTER” or “►” button to enter the Record Start/Stop operation. Illustrated as followed: Note: If the record is successful, you can see the “REC” mark. And at this time you can press the “INFO” button to display the process of record. If the record is failed, there will be a window Illustrated as followed: Note: Please select “Yes” to try recording again or “No” to exit the window. Sometimes the system needs time to identify the Memory, and you can try the record after one moment. If you try several times and it is failed, the Memory may be defected or invalid and you should use another one to try.
"Pay pre view" channels cannot be recorded due to the copyright.
22
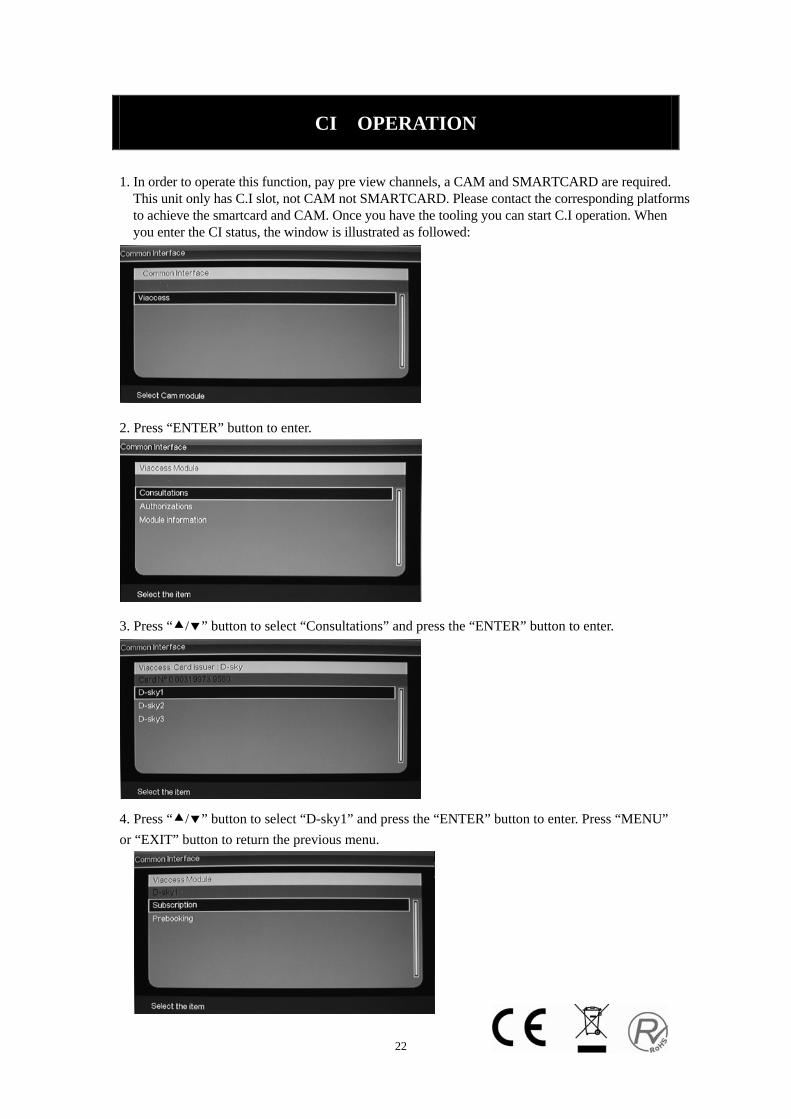
CI OPERATION
1. In order to operate this function, pay pre view channels, a CAM and SMARTCARD are required. This unit only has C.I slot, not CAM not SMARTCARD. Please contact the corresponding platforms to achieve the smartcard and CAM. Once you have the tooling you can start C.I operation. When you enter the CI status, the window is illustrated as followed:
2. Press “ENTER” button to enter.
3. Press “ / ” button to select “Consultations” and press the “ENTER” button to enter.
4. Press “ / ” button to select “D-sky1” and press the “ENTER” button to enter. Press “MENU” or “EXIT” button to return the previous menu.

23
5. Press “ / ” button to select “Subscription” and press the “ENTER” button to display the information. Press “MENU” or “EXIT” button to return the previous menu.
6. Press “ / ” button to select “Authorizations” and press the “ENTER” button to enter. Press your pincode to enter.
7. Press “ / ” button to select “Module information” and press the “ENTER” button to display the information.
24
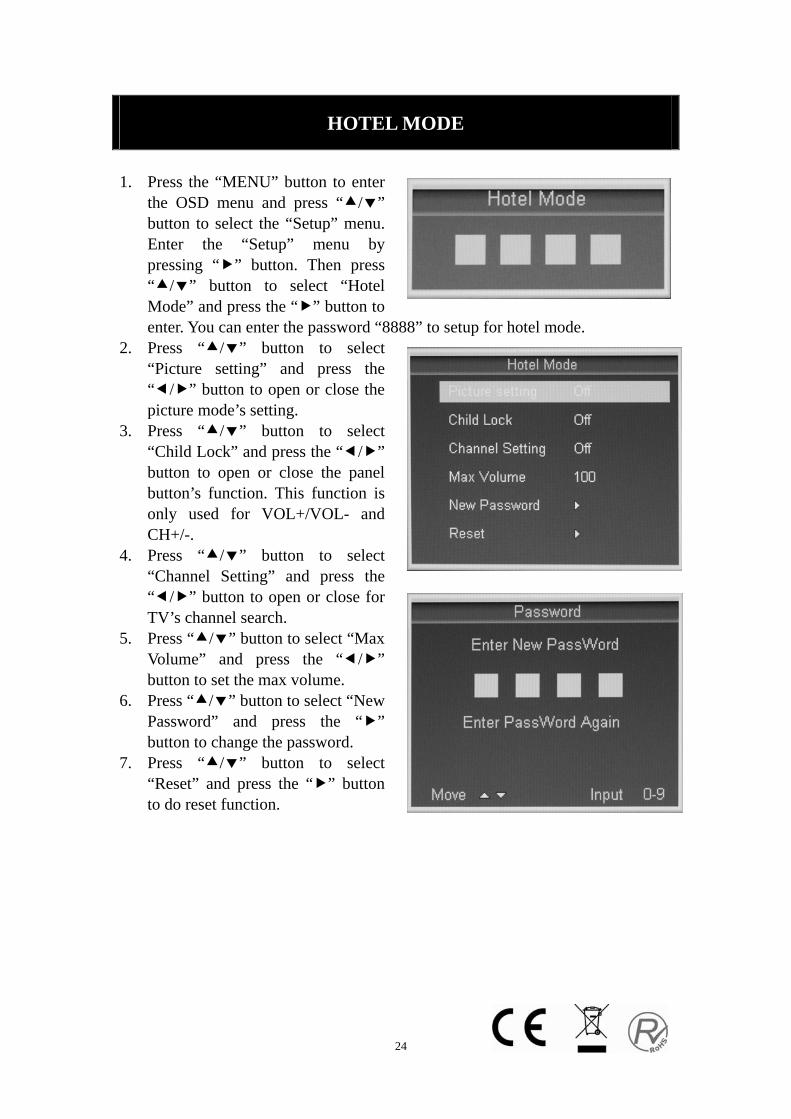
HOTEL MODE
1. Press the “MENU” button to enter
the OSD menu and press “ / ” button to select the “Setup” menu. Enter the “Setup” menu by pressing “ ” button. Then press “ / ” button to select “Hotel Mode” and press the “ ” button to enter. You can enter the password “8888” to setup for hotel mode.
2. Press “ / ” button to select “Picture setting” and press the “ / ” button to open or close the picture mode’s setting.
3. Press “ / ” button to select “Child Lock” and press the “ / ” button to open or close the panel button’s function. This function is only used for VOL+/VOL- and CH+/-.
4. Press “ / ” button to select “Channel Setting” and press the “ / ” button to open or close for TV’s channel search.
5. Press “ / ” button to select “Max Volume” and press the “ / ” button to set the max volume.
6. Press “ / ” button to select “New Password” and press the “ ” button to change the password.
7. Press “ / ” button to select “Reset” and press the “ ” button to do reset function.
25
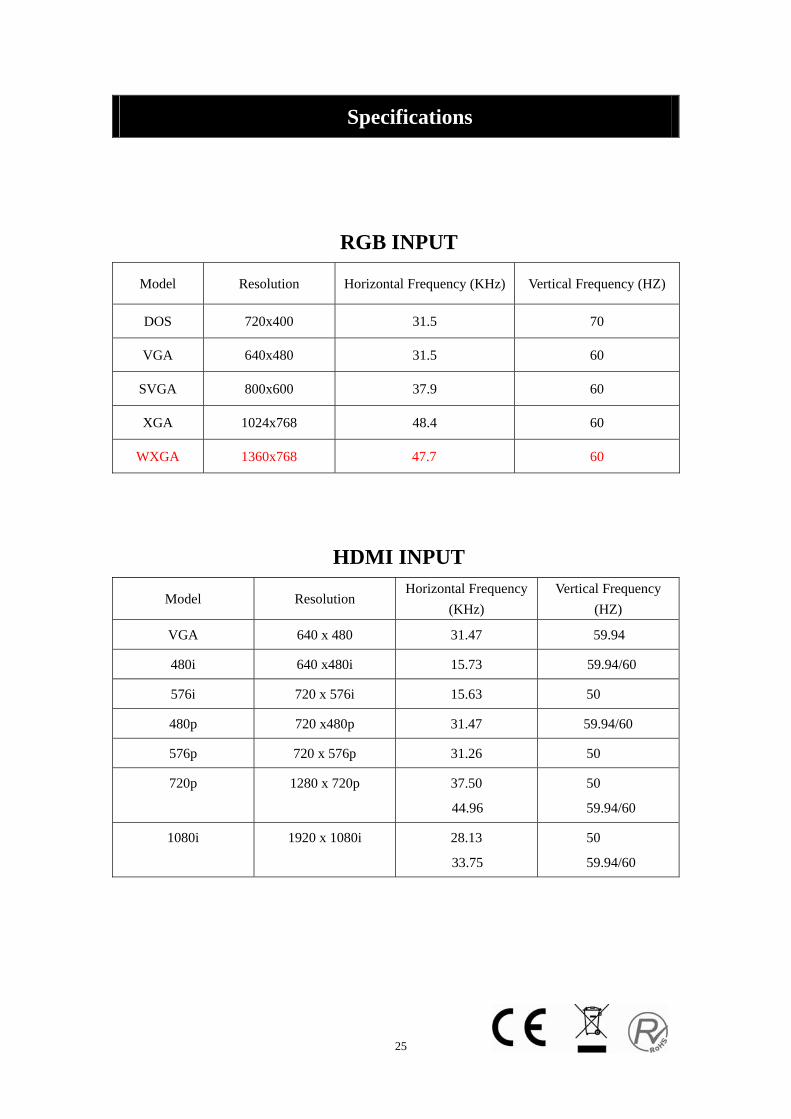
Specifications
RGB INPUT
Model Resolution Horizontal Frequency (KHz) Vertical Frequency (HZ)
DOS 720x400 31.5 70
VGA 640x480 31.5 60
SVGA 800x600 37.9 60
XGA 1024x768 48.4 60
WXGA 1360x768 47.7 60
HDMI INPUT
Model Resolution Horizontal Frequency
(KHz) Vertical Frequency
(HZ)
VGA 640 x 480 31.47 59.94
480i 640 x480i 15.73 59.94/60
576i 720 x 576i 15.63 50
480p 720 x480p 31.47 59.94/60
576p 720 x 576p 31.26 50
720p 1280 x 720p 37.50
44.96
50
59.94/60
1080i 1920 x 1080i 28.13
33.75
50
59.94/60
62
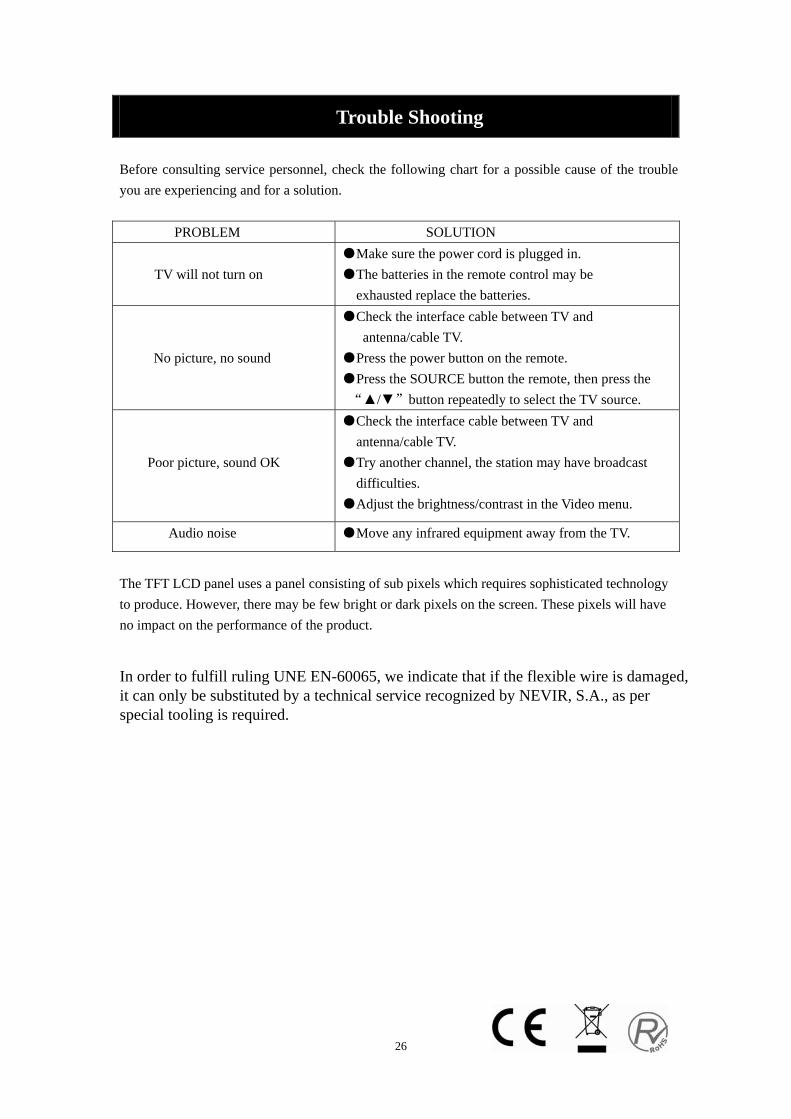
Trouble Shooting Before consulting service personnel, check the following chart for a possible cause of the trouble you are experiencing and for a solution.
PROBLEM SOLUTION TV will not turn on
●Make sure the power cord is plugged in. ●The batteries in the remote control may be
exhausted replace the batteries.
No picture, no sound
●Check the interface cable between TV and antenna/cable TV.
●Press the power button on the remote. ●Press the SOURCE button the remote, then press the “▲/▼”button repeatedly to select the TV source.
Poor picture, sound OK
●Check the interface cable between TV and antenna/cable TV.
●Try another channel, the station may have broadcast difficulties.
●Adjust the brightness/contrast in the Video menu.
Audio noise ●Move any infrared equipment away from the TV.
The TFT LCD panel uses a panel consisting of sub pixels which requires sophisticated technology to produce. However, there may be few bright or dark pixels on the screen. These pixels will have no impact on the performance of the product.
In order to fulfill ruling UNE EN-60065, we indicate that if the flexible wire is damaged, it can only be substituted by a technical service recognized by NEVIR, S.A., as per special tooling is required.
28
After-sale Service
In case any problem mostly like a fault occurs while your using LCD TV ,please contact the store where you purchased this unit or the service agency.
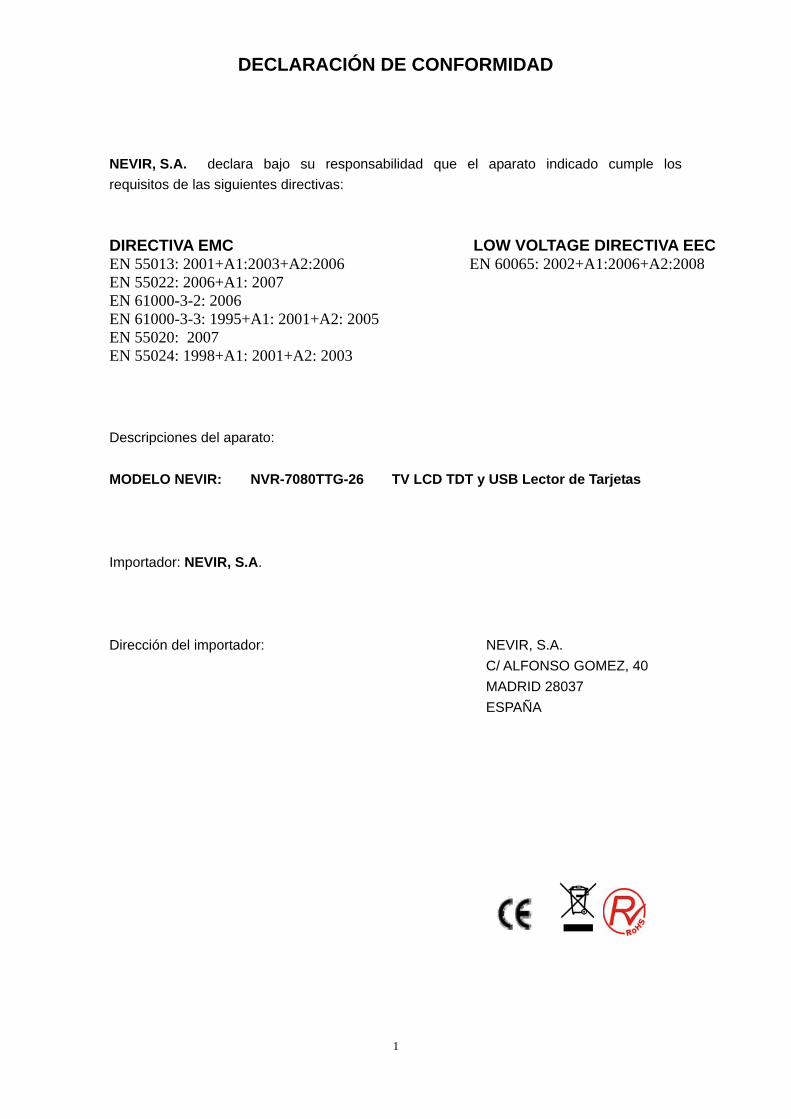
DECLARACIÓN DE CONFORMIDAD
NEVIR, S.A. declara bajo su responsabilidad que el aparato indicado cumple los requisitos de las siguientes directivas: DIRECTIVA EMC LOW VOLTAGE DIRECTIVA EEC EN 55013: 2001+A1:2003+A2:2006 EN 60065: 2002+A1:2006+A2:2008 EN 55022: 2006+A1: 2007 EN 61000-3-2: 2006 EN 61000-3-3: 1995+A1: 2001+A2: 2005 EN 55020: 2007 EN 55024: 1998+A1: 2001+A2: 2003
Descripciones del aparato: MODELO NEVIR: NVR-7080TTG-26 TV LCD TDT y USB Lector de Tarjetas Importador: NEVIR, S.A. Dirección del importador: NEVIR, S.A.
C/ ALFONSO GOMEZ, 40 MADRID 28037 ESPAÑA
1