UUsseerr MMaannuuaall - Foscam · sizes and conserving valuable network bandwidth. With flexible...
56
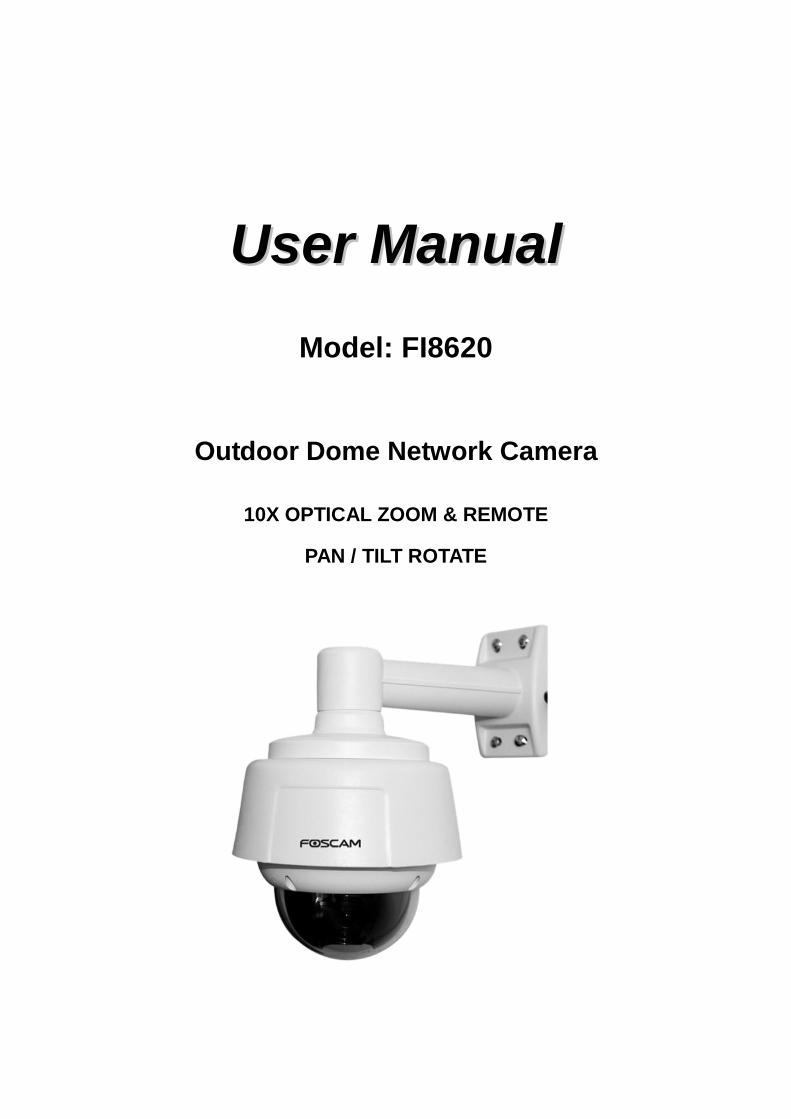
U U s s e e r r M M a a n n u u a a l l Model: FI8620 Outdoor Dome Network Camera 10X OPTICAL ZOOM & REMOTE PAN / TILT ROTATE
Transcript of UUsseerr MMaannuuaall - Foscam · sizes and conserving valuable network bandwidth. With flexible...
UUsseerr MMaannuuaall
Model FI8620
Outdoor Dome Network Camera
10X OPTICAL ZOOM amp REMOTE
PAN TILT ROTATE
1
ww
wwwwwwffoossccaammccoomm
SShheennzzhheenn FFoossccaamm IInntteelllliiggeenntt TTeecchhnnoollooggyy CCoo LLiimmiitteedd
TTeell 8866 775555 22667744 55666688 FFaaxx 8866 775555 22667744 55116688 1
Table of Contents
1 Overviews 2
11 Key Features 3
12 Read Before Use 3
13 Packing Contents 3
14 Physical Description 4
2 Surveillance Software GUI 6
21 Login Window 6
22 Surveillance Window 9
3 Advanced Camera Settings 16
31 Device Information 16
32 Date amp Time Settings 17
33 User Settings 19
34 Basic Network Settings 20
35 Remote Access 25
36 Email Settings 31
37 FTP Settings 32
38 Auto Capture 33
39 Terminal 34
310 Motion Detection 34
311 Alarm 39
312 Schedule 40
313 Video 41
314 Image Settings 43
315 Initialize 44
316 Back 44
4 Other Settings 45
Use Mobile to login 45
5 APPENDIX 46
51 Frequently Asked Questions 46
52 Default Parameters 53
2
ww
wwwwwwffoossccaammccoomm
SShheennzzhheenn FFoossccaamm IInntteelllliiggeenntt TTeecchhnnoollooggyy CCoo LLiimmiitteedd
TTeell 8866 775555 22667744 55666688 FFaaxx 8866 775555 22667744 55116688 2
53 Specifications 54
6 OBTAINING TECHNICAL SUPPORT 55
11 OOvveerrvviieewwss
IPCAM is an integrated wired IP Camera solution It combines a high quality digital video camera
with network connectivity and a powerful web server on your desktop from anywhere on your
local network or over the internet
FI8620 supports the industry-standard H264 compression technology drastically reducing file
sizes and conserving valuable network bandwidth With flexible 360-degree pan90-degree tilt
and 10X optical zoom IPCAM gives users more comprehensive control over a monitored site
The IPCAM is based on the TCPIP standard There is a WEB server inside which could support
Internet Explore Therefore the management and maintenance of your device is simplified by
using the network to achieve the remote configuration start-up and to upgrade the firmware
The camera is designed for outdoor surveillance applications such as supermarket bank and
school Controlling the IPCAM and managing images are simplified by using the provided web
interface across the network connectivity
3
ww
wwwwwwffoossccaammccoomm
SShheennzzhheenn FFoossccaamm IInntteelllliiggeenntt TTeecchhnnoollooggyy CCoo LLiimmiitteedd
TTeell 8866 775555 22667744 55666688 FFaaxx 8866 775555 22667744 55116688 3
1111 KKeeyy FFeeaattuurreess
Standard H264 video compression algorithm to satisfy the transmission of high definition
video in narrow bandwidth network
Network self-adapting function adjust stream and encoding frame rate automatically
according to network bandwidth
Supports IEFirefoxGoogleSafari browser or any other standard browsers
Supports 10X optical zoom
Pan 360 degree tilt 90 degree
Supports mobile watch
Supports dual-stream
Supports RTSP port
Embedded FOSCAM DDNS(dynamic domain name service) Service
Supports remote viewing amp record from anywhere anytime
Supporting Third Party Domain name
Multi-level users management with password protection
Embedded Web Server for users to visit by IE
Motion detection alert via email or upload image to FTP
Supports multiple network protocols HTTP TCP IP UDP FTP DHCP DDNS UPNP
RTSP
Providing CMS software to manage or monitor multiple cameras
1122 RReeaadd BBeeffoorree UUssee
Please first verify that all contents received are complete according to the Package Contents
listed below Before the Network Camera is installed please carefully read and follow the
instructions in the Quick Installation Guide to avoid damage due to faulty assembly and
installation This also ensures the product is used properly as intended
1133 PPaacckkiinngg CCoonntteennttss
IPCAMtimes1 CDtimes1
DC Power Supplytimes1 Quick Installation Guidetimes1
Mounting brackettimes1(option)
Warranty Cardtimes1
Network Cabletimes1
4
ww
wwwwwwffoossccaammccoomm
SShheennzzhheenn FFoossccaamm IInntteelllliiggeenntt TTeecchhnnoollooggyy CCoo LLiimmiitteedd
TTeell 8866 775555 22667744 55666688 FFaaxx 8866 775555 22667744 55116688 4
1144 PPhhyyssiiccaall DDeessccrriippttiioonn
Front Panel
Figure 11
The camera lens has variable optical zoom The biggest optical zoom time is 10 times With this
function you can see farther and clearer
Interface
Figure 12
1) Power Interface Connect the external power adapter request for 12V2A power
2) Reset button Press and hold on the reset button for 10 seconds Releasing the reset
button the password will back to the factory default administrator password The default
administrator username and password are all admin You must power on the camera before
reset
3) LAN 10100M adaptive Ethernet interface Through this interface IPCAM can be connected
with various network devices such as hub router etc
5
ww
wwwwwwffoossccaammccoomm
SShheennzzhheenn FFoossccaamm IInntteelllliiggeenntt TTeecchhnnoollooggyy CCoo LLiimmiitteedd
TTeell 8866 775555 22667744 55666688 FFaaxx 8866 775555 22667744 55116688 5
Bottom View
There are up to two labels located on the body of the camera this is an important feature of
original Foscam cameras If your camera does not have labels as shown in Figure 13 it may be
a clone one Cloned Foscam cameras can not use original firmware and are not eligible for
warranty or technical services
Figure 13
SN of FOSCAM
MAC address of wired
connection
FOSCAM DDNS Service
6
ww
wwwwwwffoossccaammccoomm
SShheennzzhheenn FFoossccaamm IInntteelllliiggeenntt TTeecchhnnoollooggyy CCoo LLiimmiitteedd
TTeell 8866 775555 22667744 55666688 FFaaxx 8866 775555 22667744 55116688 6
22 SSuurrvveeiillllaannccee SSooffttwwaarree GGUUII
Please refer to the Quick Installation Guide if you install the camera at first time After finishing
quick installation you can take time to learn the operation of the software
2211 LLooggiinn WWiinnddooww
Figure 21
Please check the login window above it was divided to 5 sections from no 1 to 5
Section1 Select Language
FOSCAM camera supports up to multi-languages such as English Spanish Deutsch and so on
You can select the language you need via click on the select language bar to switch
Section2 Video View Login Button
For PC please select the login button under Video View
Section3 Mobile View Login Button
If you are using the Mobile to access the camera here you need to select Mobile View login
button
1
2
3
4
5
7
ww
wwwwwwffoossccaammccoomm
SShheennzzhheenn FFoossccaamm IInntteelllliiggeenntt TTeecchhnnoollooggyy CCoo LLiimmiitteedd
TTeell 8866 775555 22667744 55666688 FFaaxx 8866 775555 22667744 55116688 7
Section4 Download ActiveX
For IE users the ActiveX have been embedded in the IP Camera Tool so if you have installed
the IP Camera Tool you need not download again If you use Firefox Google Chrome Safari or
others you should download and install QuickTime Player as the ActiveX from other website
For remote IE users first time you use the IPCAM you may need download and install the
ActiveX (Please read chapter 51 in Appendix about how to download and install the ActiveX)
Section5 Attention
For better viewing here we suggest using 1024768 screen resolution
Click the PC login button under Video View you will see the video window
For Internet Explorer
Figure 22
8
ww
wwwwwwffoossccaammccoomm
SShheennzzhheenn FFoossccaamm IInntteelllliiggeenntt TTeecchhnnoollooggyy CCoo LLiimmiitteedd
TTeell 8866 775555 22667744 55666688 FFaaxx 8866 775555 22667744 55116688 8
If you could not view living video after running the ActiveX only a red cross in the center
of the video or just a black screen Please change another port number to try
Make sure all firewall or antivirus software on your computer does not block the active download
and installation If you are unable to run the ActiveX control try shutting down the firewall or
antivirus program
For Firefox Google Chrome and Safari
Install the Quick Time Player and fill in user name and password then login you will see the
living video
Figure 23
9
ww
wwwwwwffoossccaammccoomm
SShheennzzhheenn FFoossccaamm IInntteelllliiggeenntt TTeecchhnnoollooggyy CCoo LLiimmiitteedd
TTeell 8866 775555 22667744 55666688 FFaaxx 8866 775555 22667744 55116688 9
22 Surveillance Window
Select the PC login mode and you will enter the surveillance window
Figure 24
For Visitor For Operator For Administrator
Camera supports three-level users management admin user and guest
The default ldquoadminrdquo username and password are all ldquoadminrdquo the default ldquouserrdquo username and
password are all ldquouserrdquo and the default ldquoguestrdquo username and password are all ldquoguestrdquo For first
using please go to For Administrator-gt User Settings panel to change the password and
against illegal access
Different users have different permissions Admin user has the highest authority He can do any settings User account can do settings below For Visitor and For Operator Guest account can do settings below For Visitor
1
2
3
5
6
7
4
10
ww
wwwwwwffoossccaammccoomm
SShheennzzhheenn FFoossccaamm IInntteelllliiggeenntt TTeecchhnnoollooggyy CCoo LLiimmiitteedd
TTeell 8866 775555 22667744 55666688 FFaaxx 8866 775555 22667744 55116688 10
Section1 View
The resolution contains D1(720576) CIF(352288) QCIF(176144) and Auto You can choose First Stream or Second Stream to adjust the view window
Note When the network bandwidth is bad yoursquod better select Second Stream and the video will
be more fluency
Section2 CaptureRecordPlaybackSet Path Buttons
Capture Click this icon the current living picture will be stored to a predetermined path
The default storage path is D disk You can click this button to change the storage path
Record Click the icon The camera will begin recording and store the recorded file to the
folder you set And the status column will display REC when recording Click again it will stop
recording The default storage path is D disk You can click this button to change the
storage path
Figure 25
11
ww
wwwwwwffoossccaammccoomm
SShheennzzhheenn FFoossccaamm IInntteelllliiggeenntt TTeecchhnnoollooggyy CCoo LLiimmiitteedd
TTeell 8866 775555 22667744 55666688 FFaaxx 8866 775555 22667744 55116688 11
Playback Click the button it will pop up a player And you can see the videos you have
stored in your computer
Figure 26
Set Path Set the storage path of photos and videos The default storage path is D disk
Note These buttons are controlled by the ActiveX controller therefore Firefox Google Chrome
and Safari cannot allow to these functions
Section3 PanTilt ZoomFocus Control
1------Up control button 2------Down control button
3------Left control button 4------Right control button
1
2
3 4
12
ww
wwwwwwffoossccaammccoomm
SShheennzzhheenn FFoossccaamm IInntteelllliiggeenntt TTeecchhnnoollooggyy CCoo LLiimmiitteedd
TTeell 8866 775555 22667744 55666688 FFaaxx 8866 775555 22667744 55116688 12
Zoom inout The lens has 10x optical zoom The biggest optical zoom time is 10 times
Focus +- This function can help you see more clearly
Section4 Preset Go PTZ Speed
1) Preset----------Support 8 preset position which is considered enough for DIY home amp small
business surveillance market
2) Set----------- Click Set to save the position you need the camera to remember
3) Go----------- Click Go to make the camera move the preset position
4) Number button from 1 to 8--------You can click the number button with preset position and the
camera will go to the preset position
5) PTZ Speed-------- The default PTZ speed is 45 you can change another one between 1 and
63 The larger the number the faster the speed will be
How to do preset position
We can start preset settings from position 1
Firstly select no 1 within the menu of Preset on the panel
Secondly move the camera and stop at a place where you want make preset position
Thirdly click set button to save it as position 1 and you have done preset of position 1
After that you can select no 2 within the menu of Preset on the panel and move the camera and
stop at another place and set as preset position 2 You can do all the 8 preset positions with this
method
If you want to see the preset position you have set such as the position 1 only select the set
no1 and click go button the camera will go to position no1
13
ww
wwwwwwffoossccaammccoomm
SShheennzzhheenn FFoossccaamm IInntteelllliiggeenntt TTeecchhnnoollooggyy CCoo LLiimmiitteedd
TTeell 8866 775555 22667744 55666688 FFaaxx 8866 775555 22667744 55116688 13
Section5 For Administrator
Path to Administrator Control Panel Click it and it will lead to Administrator Control Panel
Section6 OSD
If you have added time and camera name in the video you can see it in the surveillance window
Go to For Administrator ---Video panel and you can add camera name and time on the live
window Here you can change another device name The default device name is IP Camera
Go to For Administrator ---DateampTime settings panel and adjust the device time
Section7 Status bar
Figure 27
There is a status column below the view window (Figure27) 1) The current state of IPCAM
2) After the view has been digital amplified click the icon the view will be digital narrowed 3) Click the icon the view window will be digital amplified
4) Click the icon the view window will restore the original size
NOTE Firefox Google Chrome and Safari have not these functions because the ActiveX does
not support it
14
ww
wwwwwwffoossccaammccoomm
SShheennzzhheenn FFoossccaamm IInntteelllliiggeenntt TTeecchhnnoollooggyy CCoo LLiimmiitteedd
TTeell 8866 775555 22667744 55666688 FFaaxx 8866 775555 22667744 55116688 14
Onscreen Mouse Control
Put the mouse on the screen and you can see a arrow Press the mouse and the camerarsquos len
will move to the corresponding direction
For example put the mouse on the upper-right corner of the screen and you can see a arrow
press the mouse then the cameras lens will move toward the upper-right direction
When the icon has three arrows the speed of the rotation is fastest And when the icon has one
arrow the speed is lowest
Figure 28
Put the mouse at the center of the living video you will see the icon of the magnifying glass
(Figure 29) Press the left mouse and you can use the optical zoom
Figure 29
15
ww
wwwwwwffoossccaammccoomm
SShheennzzhheenn FFoossccaamm IInntteelllliiggeenntt TTeecchhnnoollooggyy CCoo LLiimmiitteedd
TTeell 8866 775555 22667744 55666688 FFaaxx 8866 775555 22667744 55116688 15
Right click on the screen you can see two graphic display modes Direct Draw and GDI The
default mode is Direct Draw and almost graphic card support this mode But some old graphic
card cannot display normally under Direct Draw you can select GDI to try again
Figure 210
NOTE
Under GDI mode you cannot see the motion detect region lines when set motion detection(For
more details read chapter 310 Motion Detection)
16
ww
wwwwwwffoossccaammccoomm
SShheennzzhheenn FFoossccaamm IInntteelllliiggeenntt TTeecchhnnoollooggyy CCoo LLiimmiitteedd
TTeell 8866 775555 22667744 55666688 FFaaxx 8866 775555 22667744 55116688 16
33 AAddvvaanncceedd CCaammeerraa SSeettttiinnggss Click the bar ldquoFor Administratorrdquo goes to Administrator Control Panel to make advanced camera
settings
31 Device Information
Click For Administrator you will see the Device Information
It contains Device ID firmware version of the camera and other status of the camera
Device ID It displays ldquoIP Camerardquo This ID is different form the camera name You can set any
camera name you like for the camera in ldquoFor Administratormdashgt VideomdashgtParenthesis Optionsrdquo
and the camera name can be showed at the video window but the device ID will always display
IP Camera
Network Connection LAN If the camera gets wired connection successfully here will show
LAN
Current Client It shows that how many people are viewing the video For example the Current
Client shows 0 that means no people are viewing the video If someone have logged in the
camera but do not open the video the Current Client will not change
Device Firmware VersionDevice Embedded Web UI Version The camerarsquos software
version
Mac Address Each camera has its own MAC ID For example Device ID is 00606E8C5058 the
same MAC ID sticker is found at the bottomback of the camera
17
ww
wwwwwwffoossccaammccoomm
SShheennzzhheenn FFoossccaamm IInntteelllliiggeenntt TTeecchhnnoollooggyy CCoo LLiimmiitteedd
TTeell 8866 775555 22667744 55666688 FFaaxx 8866 775555 22667744 55116688 17
32 Date amp Time Settings
There are four models for you to adjust time Manual setting Sync with computer time Network
Time Protocol and Keep current time choose one model and adjust the camera time Then
choose Time zone
Manual settings The administrator can enter the date and time manually Note that the date
and time format is [yyyymmdd] and [hhmmss]
Network Time Protocol It is a protocol which synchronizes computer clocks by periodically
querying an NTP server
Interval The interval time between last time and next time that the camera adjust time with Ntp
Server
Time zoneSelect the appropriate time zone from the list
Figure 31
If your country implements the Daylight Saving Time when you select the Time zone you can
see the following screen
18
ww
wwwwwwffoossccaammccoomm
SShheennzzhheenn FFoossccaamm IInntteelllliiggeenntt TTeecchhnnoollooggyy CCoo LLiimmiitteedd
TTeell 8866 775555 22667744 55666688 FFaaxx 8866 775555 22667744 55116688 18
Figure 32
The camera will adjust the daylight saving time automatically if you select ldquoAutomatically adjust
clock for daylight saving time changesrdquo
19
ww
wwwwwwffoossccaammccoomm
SShheennzzhheenn FFoossccaamm IInntteelllliiggeenntt TTeecchhnnoollooggyy CCoo LLiimmiitteedd
TTeell 8866 775555 22667744 55666688 FFaaxx 8866 775555 22667744 55116688 19
33 User Settings
The camera has set up 3-level user permissions user names are admin user guest and the
default passwords are admin user guest too
Different user has different permission Only admin can do advanced settings under For
Administrator page User account can operate For Visitor and For Operator page Guest account
only can do settings under For Visitor
Please reset the passwords at first using and prevent unauthorized users login the camera
Click Apply to save these settings
Figure 33
Note You cannot change the user name and the passwords cannot be null
20
ww
wwwwwwffoossccaammccoomm
SShheennzzhheenn FFoossccaamm IInntteelllliiggeenntt TTeecchhnnoollooggyy CCoo LLiimmiitteedd
TTeell 8866 775555 22667744 55666688 FFaaxx 8866 775555 22667744 55116688 20
34 Basic Network Settings
IP Configuration Type contains two types Fixed IP Address and Dynamic IP Address Set the
appropriate type for you Keep the camera in the same subnet of your router or computer
Fixed IP Address Select this option to manually assign a static IP address to the Network
Camera
Dynamic IP Address Select this option to obtain an available dynamic IP address assigned by
the DHCP server each time the camera is connected to the LAN
Figure 34 If you want to set a static IP for the camera you should keep the camera in the same subnet of
your router or computer The DNS Configuration Type has two types Manual DNS and From
DHCP Server If you donrsquot know the subnet mask gateway and DNS server you can check your
computerrsquos local area connection It contains all the information
The step is Control PanelNetwork ConnectionsDouble click Local Area Connections
Choose GeneralProperties You will see all the information in it
21
ww
wwwwwwffoossccaammccoomm
SShheennzzhheenn FFoossccaamm IInntteelllliiggeenntt TTeecchhnnoollooggyy CCoo LLiimmiitteedd
TTeell 8866 775555 22667744 55666688 FFaaxx 8866 775555 22667744 55116688 21
Figure 35
Figure 36
Click here
Set the same subnet
mask and gateway of
your camera with your PC
There are two DNS servers you
can set the same for your camera
Same with gateway is also OK
22
ww
wwwwwwffoossccaammccoomm
SShheennzzhheenn FFoossccaamm IInntteelllliiggeenntt TTeecchhnnoollooggyy CCoo LLiimmiitteedd
TTeell 8866 775555 22667744 55666688 FFaaxx 8866 775555 22667744 55116688 22
If you donrsquot know the DNS server you can use the same settings as the default Gateway
HTTP Port number The HTTP Port can be used to access the IPCAM on the LAN Usually it is
80 You can set any number between 1024 and 49151 too
After all settings click Apply You will see the following picture click OK and re-connect the
camera
Figure 37
RTSP port number Usually it is 554 You can set any number between 1024 and 49151 too
Click Apply and the camera will reboot
Enter rtsp IPRTSP port number11 or rtsp IPRTSP port number12 into the VLC you can
see the real-time preview WAN IP or LAN IP is OK If the RTSP port number is 554 you can
directly enter the following url rtsp IP11 or rtspIP12 The number ldquo11rdquo shows that you will
use first stream The numberrdquo12rdquo shows that you will use second stream For example
Enter rtsp1921681116911 in the VLC
RTSP Permission Checksum
On Select it and you need to enter the login username and password when you view the
real-time preview in the VLC
Off Select it and you do not need to enter the login username and password
Figure 38
23
ww
wwwwwwffoossccaammccoomm
SShheennzzhheenn FFoossccaamm IInntteelllliiggeenntt TTeecchhnnoollooggyy CCoo LLiimmiitteedd
TTeell 8866 775555 22667744 55666688 FFaaxx 8866 775555 22667744 55116688 23
Figure 39
You need to enter the user name and password if you select on for RTSP Permission Checksum
Click OK and you can see the real-time preview
Figure 310
24
ww
wwwwwwffoossccaammccoomm
SShheennzzhheenn FFoossccaamm IInntteelllliiggeenntt TTeecchhnnoollooggyy CCoo LLiimmiitteedd
TTeell 8866 775555 22667744 55666688 FFaaxx 8866 775555 22667744 55116688 24
Figure 311
NOTE 1 Yoursquod better not change the HTTP and RTSP port number at the same time because
you cannot submit successfully
2 After changing the RTSP or HTTP port number the camera will restart
3 If you cannot play the video in the VLC player please check the port mapping (Figure 316)
25
ww
wwwwwwffoossccaammccoomm
SShheennzzhheenn FFoossccaamm IInntteelllliiggeenntt TTeecchhnnoollooggyy CCoo LLiimmiitteedd
TTeell 8866 775555 22667744 55666688 FFaaxx 8866 775555 22667744 55116688 25
35 Remote Access
This section will tell you how to access the camera form WAN
Figure 312
Static IP user Users who have static IP addresses do not need to set DDNS service settings for remote access When you have finished connecting the camera using the LAN IP address and port forwarding you can access the camera directly from the Internet using the WAN IP address and port number
Click Show you will see the WAN IP as below
26
ww
wwwwwwffoossccaammccoomm
SShheennzzhheenn FFoossccaamm IInntteelllliiggeenntt TTeecchhnnoollooggyy CCoo LLiimmiitteedd
TTeell 8866 775555 22667744 55666688 FFaaxx 8866 775555 22667744 55116688 26
You can access the IP Camera from the Internet (remote access) Enter the WAN IP address and port number in IE browser or other browsers you use For example Http 218171601878888
Make sure port mapping (or also known as port forwarding) is successful You can do port mapping in two ways
1) Enter the setting page of the router to enable UPNP function Then login the camera as administrator choose UPnP Settings to enable UPNP and make sure the state is ldquoUPnP successrdquo
2) Do port forwarding manually (details Fig316)
For dynamic IP user
DDNS is a service that allows your IP Camera especially when assigned with a dynamic IP address to have a fixed host and domain name This means that even though your WAN IP address is constantly changing you will have a fixed hostname you can use to access your cameras at all times You can access the camera directly from the Internet using the hostname and port number
FOSCAM domain name Each Foscam camera has an embedded unique DDNS domain name the format of this domain name is xxxxxxmyfoscamorg On the camera body you can see the domain name sticker Here take cameramyfoscamorg for example Go to option of DDNS Service Settings on the administrator panel you can see the domain name(Figure 312)
Now you can use http Domain name + HTTP Port to access the camera via internet
Take hostname cameramyfoscamorg and HTTP Port no 8888 for example the accessing
link of the camera via internet would be http cameramyfoscamorg8888
27
ww
wwwwwwffoossccaammccoomm
SShheennzzhheenn FFoossccaamm IInntteelllliiggeenntt TTeecchhnnoollooggyy CCoo LLiimmiitteedd
TTeell 8866 775555 22667744 55666688 FFaaxx 8866 775555 22667744 55116688 27
Third Party Domain Name Settings
User can also use third part DDNS such as wwwno-ipcom www dyndnscom
Here take wwwno-ipcom for example
① Step 1 Go to the website wwwno-ipcom to create a free hostname
Firstly Login on wwwno-ipcom and click No-IP Free to register
Figure 313
Please register an account step by step according to instructions on wwwno-ipcom
After registration please login your email which used to register You will receive an email from
website please click the link to activate your ACCOUNT as indicated in email
Secondly Login the link with the registered username and password to create your
domain name
Click here to register
28
ww
wwwwwwffoossccaammccoomm
SShheennzzhheenn FFoossccaamm IInntteelllliiggeenntt TTeecchhnnoollooggyy CCoo LLiimmiitteedd
TTeell 8866 775555 22667744 55666688 FFaaxx 8866 775555 22667744 55116688 28
Figure 314
Figure 315
Please create the domain name step by step according to instructions on wwwno-ipcom
Step 2 DO DDNS Service Settings within the Camera
Please set Remote Access within the camera by hostname a user name and password
yoursquove got from wwwno-ipcom
29
ww
wwwwwwffoossccaammccoomm
SShheennzzhheenn FFoossccaamm IInntteelllliiggeenntt TTeecchhnnoollooggyy CCoo LLiimmiitteedd
TTeell 8866 775555 22667744 55666688 FFaaxx 8866 775555 22667744 55116688 29
Take hostname ycxgwpno-ipinfo user name foscam password foscam2012 for example
Firstly goes to option of Remote Access on the administrator panel
Secondly select No-Ip as a server in the Third Party DDNS
Thirdly fill foscam as DDNS user fill password foscam2012 as DDNS password fill
ycxgwpno-ipinfo as DDNS domain and server URL Then click save to make effect The
camera will restart and to take the DDNS settings effective
Please verify you have input the correct hostname user name and password
② Do port forwarding within the router
Example The camerarsquos LAN IP address is http19216813588
Firstly login the router goes to the menu of Port Forwarding or Port Trigger (or named Virtue Server on some brands of router) Take Linksys brand router as an example Login the
router and goes to Applications amp Gaming-gtSingle Port Forwarding
Secondly Create a new column by LAN IP address amp HTTP Port No of the camera within the
router showed as below
Figure 316
30
ww
wwwwwwffoossccaammccoomm
SShheennzzhheenn FFoossccaamm IInntteelllliiggeenntt TTeecchhnnoollooggyy CCoo LLiimmiitteedd
TTeell 8866 775555 22667744 55666688 FFaaxx 8866 775555 22667744 55116688 30
③ Use domain name to access the camera via internet
After the port forwarding is finished you can use the domain name+ http no to access the
camera via internet Take hostname ycxgwpno-ipinfo and http no 88for example the
accessing link of the camera via internet would be http ycxgwpno-ipinfo88
Upnp Port Forwarding If you select Enable that means you allow the IPCAM to open ports on the router automatically so that the video streams can be sent out form a LAN To utilize of this feature make sure that your router supports UPNP and it is activated Usually we recommend you do it manually (Figure 316)
31
ww
wwwwwwffoossccaammccoomm
SShheennzzhheenn FFoossccaamm IInntteelllliiggeenntt TTeecchhnnoollooggyy CCoo LLiimmiitteedd
TTeell 8866 775555 22667744 55666688 FFaaxx 8866 775555 22667744 55116688 31
36 Email Settings
If you want the camera to send emails when motion has been activated Email Settings will
need to be configured
Figure 317
Make sure your mailbox for sender supports SMTP Three recipients can be added to receive
images SMTP port is usually set as 25 If SMTP server supports SSI you should choose it The
subject and message cannot be Chinese characters
32
ww
wwwwwwffoossccaammccoomm
SShheennzzhheenn FFoossccaamm IInntteelllliiggeenntt TTeecchhnnoollooggyy CCoo LLiimmiitteedd
TTeell 8866 775555 22667744 55666688 FFaaxx 8866 775555 22667744 55116688 32
37 FTP Settings
If you want to upload images to your FTP server you can set FTP Settings
Figure 318
Figure 319
FTP server If your FTP server is set up in LAN you can set as Figure 318
If you have a FTP server which you can access on the internet you can set as Figure 319
FTP Port Usually the port is 21
If the FTP server mode is passive choose on or else choose off
Path The path of FTP that you plan to store images
Click Apply after settings
33
ww
wwwwwwffoossccaammccoomm
SShheennzzhheenn FFoossccaamm IInntteelllliiggeenntt TTeecchhnnoollooggyy CCoo LLiimmiitteedd
TTeell 8866 775555 22667744 55666688 FFaaxx 8866 775555 22667744 55116688 33
38 Auto Capture
The camera can capture pictures automatically at interval time if you have set auto capture
Figure 320
Snap interval The interval time between two snapshot actions The pictures will be stored to the
disk you set (you can set the storage path under ldquoFor Visitorrdquo)
Send E-mail Select it the camera will send email to you with the picture it has captured when
the camera alarmed
Click Apply after settings
34
ww
wwwwwwffoossccaammccoomm
SShheennzzhheenn FFoossccaamm IInntteelllliiggeenntt TTeecchhnnoollooggyy CCoo LLiimmiitteedd
TTeell 8866 775555 22667744 55666688 FFaaxx 8866 775555 22667744 55116688 34
39 Terminal
The camera has built-in cradle head yoursquod better not change the default settings (Figure 321)
or else you may not control the cradle head
Figure 321
310 Motion Detection
IP Camera supports Motion Detection when the motion has been detected it will send emails
or upload images to FTP
IP CAM supports four detection regions Choose the options dialog box before window1
window2 window3 window4 to enable the corresponding areas
For example choose window1Then you can see a box with a number at living video (Figure
322)
35
ww
wwwwwwffoossccaammccoomm
SShheennzzhheenn FFoossccaamm IInntteelllliiggeenntt TTeecchhnnoollooggyy CCoo LLiimmiitteedd
TTeell 8866 775555 22667744 55666688 FFaaxx 8866 775555 22667744 55116688 35
Figure 322
Move your mouse on the regional box and you can see the arrow icon then drag the regional
box to any position in the video
That means you choose window1
36
ww
wwwwwwffoossccaammccoomm
SShheennzzhheenn FFoossccaamm IInntteelllliiggeenntt TTeecchhnnoollooggyy CCoo LLiimmiitteedd
TTeell 8866 775555 22667744 55666688 FFaaxx 8866 775555 22667744 55116688 36
Figure 323
Move the mouse to the bottom right corner of the regional box When the mouse pattern changes
to ldquo rdquo you can change the size of the detection area
37
ww
wwwwwwffoossccaammccoomm
SShheennzzhheenn FFoossccaamm IInntteelllliiggeenntt TTeecchhnnoollooggyy CCoo LLiimmiitteedd
TTeell 8866 775555 22667744 55666688 FFaaxx 8866 775555 22667744 55116688 37
Figure 324
Move right or left and adjust the sensitivityClick apply after all settingsThe regional box
will blink with red color when something moving in your detection area
Drag it and change the size of
the alarm area
38
ww
wwwwwwffoossccaammccoomm
SShheennzzhheenn FFoossccaamm IInntteelllliiggeenntt TTeecchhnnoollooggyy CCoo LLiimmiitteedd
TTeell 8866 775555 22667744 55666688 FFaaxx 8866 775555 22667744 55116688 38
Figure 325
Note
1 If you add the dateamptime to the videodonrsquot put the detection window on the time area or else
the camera will alarm when the time change
2 If you have not set the motion detection areathe camera will not alarm at any time
3 Firefox Google chrome and Safari doesnrsquot have this function because the activex doesnrsquot
support it
4 Right click on the screen there are two graphic display modes Direct Draw and GDI Under
the GDI mode you cannot see the four detection regions when you select the window1window2
window3 window4
39
ww
wwwwwwffoossccaammccoomm
SShheennzzhheenn FFoossccaamm IInntteelllliiggeenntt TTeecchhnnoollooggyy CCoo LLiimmiitteedd
TTeell 8866 775555 22667744 55666688 FFaaxx 8866 775555 22667744 55116688 39
311 Alarm
IP CAM will send email or upload images when motion has been detected
Figure 326
Email Alarm Camera will send emails when motion is activated Make sure you have set Email
Settings first
Save Picture on the FTP Server To upload images to an FTP server when motion is detected
you must set FTP Settings first
Click Apply after settings
40
ww
wwwwwwffoossccaammccoomm
SShheennzzhheenn FFoossccaamm IInntteelllliiggeenntt TTeecchhnnoollooggyy CCoo LLiimmiitteedd
TTeell 8866 775555 22667744 55666688 FFaaxx 8866 775555 22667744 55116688 40
312 Schedule
If you want the camera alarm during the time you wish or all the time please choose Schedule
and set time range for motion alarm
Figure 327
There are two ways to set the alarm
1) Alarm at any time when motion is detected
Select All times and apply you settings the camera will alarm at any time when motion is
detected
2) Specify an alarm schedule
If you want the camera to alarm during a specify time you can select Use the week mode or Use
the work mode and set time range
Click apply the settings what you have done will take effect
If you click cancel the settings will come back to the status before your settings
If you want to reset all time range click clean
NOTE Adjust system time before set schedule
41
ww
wwwwwwffoossccaammccoomm
SShheennzzhheenn FFoossccaamm IInntteelllliiggeenntt TTeecchhnnoollooggyy CCoo LLiimmiitteedd
TTeell 8866 775555 22667744 55666688 FFaaxx 8866 775555 22667744 55116688 41
313 Video
Figure 328
Video format The format contains two kinds NTSC and PAL One camera only has one format
and you cannot change it
Resolution The camera supports First stream D1(704576)CIF(352288)QCIF(176144)
Second stream CIF(352288)QCIF(176144) The higher the resolution is the clearer video will
become But the code flux will become larger too and it will take up more bandwidth
Bit rate Generally speaking the larger the bit rate is the clearer video will become But the bit
rate configuration should combine well with the network bandwidth When the bandwidth is very
narrow and bit rate is large that will lead to video can not play well
42
ww
wwwwwwffoossccaammccoomm
SShheennzzhheenn FFoossccaamm IInntteelllliiggeenntt TTeecchhnnoollooggyy CCoo LLiimmiitteedd
TTeell 8866 775555 22667744 55666688 FFaaxx 8866 775555 22667744 55116688 42
Maximum frame rate When the video format is PAL the maximum frame rate is 25 fps When
the video format is NTSC the maximum frame rate is 30 fps You should lower frame rate when
the bandwidth is limited Normally when the frame rate above 15 you can achieve fluently video
Key Frame Interval The time between last key frame and next key frame
Bit rate control It has two models CBR and VBR If you choose CVR video encoder will be
coding on the basis of bit rate you set If you choose VBR video encoder will be coding not only
on the basis of bit rate but also consider video quality
Image Quality The smaller the value the better the image quality
Parenthesis options The camera name and time can be loaded to the video screen through
this option If you set as following picture (Figure 330) you will see the video as Figure329 The
camera name cannot be Chinese characters
Figure 329
Figure 330
43
ww
wwwwwwffoossccaammccoomm
SShheennzzhheenn FFoossccaamm IInntteelllliiggeenntt TTeecchhnnoollooggyy CCoo LLiimmiitteedd
TTeell 8866 775555 22667744 55666688 FFaaxx 8866 775555 22667744 55116688 43
314 Image Settings
Adjust the quality of the video by setting the image parameters
Figure 331
Brightness saturation contrast and hue are used to adjust the quality of the video Camera will
save your settings if you click apply If you want to quit settings you have done and restore the
status before your setting please click cancel The function of Default is used to restore the initial
settings
44
ww
wwwwwwffoossccaammccoomm
SShheennzzhheenn FFoossccaamm IInntteelllliiggeenntt TTeecchhnnoollooggyy CCoo LLiimmiitteedd
TTeell 8866 775555 22667744 55666688 FFaaxx 8866 775555 22667744 55116688 44
315 Initialize
Reboot Click reboot the infection is the same as plug the power and re-plug it
Factory default Click it all parameters will return to factory settings
Backup setting data If you donrsquot want to quit all parameters that yoursquove set You can click save
and all the parameters you set will be stored as a parameters bin file
Restore Click browse choose the correct bin file and then click ok to get all parameters which
you set before
Upgrade Click Browse choose the correct bin file and then click OK to upgrade Donrsquot shut
down the power during upgrade
Figure 332
316 Back
This will take you back to the video window
45
ww
wwwwwwffoossccaammccoomm
SShheennzzhheenn FFoossccaamm IInntteelllliiggeenntt TTeecchhnnoollooggyy CCoo LLiimmiitteedd
TTeell 8866 775555 22667744 55666688 FFaaxx 8866 775555 22667744 55116688 45
4 Other Settings
Use Mobile to login
If the camera has been linked to Internet set the parameters of the camera and router Make
sure the camera can be accessed by domain name and WAN IP
For example the WAN IP is1833754137 the domain name is ycxgwpno-ipinfo Then open
the mobile IE enter the following URL you can login the camera http
1833754137mobilehtml or
http1833754137wapwml or httpycxgwpno-ipinfomobilehtml or
http ycxgwpno-ipinfo wapwml
If the HTTP port num isnrsquot 80 you should add the port num to the URL
http1833754137portnummobilehtml
or http ycxgwpno-ipinfoport nummobilehtml
46
ww
wwwwwwffoossccaammccoomm
SShheennzzhheenn FFoossccaamm IInntteelllliiggeenntt TTeecchhnnoollooggyy CCoo LLiimmiitteedd
TTeell 8866 775555 22667744 55666688 FFaaxx 8866 775555 22667744 55116688 46
5 APPENDIX
51 Frequently Asked Questions
NOTE Any questions you would meet please check Network connections firstly Check the
working status revealed by the indicators on the network server hub exchange and network
card If abnormal check the network connections
511 I have forgotten the administrator password
To reset the administrator password you had better unplug the network cable firstly After that
press and hold down the RESET BUTTON about 10 seconds Releasing the reset button the
password will turn to the factory default
Default administrator username admin password admin
Default user username user password user
Default guest username guest password guest
512 Subnet doesnrsquot match
Check whether your ipcamera in the same subnet of your computer The step is Control PanelNetwork ConnectionsDbclick Local Area Connections Choose eneralProperties (Figure 3637) Check subnet mask IP address and gateways When you set IP address please make sure they are in the same subnet Otherwise you cant access camera
513 Download and install the ActiveX
Please click button in the Login interface Install the ActiveX after download
47
ww
wwwwwwffoossccaammccoomm
SShheennzzhheenn FFoossccaamm IInntteelllliiggeenntt TTeecchhnnoollooggyy CCoo LLiimmiitteedd
TTeell 8866 775555 22667744 55666688 FFaaxx 8866 775555 22667744 55116688 47
Figure 51
Click next
Figure 52
Click Install
48
ww
wwwwwwffoossccaammccoomm
SShheennzzhheenn FFoossccaamm IInntteelllliiggeenntt TTeecchhnnoollooggyy CCoo LLiimmiitteedd
TTeell 8866 775555 22667744 55666688 FFaaxx 8866 775555 22667744 55116688 48
Figure 53
Only click Finish and the computer restarts upon installation completion
Re-login the camera and you can see the surveillance window
514 No Pictures Problems
The video streaming is transmitted by the ActiveX controller If ActiveX controller isnrsquot installed
correctly you will see no video image You can resolve this problem by this way
Download ActiveX controller and set the safety property of IE in the PC when you view it first
time IE browserToolInternet ProperSecurityCustom LevelActiveX control and
Plug-ins Three options of front should be set to be ldquoEnablerdquo The ActiveX programs read by the
computer will be stored As follows
Enable Download unsigned ActiveX controls
Enable Initialize and script ActiveX controls not marked as safe
Enable Run ActiveX controls and plug-ins
49
ww
wwwwwwffoossccaammccoomm
SShheennzzhheenn FFoossccaamm IInntteelllliiggeenntt TTeecchhnnoollooggyy CCoo LLiimmiitteedd
TTeell 8866 775555 22667744 55666688 FFaaxx 8866 775555 22667744 55116688 49
Figure 54
If you allow the ActiveX running but still could not see living video Please change another port
number to try Donrsquot use port 80 use any port between 1024 and 49151
Figure55
NOTE Make sure that your firewall or anti-virus software does not block the camera or ActiveX
If you could not see video please shut down firewall or anti-virus software to try again
50
ww
wwwwwwffoossccaammccoomm
SShheennzzhheenn FFoossccaamm IInntteelllliiggeenntt TTeecchhnnoollooggyy CCoo LLiimmiitteedd
TTeell 8866 775555 22667744 55666688 FFaaxx 8866 775555 22667744 55116688 50
515 I cannot see the video on Firefox or Safari or Google chrome
If you cannot see live video after login the camera it may be the reason that the defaults transmit
protocol of QuickTime streaming is not HTTP or the port is not 80
For Firefox Safari and Google chrome you should install Quick Time Player as the ActiveX
controller please configure the activex controller as the following picture
Select PreferencesmdashQuickTime Preferenceshellip
Figure 56
Choose HTTP as the transport protocol
Figure 57
51
ww
wwwwwwffoossccaammccoomm
SShheennzzhheenn FFoossccaamm IInntteelllliiggeenntt TTeecchhnnoollooggyy CCoo LLiimmiitteedd
TTeell 8866 775555 22667744 55666688 FFaaxx 8866 775555 22667744 55116688 51
516 I cannot see video on MAC OS
If you cannot see live video after login FOSCAM H264 camera it may be the reason that the
defaults transmit protocol of QuickTime streaming is not HTTP or the port is not 80
Please follow the below steps and make the protocol and port correct and you can see live video
then
Steps
Click ldquoGordquo ---------gt Choose ldquoUtilitiesrdquo ----------gt Open ldquoTerminalapprdquo ------------gt Check the
default protocol and port of QuickTime streaming by inputting the URL
ldquoqtdefaults read transportSettingsrdquo
If the protocol is not HTTP or the port is not 80 please input the URL
ldquoqtdefaults write transportSettings HTTP 80rdquo to change it
After changing it you can also check if it is successful by URL
ldquoqtdefaults read transportSettingsrdquo
Please refer to the below pictures for the above steps
Figure 58
52
ww
wwwwwwffoossccaammccoomm
SShheennzzhheenn FFoossccaamm IInntteelllliiggeenntt TTeecchhnnoollooggyy CCoo LLiimmiitteedd
TTeell 8866 775555 22667744 55666688 FFaaxx 8866 775555 22667744 55116688 52
Figure 59
Figure 510
517 Canrsquot access IP camera in internet
There are some reasons
1 ActiveX controller is not installed correctly (Figure51-53)
2 The port which camera used is blocked by Firewall or Anti-virus software Please change
another port number and try again (Figure55)
3 Port forwarding is not successful
53
ww
wwwwwwffoossccaammccoomm
SShheennzzhheenn FFoossccaamm IInntteelllliiggeenntt TTeecchhnnoollooggyy CCoo LLiimmiitteedd
TTeell 8866 775555 22667744 55666688 FFaaxx 8866 775555 22667744 55116688 53
Check these settings and make sure they are correct
518 UPnP always failed
UPnP only contains port forwarding in our recent software Sometimes it may be failed to do port
forwarding automatically because of firewall or anti-virus software It also has much relation with
routerrsquos security settings So we recommend you do port forwarding manually You can view
your camera in internet successfully after you do port forwarding manually in your
router(Figure316)
519 Canrsquot operate the cradle head
If you canrsquot operate the cradle head such as click the button but the cradle head can not
move Usually the cradle head canrsquot operate mainly because of wrong settings Please donrsquot
change the default settings or else you canrsquot operate it You can see the following figure which is
the default settings Sometimes you need to press the reset button and restore the default
settings
Figure511
52 Default Parameters
Default network Parameters
IP address obtain dynamically
Subnet mask obtain dynamically
Gateway obtain dynamically
DDNS Embedded FOSCAM DDNS Service
Username and password
Default admin username admin Default password admin
Default user username user Default password user
Default guest username guest Default password guest
54
ww
wwwwwwffoossccaammccoomm
SShheennzzhheenn FFoossccaamm IInntteelllliiggeenntt TTeecchhnnoollooggyy CCoo LLiimmiitteedd
TTeell 8866 775555 22667744 55666688 FFaaxx 8866 775555 22667744 55116688 54
53 Specifications
Specification FI8620
Image Sensor
Image Sensor 480TVL 14 SONY Color CCD Sensor
Optical variable times 10 times
Lens F 38-38mm F12
Mini Illumination multicolour 005Lux black and white0001Lux
Video
Video Formats Supports NTSC or PAL Formats
Image Compression H264
ImageFrame Rate 25fps(PAL Formats)30fps(NTSC Formats)Down adjustable
Image Resolution D1(720576)CIF(352288)QCIF(176144)
View H264 dual streaming
Focusing autohand-switchkeying automatic
digital continuous autofocus ulsg
Image adjust The brightness contrast is adjustable
White balance Automatic white balance
Backlight
compensation Automatic backlight compensation
SNR gt60DB (AGC OFF)
Network
Ethernet One 10100Mbps RJ-45
Supported Protocol TCPIPUDPIPHTTPSMTPFTPDHCPDNSDDNS
UPNPPOP3RTSP
Support IP address static IP address dynamic IP address
Alarm Alarm detection The motion detecting detection threshold Settings
Alarm inform Support EmailFTP etc alarm inform way
Hardware
Interface
POWER Interface DC 12V20A (EUUSAU adapter or other types optional)
Power Consumption ﹤6 Watts
Reset Buttons One Reset
Network Interface One 10100Mbps RJ-45
Environment
Operate Temper 0deg ~ 55degC (32degF ~ 131degF)
Operate Humidity 10 ~ 80 non-condensing
Storage Temper -10degC ~ 60deg (14degF ~ 140degF)
Storage Humidity 0 ~ 90 non-condensing
Physical
Horizontal speed 1-250deg S
Vertical speed 1-100deg S
PanTilt Angle Horizontal360deg amp Vertical 90deg
Dimension 270(L) x 170(W) x 260(H)mm
Net Weight 1935g
Gross Weight 2674g
PC
Requirements
CPU 20GHZ or above (suggested 30GHz)
Memory Size 256MB or above (suggested 10GHz)
Display Card 64M or above
55
ww
wwwwwwffoossccaammccoomm
SShheennzzhheenn FFoossccaamm IInntteelllliiggeenntt TTeecchhnnoollooggyy CCoo LLiimmiitteedd
TTeell 8866 775555 22667744 55666688 FFaaxx 8866 775555 22667744 55116688 55
Supported OS Microsoft Windows 2000XPVista Mac OS
Browser IE6 and above version or compatible browser Firefox Chrome
Safari or other standard browsers
Certificate CEFCC CEFCC
Software Upgrade Upgrade from network
Application Software H264 Camera Client
6 OBTAINING TECHNICAL SUPPORT
While we hope your experience with the IPCAM network camera is enjoyable and easy to use
you may experience some issues or have questions that this Userrsquos Guide has not answered
If you have problem with FOSCAM IP camera please first contact FOSCAM reseller for
solving the problems If our reseller cannot provide service please contact our service
department techfoscamcom
1
ww
wwwwwwffoossccaammccoomm
SShheennzzhheenn FFoossccaamm IInntteelllliiggeenntt TTeecchhnnoollooggyy CCoo LLiimmiitteedd
TTeell 8866 775555 22667744 55666688 FFaaxx 8866 775555 22667744 55116688 1
Table of Contents
1 Overviews 2
11 Key Features 3
12 Read Before Use 3
13 Packing Contents 3
14 Physical Description 4
2 Surveillance Software GUI 6
21 Login Window 6
22 Surveillance Window 9
3 Advanced Camera Settings 16
31 Device Information 16
32 Date amp Time Settings 17
33 User Settings 19
34 Basic Network Settings 20
35 Remote Access 25
36 Email Settings 31
37 FTP Settings 32
38 Auto Capture 33
39 Terminal 34
310 Motion Detection 34
311 Alarm 39
312 Schedule 40
313 Video 41
314 Image Settings 43
315 Initialize 44
316 Back 44
4 Other Settings 45
Use Mobile to login 45
5 APPENDIX 46
51 Frequently Asked Questions 46
52 Default Parameters 53
2
ww
wwwwwwffoossccaammccoomm
SShheennzzhheenn FFoossccaamm IInntteelllliiggeenntt TTeecchhnnoollooggyy CCoo LLiimmiitteedd
TTeell 8866 775555 22667744 55666688 FFaaxx 8866 775555 22667744 55116688 2
53 Specifications 54
6 OBTAINING TECHNICAL SUPPORT 55
11 OOvveerrvviieewwss
IPCAM is an integrated wired IP Camera solution It combines a high quality digital video camera
with network connectivity and a powerful web server on your desktop from anywhere on your
local network or over the internet
FI8620 supports the industry-standard H264 compression technology drastically reducing file
sizes and conserving valuable network bandwidth With flexible 360-degree pan90-degree tilt
and 10X optical zoom IPCAM gives users more comprehensive control over a monitored site
The IPCAM is based on the TCPIP standard There is a WEB server inside which could support
Internet Explore Therefore the management and maintenance of your device is simplified by
using the network to achieve the remote configuration start-up and to upgrade the firmware
The camera is designed for outdoor surveillance applications such as supermarket bank and
school Controlling the IPCAM and managing images are simplified by using the provided web
interface across the network connectivity
3
ww
wwwwwwffoossccaammccoomm
SShheennzzhheenn FFoossccaamm IInntteelllliiggeenntt TTeecchhnnoollooggyy CCoo LLiimmiitteedd
TTeell 8866 775555 22667744 55666688 FFaaxx 8866 775555 22667744 55116688 3
1111 KKeeyy FFeeaattuurreess
Standard H264 video compression algorithm to satisfy the transmission of high definition
video in narrow bandwidth network
Network self-adapting function adjust stream and encoding frame rate automatically
according to network bandwidth
Supports IEFirefoxGoogleSafari browser or any other standard browsers
Supports 10X optical zoom
Pan 360 degree tilt 90 degree
Supports mobile watch
Supports dual-stream
Supports RTSP port
Embedded FOSCAM DDNS(dynamic domain name service) Service
Supports remote viewing amp record from anywhere anytime
Supporting Third Party Domain name
Multi-level users management with password protection
Embedded Web Server for users to visit by IE
Motion detection alert via email or upload image to FTP
Supports multiple network protocols HTTP TCP IP UDP FTP DHCP DDNS UPNP
RTSP
Providing CMS software to manage or monitor multiple cameras
1122 RReeaadd BBeeffoorree UUssee
Please first verify that all contents received are complete according to the Package Contents
listed below Before the Network Camera is installed please carefully read and follow the
instructions in the Quick Installation Guide to avoid damage due to faulty assembly and
installation This also ensures the product is used properly as intended
1133 PPaacckkiinngg CCoonntteennttss
IPCAMtimes1 CDtimes1
DC Power Supplytimes1 Quick Installation Guidetimes1
Mounting brackettimes1(option)
Warranty Cardtimes1
Network Cabletimes1
4
ww
wwwwwwffoossccaammccoomm
SShheennzzhheenn FFoossccaamm IInntteelllliiggeenntt TTeecchhnnoollooggyy CCoo LLiimmiitteedd
TTeell 8866 775555 22667744 55666688 FFaaxx 8866 775555 22667744 55116688 4
1144 PPhhyyssiiccaall DDeessccrriippttiioonn
Front Panel
Figure 11
The camera lens has variable optical zoom The biggest optical zoom time is 10 times With this
function you can see farther and clearer
Interface
Figure 12
1) Power Interface Connect the external power adapter request for 12V2A power
2) Reset button Press and hold on the reset button for 10 seconds Releasing the reset
button the password will back to the factory default administrator password The default
administrator username and password are all admin You must power on the camera before
reset
3) LAN 10100M adaptive Ethernet interface Through this interface IPCAM can be connected
with various network devices such as hub router etc
5
ww
wwwwwwffoossccaammccoomm
SShheennzzhheenn FFoossccaamm IInntteelllliiggeenntt TTeecchhnnoollooggyy CCoo LLiimmiitteedd
TTeell 8866 775555 22667744 55666688 FFaaxx 8866 775555 22667744 55116688 5
Bottom View
There are up to two labels located on the body of the camera this is an important feature of
original Foscam cameras If your camera does not have labels as shown in Figure 13 it may be
a clone one Cloned Foscam cameras can not use original firmware and are not eligible for
warranty or technical services
Figure 13
SN of FOSCAM
MAC address of wired
connection
FOSCAM DDNS Service
6
ww
wwwwwwffoossccaammccoomm
SShheennzzhheenn FFoossccaamm IInntteelllliiggeenntt TTeecchhnnoollooggyy CCoo LLiimmiitteedd
TTeell 8866 775555 22667744 55666688 FFaaxx 8866 775555 22667744 55116688 6
22 SSuurrvveeiillllaannccee SSooffttwwaarree GGUUII
Please refer to the Quick Installation Guide if you install the camera at first time After finishing
quick installation you can take time to learn the operation of the software
2211 LLooggiinn WWiinnddooww
Figure 21
Please check the login window above it was divided to 5 sections from no 1 to 5
Section1 Select Language
FOSCAM camera supports up to multi-languages such as English Spanish Deutsch and so on
You can select the language you need via click on the select language bar to switch
Section2 Video View Login Button
For PC please select the login button under Video View
Section3 Mobile View Login Button
If you are using the Mobile to access the camera here you need to select Mobile View login
button
1
2
3
4
5
7
ww
wwwwwwffoossccaammccoomm
SShheennzzhheenn FFoossccaamm IInntteelllliiggeenntt TTeecchhnnoollooggyy CCoo LLiimmiitteedd
TTeell 8866 775555 22667744 55666688 FFaaxx 8866 775555 22667744 55116688 7
Section4 Download ActiveX
For IE users the ActiveX have been embedded in the IP Camera Tool so if you have installed
the IP Camera Tool you need not download again If you use Firefox Google Chrome Safari or
others you should download and install QuickTime Player as the ActiveX from other website
For remote IE users first time you use the IPCAM you may need download and install the
ActiveX (Please read chapter 51 in Appendix about how to download and install the ActiveX)
Section5 Attention
For better viewing here we suggest using 1024768 screen resolution
Click the PC login button under Video View you will see the video window
For Internet Explorer
Figure 22
8
ww
wwwwwwffoossccaammccoomm
SShheennzzhheenn FFoossccaamm IInntteelllliiggeenntt TTeecchhnnoollooggyy CCoo LLiimmiitteedd
TTeell 8866 775555 22667744 55666688 FFaaxx 8866 775555 22667744 55116688 8
If you could not view living video after running the ActiveX only a red cross in the center
of the video or just a black screen Please change another port number to try
Make sure all firewall or antivirus software on your computer does not block the active download
and installation If you are unable to run the ActiveX control try shutting down the firewall or
antivirus program
For Firefox Google Chrome and Safari
Install the Quick Time Player and fill in user name and password then login you will see the
living video
Figure 23
9
ww
wwwwwwffoossccaammccoomm
SShheennzzhheenn FFoossccaamm IInntteelllliiggeenntt TTeecchhnnoollooggyy CCoo LLiimmiitteedd
TTeell 8866 775555 22667744 55666688 FFaaxx 8866 775555 22667744 55116688 9
22 Surveillance Window
Select the PC login mode and you will enter the surveillance window
Figure 24
For Visitor For Operator For Administrator
Camera supports three-level users management admin user and guest
The default ldquoadminrdquo username and password are all ldquoadminrdquo the default ldquouserrdquo username and
password are all ldquouserrdquo and the default ldquoguestrdquo username and password are all ldquoguestrdquo For first
using please go to For Administrator-gt User Settings panel to change the password and
against illegal access
Different users have different permissions Admin user has the highest authority He can do any settings User account can do settings below For Visitor and For Operator Guest account can do settings below For Visitor
1
2
3
5
6
7
4
10
ww
wwwwwwffoossccaammccoomm
SShheennzzhheenn FFoossccaamm IInntteelllliiggeenntt TTeecchhnnoollooggyy CCoo LLiimmiitteedd
TTeell 8866 775555 22667744 55666688 FFaaxx 8866 775555 22667744 55116688 10
Section1 View
The resolution contains D1(720576) CIF(352288) QCIF(176144) and Auto You can choose First Stream or Second Stream to adjust the view window
Note When the network bandwidth is bad yoursquod better select Second Stream and the video will
be more fluency
Section2 CaptureRecordPlaybackSet Path Buttons
Capture Click this icon the current living picture will be stored to a predetermined path
The default storage path is D disk You can click this button to change the storage path
Record Click the icon The camera will begin recording and store the recorded file to the
folder you set And the status column will display REC when recording Click again it will stop
recording The default storage path is D disk You can click this button to change the
storage path
Figure 25
11
ww
wwwwwwffoossccaammccoomm
SShheennzzhheenn FFoossccaamm IInntteelllliiggeenntt TTeecchhnnoollooggyy CCoo LLiimmiitteedd
TTeell 8866 775555 22667744 55666688 FFaaxx 8866 775555 22667744 55116688 11
Playback Click the button it will pop up a player And you can see the videos you have
stored in your computer
Figure 26
Set Path Set the storage path of photos and videos The default storage path is D disk
Note These buttons are controlled by the ActiveX controller therefore Firefox Google Chrome
and Safari cannot allow to these functions
Section3 PanTilt ZoomFocus Control
1------Up control button 2------Down control button
3------Left control button 4------Right control button
1
2
3 4
12
ww
wwwwwwffoossccaammccoomm
SShheennzzhheenn FFoossccaamm IInntteelllliiggeenntt TTeecchhnnoollooggyy CCoo LLiimmiitteedd
TTeell 8866 775555 22667744 55666688 FFaaxx 8866 775555 22667744 55116688 12
Zoom inout The lens has 10x optical zoom The biggest optical zoom time is 10 times
Focus +- This function can help you see more clearly
Section4 Preset Go PTZ Speed
1) Preset----------Support 8 preset position which is considered enough for DIY home amp small
business surveillance market
2) Set----------- Click Set to save the position you need the camera to remember
3) Go----------- Click Go to make the camera move the preset position
4) Number button from 1 to 8--------You can click the number button with preset position and the
camera will go to the preset position
5) PTZ Speed-------- The default PTZ speed is 45 you can change another one between 1 and
63 The larger the number the faster the speed will be
How to do preset position
We can start preset settings from position 1
Firstly select no 1 within the menu of Preset on the panel
Secondly move the camera and stop at a place where you want make preset position
Thirdly click set button to save it as position 1 and you have done preset of position 1
After that you can select no 2 within the menu of Preset on the panel and move the camera and
stop at another place and set as preset position 2 You can do all the 8 preset positions with this
method
If you want to see the preset position you have set such as the position 1 only select the set
no1 and click go button the camera will go to position no1
13
ww
wwwwwwffoossccaammccoomm
SShheennzzhheenn FFoossccaamm IInntteelllliiggeenntt TTeecchhnnoollooggyy CCoo LLiimmiitteedd
TTeell 8866 775555 22667744 55666688 FFaaxx 8866 775555 22667744 55116688 13
Section5 For Administrator
Path to Administrator Control Panel Click it and it will lead to Administrator Control Panel
Section6 OSD
If you have added time and camera name in the video you can see it in the surveillance window
Go to For Administrator ---Video panel and you can add camera name and time on the live
window Here you can change another device name The default device name is IP Camera
Go to For Administrator ---DateampTime settings panel and adjust the device time
Section7 Status bar
Figure 27
There is a status column below the view window (Figure27) 1) The current state of IPCAM
2) After the view has been digital amplified click the icon the view will be digital narrowed 3) Click the icon the view window will be digital amplified
4) Click the icon the view window will restore the original size
NOTE Firefox Google Chrome and Safari have not these functions because the ActiveX does
not support it
14
ww
wwwwwwffoossccaammccoomm
SShheennzzhheenn FFoossccaamm IInntteelllliiggeenntt TTeecchhnnoollooggyy CCoo LLiimmiitteedd
TTeell 8866 775555 22667744 55666688 FFaaxx 8866 775555 22667744 55116688 14
Onscreen Mouse Control
Put the mouse on the screen and you can see a arrow Press the mouse and the camerarsquos len
will move to the corresponding direction
For example put the mouse on the upper-right corner of the screen and you can see a arrow
press the mouse then the cameras lens will move toward the upper-right direction
When the icon has three arrows the speed of the rotation is fastest And when the icon has one
arrow the speed is lowest
Figure 28
Put the mouse at the center of the living video you will see the icon of the magnifying glass
(Figure 29) Press the left mouse and you can use the optical zoom
Figure 29
15
ww
wwwwwwffoossccaammccoomm
SShheennzzhheenn FFoossccaamm IInntteelllliiggeenntt TTeecchhnnoollooggyy CCoo LLiimmiitteedd
TTeell 8866 775555 22667744 55666688 FFaaxx 8866 775555 22667744 55116688 15
Right click on the screen you can see two graphic display modes Direct Draw and GDI The
default mode is Direct Draw and almost graphic card support this mode But some old graphic
card cannot display normally under Direct Draw you can select GDI to try again
Figure 210
NOTE
Under GDI mode you cannot see the motion detect region lines when set motion detection(For
more details read chapter 310 Motion Detection)
16
ww
wwwwwwffoossccaammccoomm
SShheennzzhheenn FFoossccaamm IInntteelllliiggeenntt TTeecchhnnoollooggyy CCoo LLiimmiitteedd
TTeell 8866 775555 22667744 55666688 FFaaxx 8866 775555 22667744 55116688 16
33 AAddvvaanncceedd CCaammeerraa SSeettttiinnggss Click the bar ldquoFor Administratorrdquo goes to Administrator Control Panel to make advanced camera
settings
31 Device Information
Click For Administrator you will see the Device Information
It contains Device ID firmware version of the camera and other status of the camera
Device ID It displays ldquoIP Camerardquo This ID is different form the camera name You can set any
camera name you like for the camera in ldquoFor Administratormdashgt VideomdashgtParenthesis Optionsrdquo
and the camera name can be showed at the video window but the device ID will always display
IP Camera
Network Connection LAN If the camera gets wired connection successfully here will show
LAN
Current Client It shows that how many people are viewing the video For example the Current
Client shows 0 that means no people are viewing the video If someone have logged in the
camera but do not open the video the Current Client will not change
Device Firmware VersionDevice Embedded Web UI Version The camerarsquos software
version
Mac Address Each camera has its own MAC ID For example Device ID is 00606E8C5058 the
same MAC ID sticker is found at the bottomback of the camera
17
ww
wwwwwwffoossccaammccoomm
SShheennzzhheenn FFoossccaamm IInntteelllliiggeenntt TTeecchhnnoollooggyy CCoo LLiimmiitteedd
TTeell 8866 775555 22667744 55666688 FFaaxx 8866 775555 22667744 55116688 17
32 Date amp Time Settings
There are four models for you to adjust time Manual setting Sync with computer time Network
Time Protocol and Keep current time choose one model and adjust the camera time Then
choose Time zone
Manual settings The administrator can enter the date and time manually Note that the date
and time format is [yyyymmdd] and [hhmmss]
Network Time Protocol It is a protocol which synchronizes computer clocks by periodically
querying an NTP server
Interval The interval time between last time and next time that the camera adjust time with Ntp
Server
Time zoneSelect the appropriate time zone from the list
Figure 31
If your country implements the Daylight Saving Time when you select the Time zone you can
see the following screen
18
ww
wwwwwwffoossccaammccoomm
SShheennzzhheenn FFoossccaamm IInntteelllliiggeenntt TTeecchhnnoollooggyy CCoo LLiimmiitteedd
TTeell 8866 775555 22667744 55666688 FFaaxx 8866 775555 22667744 55116688 18
Figure 32
The camera will adjust the daylight saving time automatically if you select ldquoAutomatically adjust
clock for daylight saving time changesrdquo
19
ww
wwwwwwffoossccaammccoomm
SShheennzzhheenn FFoossccaamm IInntteelllliiggeenntt TTeecchhnnoollooggyy CCoo LLiimmiitteedd
TTeell 8866 775555 22667744 55666688 FFaaxx 8866 775555 22667744 55116688 19
33 User Settings
The camera has set up 3-level user permissions user names are admin user guest and the
default passwords are admin user guest too
Different user has different permission Only admin can do advanced settings under For
Administrator page User account can operate For Visitor and For Operator page Guest account
only can do settings under For Visitor
Please reset the passwords at first using and prevent unauthorized users login the camera
Click Apply to save these settings
Figure 33
Note You cannot change the user name and the passwords cannot be null
20
ww
wwwwwwffoossccaammccoomm
SShheennzzhheenn FFoossccaamm IInntteelllliiggeenntt TTeecchhnnoollooggyy CCoo LLiimmiitteedd
TTeell 8866 775555 22667744 55666688 FFaaxx 8866 775555 22667744 55116688 20
34 Basic Network Settings
IP Configuration Type contains two types Fixed IP Address and Dynamic IP Address Set the
appropriate type for you Keep the camera in the same subnet of your router or computer
Fixed IP Address Select this option to manually assign a static IP address to the Network
Camera
Dynamic IP Address Select this option to obtain an available dynamic IP address assigned by
the DHCP server each time the camera is connected to the LAN
Figure 34 If you want to set a static IP for the camera you should keep the camera in the same subnet of
your router or computer The DNS Configuration Type has two types Manual DNS and From
DHCP Server If you donrsquot know the subnet mask gateway and DNS server you can check your
computerrsquos local area connection It contains all the information
The step is Control PanelNetwork ConnectionsDouble click Local Area Connections
Choose GeneralProperties You will see all the information in it
21
ww
wwwwwwffoossccaammccoomm
SShheennzzhheenn FFoossccaamm IInntteelllliiggeenntt TTeecchhnnoollooggyy CCoo LLiimmiitteedd
TTeell 8866 775555 22667744 55666688 FFaaxx 8866 775555 22667744 55116688 21
Figure 35
Figure 36
Click here
Set the same subnet
mask and gateway of
your camera with your PC
There are two DNS servers you
can set the same for your camera
Same with gateway is also OK
22
ww
wwwwwwffoossccaammccoomm
SShheennzzhheenn FFoossccaamm IInntteelllliiggeenntt TTeecchhnnoollooggyy CCoo LLiimmiitteedd
TTeell 8866 775555 22667744 55666688 FFaaxx 8866 775555 22667744 55116688 22
If you donrsquot know the DNS server you can use the same settings as the default Gateway
HTTP Port number The HTTP Port can be used to access the IPCAM on the LAN Usually it is
80 You can set any number between 1024 and 49151 too
After all settings click Apply You will see the following picture click OK and re-connect the
camera
Figure 37
RTSP port number Usually it is 554 You can set any number between 1024 and 49151 too
Click Apply and the camera will reboot
Enter rtsp IPRTSP port number11 or rtsp IPRTSP port number12 into the VLC you can
see the real-time preview WAN IP or LAN IP is OK If the RTSP port number is 554 you can
directly enter the following url rtsp IP11 or rtspIP12 The number ldquo11rdquo shows that you will
use first stream The numberrdquo12rdquo shows that you will use second stream For example
Enter rtsp1921681116911 in the VLC
RTSP Permission Checksum
On Select it and you need to enter the login username and password when you view the
real-time preview in the VLC
Off Select it and you do not need to enter the login username and password
Figure 38
23
ww
wwwwwwffoossccaammccoomm
SShheennzzhheenn FFoossccaamm IInntteelllliiggeenntt TTeecchhnnoollooggyy CCoo LLiimmiitteedd
TTeell 8866 775555 22667744 55666688 FFaaxx 8866 775555 22667744 55116688 23
Figure 39
You need to enter the user name and password if you select on for RTSP Permission Checksum
Click OK and you can see the real-time preview
Figure 310
24
ww
wwwwwwffoossccaammccoomm
SShheennzzhheenn FFoossccaamm IInntteelllliiggeenntt TTeecchhnnoollooggyy CCoo LLiimmiitteedd
TTeell 8866 775555 22667744 55666688 FFaaxx 8866 775555 22667744 55116688 24
Figure 311
NOTE 1 Yoursquod better not change the HTTP and RTSP port number at the same time because
you cannot submit successfully
2 After changing the RTSP or HTTP port number the camera will restart
3 If you cannot play the video in the VLC player please check the port mapping (Figure 316)
25
ww
wwwwwwffoossccaammccoomm
SShheennzzhheenn FFoossccaamm IInntteelllliiggeenntt TTeecchhnnoollooggyy CCoo LLiimmiitteedd
TTeell 8866 775555 22667744 55666688 FFaaxx 8866 775555 22667744 55116688 25
35 Remote Access
This section will tell you how to access the camera form WAN
Figure 312
Static IP user Users who have static IP addresses do not need to set DDNS service settings for remote access When you have finished connecting the camera using the LAN IP address and port forwarding you can access the camera directly from the Internet using the WAN IP address and port number
Click Show you will see the WAN IP as below
26
ww
wwwwwwffoossccaammccoomm
SShheennzzhheenn FFoossccaamm IInntteelllliiggeenntt TTeecchhnnoollooggyy CCoo LLiimmiitteedd
TTeell 8866 775555 22667744 55666688 FFaaxx 8866 775555 22667744 55116688 26
You can access the IP Camera from the Internet (remote access) Enter the WAN IP address and port number in IE browser or other browsers you use For example Http 218171601878888
Make sure port mapping (or also known as port forwarding) is successful You can do port mapping in two ways
1) Enter the setting page of the router to enable UPNP function Then login the camera as administrator choose UPnP Settings to enable UPNP and make sure the state is ldquoUPnP successrdquo
2) Do port forwarding manually (details Fig316)
For dynamic IP user
DDNS is a service that allows your IP Camera especially when assigned with a dynamic IP address to have a fixed host and domain name This means that even though your WAN IP address is constantly changing you will have a fixed hostname you can use to access your cameras at all times You can access the camera directly from the Internet using the hostname and port number
FOSCAM domain name Each Foscam camera has an embedded unique DDNS domain name the format of this domain name is xxxxxxmyfoscamorg On the camera body you can see the domain name sticker Here take cameramyfoscamorg for example Go to option of DDNS Service Settings on the administrator panel you can see the domain name(Figure 312)
Now you can use http Domain name + HTTP Port to access the camera via internet
Take hostname cameramyfoscamorg and HTTP Port no 8888 for example the accessing
link of the camera via internet would be http cameramyfoscamorg8888
27
ww
wwwwwwffoossccaammccoomm
SShheennzzhheenn FFoossccaamm IInntteelllliiggeenntt TTeecchhnnoollooggyy CCoo LLiimmiitteedd
TTeell 8866 775555 22667744 55666688 FFaaxx 8866 775555 22667744 55116688 27
Third Party Domain Name Settings
User can also use third part DDNS such as wwwno-ipcom www dyndnscom
Here take wwwno-ipcom for example
① Step 1 Go to the website wwwno-ipcom to create a free hostname
Firstly Login on wwwno-ipcom and click No-IP Free to register
Figure 313
Please register an account step by step according to instructions on wwwno-ipcom
After registration please login your email which used to register You will receive an email from
website please click the link to activate your ACCOUNT as indicated in email
Secondly Login the link with the registered username and password to create your
domain name
Click here to register
28
ww
wwwwwwffoossccaammccoomm
SShheennzzhheenn FFoossccaamm IInntteelllliiggeenntt TTeecchhnnoollooggyy CCoo LLiimmiitteedd
TTeell 8866 775555 22667744 55666688 FFaaxx 8866 775555 22667744 55116688 28
Figure 314
Figure 315
Please create the domain name step by step according to instructions on wwwno-ipcom
Step 2 DO DDNS Service Settings within the Camera
Please set Remote Access within the camera by hostname a user name and password
yoursquove got from wwwno-ipcom
29
ww
wwwwwwffoossccaammccoomm
SShheennzzhheenn FFoossccaamm IInntteelllliiggeenntt TTeecchhnnoollooggyy CCoo LLiimmiitteedd
TTeell 8866 775555 22667744 55666688 FFaaxx 8866 775555 22667744 55116688 29
Take hostname ycxgwpno-ipinfo user name foscam password foscam2012 for example
Firstly goes to option of Remote Access on the administrator panel
Secondly select No-Ip as a server in the Third Party DDNS
Thirdly fill foscam as DDNS user fill password foscam2012 as DDNS password fill
ycxgwpno-ipinfo as DDNS domain and server URL Then click save to make effect The
camera will restart and to take the DDNS settings effective
Please verify you have input the correct hostname user name and password
② Do port forwarding within the router
Example The camerarsquos LAN IP address is http19216813588
Firstly login the router goes to the menu of Port Forwarding or Port Trigger (or named Virtue Server on some brands of router) Take Linksys brand router as an example Login the
router and goes to Applications amp Gaming-gtSingle Port Forwarding
Secondly Create a new column by LAN IP address amp HTTP Port No of the camera within the
router showed as below
Figure 316
30
ww
wwwwwwffoossccaammccoomm
SShheennzzhheenn FFoossccaamm IInntteelllliiggeenntt TTeecchhnnoollooggyy CCoo LLiimmiitteedd
TTeell 8866 775555 22667744 55666688 FFaaxx 8866 775555 22667744 55116688 30
③ Use domain name to access the camera via internet
After the port forwarding is finished you can use the domain name+ http no to access the
camera via internet Take hostname ycxgwpno-ipinfo and http no 88for example the
accessing link of the camera via internet would be http ycxgwpno-ipinfo88
Upnp Port Forwarding If you select Enable that means you allow the IPCAM to open ports on the router automatically so that the video streams can be sent out form a LAN To utilize of this feature make sure that your router supports UPNP and it is activated Usually we recommend you do it manually (Figure 316)
31
ww
wwwwwwffoossccaammccoomm
SShheennzzhheenn FFoossccaamm IInntteelllliiggeenntt TTeecchhnnoollooggyy CCoo LLiimmiitteedd
TTeell 8866 775555 22667744 55666688 FFaaxx 8866 775555 22667744 55116688 31
36 Email Settings
If you want the camera to send emails when motion has been activated Email Settings will
need to be configured
Figure 317
Make sure your mailbox for sender supports SMTP Three recipients can be added to receive
images SMTP port is usually set as 25 If SMTP server supports SSI you should choose it The
subject and message cannot be Chinese characters
32
ww
wwwwwwffoossccaammccoomm
SShheennzzhheenn FFoossccaamm IInntteelllliiggeenntt TTeecchhnnoollooggyy CCoo LLiimmiitteedd
TTeell 8866 775555 22667744 55666688 FFaaxx 8866 775555 22667744 55116688 32
37 FTP Settings
If you want to upload images to your FTP server you can set FTP Settings
Figure 318
Figure 319
FTP server If your FTP server is set up in LAN you can set as Figure 318
If you have a FTP server which you can access on the internet you can set as Figure 319
FTP Port Usually the port is 21
If the FTP server mode is passive choose on or else choose off
Path The path of FTP that you plan to store images
Click Apply after settings
33
ww
wwwwwwffoossccaammccoomm
SShheennzzhheenn FFoossccaamm IInntteelllliiggeenntt TTeecchhnnoollooggyy CCoo LLiimmiitteedd
TTeell 8866 775555 22667744 55666688 FFaaxx 8866 775555 22667744 55116688 33
38 Auto Capture
The camera can capture pictures automatically at interval time if you have set auto capture
Figure 320
Snap interval The interval time between two snapshot actions The pictures will be stored to the
disk you set (you can set the storage path under ldquoFor Visitorrdquo)
Send E-mail Select it the camera will send email to you with the picture it has captured when
the camera alarmed
Click Apply after settings
34
ww
wwwwwwffoossccaammccoomm
SShheennzzhheenn FFoossccaamm IInntteelllliiggeenntt TTeecchhnnoollooggyy CCoo LLiimmiitteedd
TTeell 8866 775555 22667744 55666688 FFaaxx 8866 775555 22667744 55116688 34
39 Terminal
The camera has built-in cradle head yoursquod better not change the default settings (Figure 321)
or else you may not control the cradle head
Figure 321
310 Motion Detection
IP Camera supports Motion Detection when the motion has been detected it will send emails
or upload images to FTP
IP CAM supports four detection regions Choose the options dialog box before window1
window2 window3 window4 to enable the corresponding areas
For example choose window1Then you can see a box with a number at living video (Figure
322)
35
ww
wwwwwwffoossccaammccoomm
SShheennzzhheenn FFoossccaamm IInntteelllliiggeenntt TTeecchhnnoollooggyy CCoo LLiimmiitteedd
TTeell 8866 775555 22667744 55666688 FFaaxx 8866 775555 22667744 55116688 35
Figure 322
Move your mouse on the regional box and you can see the arrow icon then drag the regional
box to any position in the video
That means you choose window1
36
ww
wwwwwwffoossccaammccoomm
SShheennzzhheenn FFoossccaamm IInntteelllliiggeenntt TTeecchhnnoollooggyy CCoo LLiimmiitteedd
TTeell 8866 775555 22667744 55666688 FFaaxx 8866 775555 22667744 55116688 36
Figure 323
Move the mouse to the bottom right corner of the regional box When the mouse pattern changes
to ldquo rdquo you can change the size of the detection area
37
ww
wwwwwwffoossccaammccoomm
SShheennzzhheenn FFoossccaamm IInntteelllliiggeenntt TTeecchhnnoollooggyy CCoo LLiimmiitteedd
TTeell 8866 775555 22667744 55666688 FFaaxx 8866 775555 22667744 55116688 37
Figure 324
Move right or left and adjust the sensitivityClick apply after all settingsThe regional box
will blink with red color when something moving in your detection area
Drag it and change the size of
the alarm area
38
ww
wwwwwwffoossccaammccoomm
SShheennzzhheenn FFoossccaamm IInntteelllliiggeenntt TTeecchhnnoollooggyy CCoo LLiimmiitteedd
TTeell 8866 775555 22667744 55666688 FFaaxx 8866 775555 22667744 55116688 38
Figure 325
Note
1 If you add the dateamptime to the videodonrsquot put the detection window on the time area or else
the camera will alarm when the time change
2 If you have not set the motion detection areathe camera will not alarm at any time
3 Firefox Google chrome and Safari doesnrsquot have this function because the activex doesnrsquot
support it
4 Right click on the screen there are two graphic display modes Direct Draw and GDI Under
the GDI mode you cannot see the four detection regions when you select the window1window2
window3 window4
39
ww
wwwwwwffoossccaammccoomm
SShheennzzhheenn FFoossccaamm IInntteelllliiggeenntt TTeecchhnnoollooggyy CCoo LLiimmiitteedd
TTeell 8866 775555 22667744 55666688 FFaaxx 8866 775555 22667744 55116688 39
311 Alarm
IP CAM will send email or upload images when motion has been detected
Figure 326
Email Alarm Camera will send emails when motion is activated Make sure you have set Email
Settings first
Save Picture on the FTP Server To upload images to an FTP server when motion is detected
you must set FTP Settings first
Click Apply after settings
40
ww
wwwwwwffoossccaammccoomm
SShheennzzhheenn FFoossccaamm IInntteelllliiggeenntt TTeecchhnnoollooggyy CCoo LLiimmiitteedd
TTeell 8866 775555 22667744 55666688 FFaaxx 8866 775555 22667744 55116688 40
312 Schedule
If you want the camera alarm during the time you wish or all the time please choose Schedule
and set time range for motion alarm
Figure 327
There are two ways to set the alarm
1) Alarm at any time when motion is detected
Select All times and apply you settings the camera will alarm at any time when motion is
detected
2) Specify an alarm schedule
If you want the camera to alarm during a specify time you can select Use the week mode or Use
the work mode and set time range
Click apply the settings what you have done will take effect
If you click cancel the settings will come back to the status before your settings
If you want to reset all time range click clean
NOTE Adjust system time before set schedule
41
ww
wwwwwwffoossccaammccoomm
SShheennzzhheenn FFoossccaamm IInntteelllliiggeenntt TTeecchhnnoollooggyy CCoo LLiimmiitteedd
TTeell 8866 775555 22667744 55666688 FFaaxx 8866 775555 22667744 55116688 41
313 Video
Figure 328
Video format The format contains two kinds NTSC and PAL One camera only has one format
and you cannot change it
Resolution The camera supports First stream D1(704576)CIF(352288)QCIF(176144)
Second stream CIF(352288)QCIF(176144) The higher the resolution is the clearer video will
become But the code flux will become larger too and it will take up more bandwidth
Bit rate Generally speaking the larger the bit rate is the clearer video will become But the bit
rate configuration should combine well with the network bandwidth When the bandwidth is very
narrow and bit rate is large that will lead to video can not play well
42
ww
wwwwwwffoossccaammccoomm
SShheennzzhheenn FFoossccaamm IInntteelllliiggeenntt TTeecchhnnoollooggyy CCoo LLiimmiitteedd
TTeell 8866 775555 22667744 55666688 FFaaxx 8866 775555 22667744 55116688 42
Maximum frame rate When the video format is PAL the maximum frame rate is 25 fps When
the video format is NTSC the maximum frame rate is 30 fps You should lower frame rate when
the bandwidth is limited Normally when the frame rate above 15 you can achieve fluently video
Key Frame Interval The time between last key frame and next key frame
Bit rate control It has two models CBR and VBR If you choose CVR video encoder will be
coding on the basis of bit rate you set If you choose VBR video encoder will be coding not only
on the basis of bit rate but also consider video quality
Image Quality The smaller the value the better the image quality
Parenthesis options The camera name and time can be loaded to the video screen through
this option If you set as following picture (Figure 330) you will see the video as Figure329 The
camera name cannot be Chinese characters
Figure 329
Figure 330
43
ww
wwwwwwffoossccaammccoomm
SShheennzzhheenn FFoossccaamm IInntteelllliiggeenntt TTeecchhnnoollooggyy CCoo LLiimmiitteedd
TTeell 8866 775555 22667744 55666688 FFaaxx 8866 775555 22667744 55116688 43
314 Image Settings
Adjust the quality of the video by setting the image parameters
Figure 331
Brightness saturation contrast and hue are used to adjust the quality of the video Camera will
save your settings if you click apply If you want to quit settings you have done and restore the
status before your setting please click cancel The function of Default is used to restore the initial
settings
44
ww
wwwwwwffoossccaammccoomm
SShheennzzhheenn FFoossccaamm IInntteelllliiggeenntt TTeecchhnnoollooggyy CCoo LLiimmiitteedd
TTeell 8866 775555 22667744 55666688 FFaaxx 8866 775555 22667744 55116688 44
315 Initialize
Reboot Click reboot the infection is the same as plug the power and re-plug it
Factory default Click it all parameters will return to factory settings
Backup setting data If you donrsquot want to quit all parameters that yoursquove set You can click save
and all the parameters you set will be stored as a parameters bin file
Restore Click browse choose the correct bin file and then click ok to get all parameters which
you set before
Upgrade Click Browse choose the correct bin file and then click OK to upgrade Donrsquot shut
down the power during upgrade
Figure 332
316 Back
This will take you back to the video window
45
ww
wwwwwwffoossccaammccoomm
SShheennzzhheenn FFoossccaamm IInntteelllliiggeenntt TTeecchhnnoollooggyy CCoo LLiimmiitteedd
TTeell 8866 775555 22667744 55666688 FFaaxx 8866 775555 22667744 55116688 45
4 Other Settings
Use Mobile to login
If the camera has been linked to Internet set the parameters of the camera and router Make
sure the camera can be accessed by domain name and WAN IP
For example the WAN IP is1833754137 the domain name is ycxgwpno-ipinfo Then open
the mobile IE enter the following URL you can login the camera http
1833754137mobilehtml or
http1833754137wapwml or httpycxgwpno-ipinfomobilehtml or
http ycxgwpno-ipinfo wapwml
If the HTTP port num isnrsquot 80 you should add the port num to the URL
http1833754137portnummobilehtml
or http ycxgwpno-ipinfoport nummobilehtml
46
ww
wwwwwwffoossccaammccoomm
SShheennzzhheenn FFoossccaamm IInntteelllliiggeenntt TTeecchhnnoollooggyy CCoo LLiimmiitteedd
TTeell 8866 775555 22667744 55666688 FFaaxx 8866 775555 22667744 55116688 46
5 APPENDIX
51 Frequently Asked Questions
NOTE Any questions you would meet please check Network connections firstly Check the
working status revealed by the indicators on the network server hub exchange and network
card If abnormal check the network connections
511 I have forgotten the administrator password
To reset the administrator password you had better unplug the network cable firstly After that
press and hold down the RESET BUTTON about 10 seconds Releasing the reset button the
password will turn to the factory default
Default administrator username admin password admin
Default user username user password user
Default guest username guest password guest
512 Subnet doesnrsquot match
Check whether your ipcamera in the same subnet of your computer The step is Control PanelNetwork ConnectionsDbclick Local Area Connections Choose eneralProperties (Figure 3637) Check subnet mask IP address and gateways When you set IP address please make sure they are in the same subnet Otherwise you cant access camera
513 Download and install the ActiveX
Please click button in the Login interface Install the ActiveX after download
47
ww
wwwwwwffoossccaammccoomm
SShheennzzhheenn FFoossccaamm IInntteelllliiggeenntt TTeecchhnnoollooggyy CCoo LLiimmiitteedd
TTeell 8866 775555 22667744 55666688 FFaaxx 8866 775555 22667744 55116688 47
Figure 51
Click next
Figure 52
Click Install
48
ww
wwwwwwffoossccaammccoomm
SShheennzzhheenn FFoossccaamm IInntteelllliiggeenntt TTeecchhnnoollooggyy CCoo LLiimmiitteedd
TTeell 8866 775555 22667744 55666688 FFaaxx 8866 775555 22667744 55116688 48
Figure 53
Only click Finish and the computer restarts upon installation completion
Re-login the camera and you can see the surveillance window
514 No Pictures Problems
The video streaming is transmitted by the ActiveX controller If ActiveX controller isnrsquot installed
correctly you will see no video image You can resolve this problem by this way
Download ActiveX controller and set the safety property of IE in the PC when you view it first
time IE browserToolInternet ProperSecurityCustom LevelActiveX control and
Plug-ins Three options of front should be set to be ldquoEnablerdquo The ActiveX programs read by the
computer will be stored As follows
Enable Download unsigned ActiveX controls
Enable Initialize and script ActiveX controls not marked as safe
Enable Run ActiveX controls and plug-ins
49
ww
wwwwwwffoossccaammccoomm
SShheennzzhheenn FFoossccaamm IInntteelllliiggeenntt TTeecchhnnoollooggyy CCoo LLiimmiitteedd
TTeell 8866 775555 22667744 55666688 FFaaxx 8866 775555 22667744 55116688 49
Figure 54
If you allow the ActiveX running but still could not see living video Please change another port
number to try Donrsquot use port 80 use any port between 1024 and 49151
Figure55
NOTE Make sure that your firewall or anti-virus software does not block the camera or ActiveX
If you could not see video please shut down firewall or anti-virus software to try again
50
ww
wwwwwwffoossccaammccoomm
SShheennzzhheenn FFoossccaamm IInntteelllliiggeenntt TTeecchhnnoollooggyy CCoo LLiimmiitteedd
TTeell 8866 775555 22667744 55666688 FFaaxx 8866 775555 22667744 55116688 50
515 I cannot see the video on Firefox or Safari or Google chrome
If you cannot see live video after login the camera it may be the reason that the defaults transmit
protocol of QuickTime streaming is not HTTP or the port is not 80
For Firefox Safari and Google chrome you should install Quick Time Player as the ActiveX
controller please configure the activex controller as the following picture
Select PreferencesmdashQuickTime Preferenceshellip
Figure 56
Choose HTTP as the transport protocol
Figure 57
51
ww
wwwwwwffoossccaammccoomm
SShheennzzhheenn FFoossccaamm IInntteelllliiggeenntt TTeecchhnnoollooggyy CCoo LLiimmiitteedd
TTeell 8866 775555 22667744 55666688 FFaaxx 8866 775555 22667744 55116688 51
516 I cannot see video on MAC OS
If you cannot see live video after login FOSCAM H264 camera it may be the reason that the
defaults transmit protocol of QuickTime streaming is not HTTP or the port is not 80
Please follow the below steps and make the protocol and port correct and you can see live video
then
Steps
Click ldquoGordquo ---------gt Choose ldquoUtilitiesrdquo ----------gt Open ldquoTerminalapprdquo ------------gt Check the
default protocol and port of QuickTime streaming by inputting the URL
ldquoqtdefaults read transportSettingsrdquo
If the protocol is not HTTP or the port is not 80 please input the URL
ldquoqtdefaults write transportSettings HTTP 80rdquo to change it
After changing it you can also check if it is successful by URL
ldquoqtdefaults read transportSettingsrdquo
Please refer to the below pictures for the above steps
Figure 58
52
ww
wwwwwwffoossccaammccoomm
SShheennzzhheenn FFoossccaamm IInntteelllliiggeenntt TTeecchhnnoollooggyy CCoo LLiimmiitteedd
TTeell 8866 775555 22667744 55666688 FFaaxx 8866 775555 22667744 55116688 52
Figure 59
Figure 510
517 Canrsquot access IP camera in internet
There are some reasons
1 ActiveX controller is not installed correctly (Figure51-53)
2 The port which camera used is blocked by Firewall or Anti-virus software Please change
another port number and try again (Figure55)
3 Port forwarding is not successful
53
ww
wwwwwwffoossccaammccoomm
SShheennzzhheenn FFoossccaamm IInntteelllliiggeenntt TTeecchhnnoollooggyy CCoo LLiimmiitteedd
TTeell 8866 775555 22667744 55666688 FFaaxx 8866 775555 22667744 55116688 53
Check these settings and make sure they are correct
518 UPnP always failed
UPnP only contains port forwarding in our recent software Sometimes it may be failed to do port
forwarding automatically because of firewall or anti-virus software It also has much relation with
routerrsquos security settings So we recommend you do port forwarding manually You can view
your camera in internet successfully after you do port forwarding manually in your
router(Figure316)
519 Canrsquot operate the cradle head
If you canrsquot operate the cradle head such as click the button but the cradle head can not
move Usually the cradle head canrsquot operate mainly because of wrong settings Please donrsquot
change the default settings or else you canrsquot operate it You can see the following figure which is
the default settings Sometimes you need to press the reset button and restore the default
settings
Figure511
52 Default Parameters
Default network Parameters
IP address obtain dynamically
Subnet mask obtain dynamically
Gateway obtain dynamically
DDNS Embedded FOSCAM DDNS Service
Username and password
Default admin username admin Default password admin
Default user username user Default password user
Default guest username guest Default password guest
54
ww
wwwwwwffoossccaammccoomm
SShheennzzhheenn FFoossccaamm IInntteelllliiggeenntt TTeecchhnnoollooggyy CCoo LLiimmiitteedd
TTeell 8866 775555 22667744 55666688 FFaaxx 8866 775555 22667744 55116688 54
53 Specifications
Specification FI8620
Image Sensor
Image Sensor 480TVL 14 SONY Color CCD Sensor
Optical variable times 10 times
Lens F 38-38mm F12
Mini Illumination multicolour 005Lux black and white0001Lux
Video
Video Formats Supports NTSC or PAL Formats
Image Compression H264
ImageFrame Rate 25fps(PAL Formats)30fps(NTSC Formats)Down adjustable
Image Resolution D1(720576)CIF(352288)QCIF(176144)
View H264 dual streaming
Focusing autohand-switchkeying automatic
digital continuous autofocus ulsg
Image adjust The brightness contrast is adjustable
White balance Automatic white balance
Backlight
compensation Automatic backlight compensation
SNR gt60DB (AGC OFF)
Network
Ethernet One 10100Mbps RJ-45
Supported Protocol TCPIPUDPIPHTTPSMTPFTPDHCPDNSDDNS
UPNPPOP3RTSP
Support IP address static IP address dynamic IP address
Alarm Alarm detection The motion detecting detection threshold Settings
Alarm inform Support EmailFTP etc alarm inform way
Hardware
Interface
POWER Interface DC 12V20A (EUUSAU adapter or other types optional)
Power Consumption ﹤6 Watts
Reset Buttons One Reset
Network Interface One 10100Mbps RJ-45
Environment
Operate Temper 0deg ~ 55degC (32degF ~ 131degF)
Operate Humidity 10 ~ 80 non-condensing
Storage Temper -10degC ~ 60deg (14degF ~ 140degF)
Storage Humidity 0 ~ 90 non-condensing
Physical
Horizontal speed 1-250deg S
Vertical speed 1-100deg S
PanTilt Angle Horizontal360deg amp Vertical 90deg
Dimension 270(L) x 170(W) x 260(H)mm
Net Weight 1935g
Gross Weight 2674g
PC
Requirements
CPU 20GHZ or above (suggested 30GHz)
Memory Size 256MB or above (suggested 10GHz)
Display Card 64M or above
55
ww
wwwwwwffoossccaammccoomm
SShheennzzhheenn FFoossccaamm IInntteelllliiggeenntt TTeecchhnnoollooggyy CCoo LLiimmiitteedd
TTeell 8866 775555 22667744 55666688 FFaaxx 8866 775555 22667744 55116688 55
Supported OS Microsoft Windows 2000XPVista Mac OS
Browser IE6 and above version or compatible browser Firefox Chrome
Safari or other standard browsers
Certificate CEFCC CEFCC
Software Upgrade Upgrade from network
Application Software H264 Camera Client
6 OBTAINING TECHNICAL SUPPORT
While we hope your experience with the IPCAM network camera is enjoyable and easy to use
you may experience some issues or have questions that this Userrsquos Guide has not answered
If you have problem with FOSCAM IP camera please first contact FOSCAM reseller for
solving the problems If our reseller cannot provide service please contact our service
department techfoscamcom
2
ww
wwwwwwffoossccaammccoomm
SShheennzzhheenn FFoossccaamm IInntteelllliiggeenntt TTeecchhnnoollooggyy CCoo LLiimmiitteedd
TTeell 8866 775555 22667744 55666688 FFaaxx 8866 775555 22667744 55116688 2
53 Specifications 54
6 OBTAINING TECHNICAL SUPPORT 55
11 OOvveerrvviieewwss
IPCAM is an integrated wired IP Camera solution It combines a high quality digital video camera
with network connectivity and a powerful web server on your desktop from anywhere on your
local network or over the internet
FI8620 supports the industry-standard H264 compression technology drastically reducing file
sizes and conserving valuable network bandwidth With flexible 360-degree pan90-degree tilt
and 10X optical zoom IPCAM gives users more comprehensive control over a monitored site
The IPCAM is based on the TCPIP standard There is a WEB server inside which could support
Internet Explore Therefore the management and maintenance of your device is simplified by
using the network to achieve the remote configuration start-up and to upgrade the firmware
The camera is designed for outdoor surveillance applications such as supermarket bank and
school Controlling the IPCAM and managing images are simplified by using the provided web
interface across the network connectivity
3
ww
wwwwwwffoossccaammccoomm
SShheennzzhheenn FFoossccaamm IInntteelllliiggeenntt TTeecchhnnoollooggyy CCoo LLiimmiitteedd
TTeell 8866 775555 22667744 55666688 FFaaxx 8866 775555 22667744 55116688 3
1111 KKeeyy FFeeaattuurreess
Standard H264 video compression algorithm to satisfy the transmission of high definition
video in narrow bandwidth network
Network self-adapting function adjust stream and encoding frame rate automatically
according to network bandwidth
Supports IEFirefoxGoogleSafari browser or any other standard browsers
Supports 10X optical zoom
Pan 360 degree tilt 90 degree
Supports mobile watch
Supports dual-stream
Supports RTSP port
Embedded FOSCAM DDNS(dynamic domain name service) Service
Supports remote viewing amp record from anywhere anytime
Supporting Third Party Domain name
Multi-level users management with password protection
Embedded Web Server for users to visit by IE
Motion detection alert via email or upload image to FTP
Supports multiple network protocols HTTP TCP IP UDP FTP DHCP DDNS UPNP
RTSP
Providing CMS software to manage or monitor multiple cameras
1122 RReeaadd BBeeffoorree UUssee
Please first verify that all contents received are complete according to the Package Contents
listed below Before the Network Camera is installed please carefully read and follow the
instructions in the Quick Installation Guide to avoid damage due to faulty assembly and
installation This also ensures the product is used properly as intended
1133 PPaacckkiinngg CCoonntteennttss
IPCAMtimes1 CDtimes1
DC Power Supplytimes1 Quick Installation Guidetimes1
Mounting brackettimes1(option)
Warranty Cardtimes1
Network Cabletimes1
4
ww
wwwwwwffoossccaammccoomm
SShheennzzhheenn FFoossccaamm IInntteelllliiggeenntt TTeecchhnnoollooggyy CCoo LLiimmiitteedd
TTeell 8866 775555 22667744 55666688 FFaaxx 8866 775555 22667744 55116688 4
1144 PPhhyyssiiccaall DDeessccrriippttiioonn
Front Panel
Figure 11
The camera lens has variable optical zoom The biggest optical zoom time is 10 times With this
function you can see farther and clearer
Interface
Figure 12
1) Power Interface Connect the external power adapter request for 12V2A power
2) Reset button Press and hold on the reset button for 10 seconds Releasing the reset
button the password will back to the factory default administrator password The default
administrator username and password are all admin You must power on the camera before
reset
3) LAN 10100M adaptive Ethernet interface Through this interface IPCAM can be connected
with various network devices such as hub router etc
5
ww
wwwwwwffoossccaammccoomm
SShheennzzhheenn FFoossccaamm IInntteelllliiggeenntt TTeecchhnnoollooggyy CCoo LLiimmiitteedd
TTeell 8866 775555 22667744 55666688 FFaaxx 8866 775555 22667744 55116688 5
Bottom View
There are up to two labels located on the body of the camera this is an important feature of
original Foscam cameras If your camera does not have labels as shown in Figure 13 it may be
a clone one Cloned Foscam cameras can not use original firmware and are not eligible for
warranty or technical services
Figure 13
SN of FOSCAM
MAC address of wired
connection
FOSCAM DDNS Service
6
ww
wwwwwwffoossccaammccoomm
SShheennzzhheenn FFoossccaamm IInntteelllliiggeenntt TTeecchhnnoollooggyy CCoo LLiimmiitteedd
TTeell 8866 775555 22667744 55666688 FFaaxx 8866 775555 22667744 55116688 6
22 SSuurrvveeiillllaannccee SSooffttwwaarree GGUUII
Please refer to the Quick Installation Guide if you install the camera at first time After finishing
quick installation you can take time to learn the operation of the software
2211 LLooggiinn WWiinnddooww
Figure 21
Please check the login window above it was divided to 5 sections from no 1 to 5
Section1 Select Language
FOSCAM camera supports up to multi-languages such as English Spanish Deutsch and so on
You can select the language you need via click on the select language bar to switch
Section2 Video View Login Button
For PC please select the login button under Video View
Section3 Mobile View Login Button
If you are using the Mobile to access the camera here you need to select Mobile View login
button
1
2
3
4
5
7
ww
wwwwwwffoossccaammccoomm
SShheennzzhheenn FFoossccaamm IInntteelllliiggeenntt TTeecchhnnoollooggyy CCoo LLiimmiitteedd
TTeell 8866 775555 22667744 55666688 FFaaxx 8866 775555 22667744 55116688 7
Section4 Download ActiveX
For IE users the ActiveX have been embedded in the IP Camera Tool so if you have installed
the IP Camera Tool you need not download again If you use Firefox Google Chrome Safari or
others you should download and install QuickTime Player as the ActiveX from other website
For remote IE users first time you use the IPCAM you may need download and install the
ActiveX (Please read chapter 51 in Appendix about how to download and install the ActiveX)
Section5 Attention
For better viewing here we suggest using 1024768 screen resolution
Click the PC login button under Video View you will see the video window
For Internet Explorer
Figure 22
8
ww
wwwwwwffoossccaammccoomm
SShheennzzhheenn FFoossccaamm IInntteelllliiggeenntt TTeecchhnnoollooggyy CCoo LLiimmiitteedd
TTeell 8866 775555 22667744 55666688 FFaaxx 8866 775555 22667744 55116688 8
If you could not view living video after running the ActiveX only a red cross in the center
of the video or just a black screen Please change another port number to try
Make sure all firewall or antivirus software on your computer does not block the active download
and installation If you are unable to run the ActiveX control try shutting down the firewall or
antivirus program
For Firefox Google Chrome and Safari
Install the Quick Time Player and fill in user name and password then login you will see the
living video
Figure 23
9
ww
wwwwwwffoossccaammccoomm
SShheennzzhheenn FFoossccaamm IInntteelllliiggeenntt TTeecchhnnoollooggyy CCoo LLiimmiitteedd
TTeell 8866 775555 22667744 55666688 FFaaxx 8866 775555 22667744 55116688 9
22 Surveillance Window
Select the PC login mode and you will enter the surveillance window
Figure 24
For Visitor For Operator For Administrator
Camera supports three-level users management admin user and guest
The default ldquoadminrdquo username and password are all ldquoadminrdquo the default ldquouserrdquo username and
password are all ldquouserrdquo and the default ldquoguestrdquo username and password are all ldquoguestrdquo For first
using please go to For Administrator-gt User Settings panel to change the password and
against illegal access
Different users have different permissions Admin user has the highest authority He can do any settings User account can do settings below For Visitor and For Operator Guest account can do settings below For Visitor
1
2
3
5
6
7
4
10
ww
wwwwwwffoossccaammccoomm
SShheennzzhheenn FFoossccaamm IInntteelllliiggeenntt TTeecchhnnoollooggyy CCoo LLiimmiitteedd
TTeell 8866 775555 22667744 55666688 FFaaxx 8866 775555 22667744 55116688 10
Section1 View
The resolution contains D1(720576) CIF(352288) QCIF(176144) and Auto You can choose First Stream or Second Stream to adjust the view window
Note When the network bandwidth is bad yoursquod better select Second Stream and the video will
be more fluency
Section2 CaptureRecordPlaybackSet Path Buttons
Capture Click this icon the current living picture will be stored to a predetermined path
The default storage path is D disk You can click this button to change the storage path
Record Click the icon The camera will begin recording and store the recorded file to the
folder you set And the status column will display REC when recording Click again it will stop
recording The default storage path is D disk You can click this button to change the
storage path
Figure 25
11
ww
wwwwwwffoossccaammccoomm
SShheennzzhheenn FFoossccaamm IInntteelllliiggeenntt TTeecchhnnoollooggyy CCoo LLiimmiitteedd
TTeell 8866 775555 22667744 55666688 FFaaxx 8866 775555 22667744 55116688 11
Playback Click the button it will pop up a player And you can see the videos you have
stored in your computer
Figure 26
Set Path Set the storage path of photos and videos The default storage path is D disk
Note These buttons are controlled by the ActiveX controller therefore Firefox Google Chrome
and Safari cannot allow to these functions
Section3 PanTilt ZoomFocus Control
1------Up control button 2------Down control button
3------Left control button 4------Right control button
1
2
3 4
12
ww
wwwwwwffoossccaammccoomm
SShheennzzhheenn FFoossccaamm IInntteelllliiggeenntt TTeecchhnnoollooggyy CCoo LLiimmiitteedd
TTeell 8866 775555 22667744 55666688 FFaaxx 8866 775555 22667744 55116688 12
Zoom inout The lens has 10x optical zoom The biggest optical zoom time is 10 times
Focus +- This function can help you see more clearly
Section4 Preset Go PTZ Speed
1) Preset----------Support 8 preset position which is considered enough for DIY home amp small
business surveillance market
2) Set----------- Click Set to save the position you need the camera to remember
3) Go----------- Click Go to make the camera move the preset position
4) Number button from 1 to 8--------You can click the number button with preset position and the
camera will go to the preset position
5) PTZ Speed-------- The default PTZ speed is 45 you can change another one between 1 and
63 The larger the number the faster the speed will be
How to do preset position
We can start preset settings from position 1
Firstly select no 1 within the menu of Preset on the panel
Secondly move the camera and stop at a place where you want make preset position
Thirdly click set button to save it as position 1 and you have done preset of position 1
After that you can select no 2 within the menu of Preset on the panel and move the camera and
stop at another place and set as preset position 2 You can do all the 8 preset positions with this
method
If you want to see the preset position you have set such as the position 1 only select the set
no1 and click go button the camera will go to position no1
13
ww
wwwwwwffoossccaammccoomm
SShheennzzhheenn FFoossccaamm IInntteelllliiggeenntt TTeecchhnnoollooggyy CCoo LLiimmiitteedd
TTeell 8866 775555 22667744 55666688 FFaaxx 8866 775555 22667744 55116688 13
Section5 For Administrator
Path to Administrator Control Panel Click it and it will lead to Administrator Control Panel
Section6 OSD
If you have added time and camera name in the video you can see it in the surveillance window
Go to For Administrator ---Video panel and you can add camera name and time on the live
window Here you can change another device name The default device name is IP Camera
Go to For Administrator ---DateampTime settings panel and adjust the device time
Section7 Status bar
Figure 27
There is a status column below the view window (Figure27) 1) The current state of IPCAM
2) After the view has been digital amplified click the icon the view will be digital narrowed 3) Click the icon the view window will be digital amplified
4) Click the icon the view window will restore the original size
NOTE Firefox Google Chrome and Safari have not these functions because the ActiveX does
not support it
14
ww
wwwwwwffoossccaammccoomm
SShheennzzhheenn FFoossccaamm IInntteelllliiggeenntt TTeecchhnnoollooggyy CCoo LLiimmiitteedd
TTeell 8866 775555 22667744 55666688 FFaaxx 8866 775555 22667744 55116688 14
Onscreen Mouse Control
Put the mouse on the screen and you can see a arrow Press the mouse and the camerarsquos len
will move to the corresponding direction
For example put the mouse on the upper-right corner of the screen and you can see a arrow
press the mouse then the cameras lens will move toward the upper-right direction
When the icon has three arrows the speed of the rotation is fastest And when the icon has one
arrow the speed is lowest
Figure 28
Put the mouse at the center of the living video you will see the icon of the magnifying glass
(Figure 29) Press the left mouse and you can use the optical zoom
Figure 29
15
ww
wwwwwwffoossccaammccoomm
SShheennzzhheenn FFoossccaamm IInntteelllliiggeenntt TTeecchhnnoollooggyy CCoo LLiimmiitteedd
TTeell 8866 775555 22667744 55666688 FFaaxx 8866 775555 22667744 55116688 15
Right click on the screen you can see two graphic display modes Direct Draw and GDI The
default mode is Direct Draw and almost graphic card support this mode But some old graphic
card cannot display normally under Direct Draw you can select GDI to try again
Figure 210
NOTE
Under GDI mode you cannot see the motion detect region lines when set motion detection(For
more details read chapter 310 Motion Detection)
16
ww
wwwwwwffoossccaammccoomm
SShheennzzhheenn FFoossccaamm IInntteelllliiggeenntt TTeecchhnnoollooggyy CCoo LLiimmiitteedd
TTeell 8866 775555 22667744 55666688 FFaaxx 8866 775555 22667744 55116688 16
33 AAddvvaanncceedd CCaammeerraa SSeettttiinnggss Click the bar ldquoFor Administratorrdquo goes to Administrator Control Panel to make advanced camera
settings
31 Device Information
Click For Administrator you will see the Device Information
It contains Device ID firmware version of the camera and other status of the camera
Device ID It displays ldquoIP Camerardquo This ID is different form the camera name You can set any
camera name you like for the camera in ldquoFor Administratormdashgt VideomdashgtParenthesis Optionsrdquo
and the camera name can be showed at the video window but the device ID will always display
IP Camera
Network Connection LAN If the camera gets wired connection successfully here will show
LAN
Current Client It shows that how many people are viewing the video For example the Current
Client shows 0 that means no people are viewing the video If someone have logged in the
camera but do not open the video the Current Client will not change
Device Firmware VersionDevice Embedded Web UI Version The camerarsquos software
version
Mac Address Each camera has its own MAC ID For example Device ID is 00606E8C5058 the
same MAC ID sticker is found at the bottomback of the camera
17
ww
wwwwwwffoossccaammccoomm
SShheennzzhheenn FFoossccaamm IInntteelllliiggeenntt TTeecchhnnoollooggyy CCoo LLiimmiitteedd
TTeell 8866 775555 22667744 55666688 FFaaxx 8866 775555 22667744 55116688 17
32 Date amp Time Settings
There are four models for you to adjust time Manual setting Sync with computer time Network
Time Protocol and Keep current time choose one model and adjust the camera time Then
choose Time zone
Manual settings The administrator can enter the date and time manually Note that the date
and time format is [yyyymmdd] and [hhmmss]
Network Time Protocol It is a protocol which synchronizes computer clocks by periodically
querying an NTP server
Interval The interval time between last time and next time that the camera adjust time with Ntp
Server
Time zoneSelect the appropriate time zone from the list
Figure 31
If your country implements the Daylight Saving Time when you select the Time zone you can
see the following screen
18
ww
wwwwwwffoossccaammccoomm
SShheennzzhheenn FFoossccaamm IInntteelllliiggeenntt TTeecchhnnoollooggyy CCoo LLiimmiitteedd
TTeell 8866 775555 22667744 55666688 FFaaxx 8866 775555 22667744 55116688 18
Figure 32
The camera will adjust the daylight saving time automatically if you select ldquoAutomatically adjust
clock for daylight saving time changesrdquo
19
ww
wwwwwwffoossccaammccoomm
SShheennzzhheenn FFoossccaamm IInntteelllliiggeenntt TTeecchhnnoollooggyy CCoo LLiimmiitteedd
TTeell 8866 775555 22667744 55666688 FFaaxx 8866 775555 22667744 55116688 19
33 User Settings
The camera has set up 3-level user permissions user names are admin user guest and the
default passwords are admin user guest too
Different user has different permission Only admin can do advanced settings under For
Administrator page User account can operate For Visitor and For Operator page Guest account
only can do settings under For Visitor
Please reset the passwords at first using and prevent unauthorized users login the camera
Click Apply to save these settings
Figure 33
Note You cannot change the user name and the passwords cannot be null
20
ww
wwwwwwffoossccaammccoomm
SShheennzzhheenn FFoossccaamm IInntteelllliiggeenntt TTeecchhnnoollooggyy CCoo LLiimmiitteedd
TTeell 8866 775555 22667744 55666688 FFaaxx 8866 775555 22667744 55116688 20
34 Basic Network Settings
IP Configuration Type contains two types Fixed IP Address and Dynamic IP Address Set the
appropriate type for you Keep the camera in the same subnet of your router or computer
Fixed IP Address Select this option to manually assign a static IP address to the Network
Camera
Dynamic IP Address Select this option to obtain an available dynamic IP address assigned by
the DHCP server each time the camera is connected to the LAN
Figure 34 If you want to set a static IP for the camera you should keep the camera in the same subnet of
your router or computer The DNS Configuration Type has two types Manual DNS and From
DHCP Server If you donrsquot know the subnet mask gateway and DNS server you can check your
computerrsquos local area connection It contains all the information
The step is Control PanelNetwork ConnectionsDouble click Local Area Connections
Choose GeneralProperties You will see all the information in it
21
ww
wwwwwwffoossccaammccoomm
SShheennzzhheenn FFoossccaamm IInntteelllliiggeenntt TTeecchhnnoollooggyy CCoo LLiimmiitteedd
TTeell 8866 775555 22667744 55666688 FFaaxx 8866 775555 22667744 55116688 21
Figure 35
Figure 36
Click here
Set the same subnet
mask and gateway of
your camera with your PC
There are two DNS servers you
can set the same for your camera
Same with gateway is also OK
22
ww
wwwwwwffoossccaammccoomm
SShheennzzhheenn FFoossccaamm IInntteelllliiggeenntt TTeecchhnnoollooggyy CCoo LLiimmiitteedd
TTeell 8866 775555 22667744 55666688 FFaaxx 8866 775555 22667744 55116688 22
If you donrsquot know the DNS server you can use the same settings as the default Gateway
HTTP Port number The HTTP Port can be used to access the IPCAM on the LAN Usually it is
80 You can set any number between 1024 and 49151 too
After all settings click Apply You will see the following picture click OK and re-connect the
camera
Figure 37
RTSP port number Usually it is 554 You can set any number between 1024 and 49151 too
Click Apply and the camera will reboot
Enter rtsp IPRTSP port number11 or rtsp IPRTSP port number12 into the VLC you can
see the real-time preview WAN IP or LAN IP is OK If the RTSP port number is 554 you can
directly enter the following url rtsp IP11 or rtspIP12 The number ldquo11rdquo shows that you will
use first stream The numberrdquo12rdquo shows that you will use second stream For example
Enter rtsp1921681116911 in the VLC
RTSP Permission Checksum
On Select it and you need to enter the login username and password when you view the
real-time preview in the VLC
Off Select it and you do not need to enter the login username and password
Figure 38
23
ww
wwwwwwffoossccaammccoomm
SShheennzzhheenn FFoossccaamm IInntteelllliiggeenntt TTeecchhnnoollooggyy CCoo LLiimmiitteedd
TTeell 8866 775555 22667744 55666688 FFaaxx 8866 775555 22667744 55116688 23
Figure 39
You need to enter the user name and password if you select on for RTSP Permission Checksum
Click OK and you can see the real-time preview
Figure 310
24
ww
wwwwwwffoossccaammccoomm
SShheennzzhheenn FFoossccaamm IInntteelllliiggeenntt TTeecchhnnoollooggyy CCoo LLiimmiitteedd
TTeell 8866 775555 22667744 55666688 FFaaxx 8866 775555 22667744 55116688 24
Figure 311
NOTE 1 Yoursquod better not change the HTTP and RTSP port number at the same time because
you cannot submit successfully
2 After changing the RTSP or HTTP port number the camera will restart
3 If you cannot play the video in the VLC player please check the port mapping (Figure 316)
25
ww
wwwwwwffoossccaammccoomm
SShheennzzhheenn FFoossccaamm IInntteelllliiggeenntt TTeecchhnnoollooggyy CCoo LLiimmiitteedd
TTeell 8866 775555 22667744 55666688 FFaaxx 8866 775555 22667744 55116688 25
35 Remote Access
This section will tell you how to access the camera form WAN
Figure 312
Static IP user Users who have static IP addresses do not need to set DDNS service settings for remote access When you have finished connecting the camera using the LAN IP address and port forwarding you can access the camera directly from the Internet using the WAN IP address and port number
Click Show you will see the WAN IP as below
26
ww
wwwwwwffoossccaammccoomm
SShheennzzhheenn FFoossccaamm IInntteelllliiggeenntt TTeecchhnnoollooggyy CCoo LLiimmiitteedd
TTeell 8866 775555 22667744 55666688 FFaaxx 8866 775555 22667744 55116688 26
You can access the IP Camera from the Internet (remote access) Enter the WAN IP address and port number in IE browser or other browsers you use For example Http 218171601878888
Make sure port mapping (or also known as port forwarding) is successful You can do port mapping in two ways
1) Enter the setting page of the router to enable UPNP function Then login the camera as administrator choose UPnP Settings to enable UPNP and make sure the state is ldquoUPnP successrdquo
2) Do port forwarding manually (details Fig316)
For dynamic IP user
DDNS is a service that allows your IP Camera especially when assigned with a dynamic IP address to have a fixed host and domain name This means that even though your WAN IP address is constantly changing you will have a fixed hostname you can use to access your cameras at all times You can access the camera directly from the Internet using the hostname and port number
FOSCAM domain name Each Foscam camera has an embedded unique DDNS domain name the format of this domain name is xxxxxxmyfoscamorg On the camera body you can see the domain name sticker Here take cameramyfoscamorg for example Go to option of DDNS Service Settings on the administrator panel you can see the domain name(Figure 312)
Now you can use http Domain name + HTTP Port to access the camera via internet
Take hostname cameramyfoscamorg and HTTP Port no 8888 for example the accessing
link of the camera via internet would be http cameramyfoscamorg8888
27
ww
wwwwwwffoossccaammccoomm
SShheennzzhheenn FFoossccaamm IInntteelllliiggeenntt TTeecchhnnoollooggyy CCoo LLiimmiitteedd
TTeell 8866 775555 22667744 55666688 FFaaxx 8866 775555 22667744 55116688 27
Third Party Domain Name Settings
User can also use third part DDNS such as wwwno-ipcom www dyndnscom
Here take wwwno-ipcom for example
① Step 1 Go to the website wwwno-ipcom to create a free hostname
Firstly Login on wwwno-ipcom and click No-IP Free to register
Figure 313
Please register an account step by step according to instructions on wwwno-ipcom
After registration please login your email which used to register You will receive an email from
website please click the link to activate your ACCOUNT as indicated in email
Secondly Login the link with the registered username and password to create your
domain name
Click here to register
28
ww
wwwwwwffoossccaammccoomm
SShheennzzhheenn FFoossccaamm IInntteelllliiggeenntt TTeecchhnnoollooggyy CCoo LLiimmiitteedd
TTeell 8866 775555 22667744 55666688 FFaaxx 8866 775555 22667744 55116688 28
Figure 314
Figure 315
Please create the domain name step by step according to instructions on wwwno-ipcom
Step 2 DO DDNS Service Settings within the Camera
Please set Remote Access within the camera by hostname a user name and password
yoursquove got from wwwno-ipcom
29
ww
wwwwwwffoossccaammccoomm
SShheennzzhheenn FFoossccaamm IInntteelllliiggeenntt TTeecchhnnoollooggyy CCoo LLiimmiitteedd
TTeell 8866 775555 22667744 55666688 FFaaxx 8866 775555 22667744 55116688 29
Take hostname ycxgwpno-ipinfo user name foscam password foscam2012 for example
Firstly goes to option of Remote Access on the administrator panel
Secondly select No-Ip as a server in the Third Party DDNS
Thirdly fill foscam as DDNS user fill password foscam2012 as DDNS password fill
ycxgwpno-ipinfo as DDNS domain and server URL Then click save to make effect The
camera will restart and to take the DDNS settings effective
Please verify you have input the correct hostname user name and password
② Do port forwarding within the router
Example The camerarsquos LAN IP address is http19216813588
Firstly login the router goes to the menu of Port Forwarding or Port Trigger (or named Virtue Server on some brands of router) Take Linksys brand router as an example Login the
router and goes to Applications amp Gaming-gtSingle Port Forwarding
Secondly Create a new column by LAN IP address amp HTTP Port No of the camera within the
router showed as below
Figure 316
30
ww
wwwwwwffoossccaammccoomm
SShheennzzhheenn FFoossccaamm IInntteelllliiggeenntt TTeecchhnnoollooggyy CCoo LLiimmiitteedd
TTeell 8866 775555 22667744 55666688 FFaaxx 8866 775555 22667744 55116688 30
③ Use domain name to access the camera via internet
After the port forwarding is finished you can use the domain name+ http no to access the
camera via internet Take hostname ycxgwpno-ipinfo and http no 88for example the
accessing link of the camera via internet would be http ycxgwpno-ipinfo88
Upnp Port Forwarding If you select Enable that means you allow the IPCAM to open ports on the router automatically so that the video streams can be sent out form a LAN To utilize of this feature make sure that your router supports UPNP and it is activated Usually we recommend you do it manually (Figure 316)
31
ww
wwwwwwffoossccaammccoomm
SShheennzzhheenn FFoossccaamm IInntteelllliiggeenntt TTeecchhnnoollooggyy CCoo LLiimmiitteedd
TTeell 8866 775555 22667744 55666688 FFaaxx 8866 775555 22667744 55116688 31
36 Email Settings
If you want the camera to send emails when motion has been activated Email Settings will
need to be configured
Figure 317
Make sure your mailbox for sender supports SMTP Three recipients can be added to receive
images SMTP port is usually set as 25 If SMTP server supports SSI you should choose it The
subject and message cannot be Chinese characters
32
ww
wwwwwwffoossccaammccoomm
SShheennzzhheenn FFoossccaamm IInntteelllliiggeenntt TTeecchhnnoollooggyy CCoo LLiimmiitteedd
TTeell 8866 775555 22667744 55666688 FFaaxx 8866 775555 22667744 55116688 32
37 FTP Settings
If you want to upload images to your FTP server you can set FTP Settings
Figure 318
Figure 319
FTP server If your FTP server is set up in LAN you can set as Figure 318
If you have a FTP server which you can access on the internet you can set as Figure 319
FTP Port Usually the port is 21
If the FTP server mode is passive choose on or else choose off
Path The path of FTP that you plan to store images
Click Apply after settings
33
ww
wwwwwwffoossccaammccoomm
SShheennzzhheenn FFoossccaamm IInntteelllliiggeenntt TTeecchhnnoollooggyy CCoo LLiimmiitteedd
TTeell 8866 775555 22667744 55666688 FFaaxx 8866 775555 22667744 55116688 33
38 Auto Capture
The camera can capture pictures automatically at interval time if you have set auto capture
Figure 320
Snap interval The interval time between two snapshot actions The pictures will be stored to the
disk you set (you can set the storage path under ldquoFor Visitorrdquo)
Send E-mail Select it the camera will send email to you with the picture it has captured when
the camera alarmed
Click Apply after settings
34
ww
wwwwwwffoossccaammccoomm
SShheennzzhheenn FFoossccaamm IInntteelllliiggeenntt TTeecchhnnoollooggyy CCoo LLiimmiitteedd
TTeell 8866 775555 22667744 55666688 FFaaxx 8866 775555 22667744 55116688 34
39 Terminal
The camera has built-in cradle head yoursquod better not change the default settings (Figure 321)
or else you may not control the cradle head
Figure 321
310 Motion Detection
IP Camera supports Motion Detection when the motion has been detected it will send emails
or upload images to FTP
IP CAM supports four detection regions Choose the options dialog box before window1
window2 window3 window4 to enable the corresponding areas
For example choose window1Then you can see a box with a number at living video (Figure
322)
35
ww
wwwwwwffoossccaammccoomm
SShheennzzhheenn FFoossccaamm IInntteelllliiggeenntt TTeecchhnnoollooggyy CCoo LLiimmiitteedd
TTeell 8866 775555 22667744 55666688 FFaaxx 8866 775555 22667744 55116688 35
Figure 322
Move your mouse on the regional box and you can see the arrow icon then drag the regional
box to any position in the video
That means you choose window1
36
ww
wwwwwwffoossccaammccoomm
SShheennzzhheenn FFoossccaamm IInntteelllliiggeenntt TTeecchhnnoollooggyy CCoo LLiimmiitteedd
TTeell 8866 775555 22667744 55666688 FFaaxx 8866 775555 22667744 55116688 36
Figure 323
Move the mouse to the bottom right corner of the regional box When the mouse pattern changes
to ldquo rdquo you can change the size of the detection area
37
ww
wwwwwwffoossccaammccoomm
SShheennzzhheenn FFoossccaamm IInntteelllliiggeenntt TTeecchhnnoollooggyy CCoo LLiimmiitteedd
TTeell 8866 775555 22667744 55666688 FFaaxx 8866 775555 22667744 55116688 37
Figure 324
Move right or left and adjust the sensitivityClick apply after all settingsThe regional box
will blink with red color when something moving in your detection area
Drag it and change the size of
the alarm area
38
ww
wwwwwwffoossccaammccoomm
SShheennzzhheenn FFoossccaamm IInntteelllliiggeenntt TTeecchhnnoollooggyy CCoo LLiimmiitteedd
TTeell 8866 775555 22667744 55666688 FFaaxx 8866 775555 22667744 55116688 38
Figure 325
Note
1 If you add the dateamptime to the videodonrsquot put the detection window on the time area or else
the camera will alarm when the time change
2 If you have not set the motion detection areathe camera will not alarm at any time
3 Firefox Google chrome and Safari doesnrsquot have this function because the activex doesnrsquot
support it
4 Right click on the screen there are two graphic display modes Direct Draw and GDI Under
the GDI mode you cannot see the four detection regions when you select the window1window2
window3 window4
39
ww
wwwwwwffoossccaammccoomm
SShheennzzhheenn FFoossccaamm IInntteelllliiggeenntt TTeecchhnnoollooggyy CCoo LLiimmiitteedd
TTeell 8866 775555 22667744 55666688 FFaaxx 8866 775555 22667744 55116688 39
311 Alarm
IP CAM will send email or upload images when motion has been detected
Figure 326
Email Alarm Camera will send emails when motion is activated Make sure you have set Email
Settings first
Save Picture on the FTP Server To upload images to an FTP server when motion is detected
you must set FTP Settings first
Click Apply after settings
40
ww
wwwwwwffoossccaammccoomm
SShheennzzhheenn FFoossccaamm IInntteelllliiggeenntt TTeecchhnnoollooggyy CCoo LLiimmiitteedd
TTeell 8866 775555 22667744 55666688 FFaaxx 8866 775555 22667744 55116688 40
312 Schedule
If you want the camera alarm during the time you wish or all the time please choose Schedule
and set time range for motion alarm
Figure 327
There are two ways to set the alarm
1) Alarm at any time when motion is detected
Select All times and apply you settings the camera will alarm at any time when motion is
detected
2) Specify an alarm schedule
If you want the camera to alarm during a specify time you can select Use the week mode or Use
the work mode and set time range
Click apply the settings what you have done will take effect
If you click cancel the settings will come back to the status before your settings
If you want to reset all time range click clean
NOTE Adjust system time before set schedule
41
ww
wwwwwwffoossccaammccoomm
SShheennzzhheenn FFoossccaamm IInntteelllliiggeenntt TTeecchhnnoollooggyy CCoo LLiimmiitteedd
TTeell 8866 775555 22667744 55666688 FFaaxx 8866 775555 22667744 55116688 41
313 Video
Figure 328
Video format The format contains two kinds NTSC and PAL One camera only has one format
and you cannot change it
Resolution The camera supports First stream D1(704576)CIF(352288)QCIF(176144)
Second stream CIF(352288)QCIF(176144) The higher the resolution is the clearer video will
become But the code flux will become larger too and it will take up more bandwidth
Bit rate Generally speaking the larger the bit rate is the clearer video will become But the bit
rate configuration should combine well with the network bandwidth When the bandwidth is very
narrow and bit rate is large that will lead to video can not play well
42
ww
wwwwwwffoossccaammccoomm
SShheennzzhheenn FFoossccaamm IInntteelllliiggeenntt TTeecchhnnoollooggyy CCoo LLiimmiitteedd
TTeell 8866 775555 22667744 55666688 FFaaxx 8866 775555 22667744 55116688 42
Maximum frame rate When the video format is PAL the maximum frame rate is 25 fps When
the video format is NTSC the maximum frame rate is 30 fps You should lower frame rate when
the bandwidth is limited Normally when the frame rate above 15 you can achieve fluently video
Key Frame Interval The time between last key frame and next key frame
Bit rate control It has two models CBR and VBR If you choose CVR video encoder will be
coding on the basis of bit rate you set If you choose VBR video encoder will be coding not only
on the basis of bit rate but also consider video quality
Image Quality The smaller the value the better the image quality
Parenthesis options The camera name and time can be loaded to the video screen through
this option If you set as following picture (Figure 330) you will see the video as Figure329 The
camera name cannot be Chinese characters
Figure 329
Figure 330
43
ww
wwwwwwffoossccaammccoomm
SShheennzzhheenn FFoossccaamm IInntteelllliiggeenntt TTeecchhnnoollooggyy CCoo LLiimmiitteedd
TTeell 8866 775555 22667744 55666688 FFaaxx 8866 775555 22667744 55116688 43
314 Image Settings
Adjust the quality of the video by setting the image parameters
Figure 331
Brightness saturation contrast and hue are used to adjust the quality of the video Camera will
save your settings if you click apply If you want to quit settings you have done and restore the
status before your setting please click cancel The function of Default is used to restore the initial
settings
44
ww
wwwwwwffoossccaammccoomm
SShheennzzhheenn FFoossccaamm IInntteelllliiggeenntt TTeecchhnnoollooggyy CCoo LLiimmiitteedd
TTeell 8866 775555 22667744 55666688 FFaaxx 8866 775555 22667744 55116688 44
315 Initialize
Reboot Click reboot the infection is the same as plug the power and re-plug it
Factory default Click it all parameters will return to factory settings
Backup setting data If you donrsquot want to quit all parameters that yoursquove set You can click save
and all the parameters you set will be stored as a parameters bin file
Restore Click browse choose the correct bin file and then click ok to get all parameters which
you set before
Upgrade Click Browse choose the correct bin file and then click OK to upgrade Donrsquot shut
down the power during upgrade
Figure 332
316 Back
This will take you back to the video window
45
ww
wwwwwwffoossccaammccoomm
SShheennzzhheenn FFoossccaamm IInntteelllliiggeenntt TTeecchhnnoollooggyy CCoo LLiimmiitteedd
TTeell 8866 775555 22667744 55666688 FFaaxx 8866 775555 22667744 55116688 45
4 Other Settings
Use Mobile to login
If the camera has been linked to Internet set the parameters of the camera and router Make
sure the camera can be accessed by domain name and WAN IP
For example the WAN IP is1833754137 the domain name is ycxgwpno-ipinfo Then open
the mobile IE enter the following URL you can login the camera http
1833754137mobilehtml or
http1833754137wapwml or httpycxgwpno-ipinfomobilehtml or
http ycxgwpno-ipinfo wapwml
If the HTTP port num isnrsquot 80 you should add the port num to the URL
http1833754137portnummobilehtml
or http ycxgwpno-ipinfoport nummobilehtml
46
ww
wwwwwwffoossccaammccoomm
SShheennzzhheenn FFoossccaamm IInntteelllliiggeenntt TTeecchhnnoollooggyy CCoo LLiimmiitteedd
TTeell 8866 775555 22667744 55666688 FFaaxx 8866 775555 22667744 55116688 46
5 APPENDIX
51 Frequently Asked Questions
NOTE Any questions you would meet please check Network connections firstly Check the
working status revealed by the indicators on the network server hub exchange and network
card If abnormal check the network connections
511 I have forgotten the administrator password
To reset the administrator password you had better unplug the network cable firstly After that
press and hold down the RESET BUTTON about 10 seconds Releasing the reset button the
password will turn to the factory default
Default administrator username admin password admin
Default user username user password user
Default guest username guest password guest
512 Subnet doesnrsquot match
Check whether your ipcamera in the same subnet of your computer The step is Control PanelNetwork ConnectionsDbclick Local Area Connections Choose eneralProperties (Figure 3637) Check subnet mask IP address and gateways When you set IP address please make sure they are in the same subnet Otherwise you cant access camera
513 Download and install the ActiveX
Please click button in the Login interface Install the ActiveX after download
47
ww
wwwwwwffoossccaammccoomm
SShheennzzhheenn FFoossccaamm IInntteelllliiggeenntt TTeecchhnnoollooggyy CCoo LLiimmiitteedd
TTeell 8866 775555 22667744 55666688 FFaaxx 8866 775555 22667744 55116688 47
Figure 51
Click next
Figure 52
Click Install
48
ww
wwwwwwffoossccaammccoomm
SShheennzzhheenn FFoossccaamm IInntteelllliiggeenntt TTeecchhnnoollooggyy CCoo LLiimmiitteedd
TTeell 8866 775555 22667744 55666688 FFaaxx 8866 775555 22667744 55116688 48
Figure 53
Only click Finish and the computer restarts upon installation completion
Re-login the camera and you can see the surveillance window
514 No Pictures Problems
The video streaming is transmitted by the ActiveX controller If ActiveX controller isnrsquot installed
correctly you will see no video image You can resolve this problem by this way
Download ActiveX controller and set the safety property of IE in the PC when you view it first
time IE browserToolInternet ProperSecurityCustom LevelActiveX control and
Plug-ins Three options of front should be set to be ldquoEnablerdquo The ActiveX programs read by the
computer will be stored As follows
Enable Download unsigned ActiveX controls
Enable Initialize and script ActiveX controls not marked as safe
Enable Run ActiveX controls and plug-ins
49
ww
wwwwwwffoossccaammccoomm
SShheennzzhheenn FFoossccaamm IInntteelllliiggeenntt TTeecchhnnoollooggyy CCoo LLiimmiitteedd
TTeell 8866 775555 22667744 55666688 FFaaxx 8866 775555 22667744 55116688 49
Figure 54
If you allow the ActiveX running but still could not see living video Please change another port
number to try Donrsquot use port 80 use any port between 1024 and 49151
Figure55
NOTE Make sure that your firewall or anti-virus software does not block the camera or ActiveX
If you could not see video please shut down firewall or anti-virus software to try again
50
ww
wwwwwwffoossccaammccoomm
SShheennzzhheenn FFoossccaamm IInntteelllliiggeenntt TTeecchhnnoollooggyy CCoo LLiimmiitteedd
TTeell 8866 775555 22667744 55666688 FFaaxx 8866 775555 22667744 55116688 50
515 I cannot see the video on Firefox or Safari or Google chrome
If you cannot see live video after login the camera it may be the reason that the defaults transmit
protocol of QuickTime streaming is not HTTP or the port is not 80
For Firefox Safari and Google chrome you should install Quick Time Player as the ActiveX
controller please configure the activex controller as the following picture
Select PreferencesmdashQuickTime Preferenceshellip
Figure 56
Choose HTTP as the transport protocol
Figure 57
51
ww
wwwwwwffoossccaammccoomm
SShheennzzhheenn FFoossccaamm IInntteelllliiggeenntt TTeecchhnnoollooggyy CCoo LLiimmiitteedd
TTeell 8866 775555 22667744 55666688 FFaaxx 8866 775555 22667744 55116688 51
516 I cannot see video on MAC OS
If you cannot see live video after login FOSCAM H264 camera it may be the reason that the
defaults transmit protocol of QuickTime streaming is not HTTP or the port is not 80
Please follow the below steps and make the protocol and port correct and you can see live video
then
Steps
Click ldquoGordquo ---------gt Choose ldquoUtilitiesrdquo ----------gt Open ldquoTerminalapprdquo ------------gt Check the
default protocol and port of QuickTime streaming by inputting the URL
ldquoqtdefaults read transportSettingsrdquo
If the protocol is not HTTP or the port is not 80 please input the URL
ldquoqtdefaults write transportSettings HTTP 80rdquo to change it
After changing it you can also check if it is successful by URL
ldquoqtdefaults read transportSettingsrdquo
Please refer to the below pictures for the above steps
Figure 58
52
ww
wwwwwwffoossccaammccoomm
SShheennzzhheenn FFoossccaamm IInntteelllliiggeenntt TTeecchhnnoollooggyy CCoo LLiimmiitteedd
TTeell 8866 775555 22667744 55666688 FFaaxx 8866 775555 22667744 55116688 52
Figure 59
Figure 510
517 Canrsquot access IP camera in internet
There are some reasons
1 ActiveX controller is not installed correctly (Figure51-53)
2 The port which camera used is blocked by Firewall or Anti-virus software Please change
another port number and try again (Figure55)
3 Port forwarding is not successful
53
ww
wwwwwwffoossccaammccoomm
SShheennzzhheenn FFoossccaamm IInntteelllliiggeenntt TTeecchhnnoollooggyy CCoo LLiimmiitteedd
TTeell 8866 775555 22667744 55666688 FFaaxx 8866 775555 22667744 55116688 53
Check these settings and make sure they are correct
518 UPnP always failed
UPnP only contains port forwarding in our recent software Sometimes it may be failed to do port
forwarding automatically because of firewall or anti-virus software It also has much relation with
routerrsquos security settings So we recommend you do port forwarding manually You can view
your camera in internet successfully after you do port forwarding manually in your
router(Figure316)
519 Canrsquot operate the cradle head
If you canrsquot operate the cradle head such as click the button but the cradle head can not
move Usually the cradle head canrsquot operate mainly because of wrong settings Please donrsquot
change the default settings or else you canrsquot operate it You can see the following figure which is
the default settings Sometimes you need to press the reset button and restore the default
settings
Figure511
52 Default Parameters
Default network Parameters
IP address obtain dynamically
Subnet mask obtain dynamically
Gateway obtain dynamically
DDNS Embedded FOSCAM DDNS Service
Username and password
Default admin username admin Default password admin
Default user username user Default password user
Default guest username guest Default password guest
54
ww
wwwwwwffoossccaammccoomm
SShheennzzhheenn FFoossccaamm IInntteelllliiggeenntt TTeecchhnnoollooggyy CCoo LLiimmiitteedd
TTeell 8866 775555 22667744 55666688 FFaaxx 8866 775555 22667744 55116688 54
53 Specifications
Specification FI8620
Image Sensor
Image Sensor 480TVL 14 SONY Color CCD Sensor
Optical variable times 10 times
Lens F 38-38mm F12
Mini Illumination multicolour 005Lux black and white0001Lux
Video
Video Formats Supports NTSC or PAL Formats
Image Compression H264
ImageFrame Rate 25fps(PAL Formats)30fps(NTSC Formats)Down adjustable
Image Resolution D1(720576)CIF(352288)QCIF(176144)
View H264 dual streaming
Focusing autohand-switchkeying automatic
digital continuous autofocus ulsg
Image adjust The brightness contrast is adjustable
White balance Automatic white balance
Backlight
compensation Automatic backlight compensation
SNR gt60DB (AGC OFF)
Network
Ethernet One 10100Mbps RJ-45
Supported Protocol TCPIPUDPIPHTTPSMTPFTPDHCPDNSDDNS
UPNPPOP3RTSP
Support IP address static IP address dynamic IP address
Alarm Alarm detection The motion detecting detection threshold Settings
Alarm inform Support EmailFTP etc alarm inform way
Hardware
Interface
POWER Interface DC 12V20A (EUUSAU adapter or other types optional)
Power Consumption ﹤6 Watts
Reset Buttons One Reset
Network Interface One 10100Mbps RJ-45
Environment
Operate Temper 0deg ~ 55degC (32degF ~ 131degF)
Operate Humidity 10 ~ 80 non-condensing
Storage Temper -10degC ~ 60deg (14degF ~ 140degF)
Storage Humidity 0 ~ 90 non-condensing
Physical
Horizontal speed 1-250deg S
Vertical speed 1-100deg S
PanTilt Angle Horizontal360deg amp Vertical 90deg
Dimension 270(L) x 170(W) x 260(H)mm
Net Weight 1935g
Gross Weight 2674g
PC
Requirements
CPU 20GHZ or above (suggested 30GHz)
Memory Size 256MB or above (suggested 10GHz)
Display Card 64M or above
55
ww
wwwwwwffoossccaammccoomm
SShheennzzhheenn FFoossccaamm IInntteelllliiggeenntt TTeecchhnnoollooggyy CCoo LLiimmiitteedd
TTeell 8866 775555 22667744 55666688 FFaaxx 8866 775555 22667744 55116688 55
Supported OS Microsoft Windows 2000XPVista Mac OS
Browser IE6 and above version or compatible browser Firefox Chrome
Safari or other standard browsers
Certificate CEFCC CEFCC
Software Upgrade Upgrade from network
Application Software H264 Camera Client
6 OBTAINING TECHNICAL SUPPORT
While we hope your experience with the IPCAM network camera is enjoyable and easy to use
you may experience some issues or have questions that this Userrsquos Guide has not answered
If you have problem with FOSCAM IP camera please first contact FOSCAM reseller for
solving the problems If our reseller cannot provide service please contact our service
department techfoscamcom
3
ww
wwwwwwffoossccaammccoomm
SShheennzzhheenn FFoossccaamm IInntteelllliiggeenntt TTeecchhnnoollooggyy CCoo LLiimmiitteedd
TTeell 8866 775555 22667744 55666688 FFaaxx 8866 775555 22667744 55116688 3
1111 KKeeyy FFeeaattuurreess
Standard H264 video compression algorithm to satisfy the transmission of high definition
video in narrow bandwidth network
Network self-adapting function adjust stream and encoding frame rate automatically
according to network bandwidth
Supports IEFirefoxGoogleSafari browser or any other standard browsers
Supports 10X optical zoom
Pan 360 degree tilt 90 degree
Supports mobile watch
Supports dual-stream
Supports RTSP port
Embedded FOSCAM DDNS(dynamic domain name service) Service
Supports remote viewing amp record from anywhere anytime
Supporting Third Party Domain name
Multi-level users management with password protection
Embedded Web Server for users to visit by IE
Motion detection alert via email or upload image to FTP
Supports multiple network protocols HTTP TCP IP UDP FTP DHCP DDNS UPNP
RTSP
Providing CMS software to manage or monitor multiple cameras
1122 RReeaadd BBeeffoorree UUssee
Please first verify that all contents received are complete according to the Package Contents
listed below Before the Network Camera is installed please carefully read and follow the
instructions in the Quick Installation Guide to avoid damage due to faulty assembly and
installation This also ensures the product is used properly as intended
1133 PPaacckkiinngg CCoonntteennttss
IPCAMtimes1 CDtimes1
DC Power Supplytimes1 Quick Installation Guidetimes1
Mounting brackettimes1(option)
Warranty Cardtimes1
Network Cabletimes1
4
ww
wwwwwwffoossccaammccoomm
SShheennzzhheenn FFoossccaamm IInntteelllliiggeenntt TTeecchhnnoollooggyy CCoo LLiimmiitteedd
TTeell 8866 775555 22667744 55666688 FFaaxx 8866 775555 22667744 55116688 4
1144 PPhhyyssiiccaall DDeessccrriippttiioonn
Front Panel
Figure 11
The camera lens has variable optical zoom The biggest optical zoom time is 10 times With this
function you can see farther and clearer
Interface
Figure 12
1) Power Interface Connect the external power adapter request for 12V2A power
2) Reset button Press and hold on the reset button for 10 seconds Releasing the reset
button the password will back to the factory default administrator password The default
administrator username and password are all admin You must power on the camera before
reset
3) LAN 10100M adaptive Ethernet interface Through this interface IPCAM can be connected
with various network devices such as hub router etc
5
ww
wwwwwwffoossccaammccoomm
SShheennzzhheenn FFoossccaamm IInntteelllliiggeenntt TTeecchhnnoollooggyy CCoo LLiimmiitteedd
TTeell 8866 775555 22667744 55666688 FFaaxx 8866 775555 22667744 55116688 5
Bottom View
There are up to two labels located on the body of the camera this is an important feature of
original Foscam cameras If your camera does not have labels as shown in Figure 13 it may be
a clone one Cloned Foscam cameras can not use original firmware and are not eligible for
warranty or technical services
Figure 13
SN of FOSCAM
MAC address of wired
connection
FOSCAM DDNS Service
6
ww
wwwwwwffoossccaammccoomm
SShheennzzhheenn FFoossccaamm IInntteelllliiggeenntt TTeecchhnnoollooggyy CCoo LLiimmiitteedd
TTeell 8866 775555 22667744 55666688 FFaaxx 8866 775555 22667744 55116688 6
22 SSuurrvveeiillllaannccee SSooffttwwaarree GGUUII
Please refer to the Quick Installation Guide if you install the camera at first time After finishing
quick installation you can take time to learn the operation of the software
2211 LLooggiinn WWiinnddooww
Figure 21
Please check the login window above it was divided to 5 sections from no 1 to 5
Section1 Select Language
FOSCAM camera supports up to multi-languages such as English Spanish Deutsch and so on
You can select the language you need via click on the select language bar to switch
Section2 Video View Login Button
For PC please select the login button under Video View
Section3 Mobile View Login Button
If you are using the Mobile to access the camera here you need to select Mobile View login
button
1
2
3
4
5
7
ww
wwwwwwffoossccaammccoomm
SShheennzzhheenn FFoossccaamm IInntteelllliiggeenntt TTeecchhnnoollooggyy CCoo LLiimmiitteedd
TTeell 8866 775555 22667744 55666688 FFaaxx 8866 775555 22667744 55116688 7
Section4 Download ActiveX
For IE users the ActiveX have been embedded in the IP Camera Tool so if you have installed
the IP Camera Tool you need not download again If you use Firefox Google Chrome Safari or
others you should download and install QuickTime Player as the ActiveX from other website
For remote IE users first time you use the IPCAM you may need download and install the
ActiveX (Please read chapter 51 in Appendix about how to download and install the ActiveX)
Section5 Attention
For better viewing here we suggest using 1024768 screen resolution
Click the PC login button under Video View you will see the video window
For Internet Explorer
Figure 22
8
ww
wwwwwwffoossccaammccoomm
SShheennzzhheenn FFoossccaamm IInntteelllliiggeenntt TTeecchhnnoollooggyy CCoo LLiimmiitteedd
TTeell 8866 775555 22667744 55666688 FFaaxx 8866 775555 22667744 55116688 8
If you could not view living video after running the ActiveX only a red cross in the center
of the video or just a black screen Please change another port number to try
Make sure all firewall or antivirus software on your computer does not block the active download
and installation If you are unable to run the ActiveX control try shutting down the firewall or
antivirus program
For Firefox Google Chrome and Safari
Install the Quick Time Player and fill in user name and password then login you will see the
living video
Figure 23
9
ww
wwwwwwffoossccaammccoomm
SShheennzzhheenn FFoossccaamm IInntteelllliiggeenntt TTeecchhnnoollooggyy CCoo LLiimmiitteedd
TTeell 8866 775555 22667744 55666688 FFaaxx 8866 775555 22667744 55116688 9
22 Surveillance Window
Select the PC login mode and you will enter the surveillance window
Figure 24
For Visitor For Operator For Administrator
Camera supports three-level users management admin user and guest
The default ldquoadminrdquo username and password are all ldquoadminrdquo the default ldquouserrdquo username and
password are all ldquouserrdquo and the default ldquoguestrdquo username and password are all ldquoguestrdquo For first
using please go to For Administrator-gt User Settings panel to change the password and
against illegal access
Different users have different permissions Admin user has the highest authority He can do any settings User account can do settings below For Visitor and For Operator Guest account can do settings below For Visitor
1
2
3
5
6
7
4
10
ww
wwwwwwffoossccaammccoomm
SShheennzzhheenn FFoossccaamm IInntteelllliiggeenntt TTeecchhnnoollooggyy CCoo LLiimmiitteedd
TTeell 8866 775555 22667744 55666688 FFaaxx 8866 775555 22667744 55116688 10
Section1 View
The resolution contains D1(720576) CIF(352288) QCIF(176144) and Auto You can choose First Stream or Second Stream to adjust the view window
Note When the network bandwidth is bad yoursquod better select Second Stream and the video will
be more fluency
Section2 CaptureRecordPlaybackSet Path Buttons
Capture Click this icon the current living picture will be stored to a predetermined path
The default storage path is D disk You can click this button to change the storage path
Record Click the icon The camera will begin recording and store the recorded file to the
folder you set And the status column will display REC when recording Click again it will stop
recording The default storage path is D disk You can click this button to change the
storage path
Figure 25
11
ww
wwwwwwffoossccaammccoomm
SShheennzzhheenn FFoossccaamm IInntteelllliiggeenntt TTeecchhnnoollooggyy CCoo LLiimmiitteedd
TTeell 8866 775555 22667744 55666688 FFaaxx 8866 775555 22667744 55116688 11
Playback Click the button it will pop up a player And you can see the videos you have
stored in your computer
Figure 26
Set Path Set the storage path of photos and videos The default storage path is D disk
Note These buttons are controlled by the ActiveX controller therefore Firefox Google Chrome
and Safari cannot allow to these functions
Section3 PanTilt ZoomFocus Control
1------Up control button 2------Down control button
3------Left control button 4------Right control button
1
2
3 4
12
ww
wwwwwwffoossccaammccoomm
SShheennzzhheenn FFoossccaamm IInntteelllliiggeenntt TTeecchhnnoollooggyy CCoo LLiimmiitteedd
TTeell 8866 775555 22667744 55666688 FFaaxx 8866 775555 22667744 55116688 12
Zoom inout The lens has 10x optical zoom The biggest optical zoom time is 10 times
Focus +- This function can help you see more clearly
Section4 Preset Go PTZ Speed
1) Preset----------Support 8 preset position which is considered enough for DIY home amp small
business surveillance market
2) Set----------- Click Set to save the position you need the camera to remember
3) Go----------- Click Go to make the camera move the preset position
4) Number button from 1 to 8--------You can click the number button with preset position and the
camera will go to the preset position
5) PTZ Speed-------- The default PTZ speed is 45 you can change another one between 1 and
63 The larger the number the faster the speed will be
How to do preset position
We can start preset settings from position 1
Firstly select no 1 within the menu of Preset on the panel
Secondly move the camera and stop at a place where you want make preset position
Thirdly click set button to save it as position 1 and you have done preset of position 1
After that you can select no 2 within the menu of Preset on the panel and move the camera and
stop at another place and set as preset position 2 You can do all the 8 preset positions with this
method
If you want to see the preset position you have set such as the position 1 only select the set
no1 and click go button the camera will go to position no1
13
ww
wwwwwwffoossccaammccoomm
SShheennzzhheenn FFoossccaamm IInntteelllliiggeenntt TTeecchhnnoollooggyy CCoo LLiimmiitteedd
TTeell 8866 775555 22667744 55666688 FFaaxx 8866 775555 22667744 55116688 13
Section5 For Administrator
Path to Administrator Control Panel Click it and it will lead to Administrator Control Panel
Section6 OSD
If you have added time and camera name in the video you can see it in the surveillance window
Go to For Administrator ---Video panel and you can add camera name and time on the live
window Here you can change another device name The default device name is IP Camera
Go to For Administrator ---DateampTime settings panel and adjust the device time
Section7 Status bar
Figure 27
There is a status column below the view window (Figure27) 1) The current state of IPCAM
2) After the view has been digital amplified click the icon the view will be digital narrowed 3) Click the icon the view window will be digital amplified
4) Click the icon the view window will restore the original size
NOTE Firefox Google Chrome and Safari have not these functions because the ActiveX does
not support it
14
ww
wwwwwwffoossccaammccoomm
SShheennzzhheenn FFoossccaamm IInntteelllliiggeenntt TTeecchhnnoollooggyy CCoo LLiimmiitteedd
TTeell 8866 775555 22667744 55666688 FFaaxx 8866 775555 22667744 55116688 14
Onscreen Mouse Control
Put the mouse on the screen and you can see a arrow Press the mouse and the camerarsquos len
will move to the corresponding direction
For example put the mouse on the upper-right corner of the screen and you can see a arrow
press the mouse then the cameras lens will move toward the upper-right direction
When the icon has three arrows the speed of the rotation is fastest And when the icon has one
arrow the speed is lowest
Figure 28
Put the mouse at the center of the living video you will see the icon of the magnifying glass
(Figure 29) Press the left mouse and you can use the optical zoom
Figure 29
15
ww
wwwwwwffoossccaammccoomm
SShheennzzhheenn FFoossccaamm IInntteelllliiggeenntt TTeecchhnnoollooggyy CCoo LLiimmiitteedd
TTeell 8866 775555 22667744 55666688 FFaaxx 8866 775555 22667744 55116688 15
Right click on the screen you can see two graphic display modes Direct Draw and GDI The
default mode is Direct Draw and almost graphic card support this mode But some old graphic
card cannot display normally under Direct Draw you can select GDI to try again
Figure 210
NOTE
Under GDI mode you cannot see the motion detect region lines when set motion detection(For
more details read chapter 310 Motion Detection)
16
ww
wwwwwwffoossccaammccoomm
SShheennzzhheenn FFoossccaamm IInntteelllliiggeenntt TTeecchhnnoollooggyy CCoo LLiimmiitteedd
TTeell 8866 775555 22667744 55666688 FFaaxx 8866 775555 22667744 55116688 16
33 AAddvvaanncceedd CCaammeerraa SSeettttiinnggss Click the bar ldquoFor Administratorrdquo goes to Administrator Control Panel to make advanced camera
settings
31 Device Information
Click For Administrator you will see the Device Information
It contains Device ID firmware version of the camera and other status of the camera
Device ID It displays ldquoIP Camerardquo This ID is different form the camera name You can set any
camera name you like for the camera in ldquoFor Administratormdashgt VideomdashgtParenthesis Optionsrdquo
and the camera name can be showed at the video window but the device ID will always display
IP Camera
Network Connection LAN If the camera gets wired connection successfully here will show
LAN
Current Client It shows that how many people are viewing the video For example the Current
Client shows 0 that means no people are viewing the video If someone have logged in the
camera but do not open the video the Current Client will not change
Device Firmware VersionDevice Embedded Web UI Version The camerarsquos software
version
Mac Address Each camera has its own MAC ID For example Device ID is 00606E8C5058 the
same MAC ID sticker is found at the bottomback of the camera
17
ww
wwwwwwffoossccaammccoomm
SShheennzzhheenn FFoossccaamm IInntteelllliiggeenntt TTeecchhnnoollooggyy CCoo LLiimmiitteedd
TTeell 8866 775555 22667744 55666688 FFaaxx 8866 775555 22667744 55116688 17
32 Date amp Time Settings
There are four models for you to adjust time Manual setting Sync with computer time Network
Time Protocol and Keep current time choose one model and adjust the camera time Then
choose Time zone
Manual settings The administrator can enter the date and time manually Note that the date
and time format is [yyyymmdd] and [hhmmss]
Network Time Protocol It is a protocol which synchronizes computer clocks by periodically
querying an NTP server
Interval The interval time between last time and next time that the camera adjust time with Ntp
Server
Time zoneSelect the appropriate time zone from the list
Figure 31
If your country implements the Daylight Saving Time when you select the Time zone you can
see the following screen
18
ww
wwwwwwffoossccaammccoomm
SShheennzzhheenn FFoossccaamm IInntteelllliiggeenntt TTeecchhnnoollooggyy CCoo LLiimmiitteedd
TTeell 8866 775555 22667744 55666688 FFaaxx 8866 775555 22667744 55116688 18
Figure 32
The camera will adjust the daylight saving time automatically if you select ldquoAutomatically adjust
clock for daylight saving time changesrdquo
19
ww
wwwwwwffoossccaammccoomm
SShheennzzhheenn FFoossccaamm IInntteelllliiggeenntt TTeecchhnnoollooggyy CCoo LLiimmiitteedd
TTeell 8866 775555 22667744 55666688 FFaaxx 8866 775555 22667744 55116688 19
33 User Settings
The camera has set up 3-level user permissions user names are admin user guest and the
default passwords are admin user guest too
Different user has different permission Only admin can do advanced settings under For
Administrator page User account can operate For Visitor and For Operator page Guest account
only can do settings under For Visitor
Please reset the passwords at first using and prevent unauthorized users login the camera
Click Apply to save these settings
Figure 33
Note You cannot change the user name and the passwords cannot be null
20
ww
wwwwwwffoossccaammccoomm
SShheennzzhheenn FFoossccaamm IInntteelllliiggeenntt TTeecchhnnoollooggyy CCoo LLiimmiitteedd
TTeell 8866 775555 22667744 55666688 FFaaxx 8866 775555 22667744 55116688 20
34 Basic Network Settings
IP Configuration Type contains two types Fixed IP Address and Dynamic IP Address Set the
appropriate type for you Keep the camera in the same subnet of your router or computer
Fixed IP Address Select this option to manually assign a static IP address to the Network
Camera
Dynamic IP Address Select this option to obtain an available dynamic IP address assigned by
the DHCP server each time the camera is connected to the LAN
Figure 34 If you want to set a static IP for the camera you should keep the camera in the same subnet of
your router or computer The DNS Configuration Type has two types Manual DNS and From
DHCP Server If you donrsquot know the subnet mask gateway and DNS server you can check your
computerrsquos local area connection It contains all the information
The step is Control PanelNetwork ConnectionsDouble click Local Area Connections
Choose GeneralProperties You will see all the information in it
21
ww
wwwwwwffoossccaammccoomm
SShheennzzhheenn FFoossccaamm IInntteelllliiggeenntt TTeecchhnnoollooggyy CCoo LLiimmiitteedd
TTeell 8866 775555 22667744 55666688 FFaaxx 8866 775555 22667744 55116688 21
Figure 35
Figure 36
Click here
Set the same subnet
mask and gateway of
your camera with your PC
There are two DNS servers you
can set the same for your camera
Same with gateway is also OK
22
ww
wwwwwwffoossccaammccoomm
SShheennzzhheenn FFoossccaamm IInntteelllliiggeenntt TTeecchhnnoollooggyy CCoo LLiimmiitteedd
TTeell 8866 775555 22667744 55666688 FFaaxx 8866 775555 22667744 55116688 22
If you donrsquot know the DNS server you can use the same settings as the default Gateway
HTTP Port number The HTTP Port can be used to access the IPCAM on the LAN Usually it is
80 You can set any number between 1024 and 49151 too
After all settings click Apply You will see the following picture click OK and re-connect the
camera
Figure 37
RTSP port number Usually it is 554 You can set any number between 1024 and 49151 too
Click Apply and the camera will reboot
Enter rtsp IPRTSP port number11 or rtsp IPRTSP port number12 into the VLC you can
see the real-time preview WAN IP or LAN IP is OK If the RTSP port number is 554 you can
directly enter the following url rtsp IP11 or rtspIP12 The number ldquo11rdquo shows that you will
use first stream The numberrdquo12rdquo shows that you will use second stream For example
Enter rtsp1921681116911 in the VLC
RTSP Permission Checksum
On Select it and you need to enter the login username and password when you view the
real-time preview in the VLC
Off Select it and you do not need to enter the login username and password
Figure 38
23
ww
wwwwwwffoossccaammccoomm
SShheennzzhheenn FFoossccaamm IInntteelllliiggeenntt TTeecchhnnoollooggyy CCoo LLiimmiitteedd
TTeell 8866 775555 22667744 55666688 FFaaxx 8866 775555 22667744 55116688 23
Figure 39
You need to enter the user name and password if you select on for RTSP Permission Checksum
Click OK and you can see the real-time preview
Figure 310
24
ww
wwwwwwffoossccaammccoomm
SShheennzzhheenn FFoossccaamm IInntteelllliiggeenntt TTeecchhnnoollooggyy CCoo LLiimmiitteedd
TTeell 8866 775555 22667744 55666688 FFaaxx 8866 775555 22667744 55116688 24
Figure 311
NOTE 1 Yoursquod better not change the HTTP and RTSP port number at the same time because
you cannot submit successfully
2 After changing the RTSP or HTTP port number the camera will restart
3 If you cannot play the video in the VLC player please check the port mapping (Figure 316)
25
ww
wwwwwwffoossccaammccoomm
SShheennzzhheenn FFoossccaamm IInntteelllliiggeenntt TTeecchhnnoollooggyy CCoo LLiimmiitteedd
TTeell 8866 775555 22667744 55666688 FFaaxx 8866 775555 22667744 55116688 25
35 Remote Access
This section will tell you how to access the camera form WAN
Figure 312
Static IP user Users who have static IP addresses do not need to set DDNS service settings for remote access When you have finished connecting the camera using the LAN IP address and port forwarding you can access the camera directly from the Internet using the WAN IP address and port number
Click Show you will see the WAN IP as below
26
ww
wwwwwwffoossccaammccoomm
SShheennzzhheenn FFoossccaamm IInntteelllliiggeenntt TTeecchhnnoollooggyy CCoo LLiimmiitteedd
TTeell 8866 775555 22667744 55666688 FFaaxx 8866 775555 22667744 55116688 26
You can access the IP Camera from the Internet (remote access) Enter the WAN IP address and port number in IE browser or other browsers you use For example Http 218171601878888
Make sure port mapping (or also known as port forwarding) is successful You can do port mapping in two ways
1) Enter the setting page of the router to enable UPNP function Then login the camera as administrator choose UPnP Settings to enable UPNP and make sure the state is ldquoUPnP successrdquo
2) Do port forwarding manually (details Fig316)
For dynamic IP user
DDNS is a service that allows your IP Camera especially when assigned with a dynamic IP address to have a fixed host and domain name This means that even though your WAN IP address is constantly changing you will have a fixed hostname you can use to access your cameras at all times You can access the camera directly from the Internet using the hostname and port number
FOSCAM domain name Each Foscam camera has an embedded unique DDNS domain name the format of this domain name is xxxxxxmyfoscamorg On the camera body you can see the domain name sticker Here take cameramyfoscamorg for example Go to option of DDNS Service Settings on the administrator panel you can see the domain name(Figure 312)
Now you can use http Domain name + HTTP Port to access the camera via internet
Take hostname cameramyfoscamorg and HTTP Port no 8888 for example the accessing
link of the camera via internet would be http cameramyfoscamorg8888
27
ww
wwwwwwffoossccaammccoomm
SShheennzzhheenn FFoossccaamm IInntteelllliiggeenntt TTeecchhnnoollooggyy CCoo LLiimmiitteedd
TTeell 8866 775555 22667744 55666688 FFaaxx 8866 775555 22667744 55116688 27
Third Party Domain Name Settings
User can also use third part DDNS such as wwwno-ipcom www dyndnscom
Here take wwwno-ipcom for example
① Step 1 Go to the website wwwno-ipcom to create a free hostname
Firstly Login on wwwno-ipcom and click No-IP Free to register
Figure 313
Please register an account step by step according to instructions on wwwno-ipcom
After registration please login your email which used to register You will receive an email from
website please click the link to activate your ACCOUNT as indicated in email
Secondly Login the link with the registered username and password to create your
domain name
Click here to register
28
ww
wwwwwwffoossccaammccoomm
SShheennzzhheenn FFoossccaamm IInntteelllliiggeenntt TTeecchhnnoollooggyy CCoo LLiimmiitteedd
TTeell 8866 775555 22667744 55666688 FFaaxx 8866 775555 22667744 55116688 28
Figure 314
Figure 315
Please create the domain name step by step according to instructions on wwwno-ipcom
Step 2 DO DDNS Service Settings within the Camera
Please set Remote Access within the camera by hostname a user name and password
yoursquove got from wwwno-ipcom
29
ww
wwwwwwffoossccaammccoomm
SShheennzzhheenn FFoossccaamm IInntteelllliiggeenntt TTeecchhnnoollooggyy CCoo LLiimmiitteedd
TTeell 8866 775555 22667744 55666688 FFaaxx 8866 775555 22667744 55116688 29
Take hostname ycxgwpno-ipinfo user name foscam password foscam2012 for example
Firstly goes to option of Remote Access on the administrator panel
Secondly select No-Ip as a server in the Third Party DDNS
Thirdly fill foscam as DDNS user fill password foscam2012 as DDNS password fill
ycxgwpno-ipinfo as DDNS domain and server URL Then click save to make effect The
camera will restart and to take the DDNS settings effective
Please verify you have input the correct hostname user name and password
② Do port forwarding within the router
Example The camerarsquos LAN IP address is http19216813588
Firstly login the router goes to the menu of Port Forwarding or Port Trigger (or named Virtue Server on some brands of router) Take Linksys brand router as an example Login the
router and goes to Applications amp Gaming-gtSingle Port Forwarding
Secondly Create a new column by LAN IP address amp HTTP Port No of the camera within the
router showed as below
Figure 316
30
ww
wwwwwwffoossccaammccoomm
SShheennzzhheenn FFoossccaamm IInntteelllliiggeenntt TTeecchhnnoollooggyy CCoo LLiimmiitteedd
TTeell 8866 775555 22667744 55666688 FFaaxx 8866 775555 22667744 55116688 30
③ Use domain name to access the camera via internet
After the port forwarding is finished you can use the domain name+ http no to access the
camera via internet Take hostname ycxgwpno-ipinfo and http no 88for example the
accessing link of the camera via internet would be http ycxgwpno-ipinfo88
Upnp Port Forwarding If you select Enable that means you allow the IPCAM to open ports on the router automatically so that the video streams can be sent out form a LAN To utilize of this feature make sure that your router supports UPNP and it is activated Usually we recommend you do it manually (Figure 316)
31
ww
wwwwwwffoossccaammccoomm
SShheennzzhheenn FFoossccaamm IInntteelllliiggeenntt TTeecchhnnoollooggyy CCoo LLiimmiitteedd
TTeell 8866 775555 22667744 55666688 FFaaxx 8866 775555 22667744 55116688 31
36 Email Settings
If you want the camera to send emails when motion has been activated Email Settings will
need to be configured
Figure 317
Make sure your mailbox for sender supports SMTP Three recipients can be added to receive
images SMTP port is usually set as 25 If SMTP server supports SSI you should choose it The
subject and message cannot be Chinese characters
32
ww
wwwwwwffoossccaammccoomm
SShheennzzhheenn FFoossccaamm IInntteelllliiggeenntt TTeecchhnnoollooggyy CCoo LLiimmiitteedd
TTeell 8866 775555 22667744 55666688 FFaaxx 8866 775555 22667744 55116688 32
37 FTP Settings
If you want to upload images to your FTP server you can set FTP Settings
Figure 318
Figure 319
FTP server If your FTP server is set up in LAN you can set as Figure 318
If you have a FTP server which you can access on the internet you can set as Figure 319
FTP Port Usually the port is 21
If the FTP server mode is passive choose on or else choose off
Path The path of FTP that you plan to store images
Click Apply after settings
33
ww
wwwwwwffoossccaammccoomm
SShheennzzhheenn FFoossccaamm IInntteelllliiggeenntt TTeecchhnnoollooggyy CCoo LLiimmiitteedd
TTeell 8866 775555 22667744 55666688 FFaaxx 8866 775555 22667744 55116688 33
38 Auto Capture
The camera can capture pictures automatically at interval time if you have set auto capture
Figure 320
Snap interval The interval time between two snapshot actions The pictures will be stored to the
disk you set (you can set the storage path under ldquoFor Visitorrdquo)
Send E-mail Select it the camera will send email to you with the picture it has captured when
the camera alarmed
Click Apply after settings
34
ww
wwwwwwffoossccaammccoomm
SShheennzzhheenn FFoossccaamm IInntteelllliiggeenntt TTeecchhnnoollooggyy CCoo LLiimmiitteedd
TTeell 8866 775555 22667744 55666688 FFaaxx 8866 775555 22667744 55116688 34
39 Terminal
The camera has built-in cradle head yoursquod better not change the default settings (Figure 321)
or else you may not control the cradle head
Figure 321
310 Motion Detection
IP Camera supports Motion Detection when the motion has been detected it will send emails
or upload images to FTP
IP CAM supports four detection regions Choose the options dialog box before window1
window2 window3 window4 to enable the corresponding areas
For example choose window1Then you can see a box with a number at living video (Figure
322)
35
ww
wwwwwwffoossccaammccoomm
SShheennzzhheenn FFoossccaamm IInntteelllliiggeenntt TTeecchhnnoollooggyy CCoo LLiimmiitteedd
TTeell 8866 775555 22667744 55666688 FFaaxx 8866 775555 22667744 55116688 35
Figure 322
Move your mouse on the regional box and you can see the arrow icon then drag the regional
box to any position in the video
That means you choose window1
36
ww
wwwwwwffoossccaammccoomm
SShheennzzhheenn FFoossccaamm IInntteelllliiggeenntt TTeecchhnnoollooggyy CCoo LLiimmiitteedd
TTeell 8866 775555 22667744 55666688 FFaaxx 8866 775555 22667744 55116688 36
Figure 323
Move the mouse to the bottom right corner of the regional box When the mouse pattern changes
to ldquo rdquo you can change the size of the detection area
37
ww
wwwwwwffoossccaammccoomm
SShheennzzhheenn FFoossccaamm IInntteelllliiggeenntt TTeecchhnnoollooggyy CCoo LLiimmiitteedd
TTeell 8866 775555 22667744 55666688 FFaaxx 8866 775555 22667744 55116688 37
Figure 324
Move right or left and adjust the sensitivityClick apply after all settingsThe regional box
will blink with red color when something moving in your detection area
Drag it and change the size of
the alarm area
38
ww
wwwwwwffoossccaammccoomm
SShheennzzhheenn FFoossccaamm IInntteelllliiggeenntt TTeecchhnnoollooggyy CCoo LLiimmiitteedd
TTeell 8866 775555 22667744 55666688 FFaaxx 8866 775555 22667744 55116688 38
Figure 325
Note
1 If you add the dateamptime to the videodonrsquot put the detection window on the time area or else
the camera will alarm when the time change
2 If you have not set the motion detection areathe camera will not alarm at any time
3 Firefox Google chrome and Safari doesnrsquot have this function because the activex doesnrsquot
support it
4 Right click on the screen there are two graphic display modes Direct Draw and GDI Under
the GDI mode you cannot see the four detection regions when you select the window1window2
window3 window4
39
ww
wwwwwwffoossccaammccoomm
SShheennzzhheenn FFoossccaamm IInntteelllliiggeenntt TTeecchhnnoollooggyy CCoo LLiimmiitteedd
TTeell 8866 775555 22667744 55666688 FFaaxx 8866 775555 22667744 55116688 39
311 Alarm
IP CAM will send email or upload images when motion has been detected
Figure 326
Email Alarm Camera will send emails when motion is activated Make sure you have set Email
Settings first
Save Picture on the FTP Server To upload images to an FTP server when motion is detected
you must set FTP Settings first
Click Apply after settings
40
ww
wwwwwwffoossccaammccoomm
SShheennzzhheenn FFoossccaamm IInntteelllliiggeenntt TTeecchhnnoollooggyy CCoo LLiimmiitteedd
TTeell 8866 775555 22667744 55666688 FFaaxx 8866 775555 22667744 55116688 40
312 Schedule
If you want the camera alarm during the time you wish or all the time please choose Schedule
and set time range for motion alarm
Figure 327
There are two ways to set the alarm
1) Alarm at any time when motion is detected
Select All times and apply you settings the camera will alarm at any time when motion is
detected
2) Specify an alarm schedule
If you want the camera to alarm during a specify time you can select Use the week mode or Use
the work mode and set time range
Click apply the settings what you have done will take effect
If you click cancel the settings will come back to the status before your settings
If you want to reset all time range click clean
NOTE Adjust system time before set schedule
41
ww
wwwwwwffoossccaammccoomm
SShheennzzhheenn FFoossccaamm IInntteelllliiggeenntt TTeecchhnnoollooggyy CCoo LLiimmiitteedd
TTeell 8866 775555 22667744 55666688 FFaaxx 8866 775555 22667744 55116688 41
313 Video
Figure 328
Video format The format contains two kinds NTSC and PAL One camera only has one format
and you cannot change it
Resolution The camera supports First stream D1(704576)CIF(352288)QCIF(176144)
Second stream CIF(352288)QCIF(176144) The higher the resolution is the clearer video will
become But the code flux will become larger too and it will take up more bandwidth
Bit rate Generally speaking the larger the bit rate is the clearer video will become But the bit
rate configuration should combine well with the network bandwidth When the bandwidth is very
narrow and bit rate is large that will lead to video can not play well
42
ww
wwwwwwffoossccaammccoomm
SShheennzzhheenn FFoossccaamm IInntteelllliiggeenntt TTeecchhnnoollooggyy CCoo LLiimmiitteedd
TTeell 8866 775555 22667744 55666688 FFaaxx 8866 775555 22667744 55116688 42
Maximum frame rate When the video format is PAL the maximum frame rate is 25 fps When
the video format is NTSC the maximum frame rate is 30 fps You should lower frame rate when
the bandwidth is limited Normally when the frame rate above 15 you can achieve fluently video
Key Frame Interval The time between last key frame and next key frame
Bit rate control It has two models CBR and VBR If you choose CVR video encoder will be
coding on the basis of bit rate you set If you choose VBR video encoder will be coding not only
on the basis of bit rate but also consider video quality
Image Quality The smaller the value the better the image quality
Parenthesis options The camera name and time can be loaded to the video screen through
this option If you set as following picture (Figure 330) you will see the video as Figure329 The
camera name cannot be Chinese characters
Figure 329
Figure 330
43
ww
wwwwwwffoossccaammccoomm
SShheennzzhheenn FFoossccaamm IInntteelllliiggeenntt TTeecchhnnoollooggyy CCoo LLiimmiitteedd
TTeell 8866 775555 22667744 55666688 FFaaxx 8866 775555 22667744 55116688 43
314 Image Settings
Adjust the quality of the video by setting the image parameters
Figure 331
Brightness saturation contrast and hue are used to adjust the quality of the video Camera will
save your settings if you click apply If you want to quit settings you have done and restore the
status before your setting please click cancel The function of Default is used to restore the initial
settings
44
ww
wwwwwwffoossccaammccoomm
SShheennzzhheenn FFoossccaamm IInntteelllliiggeenntt TTeecchhnnoollooggyy CCoo LLiimmiitteedd
TTeell 8866 775555 22667744 55666688 FFaaxx 8866 775555 22667744 55116688 44
315 Initialize
Reboot Click reboot the infection is the same as plug the power and re-plug it
Factory default Click it all parameters will return to factory settings
Backup setting data If you donrsquot want to quit all parameters that yoursquove set You can click save
and all the parameters you set will be stored as a parameters bin file
Restore Click browse choose the correct bin file and then click ok to get all parameters which
you set before
Upgrade Click Browse choose the correct bin file and then click OK to upgrade Donrsquot shut
down the power during upgrade
Figure 332
316 Back
This will take you back to the video window
45
ww
wwwwwwffoossccaammccoomm
SShheennzzhheenn FFoossccaamm IInntteelllliiggeenntt TTeecchhnnoollooggyy CCoo LLiimmiitteedd
TTeell 8866 775555 22667744 55666688 FFaaxx 8866 775555 22667744 55116688 45
4 Other Settings
Use Mobile to login
If the camera has been linked to Internet set the parameters of the camera and router Make
sure the camera can be accessed by domain name and WAN IP
For example the WAN IP is1833754137 the domain name is ycxgwpno-ipinfo Then open
the mobile IE enter the following URL you can login the camera http
1833754137mobilehtml or
http1833754137wapwml or httpycxgwpno-ipinfomobilehtml or
http ycxgwpno-ipinfo wapwml
If the HTTP port num isnrsquot 80 you should add the port num to the URL
http1833754137portnummobilehtml
or http ycxgwpno-ipinfoport nummobilehtml
46
ww
wwwwwwffoossccaammccoomm
SShheennzzhheenn FFoossccaamm IInntteelllliiggeenntt TTeecchhnnoollooggyy CCoo LLiimmiitteedd
TTeell 8866 775555 22667744 55666688 FFaaxx 8866 775555 22667744 55116688 46
5 APPENDIX
51 Frequently Asked Questions
NOTE Any questions you would meet please check Network connections firstly Check the
working status revealed by the indicators on the network server hub exchange and network
card If abnormal check the network connections
511 I have forgotten the administrator password
To reset the administrator password you had better unplug the network cable firstly After that
press and hold down the RESET BUTTON about 10 seconds Releasing the reset button the
password will turn to the factory default
Default administrator username admin password admin
Default user username user password user
Default guest username guest password guest
512 Subnet doesnrsquot match
Check whether your ipcamera in the same subnet of your computer The step is Control PanelNetwork ConnectionsDbclick Local Area Connections Choose eneralProperties (Figure 3637) Check subnet mask IP address and gateways When you set IP address please make sure they are in the same subnet Otherwise you cant access camera
513 Download and install the ActiveX
Please click button in the Login interface Install the ActiveX after download
47
ww
wwwwwwffoossccaammccoomm
SShheennzzhheenn FFoossccaamm IInntteelllliiggeenntt TTeecchhnnoollooggyy CCoo LLiimmiitteedd
TTeell 8866 775555 22667744 55666688 FFaaxx 8866 775555 22667744 55116688 47
Figure 51
Click next
Figure 52
Click Install
48
ww
wwwwwwffoossccaammccoomm
SShheennzzhheenn FFoossccaamm IInntteelllliiggeenntt TTeecchhnnoollooggyy CCoo LLiimmiitteedd
TTeell 8866 775555 22667744 55666688 FFaaxx 8866 775555 22667744 55116688 48
Figure 53
Only click Finish and the computer restarts upon installation completion
Re-login the camera and you can see the surveillance window
514 No Pictures Problems
The video streaming is transmitted by the ActiveX controller If ActiveX controller isnrsquot installed
correctly you will see no video image You can resolve this problem by this way
Download ActiveX controller and set the safety property of IE in the PC when you view it first
time IE browserToolInternet ProperSecurityCustom LevelActiveX control and
Plug-ins Three options of front should be set to be ldquoEnablerdquo The ActiveX programs read by the
computer will be stored As follows
Enable Download unsigned ActiveX controls
Enable Initialize and script ActiveX controls not marked as safe
Enable Run ActiveX controls and plug-ins
49
ww
wwwwwwffoossccaammccoomm
SShheennzzhheenn FFoossccaamm IInntteelllliiggeenntt TTeecchhnnoollooggyy CCoo LLiimmiitteedd
TTeell 8866 775555 22667744 55666688 FFaaxx 8866 775555 22667744 55116688 49
Figure 54
If you allow the ActiveX running but still could not see living video Please change another port
number to try Donrsquot use port 80 use any port between 1024 and 49151
Figure55
NOTE Make sure that your firewall or anti-virus software does not block the camera or ActiveX
If you could not see video please shut down firewall or anti-virus software to try again
50
ww
wwwwwwffoossccaammccoomm
SShheennzzhheenn FFoossccaamm IInntteelllliiggeenntt TTeecchhnnoollooggyy CCoo LLiimmiitteedd
TTeell 8866 775555 22667744 55666688 FFaaxx 8866 775555 22667744 55116688 50
515 I cannot see the video on Firefox or Safari or Google chrome
If you cannot see live video after login the camera it may be the reason that the defaults transmit
protocol of QuickTime streaming is not HTTP or the port is not 80
For Firefox Safari and Google chrome you should install Quick Time Player as the ActiveX
controller please configure the activex controller as the following picture
Select PreferencesmdashQuickTime Preferenceshellip
Figure 56
Choose HTTP as the transport protocol
Figure 57
51
ww
wwwwwwffoossccaammccoomm
SShheennzzhheenn FFoossccaamm IInntteelllliiggeenntt TTeecchhnnoollooggyy CCoo LLiimmiitteedd
TTeell 8866 775555 22667744 55666688 FFaaxx 8866 775555 22667744 55116688 51
516 I cannot see video on MAC OS
If you cannot see live video after login FOSCAM H264 camera it may be the reason that the
defaults transmit protocol of QuickTime streaming is not HTTP or the port is not 80
Please follow the below steps and make the protocol and port correct and you can see live video
then
Steps
Click ldquoGordquo ---------gt Choose ldquoUtilitiesrdquo ----------gt Open ldquoTerminalapprdquo ------------gt Check the
default protocol and port of QuickTime streaming by inputting the URL
ldquoqtdefaults read transportSettingsrdquo
If the protocol is not HTTP or the port is not 80 please input the URL
ldquoqtdefaults write transportSettings HTTP 80rdquo to change it
After changing it you can also check if it is successful by URL
ldquoqtdefaults read transportSettingsrdquo
Please refer to the below pictures for the above steps
Figure 58
52
ww
wwwwwwffoossccaammccoomm
SShheennzzhheenn FFoossccaamm IInntteelllliiggeenntt TTeecchhnnoollooggyy CCoo LLiimmiitteedd
TTeell 8866 775555 22667744 55666688 FFaaxx 8866 775555 22667744 55116688 52
Figure 59
Figure 510
517 Canrsquot access IP camera in internet
There are some reasons
1 ActiveX controller is not installed correctly (Figure51-53)
2 The port which camera used is blocked by Firewall or Anti-virus software Please change
another port number and try again (Figure55)
3 Port forwarding is not successful
53
ww
wwwwwwffoossccaammccoomm
SShheennzzhheenn FFoossccaamm IInntteelllliiggeenntt TTeecchhnnoollooggyy CCoo LLiimmiitteedd
TTeell 8866 775555 22667744 55666688 FFaaxx 8866 775555 22667744 55116688 53
Check these settings and make sure they are correct
518 UPnP always failed
UPnP only contains port forwarding in our recent software Sometimes it may be failed to do port
forwarding automatically because of firewall or anti-virus software It also has much relation with
routerrsquos security settings So we recommend you do port forwarding manually You can view
your camera in internet successfully after you do port forwarding manually in your
router(Figure316)
519 Canrsquot operate the cradle head
If you canrsquot operate the cradle head such as click the button but the cradle head can not
move Usually the cradle head canrsquot operate mainly because of wrong settings Please donrsquot
change the default settings or else you canrsquot operate it You can see the following figure which is
the default settings Sometimes you need to press the reset button and restore the default
settings
Figure511
52 Default Parameters
Default network Parameters
IP address obtain dynamically
Subnet mask obtain dynamically
Gateway obtain dynamically
DDNS Embedded FOSCAM DDNS Service
Username and password
Default admin username admin Default password admin
Default user username user Default password user
Default guest username guest Default password guest
54
ww
wwwwwwffoossccaammccoomm
SShheennzzhheenn FFoossccaamm IInntteelllliiggeenntt TTeecchhnnoollooggyy CCoo LLiimmiitteedd
TTeell 8866 775555 22667744 55666688 FFaaxx 8866 775555 22667744 55116688 54
53 Specifications
Specification FI8620
Image Sensor
Image Sensor 480TVL 14 SONY Color CCD Sensor
Optical variable times 10 times
Lens F 38-38mm F12
Mini Illumination multicolour 005Lux black and white0001Lux
Video
Video Formats Supports NTSC or PAL Formats
Image Compression H264
ImageFrame Rate 25fps(PAL Formats)30fps(NTSC Formats)Down adjustable
Image Resolution D1(720576)CIF(352288)QCIF(176144)
View H264 dual streaming
Focusing autohand-switchkeying automatic
digital continuous autofocus ulsg
Image adjust The brightness contrast is adjustable
White balance Automatic white balance
Backlight
compensation Automatic backlight compensation
SNR gt60DB (AGC OFF)
Network
Ethernet One 10100Mbps RJ-45
Supported Protocol TCPIPUDPIPHTTPSMTPFTPDHCPDNSDDNS
UPNPPOP3RTSP
Support IP address static IP address dynamic IP address
Alarm Alarm detection The motion detecting detection threshold Settings
Alarm inform Support EmailFTP etc alarm inform way
Hardware
Interface
POWER Interface DC 12V20A (EUUSAU adapter or other types optional)
Power Consumption ﹤6 Watts
Reset Buttons One Reset
Network Interface One 10100Mbps RJ-45
Environment
Operate Temper 0deg ~ 55degC (32degF ~ 131degF)
Operate Humidity 10 ~ 80 non-condensing
Storage Temper -10degC ~ 60deg (14degF ~ 140degF)
Storage Humidity 0 ~ 90 non-condensing
Physical
Horizontal speed 1-250deg S
Vertical speed 1-100deg S
PanTilt Angle Horizontal360deg amp Vertical 90deg
Dimension 270(L) x 170(W) x 260(H)mm
Net Weight 1935g
Gross Weight 2674g
PC
Requirements
CPU 20GHZ or above (suggested 30GHz)
Memory Size 256MB or above (suggested 10GHz)
Display Card 64M or above
55
ww
wwwwwwffoossccaammccoomm
SShheennzzhheenn FFoossccaamm IInntteelllliiggeenntt TTeecchhnnoollooggyy CCoo LLiimmiitteedd
TTeell 8866 775555 22667744 55666688 FFaaxx 8866 775555 22667744 55116688 55
Supported OS Microsoft Windows 2000XPVista Mac OS
Browser IE6 and above version or compatible browser Firefox Chrome
Safari or other standard browsers
Certificate CEFCC CEFCC
Software Upgrade Upgrade from network
Application Software H264 Camera Client
6 OBTAINING TECHNICAL SUPPORT
While we hope your experience with the IPCAM network camera is enjoyable and easy to use
you may experience some issues or have questions that this Userrsquos Guide has not answered
If you have problem with FOSCAM IP camera please first contact FOSCAM reseller for
solving the problems If our reseller cannot provide service please contact our service
department techfoscamcom

4
ww
wwwwwwffoossccaammccoomm
SShheennzzhheenn FFoossccaamm IInntteelllliiggeenntt TTeecchhnnoollooggyy CCoo LLiimmiitteedd
TTeell 8866 775555 22667744 55666688 FFaaxx 8866 775555 22667744 55116688 4
1144 PPhhyyssiiccaall DDeessccrriippttiioonn
Front Panel
Figure 11
The camera lens has variable optical zoom The biggest optical zoom time is 10 times With this
function you can see farther and clearer
Interface
Figure 12
1) Power Interface Connect the external power adapter request for 12V2A power
2) Reset button Press and hold on the reset button for 10 seconds Releasing the reset
button the password will back to the factory default administrator password The default
administrator username and password are all admin You must power on the camera before
reset
3) LAN 10100M adaptive Ethernet interface Through this interface IPCAM can be connected
with various network devices such as hub router etc
5
ww
wwwwwwffoossccaammccoomm
SShheennzzhheenn FFoossccaamm IInntteelllliiggeenntt TTeecchhnnoollooggyy CCoo LLiimmiitteedd
TTeell 8866 775555 22667744 55666688 FFaaxx 8866 775555 22667744 55116688 5
Bottom View
There are up to two labels located on the body of the camera this is an important feature of
original Foscam cameras If your camera does not have labels as shown in Figure 13 it may be
a clone one Cloned Foscam cameras can not use original firmware and are not eligible for
warranty or technical services
Figure 13
SN of FOSCAM
MAC address of wired
connection
FOSCAM DDNS Service
6
ww
wwwwwwffoossccaammccoomm
SShheennzzhheenn FFoossccaamm IInntteelllliiggeenntt TTeecchhnnoollooggyy CCoo LLiimmiitteedd
TTeell 8866 775555 22667744 55666688 FFaaxx 8866 775555 22667744 55116688 6
22 SSuurrvveeiillllaannccee SSooffttwwaarree GGUUII
Please refer to the Quick Installation Guide if you install the camera at first time After finishing
quick installation you can take time to learn the operation of the software
2211 LLooggiinn WWiinnddooww
Figure 21
Please check the login window above it was divided to 5 sections from no 1 to 5
Section1 Select Language
FOSCAM camera supports up to multi-languages such as English Spanish Deutsch and so on
You can select the language you need via click on the select language bar to switch
Section2 Video View Login Button
For PC please select the login button under Video View
Section3 Mobile View Login Button
If you are using the Mobile to access the camera here you need to select Mobile View login
button
1
2
3
4
5
7
ww
wwwwwwffoossccaammccoomm
SShheennzzhheenn FFoossccaamm IInntteelllliiggeenntt TTeecchhnnoollooggyy CCoo LLiimmiitteedd
TTeell 8866 775555 22667744 55666688 FFaaxx 8866 775555 22667744 55116688 7
Section4 Download ActiveX
For IE users the ActiveX have been embedded in the IP Camera Tool so if you have installed
the IP Camera Tool you need not download again If you use Firefox Google Chrome Safari or
others you should download and install QuickTime Player as the ActiveX from other website
For remote IE users first time you use the IPCAM you may need download and install the
ActiveX (Please read chapter 51 in Appendix about how to download and install the ActiveX)
Section5 Attention
For better viewing here we suggest using 1024768 screen resolution
Click the PC login button under Video View you will see the video window
For Internet Explorer
Figure 22
8
ww
wwwwwwffoossccaammccoomm
SShheennzzhheenn FFoossccaamm IInntteelllliiggeenntt TTeecchhnnoollooggyy CCoo LLiimmiitteedd
TTeell 8866 775555 22667744 55666688 FFaaxx 8866 775555 22667744 55116688 8
If you could not view living video after running the ActiveX only a red cross in the center
of the video or just a black screen Please change another port number to try
Make sure all firewall or antivirus software on your computer does not block the active download
and installation If you are unable to run the ActiveX control try shutting down the firewall or
antivirus program
For Firefox Google Chrome and Safari
Install the Quick Time Player and fill in user name and password then login you will see the
living video
Figure 23
9
ww
wwwwwwffoossccaammccoomm
SShheennzzhheenn FFoossccaamm IInntteelllliiggeenntt TTeecchhnnoollooggyy CCoo LLiimmiitteedd
TTeell 8866 775555 22667744 55666688 FFaaxx 8866 775555 22667744 55116688 9
22 Surveillance Window
Select the PC login mode and you will enter the surveillance window
Figure 24
For Visitor For Operator For Administrator
Camera supports three-level users management admin user and guest
The default ldquoadminrdquo username and password are all ldquoadminrdquo the default ldquouserrdquo username and
password are all ldquouserrdquo and the default ldquoguestrdquo username and password are all ldquoguestrdquo For first
using please go to For Administrator-gt User Settings panel to change the password and
against illegal access
Different users have different permissions Admin user has the highest authority He can do any settings User account can do settings below For Visitor and For Operator Guest account can do settings below For Visitor
1
2
3
5
6
7
4
10
ww
wwwwwwffoossccaammccoomm
SShheennzzhheenn FFoossccaamm IInntteelllliiggeenntt TTeecchhnnoollooggyy CCoo LLiimmiitteedd
TTeell 8866 775555 22667744 55666688 FFaaxx 8866 775555 22667744 55116688 10
Section1 View
The resolution contains D1(720576) CIF(352288) QCIF(176144) and Auto You can choose First Stream or Second Stream to adjust the view window
Note When the network bandwidth is bad yoursquod better select Second Stream and the video will
be more fluency
Section2 CaptureRecordPlaybackSet Path Buttons
Capture Click this icon the current living picture will be stored to a predetermined path
The default storage path is D disk You can click this button to change the storage path
Record Click the icon The camera will begin recording and store the recorded file to the
folder you set And the status column will display REC when recording Click again it will stop
recording The default storage path is D disk You can click this button to change the
storage path
Figure 25
11
ww
wwwwwwffoossccaammccoomm
SShheennzzhheenn FFoossccaamm IInntteelllliiggeenntt TTeecchhnnoollooggyy CCoo LLiimmiitteedd
TTeell 8866 775555 22667744 55666688 FFaaxx 8866 775555 22667744 55116688 11
Playback Click the button it will pop up a player And you can see the videos you have
stored in your computer
Figure 26
Set Path Set the storage path of photos and videos The default storage path is D disk
Note These buttons are controlled by the ActiveX controller therefore Firefox Google Chrome
and Safari cannot allow to these functions
Section3 PanTilt ZoomFocus Control
1------Up control button 2------Down control button
3------Left control button 4------Right control button
1
2
3 4
12
ww
wwwwwwffoossccaammccoomm
SShheennzzhheenn FFoossccaamm IInntteelllliiggeenntt TTeecchhnnoollooggyy CCoo LLiimmiitteedd
TTeell 8866 775555 22667744 55666688 FFaaxx 8866 775555 22667744 55116688 12
Zoom inout The lens has 10x optical zoom The biggest optical zoom time is 10 times
Focus +- This function can help you see more clearly
Section4 Preset Go PTZ Speed
1) Preset----------Support 8 preset position which is considered enough for DIY home amp small
business surveillance market
2) Set----------- Click Set to save the position you need the camera to remember
3) Go----------- Click Go to make the camera move the preset position
4) Number button from 1 to 8--------You can click the number button with preset position and the
camera will go to the preset position
5) PTZ Speed-------- The default PTZ speed is 45 you can change another one between 1 and
63 The larger the number the faster the speed will be
How to do preset position
We can start preset settings from position 1
Firstly select no 1 within the menu of Preset on the panel
Secondly move the camera and stop at a place where you want make preset position
Thirdly click set button to save it as position 1 and you have done preset of position 1
After that you can select no 2 within the menu of Preset on the panel and move the camera and
stop at another place and set as preset position 2 You can do all the 8 preset positions with this
method
If you want to see the preset position you have set such as the position 1 only select the set
no1 and click go button the camera will go to position no1
13
ww
wwwwwwffoossccaammccoomm
SShheennzzhheenn FFoossccaamm IInntteelllliiggeenntt TTeecchhnnoollooggyy CCoo LLiimmiitteedd
TTeell 8866 775555 22667744 55666688 FFaaxx 8866 775555 22667744 55116688 13
Section5 For Administrator
Path to Administrator Control Panel Click it and it will lead to Administrator Control Panel
Section6 OSD
If you have added time and camera name in the video you can see it in the surveillance window
Go to For Administrator ---Video panel and you can add camera name and time on the live
window Here you can change another device name The default device name is IP Camera
Go to For Administrator ---DateampTime settings panel and adjust the device time
Section7 Status bar
Figure 27
There is a status column below the view window (Figure27) 1) The current state of IPCAM
2) After the view has been digital amplified click the icon the view will be digital narrowed 3) Click the icon the view window will be digital amplified
4) Click the icon the view window will restore the original size
NOTE Firefox Google Chrome and Safari have not these functions because the ActiveX does
not support it
14
ww
wwwwwwffoossccaammccoomm
SShheennzzhheenn FFoossccaamm IInntteelllliiggeenntt TTeecchhnnoollooggyy CCoo LLiimmiitteedd
TTeell 8866 775555 22667744 55666688 FFaaxx 8866 775555 22667744 55116688 14
Onscreen Mouse Control
Put the mouse on the screen and you can see a arrow Press the mouse and the camerarsquos len
will move to the corresponding direction
For example put the mouse on the upper-right corner of the screen and you can see a arrow
press the mouse then the cameras lens will move toward the upper-right direction
When the icon has three arrows the speed of the rotation is fastest And when the icon has one
arrow the speed is lowest
Figure 28
Put the mouse at the center of the living video you will see the icon of the magnifying glass
(Figure 29) Press the left mouse and you can use the optical zoom
Figure 29
15
ww
wwwwwwffoossccaammccoomm
SShheennzzhheenn FFoossccaamm IInntteelllliiggeenntt TTeecchhnnoollooggyy CCoo LLiimmiitteedd
TTeell 8866 775555 22667744 55666688 FFaaxx 8866 775555 22667744 55116688 15
Right click on the screen you can see two graphic display modes Direct Draw and GDI The
default mode is Direct Draw and almost graphic card support this mode But some old graphic
card cannot display normally under Direct Draw you can select GDI to try again
Figure 210
NOTE
Under GDI mode you cannot see the motion detect region lines when set motion detection(For
more details read chapter 310 Motion Detection)
16
ww
wwwwwwffoossccaammccoomm
SShheennzzhheenn FFoossccaamm IInntteelllliiggeenntt TTeecchhnnoollooggyy CCoo LLiimmiitteedd
TTeell 8866 775555 22667744 55666688 FFaaxx 8866 775555 22667744 55116688 16
33 AAddvvaanncceedd CCaammeerraa SSeettttiinnggss Click the bar ldquoFor Administratorrdquo goes to Administrator Control Panel to make advanced camera
settings
31 Device Information
Click For Administrator you will see the Device Information
It contains Device ID firmware version of the camera and other status of the camera
Device ID It displays ldquoIP Camerardquo This ID is different form the camera name You can set any
camera name you like for the camera in ldquoFor Administratormdashgt VideomdashgtParenthesis Optionsrdquo
and the camera name can be showed at the video window but the device ID will always display
IP Camera
Network Connection LAN If the camera gets wired connection successfully here will show
LAN
Current Client It shows that how many people are viewing the video For example the Current
Client shows 0 that means no people are viewing the video If someone have logged in the
camera but do not open the video the Current Client will not change
Device Firmware VersionDevice Embedded Web UI Version The camerarsquos software
version
Mac Address Each camera has its own MAC ID For example Device ID is 00606E8C5058 the
same MAC ID sticker is found at the bottomback of the camera
17
ww
wwwwwwffoossccaammccoomm
SShheennzzhheenn FFoossccaamm IInntteelllliiggeenntt TTeecchhnnoollooggyy CCoo LLiimmiitteedd
TTeell 8866 775555 22667744 55666688 FFaaxx 8866 775555 22667744 55116688 17
32 Date amp Time Settings
There are four models for you to adjust time Manual setting Sync with computer time Network
Time Protocol and Keep current time choose one model and adjust the camera time Then
choose Time zone
Manual settings The administrator can enter the date and time manually Note that the date
and time format is [yyyymmdd] and [hhmmss]
Network Time Protocol It is a protocol which synchronizes computer clocks by periodically
querying an NTP server
Interval The interval time between last time and next time that the camera adjust time with Ntp
Server
Time zoneSelect the appropriate time zone from the list
Figure 31
If your country implements the Daylight Saving Time when you select the Time zone you can
see the following screen
18
ww
wwwwwwffoossccaammccoomm
SShheennzzhheenn FFoossccaamm IInntteelllliiggeenntt TTeecchhnnoollooggyy CCoo LLiimmiitteedd
TTeell 8866 775555 22667744 55666688 FFaaxx 8866 775555 22667744 55116688 18
Figure 32
The camera will adjust the daylight saving time automatically if you select ldquoAutomatically adjust
clock for daylight saving time changesrdquo
19
ww
wwwwwwffoossccaammccoomm
SShheennzzhheenn FFoossccaamm IInntteelllliiggeenntt TTeecchhnnoollooggyy CCoo LLiimmiitteedd
TTeell 8866 775555 22667744 55666688 FFaaxx 8866 775555 22667744 55116688 19
33 User Settings
The camera has set up 3-level user permissions user names are admin user guest and the
default passwords are admin user guest too
Different user has different permission Only admin can do advanced settings under For
Administrator page User account can operate For Visitor and For Operator page Guest account
only can do settings under For Visitor
Please reset the passwords at first using and prevent unauthorized users login the camera
Click Apply to save these settings
Figure 33
Note You cannot change the user name and the passwords cannot be null
20
ww
wwwwwwffoossccaammccoomm
SShheennzzhheenn FFoossccaamm IInntteelllliiggeenntt TTeecchhnnoollooggyy CCoo LLiimmiitteedd
TTeell 8866 775555 22667744 55666688 FFaaxx 8866 775555 22667744 55116688 20
34 Basic Network Settings
IP Configuration Type contains two types Fixed IP Address and Dynamic IP Address Set the
appropriate type for you Keep the camera in the same subnet of your router or computer
Fixed IP Address Select this option to manually assign a static IP address to the Network
Camera
Dynamic IP Address Select this option to obtain an available dynamic IP address assigned by
the DHCP server each time the camera is connected to the LAN
Figure 34 If you want to set a static IP for the camera you should keep the camera in the same subnet of
your router or computer The DNS Configuration Type has two types Manual DNS and From
DHCP Server If you donrsquot know the subnet mask gateway and DNS server you can check your
computerrsquos local area connection It contains all the information
The step is Control PanelNetwork ConnectionsDouble click Local Area Connections
Choose GeneralProperties You will see all the information in it
21
ww
wwwwwwffoossccaammccoomm
SShheennzzhheenn FFoossccaamm IInntteelllliiggeenntt TTeecchhnnoollooggyy CCoo LLiimmiitteedd
TTeell 8866 775555 22667744 55666688 FFaaxx 8866 775555 22667744 55116688 21
Figure 35
Figure 36
Click here
Set the same subnet
mask and gateway of
your camera with your PC
There are two DNS servers you
can set the same for your camera
Same with gateway is also OK
22
ww
wwwwwwffoossccaammccoomm
SShheennzzhheenn FFoossccaamm IInntteelllliiggeenntt TTeecchhnnoollooggyy CCoo LLiimmiitteedd
TTeell 8866 775555 22667744 55666688 FFaaxx 8866 775555 22667744 55116688 22
If you donrsquot know the DNS server you can use the same settings as the default Gateway
HTTP Port number The HTTP Port can be used to access the IPCAM on the LAN Usually it is
80 You can set any number between 1024 and 49151 too
After all settings click Apply You will see the following picture click OK and re-connect the
camera
Figure 37
RTSP port number Usually it is 554 You can set any number between 1024 and 49151 too
Click Apply and the camera will reboot
Enter rtsp IPRTSP port number11 or rtsp IPRTSP port number12 into the VLC you can
see the real-time preview WAN IP or LAN IP is OK If the RTSP port number is 554 you can
directly enter the following url rtsp IP11 or rtspIP12 The number ldquo11rdquo shows that you will
use first stream The numberrdquo12rdquo shows that you will use second stream For example
Enter rtsp1921681116911 in the VLC
RTSP Permission Checksum
On Select it and you need to enter the login username and password when you view the
real-time preview in the VLC
Off Select it and you do not need to enter the login username and password
Figure 38
23
ww
wwwwwwffoossccaammccoomm
SShheennzzhheenn FFoossccaamm IInntteelllliiggeenntt TTeecchhnnoollooggyy CCoo LLiimmiitteedd
TTeell 8866 775555 22667744 55666688 FFaaxx 8866 775555 22667744 55116688 23
Figure 39
You need to enter the user name and password if you select on for RTSP Permission Checksum
Click OK and you can see the real-time preview
Figure 310
24
ww
wwwwwwffoossccaammccoomm
SShheennzzhheenn FFoossccaamm IInntteelllliiggeenntt TTeecchhnnoollooggyy CCoo LLiimmiitteedd
TTeell 8866 775555 22667744 55666688 FFaaxx 8866 775555 22667744 55116688 24
Figure 311
NOTE 1 Yoursquod better not change the HTTP and RTSP port number at the same time because
you cannot submit successfully
2 After changing the RTSP or HTTP port number the camera will restart
3 If you cannot play the video in the VLC player please check the port mapping (Figure 316)
25
ww
wwwwwwffoossccaammccoomm
SShheennzzhheenn FFoossccaamm IInntteelllliiggeenntt TTeecchhnnoollooggyy CCoo LLiimmiitteedd
TTeell 8866 775555 22667744 55666688 FFaaxx 8866 775555 22667744 55116688 25
35 Remote Access
This section will tell you how to access the camera form WAN
Figure 312
Static IP user Users who have static IP addresses do not need to set DDNS service settings for remote access When you have finished connecting the camera using the LAN IP address and port forwarding you can access the camera directly from the Internet using the WAN IP address and port number
Click Show you will see the WAN IP as below
26
ww
wwwwwwffoossccaammccoomm
SShheennzzhheenn FFoossccaamm IInntteelllliiggeenntt TTeecchhnnoollooggyy CCoo LLiimmiitteedd
TTeell 8866 775555 22667744 55666688 FFaaxx 8866 775555 22667744 55116688 26
You can access the IP Camera from the Internet (remote access) Enter the WAN IP address and port number in IE browser or other browsers you use For example Http 218171601878888
Make sure port mapping (or also known as port forwarding) is successful You can do port mapping in two ways
1) Enter the setting page of the router to enable UPNP function Then login the camera as administrator choose UPnP Settings to enable UPNP and make sure the state is ldquoUPnP successrdquo
2) Do port forwarding manually (details Fig316)
For dynamic IP user
DDNS is a service that allows your IP Camera especially when assigned with a dynamic IP address to have a fixed host and domain name This means that even though your WAN IP address is constantly changing you will have a fixed hostname you can use to access your cameras at all times You can access the camera directly from the Internet using the hostname and port number
FOSCAM domain name Each Foscam camera has an embedded unique DDNS domain name the format of this domain name is xxxxxxmyfoscamorg On the camera body you can see the domain name sticker Here take cameramyfoscamorg for example Go to option of DDNS Service Settings on the administrator panel you can see the domain name(Figure 312)
Now you can use http Domain name + HTTP Port to access the camera via internet
Take hostname cameramyfoscamorg and HTTP Port no 8888 for example the accessing
link of the camera via internet would be http cameramyfoscamorg8888
27
ww
wwwwwwffoossccaammccoomm
SShheennzzhheenn FFoossccaamm IInntteelllliiggeenntt TTeecchhnnoollooggyy CCoo LLiimmiitteedd
TTeell 8866 775555 22667744 55666688 FFaaxx 8866 775555 22667744 55116688 27
Third Party Domain Name Settings
User can also use third part DDNS such as wwwno-ipcom www dyndnscom
Here take wwwno-ipcom for example
① Step 1 Go to the website wwwno-ipcom to create a free hostname
Firstly Login on wwwno-ipcom and click No-IP Free to register
Figure 313
Please register an account step by step according to instructions on wwwno-ipcom
After registration please login your email which used to register You will receive an email from
website please click the link to activate your ACCOUNT as indicated in email
Secondly Login the link with the registered username and password to create your
domain name
Click here to register
28
ww
wwwwwwffoossccaammccoomm
SShheennzzhheenn FFoossccaamm IInntteelllliiggeenntt TTeecchhnnoollooggyy CCoo LLiimmiitteedd
TTeell 8866 775555 22667744 55666688 FFaaxx 8866 775555 22667744 55116688 28
Figure 314
Figure 315
Please create the domain name step by step according to instructions on wwwno-ipcom
Step 2 DO DDNS Service Settings within the Camera
Please set Remote Access within the camera by hostname a user name and password
yoursquove got from wwwno-ipcom
29
ww
wwwwwwffoossccaammccoomm
SShheennzzhheenn FFoossccaamm IInntteelllliiggeenntt TTeecchhnnoollooggyy CCoo LLiimmiitteedd
TTeell 8866 775555 22667744 55666688 FFaaxx 8866 775555 22667744 55116688 29
Take hostname ycxgwpno-ipinfo user name foscam password foscam2012 for example
Firstly goes to option of Remote Access on the administrator panel
Secondly select No-Ip as a server in the Third Party DDNS
Thirdly fill foscam as DDNS user fill password foscam2012 as DDNS password fill
ycxgwpno-ipinfo as DDNS domain and server URL Then click save to make effect The
camera will restart and to take the DDNS settings effective
Please verify you have input the correct hostname user name and password
② Do port forwarding within the router
Example The camerarsquos LAN IP address is http19216813588
Firstly login the router goes to the menu of Port Forwarding or Port Trigger (or named Virtue Server on some brands of router) Take Linksys brand router as an example Login the
router and goes to Applications amp Gaming-gtSingle Port Forwarding
Secondly Create a new column by LAN IP address amp HTTP Port No of the camera within the
router showed as below
Figure 316
30
ww
wwwwwwffoossccaammccoomm
SShheennzzhheenn FFoossccaamm IInntteelllliiggeenntt TTeecchhnnoollooggyy CCoo LLiimmiitteedd
TTeell 8866 775555 22667744 55666688 FFaaxx 8866 775555 22667744 55116688 30
③ Use domain name to access the camera via internet
After the port forwarding is finished you can use the domain name+ http no to access the
camera via internet Take hostname ycxgwpno-ipinfo and http no 88for example the
accessing link of the camera via internet would be http ycxgwpno-ipinfo88
Upnp Port Forwarding If you select Enable that means you allow the IPCAM to open ports on the router automatically so that the video streams can be sent out form a LAN To utilize of this feature make sure that your router supports UPNP and it is activated Usually we recommend you do it manually (Figure 316)
31
ww
wwwwwwffoossccaammccoomm
SShheennzzhheenn FFoossccaamm IInntteelllliiggeenntt TTeecchhnnoollooggyy CCoo LLiimmiitteedd
TTeell 8866 775555 22667744 55666688 FFaaxx 8866 775555 22667744 55116688 31
36 Email Settings
If you want the camera to send emails when motion has been activated Email Settings will
need to be configured
Figure 317
Make sure your mailbox for sender supports SMTP Three recipients can be added to receive
images SMTP port is usually set as 25 If SMTP server supports SSI you should choose it The
subject and message cannot be Chinese characters
32
ww
wwwwwwffoossccaammccoomm
SShheennzzhheenn FFoossccaamm IInntteelllliiggeenntt TTeecchhnnoollooggyy CCoo LLiimmiitteedd
TTeell 8866 775555 22667744 55666688 FFaaxx 8866 775555 22667744 55116688 32
37 FTP Settings
If you want to upload images to your FTP server you can set FTP Settings
Figure 318
Figure 319
FTP server If your FTP server is set up in LAN you can set as Figure 318
If you have a FTP server which you can access on the internet you can set as Figure 319
FTP Port Usually the port is 21
If the FTP server mode is passive choose on or else choose off
Path The path of FTP that you plan to store images
Click Apply after settings
33
ww
wwwwwwffoossccaammccoomm
SShheennzzhheenn FFoossccaamm IInntteelllliiggeenntt TTeecchhnnoollooggyy CCoo LLiimmiitteedd
TTeell 8866 775555 22667744 55666688 FFaaxx 8866 775555 22667744 55116688 33
38 Auto Capture
The camera can capture pictures automatically at interval time if you have set auto capture
Figure 320
Snap interval The interval time between two snapshot actions The pictures will be stored to the
disk you set (you can set the storage path under ldquoFor Visitorrdquo)
Send E-mail Select it the camera will send email to you with the picture it has captured when
the camera alarmed
Click Apply after settings
34
ww
wwwwwwffoossccaammccoomm
SShheennzzhheenn FFoossccaamm IInntteelllliiggeenntt TTeecchhnnoollooggyy CCoo LLiimmiitteedd
TTeell 8866 775555 22667744 55666688 FFaaxx 8866 775555 22667744 55116688 34
39 Terminal
The camera has built-in cradle head yoursquod better not change the default settings (Figure 321)
or else you may not control the cradle head
Figure 321
310 Motion Detection
IP Camera supports Motion Detection when the motion has been detected it will send emails
or upload images to FTP
IP CAM supports four detection regions Choose the options dialog box before window1
window2 window3 window4 to enable the corresponding areas
For example choose window1Then you can see a box with a number at living video (Figure
322)
35
ww
wwwwwwffoossccaammccoomm
SShheennzzhheenn FFoossccaamm IInntteelllliiggeenntt TTeecchhnnoollooggyy CCoo LLiimmiitteedd
TTeell 8866 775555 22667744 55666688 FFaaxx 8866 775555 22667744 55116688 35
Figure 322
Move your mouse on the regional box and you can see the arrow icon then drag the regional
box to any position in the video
That means you choose window1
36
ww
wwwwwwffoossccaammccoomm
SShheennzzhheenn FFoossccaamm IInntteelllliiggeenntt TTeecchhnnoollooggyy CCoo LLiimmiitteedd
TTeell 8866 775555 22667744 55666688 FFaaxx 8866 775555 22667744 55116688 36
Figure 323
Move the mouse to the bottom right corner of the regional box When the mouse pattern changes
to ldquo rdquo you can change the size of the detection area
37
ww
wwwwwwffoossccaammccoomm
SShheennzzhheenn FFoossccaamm IInntteelllliiggeenntt TTeecchhnnoollooggyy CCoo LLiimmiitteedd
TTeell 8866 775555 22667744 55666688 FFaaxx 8866 775555 22667744 55116688 37
Figure 324
Move right or left and adjust the sensitivityClick apply after all settingsThe regional box
will blink with red color when something moving in your detection area
Drag it and change the size of
the alarm area
38
ww
wwwwwwffoossccaammccoomm
SShheennzzhheenn FFoossccaamm IInntteelllliiggeenntt TTeecchhnnoollooggyy CCoo LLiimmiitteedd
TTeell 8866 775555 22667744 55666688 FFaaxx 8866 775555 22667744 55116688 38
Figure 325
Note
1 If you add the dateamptime to the videodonrsquot put the detection window on the time area or else
the camera will alarm when the time change
2 If you have not set the motion detection areathe camera will not alarm at any time
3 Firefox Google chrome and Safari doesnrsquot have this function because the activex doesnrsquot
support it
4 Right click on the screen there are two graphic display modes Direct Draw and GDI Under
the GDI mode you cannot see the four detection regions when you select the window1window2
window3 window4
39
ww
wwwwwwffoossccaammccoomm
SShheennzzhheenn FFoossccaamm IInntteelllliiggeenntt TTeecchhnnoollooggyy CCoo LLiimmiitteedd
TTeell 8866 775555 22667744 55666688 FFaaxx 8866 775555 22667744 55116688 39
311 Alarm
IP CAM will send email or upload images when motion has been detected
Figure 326
Email Alarm Camera will send emails when motion is activated Make sure you have set Email
Settings first
Save Picture on the FTP Server To upload images to an FTP server when motion is detected
you must set FTP Settings first
Click Apply after settings
40
ww
wwwwwwffoossccaammccoomm
SShheennzzhheenn FFoossccaamm IInntteelllliiggeenntt TTeecchhnnoollooggyy CCoo LLiimmiitteedd
TTeell 8866 775555 22667744 55666688 FFaaxx 8866 775555 22667744 55116688 40
312 Schedule
If you want the camera alarm during the time you wish or all the time please choose Schedule
and set time range for motion alarm
Figure 327
There are two ways to set the alarm
1) Alarm at any time when motion is detected
Select All times and apply you settings the camera will alarm at any time when motion is
detected
2) Specify an alarm schedule
If you want the camera to alarm during a specify time you can select Use the week mode or Use
the work mode and set time range
Click apply the settings what you have done will take effect
If you click cancel the settings will come back to the status before your settings
If you want to reset all time range click clean
NOTE Adjust system time before set schedule
41
ww
wwwwwwffoossccaammccoomm
SShheennzzhheenn FFoossccaamm IInntteelllliiggeenntt TTeecchhnnoollooggyy CCoo LLiimmiitteedd
TTeell 8866 775555 22667744 55666688 FFaaxx 8866 775555 22667744 55116688 41
313 Video
Figure 328
Video format The format contains two kinds NTSC and PAL One camera only has one format
and you cannot change it
Resolution The camera supports First stream D1(704576)CIF(352288)QCIF(176144)
Second stream CIF(352288)QCIF(176144) The higher the resolution is the clearer video will
become But the code flux will become larger too and it will take up more bandwidth
Bit rate Generally speaking the larger the bit rate is the clearer video will become But the bit
rate configuration should combine well with the network bandwidth When the bandwidth is very
narrow and bit rate is large that will lead to video can not play well
42
ww
wwwwwwffoossccaammccoomm
SShheennzzhheenn FFoossccaamm IInntteelllliiggeenntt TTeecchhnnoollooggyy CCoo LLiimmiitteedd
TTeell 8866 775555 22667744 55666688 FFaaxx 8866 775555 22667744 55116688 42
Maximum frame rate When the video format is PAL the maximum frame rate is 25 fps When
the video format is NTSC the maximum frame rate is 30 fps You should lower frame rate when
the bandwidth is limited Normally when the frame rate above 15 you can achieve fluently video
Key Frame Interval The time between last key frame and next key frame
Bit rate control It has two models CBR and VBR If you choose CVR video encoder will be
coding on the basis of bit rate you set If you choose VBR video encoder will be coding not only
on the basis of bit rate but also consider video quality
Image Quality The smaller the value the better the image quality
Parenthesis options The camera name and time can be loaded to the video screen through
this option If you set as following picture (Figure 330) you will see the video as Figure329 The
camera name cannot be Chinese characters
Figure 329
Figure 330
43
ww
wwwwwwffoossccaammccoomm
SShheennzzhheenn FFoossccaamm IInntteelllliiggeenntt TTeecchhnnoollooggyy CCoo LLiimmiitteedd
TTeell 8866 775555 22667744 55666688 FFaaxx 8866 775555 22667744 55116688 43
314 Image Settings
Adjust the quality of the video by setting the image parameters
Figure 331
Brightness saturation contrast and hue are used to adjust the quality of the video Camera will
save your settings if you click apply If you want to quit settings you have done and restore the
status before your setting please click cancel The function of Default is used to restore the initial
settings
44
ww
wwwwwwffoossccaammccoomm
SShheennzzhheenn FFoossccaamm IInntteelllliiggeenntt TTeecchhnnoollooggyy CCoo LLiimmiitteedd
TTeell 8866 775555 22667744 55666688 FFaaxx 8866 775555 22667744 55116688 44
315 Initialize
Reboot Click reboot the infection is the same as plug the power and re-plug it
Factory default Click it all parameters will return to factory settings
Backup setting data If you donrsquot want to quit all parameters that yoursquove set You can click save
and all the parameters you set will be stored as a parameters bin file
Restore Click browse choose the correct bin file and then click ok to get all parameters which
you set before
Upgrade Click Browse choose the correct bin file and then click OK to upgrade Donrsquot shut
down the power during upgrade
Figure 332
316 Back
This will take you back to the video window
45
ww
wwwwwwffoossccaammccoomm
SShheennzzhheenn FFoossccaamm IInntteelllliiggeenntt TTeecchhnnoollooggyy CCoo LLiimmiitteedd
TTeell 8866 775555 22667744 55666688 FFaaxx 8866 775555 22667744 55116688 45
4 Other Settings
Use Mobile to login
If the camera has been linked to Internet set the parameters of the camera and router Make
sure the camera can be accessed by domain name and WAN IP
For example the WAN IP is1833754137 the domain name is ycxgwpno-ipinfo Then open
the mobile IE enter the following URL you can login the camera http
1833754137mobilehtml or
http1833754137wapwml or httpycxgwpno-ipinfomobilehtml or
http ycxgwpno-ipinfo wapwml
If the HTTP port num isnrsquot 80 you should add the port num to the URL
http1833754137portnummobilehtml
or http ycxgwpno-ipinfoport nummobilehtml
46
ww
wwwwwwffoossccaammccoomm
SShheennzzhheenn FFoossccaamm IInntteelllliiggeenntt TTeecchhnnoollooggyy CCoo LLiimmiitteedd
TTeell 8866 775555 22667744 55666688 FFaaxx 8866 775555 22667744 55116688 46
5 APPENDIX
51 Frequently Asked Questions
NOTE Any questions you would meet please check Network connections firstly Check the
working status revealed by the indicators on the network server hub exchange and network
card If abnormal check the network connections
511 I have forgotten the administrator password
To reset the administrator password you had better unplug the network cable firstly After that
press and hold down the RESET BUTTON about 10 seconds Releasing the reset button the
password will turn to the factory default
Default administrator username admin password admin
Default user username user password user
Default guest username guest password guest
512 Subnet doesnrsquot match
Check whether your ipcamera in the same subnet of your computer The step is Control PanelNetwork ConnectionsDbclick Local Area Connections Choose eneralProperties (Figure 3637) Check subnet mask IP address and gateways When you set IP address please make sure they are in the same subnet Otherwise you cant access camera
513 Download and install the ActiveX
Please click button in the Login interface Install the ActiveX after download
47
ww
wwwwwwffoossccaammccoomm
SShheennzzhheenn FFoossccaamm IInntteelllliiggeenntt TTeecchhnnoollooggyy CCoo LLiimmiitteedd
TTeell 8866 775555 22667744 55666688 FFaaxx 8866 775555 22667744 55116688 47
Figure 51
Click next
Figure 52
Click Install
48
ww
wwwwwwffoossccaammccoomm
SShheennzzhheenn FFoossccaamm IInntteelllliiggeenntt TTeecchhnnoollooggyy CCoo LLiimmiitteedd
TTeell 8866 775555 22667744 55666688 FFaaxx 8866 775555 22667744 55116688 48
Figure 53
Only click Finish and the computer restarts upon installation completion
Re-login the camera and you can see the surveillance window
514 No Pictures Problems
The video streaming is transmitted by the ActiveX controller If ActiveX controller isnrsquot installed
correctly you will see no video image You can resolve this problem by this way
Download ActiveX controller and set the safety property of IE in the PC when you view it first
time IE browserToolInternet ProperSecurityCustom LevelActiveX control and
Plug-ins Three options of front should be set to be ldquoEnablerdquo The ActiveX programs read by the
computer will be stored As follows
Enable Download unsigned ActiveX controls
Enable Initialize and script ActiveX controls not marked as safe
Enable Run ActiveX controls and plug-ins
49
ww
wwwwwwffoossccaammccoomm
SShheennzzhheenn FFoossccaamm IInntteelllliiggeenntt TTeecchhnnoollooggyy CCoo LLiimmiitteedd
TTeell 8866 775555 22667744 55666688 FFaaxx 8866 775555 22667744 55116688 49
Figure 54
If you allow the ActiveX running but still could not see living video Please change another port
number to try Donrsquot use port 80 use any port between 1024 and 49151
Figure55
NOTE Make sure that your firewall or anti-virus software does not block the camera or ActiveX
If you could not see video please shut down firewall or anti-virus software to try again
50
ww
wwwwwwffoossccaammccoomm
SShheennzzhheenn FFoossccaamm IInntteelllliiggeenntt TTeecchhnnoollooggyy CCoo LLiimmiitteedd
TTeell 8866 775555 22667744 55666688 FFaaxx 8866 775555 22667744 55116688 50
515 I cannot see the video on Firefox or Safari or Google chrome
If you cannot see live video after login the camera it may be the reason that the defaults transmit
protocol of QuickTime streaming is not HTTP or the port is not 80
For Firefox Safari and Google chrome you should install Quick Time Player as the ActiveX
controller please configure the activex controller as the following picture
Select PreferencesmdashQuickTime Preferenceshellip
Figure 56
Choose HTTP as the transport protocol
Figure 57
51
ww
wwwwwwffoossccaammccoomm
SShheennzzhheenn FFoossccaamm IInntteelllliiggeenntt TTeecchhnnoollooggyy CCoo LLiimmiitteedd
TTeell 8866 775555 22667744 55666688 FFaaxx 8866 775555 22667744 55116688 51
516 I cannot see video on MAC OS
If you cannot see live video after login FOSCAM H264 camera it may be the reason that the
defaults transmit protocol of QuickTime streaming is not HTTP or the port is not 80
Please follow the below steps and make the protocol and port correct and you can see live video
then
Steps
Click ldquoGordquo ---------gt Choose ldquoUtilitiesrdquo ----------gt Open ldquoTerminalapprdquo ------------gt Check the
default protocol and port of QuickTime streaming by inputting the URL
ldquoqtdefaults read transportSettingsrdquo
If the protocol is not HTTP or the port is not 80 please input the URL
ldquoqtdefaults write transportSettings HTTP 80rdquo to change it
After changing it you can also check if it is successful by URL
ldquoqtdefaults read transportSettingsrdquo
Please refer to the below pictures for the above steps
Figure 58
52
ww
wwwwwwffoossccaammccoomm
SShheennzzhheenn FFoossccaamm IInntteelllliiggeenntt TTeecchhnnoollooggyy CCoo LLiimmiitteedd
TTeell 8866 775555 22667744 55666688 FFaaxx 8866 775555 22667744 55116688 52
Figure 59
Figure 510
517 Canrsquot access IP camera in internet
There are some reasons
1 ActiveX controller is not installed correctly (Figure51-53)
2 The port which camera used is blocked by Firewall or Anti-virus software Please change
another port number and try again (Figure55)
3 Port forwarding is not successful
53
ww
wwwwwwffoossccaammccoomm
SShheennzzhheenn FFoossccaamm IInntteelllliiggeenntt TTeecchhnnoollooggyy CCoo LLiimmiitteedd
TTeell 8866 775555 22667744 55666688 FFaaxx 8866 775555 22667744 55116688 53
Check these settings and make sure they are correct
518 UPnP always failed
UPnP only contains port forwarding in our recent software Sometimes it may be failed to do port
forwarding automatically because of firewall or anti-virus software It also has much relation with
routerrsquos security settings So we recommend you do port forwarding manually You can view
your camera in internet successfully after you do port forwarding manually in your
router(Figure316)
519 Canrsquot operate the cradle head
If you canrsquot operate the cradle head such as click the button but the cradle head can not
move Usually the cradle head canrsquot operate mainly because of wrong settings Please donrsquot
change the default settings or else you canrsquot operate it You can see the following figure which is
the default settings Sometimes you need to press the reset button and restore the default
settings
Figure511
52 Default Parameters
Default network Parameters
IP address obtain dynamically
Subnet mask obtain dynamically
Gateway obtain dynamically
DDNS Embedded FOSCAM DDNS Service
Username and password
Default admin username admin Default password admin
Default user username user Default password user
Default guest username guest Default password guest
54
ww
wwwwwwffoossccaammccoomm
SShheennzzhheenn FFoossccaamm IInntteelllliiggeenntt TTeecchhnnoollooggyy CCoo LLiimmiitteedd
TTeell 8866 775555 22667744 55666688 FFaaxx 8866 775555 22667744 55116688 54
53 Specifications
Specification FI8620
Image Sensor
Image Sensor 480TVL 14 SONY Color CCD Sensor
Optical variable times 10 times
Lens F 38-38mm F12
Mini Illumination multicolour 005Lux black and white0001Lux
Video
Video Formats Supports NTSC or PAL Formats
Image Compression H264
ImageFrame Rate 25fps(PAL Formats)30fps(NTSC Formats)Down adjustable
Image Resolution D1(720576)CIF(352288)QCIF(176144)
View H264 dual streaming
Focusing autohand-switchkeying automatic
digital continuous autofocus ulsg
Image adjust The brightness contrast is adjustable
White balance Automatic white balance
Backlight
compensation Automatic backlight compensation
SNR gt60DB (AGC OFF)
Network
Ethernet One 10100Mbps RJ-45
Supported Protocol TCPIPUDPIPHTTPSMTPFTPDHCPDNSDDNS
UPNPPOP3RTSP
Support IP address static IP address dynamic IP address
Alarm Alarm detection The motion detecting detection threshold Settings
Alarm inform Support EmailFTP etc alarm inform way
Hardware
Interface
POWER Interface DC 12V20A (EUUSAU adapter or other types optional)
Power Consumption ﹤6 Watts
Reset Buttons One Reset
Network Interface One 10100Mbps RJ-45
Environment
Operate Temper 0deg ~ 55degC (32degF ~ 131degF)
Operate Humidity 10 ~ 80 non-condensing
Storage Temper -10degC ~ 60deg (14degF ~ 140degF)
Storage Humidity 0 ~ 90 non-condensing
Physical
Horizontal speed 1-250deg S
Vertical speed 1-100deg S
PanTilt Angle Horizontal360deg amp Vertical 90deg
Dimension 270(L) x 170(W) x 260(H)mm
Net Weight 1935g
Gross Weight 2674g
PC
Requirements
CPU 20GHZ or above (suggested 30GHz)
Memory Size 256MB or above (suggested 10GHz)
Display Card 64M or above
55
ww
wwwwwwffoossccaammccoomm
SShheennzzhheenn FFoossccaamm IInntteelllliiggeenntt TTeecchhnnoollooggyy CCoo LLiimmiitteedd
TTeell 8866 775555 22667744 55666688 FFaaxx 8866 775555 22667744 55116688 55
Supported OS Microsoft Windows 2000XPVista Mac OS
Browser IE6 and above version or compatible browser Firefox Chrome
Safari or other standard browsers
Certificate CEFCC CEFCC
Software Upgrade Upgrade from network
Application Software H264 Camera Client
6 OBTAINING TECHNICAL SUPPORT
While we hope your experience with the IPCAM network camera is enjoyable and easy to use
you may experience some issues or have questions that this Userrsquos Guide has not answered
If you have problem with FOSCAM IP camera please first contact FOSCAM reseller for
solving the problems If our reseller cannot provide service please contact our service
department techfoscamcom
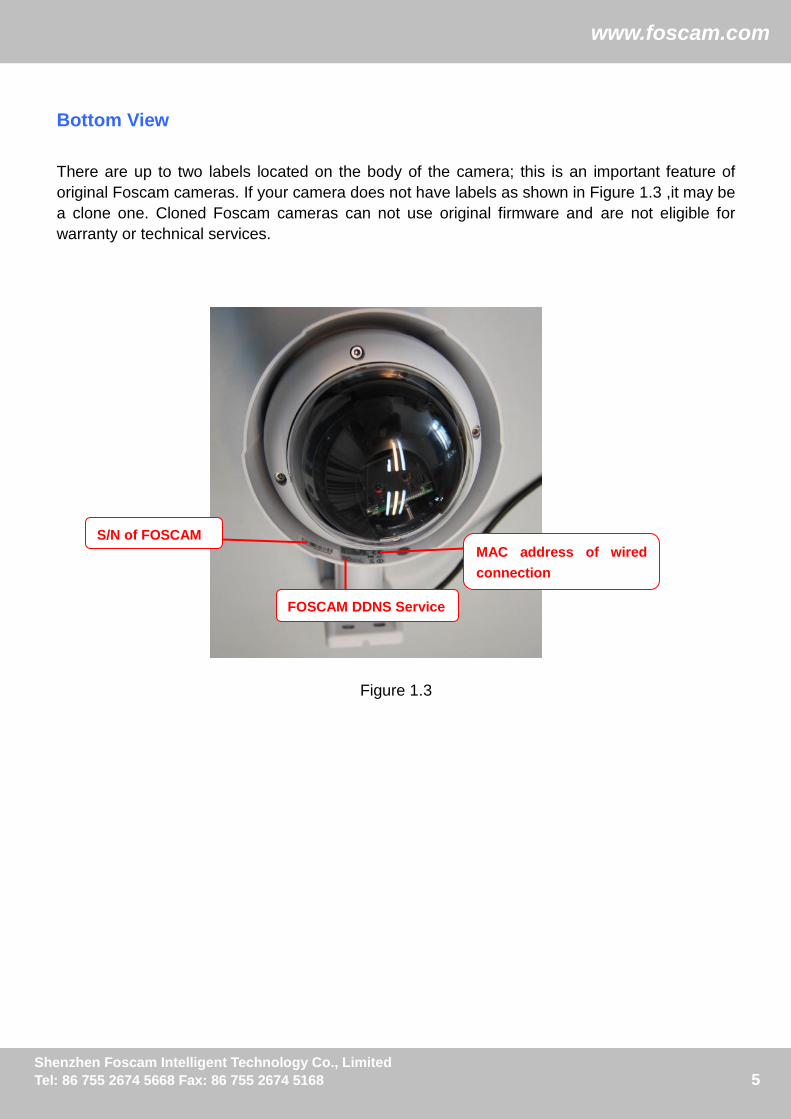
5
ww
wwwwwwffoossccaammccoomm
SShheennzzhheenn FFoossccaamm IInntteelllliiggeenntt TTeecchhnnoollooggyy CCoo LLiimmiitteedd
TTeell 8866 775555 22667744 55666688 FFaaxx 8866 775555 22667744 55116688 5
Bottom View
There are up to two labels located on the body of the camera this is an important feature of
original Foscam cameras If your camera does not have labels as shown in Figure 13 it may be
a clone one Cloned Foscam cameras can not use original firmware and are not eligible for
warranty or technical services
Figure 13
SN of FOSCAM
MAC address of wired
connection
FOSCAM DDNS Service
6
ww
wwwwwwffoossccaammccoomm
SShheennzzhheenn FFoossccaamm IInntteelllliiggeenntt TTeecchhnnoollooggyy CCoo LLiimmiitteedd
TTeell 8866 775555 22667744 55666688 FFaaxx 8866 775555 22667744 55116688 6
22 SSuurrvveeiillllaannccee SSooffttwwaarree GGUUII
Please refer to the Quick Installation Guide if you install the camera at first time After finishing
quick installation you can take time to learn the operation of the software
2211 LLooggiinn WWiinnddooww
Figure 21
Please check the login window above it was divided to 5 sections from no 1 to 5
Section1 Select Language
FOSCAM camera supports up to multi-languages such as English Spanish Deutsch and so on
You can select the language you need via click on the select language bar to switch
Section2 Video View Login Button
For PC please select the login button under Video View
Section3 Mobile View Login Button
If you are using the Mobile to access the camera here you need to select Mobile View login
button
1
2
3
4
5
7
ww
wwwwwwffoossccaammccoomm
SShheennzzhheenn FFoossccaamm IInntteelllliiggeenntt TTeecchhnnoollooggyy CCoo LLiimmiitteedd
TTeell 8866 775555 22667744 55666688 FFaaxx 8866 775555 22667744 55116688 7
Section4 Download ActiveX
For IE users the ActiveX have been embedded in the IP Camera Tool so if you have installed
the IP Camera Tool you need not download again If you use Firefox Google Chrome Safari or
others you should download and install QuickTime Player as the ActiveX from other website
For remote IE users first time you use the IPCAM you may need download and install the
ActiveX (Please read chapter 51 in Appendix about how to download and install the ActiveX)
Section5 Attention
For better viewing here we suggest using 1024768 screen resolution
Click the PC login button under Video View you will see the video window
For Internet Explorer
Figure 22
8
ww
wwwwwwffoossccaammccoomm
SShheennzzhheenn FFoossccaamm IInntteelllliiggeenntt TTeecchhnnoollooggyy CCoo LLiimmiitteedd
TTeell 8866 775555 22667744 55666688 FFaaxx 8866 775555 22667744 55116688 8
If you could not view living video after running the ActiveX only a red cross in the center
of the video or just a black screen Please change another port number to try
Make sure all firewall or antivirus software on your computer does not block the active download
and installation If you are unable to run the ActiveX control try shutting down the firewall or
antivirus program
For Firefox Google Chrome and Safari
Install the Quick Time Player and fill in user name and password then login you will see the
living video
Figure 23
9
ww
wwwwwwffoossccaammccoomm
SShheennzzhheenn FFoossccaamm IInntteelllliiggeenntt TTeecchhnnoollooggyy CCoo LLiimmiitteedd
TTeell 8866 775555 22667744 55666688 FFaaxx 8866 775555 22667744 55116688 9
22 Surveillance Window
Select the PC login mode and you will enter the surveillance window
Figure 24
For Visitor For Operator For Administrator
Camera supports three-level users management admin user and guest
The default ldquoadminrdquo username and password are all ldquoadminrdquo the default ldquouserrdquo username and
password are all ldquouserrdquo and the default ldquoguestrdquo username and password are all ldquoguestrdquo For first
using please go to For Administrator-gt User Settings panel to change the password and
against illegal access
Different users have different permissions Admin user has the highest authority He can do any settings User account can do settings below For Visitor and For Operator Guest account can do settings below For Visitor
1
2
3
5
6
7
4
10
ww
wwwwwwffoossccaammccoomm
SShheennzzhheenn FFoossccaamm IInntteelllliiggeenntt TTeecchhnnoollooggyy CCoo LLiimmiitteedd
TTeell 8866 775555 22667744 55666688 FFaaxx 8866 775555 22667744 55116688 10
Section1 View
The resolution contains D1(720576) CIF(352288) QCIF(176144) and Auto You can choose First Stream or Second Stream to adjust the view window
Note When the network bandwidth is bad yoursquod better select Second Stream and the video will
be more fluency
Section2 CaptureRecordPlaybackSet Path Buttons
Capture Click this icon the current living picture will be stored to a predetermined path
The default storage path is D disk You can click this button to change the storage path
Record Click the icon The camera will begin recording and store the recorded file to the
folder you set And the status column will display REC when recording Click again it will stop
recording The default storage path is D disk You can click this button to change the
storage path
Figure 25
11
ww
wwwwwwffoossccaammccoomm
SShheennzzhheenn FFoossccaamm IInntteelllliiggeenntt TTeecchhnnoollooggyy CCoo LLiimmiitteedd
TTeell 8866 775555 22667744 55666688 FFaaxx 8866 775555 22667744 55116688 11
Playback Click the button it will pop up a player And you can see the videos you have
stored in your computer
Figure 26
Set Path Set the storage path of photos and videos The default storage path is D disk
Note These buttons are controlled by the ActiveX controller therefore Firefox Google Chrome
and Safari cannot allow to these functions
Section3 PanTilt ZoomFocus Control
1------Up control button 2------Down control button
3------Left control button 4------Right control button
1
2
3 4
12
ww
wwwwwwffoossccaammccoomm
SShheennzzhheenn FFoossccaamm IInntteelllliiggeenntt TTeecchhnnoollooggyy CCoo LLiimmiitteedd
TTeell 8866 775555 22667744 55666688 FFaaxx 8866 775555 22667744 55116688 12
Zoom inout The lens has 10x optical zoom The biggest optical zoom time is 10 times
Focus +- This function can help you see more clearly
Section4 Preset Go PTZ Speed
1) Preset----------Support 8 preset position which is considered enough for DIY home amp small
business surveillance market
2) Set----------- Click Set to save the position you need the camera to remember
3) Go----------- Click Go to make the camera move the preset position
4) Number button from 1 to 8--------You can click the number button with preset position and the
camera will go to the preset position
5) PTZ Speed-------- The default PTZ speed is 45 you can change another one between 1 and
63 The larger the number the faster the speed will be
How to do preset position
We can start preset settings from position 1
Firstly select no 1 within the menu of Preset on the panel
Secondly move the camera and stop at a place where you want make preset position
Thirdly click set button to save it as position 1 and you have done preset of position 1
After that you can select no 2 within the menu of Preset on the panel and move the camera and
stop at another place and set as preset position 2 You can do all the 8 preset positions with this
method
If you want to see the preset position you have set such as the position 1 only select the set
no1 and click go button the camera will go to position no1
13
ww
wwwwwwffoossccaammccoomm
SShheennzzhheenn FFoossccaamm IInntteelllliiggeenntt TTeecchhnnoollooggyy CCoo LLiimmiitteedd
TTeell 8866 775555 22667744 55666688 FFaaxx 8866 775555 22667744 55116688 13
Section5 For Administrator
Path to Administrator Control Panel Click it and it will lead to Administrator Control Panel
Section6 OSD
If you have added time and camera name in the video you can see it in the surveillance window
Go to For Administrator ---Video panel and you can add camera name and time on the live
window Here you can change another device name The default device name is IP Camera
Go to For Administrator ---DateampTime settings panel and adjust the device time
Section7 Status bar
Figure 27
There is a status column below the view window (Figure27) 1) The current state of IPCAM
2) After the view has been digital amplified click the icon the view will be digital narrowed 3) Click the icon the view window will be digital amplified
4) Click the icon the view window will restore the original size
NOTE Firefox Google Chrome and Safari have not these functions because the ActiveX does
not support it
14
ww
wwwwwwffoossccaammccoomm
SShheennzzhheenn FFoossccaamm IInntteelllliiggeenntt TTeecchhnnoollooggyy CCoo LLiimmiitteedd
TTeell 8866 775555 22667744 55666688 FFaaxx 8866 775555 22667744 55116688 14
Onscreen Mouse Control
Put the mouse on the screen and you can see a arrow Press the mouse and the camerarsquos len
will move to the corresponding direction
For example put the mouse on the upper-right corner of the screen and you can see a arrow
press the mouse then the cameras lens will move toward the upper-right direction
When the icon has three arrows the speed of the rotation is fastest And when the icon has one
arrow the speed is lowest
Figure 28
Put the mouse at the center of the living video you will see the icon of the magnifying glass
(Figure 29) Press the left mouse and you can use the optical zoom
Figure 29
15
ww
wwwwwwffoossccaammccoomm
SShheennzzhheenn FFoossccaamm IInntteelllliiggeenntt TTeecchhnnoollooggyy CCoo LLiimmiitteedd
TTeell 8866 775555 22667744 55666688 FFaaxx 8866 775555 22667744 55116688 15
Right click on the screen you can see two graphic display modes Direct Draw and GDI The
default mode is Direct Draw and almost graphic card support this mode But some old graphic
card cannot display normally under Direct Draw you can select GDI to try again
Figure 210
NOTE
Under GDI mode you cannot see the motion detect region lines when set motion detection(For
more details read chapter 310 Motion Detection)
16
ww
wwwwwwffoossccaammccoomm
SShheennzzhheenn FFoossccaamm IInntteelllliiggeenntt TTeecchhnnoollooggyy CCoo LLiimmiitteedd
TTeell 8866 775555 22667744 55666688 FFaaxx 8866 775555 22667744 55116688 16
33 AAddvvaanncceedd CCaammeerraa SSeettttiinnggss Click the bar ldquoFor Administratorrdquo goes to Administrator Control Panel to make advanced camera
settings
31 Device Information
Click For Administrator you will see the Device Information
It contains Device ID firmware version of the camera and other status of the camera
Device ID It displays ldquoIP Camerardquo This ID is different form the camera name You can set any
camera name you like for the camera in ldquoFor Administratormdashgt VideomdashgtParenthesis Optionsrdquo
and the camera name can be showed at the video window but the device ID will always display
IP Camera
Network Connection LAN If the camera gets wired connection successfully here will show
LAN
Current Client It shows that how many people are viewing the video For example the Current
Client shows 0 that means no people are viewing the video If someone have logged in the
camera but do not open the video the Current Client will not change
Device Firmware VersionDevice Embedded Web UI Version The camerarsquos software
version
Mac Address Each camera has its own MAC ID For example Device ID is 00606E8C5058 the
same MAC ID sticker is found at the bottomback of the camera
17
ww
wwwwwwffoossccaammccoomm
SShheennzzhheenn FFoossccaamm IInntteelllliiggeenntt TTeecchhnnoollooggyy CCoo LLiimmiitteedd
TTeell 8866 775555 22667744 55666688 FFaaxx 8866 775555 22667744 55116688 17
32 Date amp Time Settings
There are four models for you to adjust time Manual setting Sync with computer time Network
Time Protocol and Keep current time choose one model and adjust the camera time Then
choose Time zone
Manual settings The administrator can enter the date and time manually Note that the date
and time format is [yyyymmdd] and [hhmmss]
Network Time Protocol It is a protocol which synchronizes computer clocks by periodically
querying an NTP server
Interval The interval time between last time and next time that the camera adjust time with Ntp
Server
Time zoneSelect the appropriate time zone from the list
Figure 31
If your country implements the Daylight Saving Time when you select the Time zone you can
see the following screen
18
ww
wwwwwwffoossccaammccoomm
SShheennzzhheenn FFoossccaamm IInntteelllliiggeenntt TTeecchhnnoollooggyy CCoo LLiimmiitteedd
TTeell 8866 775555 22667744 55666688 FFaaxx 8866 775555 22667744 55116688 18
Figure 32
The camera will adjust the daylight saving time automatically if you select ldquoAutomatically adjust
clock for daylight saving time changesrdquo
19
ww
wwwwwwffoossccaammccoomm
SShheennzzhheenn FFoossccaamm IInntteelllliiggeenntt TTeecchhnnoollooggyy CCoo LLiimmiitteedd
TTeell 8866 775555 22667744 55666688 FFaaxx 8866 775555 22667744 55116688 19
33 User Settings
The camera has set up 3-level user permissions user names are admin user guest and the
default passwords are admin user guest too
Different user has different permission Only admin can do advanced settings under For
Administrator page User account can operate For Visitor and For Operator page Guest account
only can do settings under For Visitor
Please reset the passwords at first using and prevent unauthorized users login the camera
Click Apply to save these settings
Figure 33
Note You cannot change the user name and the passwords cannot be null
20
ww
wwwwwwffoossccaammccoomm
SShheennzzhheenn FFoossccaamm IInntteelllliiggeenntt TTeecchhnnoollooggyy CCoo LLiimmiitteedd
TTeell 8866 775555 22667744 55666688 FFaaxx 8866 775555 22667744 55116688 20
34 Basic Network Settings
IP Configuration Type contains two types Fixed IP Address and Dynamic IP Address Set the
appropriate type for you Keep the camera in the same subnet of your router or computer
Fixed IP Address Select this option to manually assign a static IP address to the Network
Camera
Dynamic IP Address Select this option to obtain an available dynamic IP address assigned by
the DHCP server each time the camera is connected to the LAN
Figure 34 If you want to set a static IP for the camera you should keep the camera in the same subnet of
your router or computer The DNS Configuration Type has two types Manual DNS and From
DHCP Server If you donrsquot know the subnet mask gateway and DNS server you can check your
computerrsquos local area connection It contains all the information
The step is Control PanelNetwork ConnectionsDouble click Local Area Connections
Choose GeneralProperties You will see all the information in it
21
ww
wwwwwwffoossccaammccoomm
SShheennzzhheenn FFoossccaamm IInntteelllliiggeenntt TTeecchhnnoollooggyy CCoo LLiimmiitteedd
TTeell 8866 775555 22667744 55666688 FFaaxx 8866 775555 22667744 55116688 21
Figure 35
Figure 36
Click here
Set the same subnet
mask and gateway of
your camera with your PC
There are two DNS servers you
can set the same for your camera
Same with gateway is also OK
22
ww
wwwwwwffoossccaammccoomm
SShheennzzhheenn FFoossccaamm IInntteelllliiggeenntt TTeecchhnnoollooggyy CCoo LLiimmiitteedd
TTeell 8866 775555 22667744 55666688 FFaaxx 8866 775555 22667744 55116688 22
If you donrsquot know the DNS server you can use the same settings as the default Gateway
HTTP Port number The HTTP Port can be used to access the IPCAM on the LAN Usually it is
80 You can set any number between 1024 and 49151 too
After all settings click Apply You will see the following picture click OK and re-connect the
camera
Figure 37
RTSP port number Usually it is 554 You can set any number between 1024 and 49151 too
Click Apply and the camera will reboot
Enter rtsp IPRTSP port number11 or rtsp IPRTSP port number12 into the VLC you can
see the real-time preview WAN IP or LAN IP is OK If the RTSP port number is 554 you can
directly enter the following url rtsp IP11 or rtspIP12 The number ldquo11rdquo shows that you will
use first stream The numberrdquo12rdquo shows that you will use second stream For example
Enter rtsp1921681116911 in the VLC
RTSP Permission Checksum
On Select it and you need to enter the login username and password when you view the
real-time preview in the VLC
Off Select it and you do not need to enter the login username and password
Figure 38
23
ww
wwwwwwffoossccaammccoomm
SShheennzzhheenn FFoossccaamm IInntteelllliiggeenntt TTeecchhnnoollooggyy CCoo LLiimmiitteedd
TTeell 8866 775555 22667744 55666688 FFaaxx 8866 775555 22667744 55116688 23
Figure 39
You need to enter the user name and password if you select on for RTSP Permission Checksum
Click OK and you can see the real-time preview
Figure 310
24
ww
wwwwwwffoossccaammccoomm
SShheennzzhheenn FFoossccaamm IInntteelllliiggeenntt TTeecchhnnoollooggyy CCoo LLiimmiitteedd
TTeell 8866 775555 22667744 55666688 FFaaxx 8866 775555 22667744 55116688 24
Figure 311
NOTE 1 Yoursquod better not change the HTTP and RTSP port number at the same time because
you cannot submit successfully
2 After changing the RTSP or HTTP port number the camera will restart
3 If you cannot play the video in the VLC player please check the port mapping (Figure 316)
25
ww
wwwwwwffoossccaammccoomm
SShheennzzhheenn FFoossccaamm IInntteelllliiggeenntt TTeecchhnnoollooggyy CCoo LLiimmiitteedd
TTeell 8866 775555 22667744 55666688 FFaaxx 8866 775555 22667744 55116688 25
35 Remote Access
This section will tell you how to access the camera form WAN
Figure 312
Static IP user Users who have static IP addresses do not need to set DDNS service settings for remote access When you have finished connecting the camera using the LAN IP address and port forwarding you can access the camera directly from the Internet using the WAN IP address and port number
Click Show you will see the WAN IP as below
26
ww
wwwwwwffoossccaammccoomm
SShheennzzhheenn FFoossccaamm IInntteelllliiggeenntt TTeecchhnnoollooggyy CCoo LLiimmiitteedd
TTeell 8866 775555 22667744 55666688 FFaaxx 8866 775555 22667744 55116688 26
You can access the IP Camera from the Internet (remote access) Enter the WAN IP address and port number in IE browser or other browsers you use For example Http 218171601878888
Make sure port mapping (or also known as port forwarding) is successful You can do port mapping in two ways
1) Enter the setting page of the router to enable UPNP function Then login the camera as administrator choose UPnP Settings to enable UPNP and make sure the state is ldquoUPnP successrdquo
2) Do port forwarding manually (details Fig316)
For dynamic IP user
DDNS is a service that allows your IP Camera especially when assigned with a dynamic IP address to have a fixed host and domain name This means that even though your WAN IP address is constantly changing you will have a fixed hostname you can use to access your cameras at all times You can access the camera directly from the Internet using the hostname and port number
FOSCAM domain name Each Foscam camera has an embedded unique DDNS domain name the format of this domain name is xxxxxxmyfoscamorg On the camera body you can see the domain name sticker Here take cameramyfoscamorg for example Go to option of DDNS Service Settings on the administrator panel you can see the domain name(Figure 312)
Now you can use http Domain name + HTTP Port to access the camera via internet
Take hostname cameramyfoscamorg and HTTP Port no 8888 for example the accessing
link of the camera via internet would be http cameramyfoscamorg8888
27
ww
wwwwwwffoossccaammccoomm
SShheennzzhheenn FFoossccaamm IInntteelllliiggeenntt TTeecchhnnoollooggyy CCoo LLiimmiitteedd
TTeell 8866 775555 22667744 55666688 FFaaxx 8866 775555 22667744 55116688 27
Third Party Domain Name Settings
User can also use third part DDNS such as wwwno-ipcom www dyndnscom
Here take wwwno-ipcom for example
① Step 1 Go to the website wwwno-ipcom to create a free hostname
Firstly Login on wwwno-ipcom and click No-IP Free to register
Figure 313
Please register an account step by step according to instructions on wwwno-ipcom
After registration please login your email which used to register You will receive an email from
website please click the link to activate your ACCOUNT as indicated in email
Secondly Login the link with the registered username and password to create your
domain name
Click here to register
28
ww
wwwwwwffoossccaammccoomm
SShheennzzhheenn FFoossccaamm IInntteelllliiggeenntt TTeecchhnnoollooggyy CCoo LLiimmiitteedd
TTeell 8866 775555 22667744 55666688 FFaaxx 8866 775555 22667744 55116688 28
Figure 314
Figure 315
Please create the domain name step by step according to instructions on wwwno-ipcom
Step 2 DO DDNS Service Settings within the Camera
Please set Remote Access within the camera by hostname a user name and password
yoursquove got from wwwno-ipcom
29
ww
wwwwwwffoossccaammccoomm
SShheennzzhheenn FFoossccaamm IInntteelllliiggeenntt TTeecchhnnoollooggyy CCoo LLiimmiitteedd
TTeell 8866 775555 22667744 55666688 FFaaxx 8866 775555 22667744 55116688 29
Take hostname ycxgwpno-ipinfo user name foscam password foscam2012 for example
Firstly goes to option of Remote Access on the administrator panel
Secondly select No-Ip as a server in the Third Party DDNS
Thirdly fill foscam as DDNS user fill password foscam2012 as DDNS password fill
ycxgwpno-ipinfo as DDNS domain and server URL Then click save to make effect The
camera will restart and to take the DDNS settings effective
Please verify you have input the correct hostname user name and password
② Do port forwarding within the router
Example The camerarsquos LAN IP address is http19216813588
Firstly login the router goes to the menu of Port Forwarding or Port Trigger (or named Virtue Server on some brands of router) Take Linksys brand router as an example Login the
router and goes to Applications amp Gaming-gtSingle Port Forwarding
Secondly Create a new column by LAN IP address amp HTTP Port No of the camera within the
router showed as below
Figure 316
30
ww
wwwwwwffoossccaammccoomm
SShheennzzhheenn FFoossccaamm IInntteelllliiggeenntt TTeecchhnnoollooggyy CCoo LLiimmiitteedd
TTeell 8866 775555 22667744 55666688 FFaaxx 8866 775555 22667744 55116688 30
③ Use domain name to access the camera via internet
After the port forwarding is finished you can use the domain name+ http no to access the
camera via internet Take hostname ycxgwpno-ipinfo and http no 88for example the
accessing link of the camera via internet would be http ycxgwpno-ipinfo88
Upnp Port Forwarding If you select Enable that means you allow the IPCAM to open ports on the router automatically so that the video streams can be sent out form a LAN To utilize of this feature make sure that your router supports UPNP and it is activated Usually we recommend you do it manually (Figure 316)
31
ww
wwwwwwffoossccaammccoomm
SShheennzzhheenn FFoossccaamm IInntteelllliiggeenntt TTeecchhnnoollooggyy CCoo LLiimmiitteedd
TTeell 8866 775555 22667744 55666688 FFaaxx 8866 775555 22667744 55116688 31
36 Email Settings
If you want the camera to send emails when motion has been activated Email Settings will
need to be configured
Figure 317
Make sure your mailbox for sender supports SMTP Three recipients can be added to receive
images SMTP port is usually set as 25 If SMTP server supports SSI you should choose it The
subject and message cannot be Chinese characters
32
ww
wwwwwwffoossccaammccoomm
SShheennzzhheenn FFoossccaamm IInntteelllliiggeenntt TTeecchhnnoollooggyy CCoo LLiimmiitteedd
TTeell 8866 775555 22667744 55666688 FFaaxx 8866 775555 22667744 55116688 32
37 FTP Settings
If you want to upload images to your FTP server you can set FTP Settings
Figure 318
Figure 319
FTP server If your FTP server is set up in LAN you can set as Figure 318
If you have a FTP server which you can access on the internet you can set as Figure 319
FTP Port Usually the port is 21
If the FTP server mode is passive choose on or else choose off
Path The path of FTP that you plan to store images
Click Apply after settings
33
ww
wwwwwwffoossccaammccoomm
SShheennzzhheenn FFoossccaamm IInntteelllliiggeenntt TTeecchhnnoollooggyy CCoo LLiimmiitteedd
TTeell 8866 775555 22667744 55666688 FFaaxx 8866 775555 22667744 55116688 33
38 Auto Capture
The camera can capture pictures automatically at interval time if you have set auto capture
Figure 320
Snap interval The interval time between two snapshot actions The pictures will be stored to the
disk you set (you can set the storage path under ldquoFor Visitorrdquo)
Send E-mail Select it the camera will send email to you with the picture it has captured when
the camera alarmed
Click Apply after settings
34
ww
wwwwwwffoossccaammccoomm
SShheennzzhheenn FFoossccaamm IInntteelllliiggeenntt TTeecchhnnoollooggyy CCoo LLiimmiitteedd
TTeell 8866 775555 22667744 55666688 FFaaxx 8866 775555 22667744 55116688 34
39 Terminal
The camera has built-in cradle head yoursquod better not change the default settings (Figure 321)
or else you may not control the cradle head
Figure 321
310 Motion Detection
IP Camera supports Motion Detection when the motion has been detected it will send emails
or upload images to FTP
IP CAM supports four detection regions Choose the options dialog box before window1
window2 window3 window4 to enable the corresponding areas
For example choose window1Then you can see a box with a number at living video (Figure
322)
35
ww
wwwwwwffoossccaammccoomm
SShheennzzhheenn FFoossccaamm IInntteelllliiggeenntt TTeecchhnnoollooggyy CCoo LLiimmiitteedd
TTeell 8866 775555 22667744 55666688 FFaaxx 8866 775555 22667744 55116688 35
Figure 322
Move your mouse on the regional box and you can see the arrow icon then drag the regional
box to any position in the video
That means you choose window1
36
ww
wwwwwwffoossccaammccoomm
SShheennzzhheenn FFoossccaamm IInntteelllliiggeenntt TTeecchhnnoollooggyy CCoo LLiimmiitteedd
TTeell 8866 775555 22667744 55666688 FFaaxx 8866 775555 22667744 55116688 36
Figure 323
Move the mouse to the bottom right corner of the regional box When the mouse pattern changes
to ldquo rdquo you can change the size of the detection area
37
ww
wwwwwwffoossccaammccoomm
SShheennzzhheenn FFoossccaamm IInntteelllliiggeenntt TTeecchhnnoollooggyy CCoo LLiimmiitteedd
TTeell 8866 775555 22667744 55666688 FFaaxx 8866 775555 22667744 55116688 37
Figure 324
Move right or left and adjust the sensitivityClick apply after all settingsThe regional box
will blink with red color when something moving in your detection area
Drag it and change the size of
the alarm area
38
ww
wwwwwwffoossccaammccoomm
SShheennzzhheenn FFoossccaamm IInntteelllliiggeenntt TTeecchhnnoollooggyy CCoo LLiimmiitteedd
TTeell 8866 775555 22667744 55666688 FFaaxx 8866 775555 22667744 55116688 38
Figure 325
Note
1 If you add the dateamptime to the videodonrsquot put the detection window on the time area or else
the camera will alarm when the time change
2 If you have not set the motion detection areathe camera will not alarm at any time
3 Firefox Google chrome and Safari doesnrsquot have this function because the activex doesnrsquot
support it
4 Right click on the screen there are two graphic display modes Direct Draw and GDI Under
the GDI mode you cannot see the four detection regions when you select the window1window2
window3 window4
39
ww
wwwwwwffoossccaammccoomm
SShheennzzhheenn FFoossccaamm IInntteelllliiggeenntt TTeecchhnnoollooggyy CCoo LLiimmiitteedd
TTeell 8866 775555 22667744 55666688 FFaaxx 8866 775555 22667744 55116688 39
311 Alarm
IP CAM will send email or upload images when motion has been detected
Figure 326
Email Alarm Camera will send emails when motion is activated Make sure you have set Email
Settings first
Save Picture on the FTP Server To upload images to an FTP server when motion is detected
you must set FTP Settings first
Click Apply after settings
40
ww
wwwwwwffoossccaammccoomm
SShheennzzhheenn FFoossccaamm IInntteelllliiggeenntt TTeecchhnnoollooggyy CCoo LLiimmiitteedd
TTeell 8866 775555 22667744 55666688 FFaaxx 8866 775555 22667744 55116688 40
312 Schedule
If you want the camera alarm during the time you wish or all the time please choose Schedule
and set time range for motion alarm
Figure 327
There are two ways to set the alarm
1) Alarm at any time when motion is detected
Select All times and apply you settings the camera will alarm at any time when motion is
detected
2) Specify an alarm schedule
If you want the camera to alarm during a specify time you can select Use the week mode or Use
the work mode and set time range
Click apply the settings what you have done will take effect
If you click cancel the settings will come back to the status before your settings
If you want to reset all time range click clean
NOTE Adjust system time before set schedule
41
ww
wwwwwwffoossccaammccoomm
SShheennzzhheenn FFoossccaamm IInntteelllliiggeenntt TTeecchhnnoollooggyy CCoo LLiimmiitteedd
TTeell 8866 775555 22667744 55666688 FFaaxx 8866 775555 22667744 55116688 41
313 Video
Figure 328
Video format The format contains two kinds NTSC and PAL One camera only has one format
and you cannot change it
Resolution The camera supports First stream D1(704576)CIF(352288)QCIF(176144)
Second stream CIF(352288)QCIF(176144) The higher the resolution is the clearer video will
become But the code flux will become larger too and it will take up more bandwidth
Bit rate Generally speaking the larger the bit rate is the clearer video will become But the bit
rate configuration should combine well with the network bandwidth When the bandwidth is very
narrow and bit rate is large that will lead to video can not play well
42
ww
wwwwwwffoossccaammccoomm
SShheennzzhheenn FFoossccaamm IInntteelllliiggeenntt TTeecchhnnoollooggyy CCoo LLiimmiitteedd
TTeell 8866 775555 22667744 55666688 FFaaxx 8866 775555 22667744 55116688 42
Maximum frame rate When the video format is PAL the maximum frame rate is 25 fps When
the video format is NTSC the maximum frame rate is 30 fps You should lower frame rate when
the bandwidth is limited Normally when the frame rate above 15 you can achieve fluently video
Key Frame Interval The time between last key frame and next key frame
Bit rate control It has two models CBR and VBR If you choose CVR video encoder will be
coding on the basis of bit rate you set If you choose VBR video encoder will be coding not only
on the basis of bit rate but also consider video quality
Image Quality The smaller the value the better the image quality
Parenthesis options The camera name and time can be loaded to the video screen through
this option If you set as following picture (Figure 330) you will see the video as Figure329 The
camera name cannot be Chinese characters
Figure 329
Figure 330
43
ww
wwwwwwffoossccaammccoomm
SShheennzzhheenn FFoossccaamm IInntteelllliiggeenntt TTeecchhnnoollooggyy CCoo LLiimmiitteedd
TTeell 8866 775555 22667744 55666688 FFaaxx 8866 775555 22667744 55116688 43
314 Image Settings
Adjust the quality of the video by setting the image parameters
Figure 331
Brightness saturation contrast and hue are used to adjust the quality of the video Camera will
save your settings if you click apply If you want to quit settings you have done and restore the
status before your setting please click cancel The function of Default is used to restore the initial
settings
44
ww
wwwwwwffoossccaammccoomm
SShheennzzhheenn FFoossccaamm IInntteelllliiggeenntt TTeecchhnnoollooggyy CCoo LLiimmiitteedd
TTeell 8866 775555 22667744 55666688 FFaaxx 8866 775555 22667744 55116688 44
315 Initialize
Reboot Click reboot the infection is the same as plug the power and re-plug it
Factory default Click it all parameters will return to factory settings
Backup setting data If you donrsquot want to quit all parameters that yoursquove set You can click save
and all the parameters you set will be stored as a parameters bin file
Restore Click browse choose the correct bin file and then click ok to get all parameters which
you set before
Upgrade Click Browse choose the correct bin file and then click OK to upgrade Donrsquot shut
down the power during upgrade
Figure 332
316 Back
This will take you back to the video window
45
ww
wwwwwwffoossccaammccoomm
SShheennzzhheenn FFoossccaamm IInntteelllliiggeenntt TTeecchhnnoollooggyy CCoo LLiimmiitteedd
TTeell 8866 775555 22667744 55666688 FFaaxx 8866 775555 22667744 55116688 45
4 Other Settings
Use Mobile to login
If the camera has been linked to Internet set the parameters of the camera and router Make
sure the camera can be accessed by domain name and WAN IP
For example the WAN IP is1833754137 the domain name is ycxgwpno-ipinfo Then open
the mobile IE enter the following URL you can login the camera http
1833754137mobilehtml or
http1833754137wapwml or httpycxgwpno-ipinfomobilehtml or
http ycxgwpno-ipinfo wapwml
If the HTTP port num isnrsquot 80 you should add the port num to the URL
http1833754137portnummobilehtml
or http ycxgwpno-ipinfoport nummobilehtml
46
ww
wwwwwwffoossccaammccoomm
SShheennzzhheenn FFoossccaamm IInntteelllliiggeenntt TTeecchhnnoollooggyy CCoo LLiimmiitteedd
TTeell 8866 775555 22667744 55666688 FFaaxx 8866 775555 22667744 55116688 46
5 APPENDIX
51 Frequently Asked Questions
NOTE Any questions you would meet please check Network connections firstly Check the
working status revealed by the indicators on the network server hub exchange and network
card If abnormal check the network connections
511 I have forgotten the administrator password
To reset the administrator password you had better unplug the network cable firstly After that
press and hold down the RESET BUTTON about 10 seconds Releasing the reset button the
password will turn to the factory default
Default administrator username admin password admin
Default user username user password user
Default guest username guest password guest
512 Subnet doesnrsquot match
Check whether your ipcamera in the same subnet of your computer The step is Control PanelNetwork ConnectionsDbclick Local Area Connections Choose eneralProperties (Figure 3637) Check subnet mask IP address and gateways When you set IP address please make sure they are in the same subnet Otherwise you cant access camera
513 Download and install the ActiveX
Please click button in the Login interface Install the ActiveX after download
47
ww
wwwwwwffoossccaammccoomm
SShheennzzhheenn FFoossccaamm IInntteelllliiggeenntt TTeecchhnnoollooggyy CCoo LLiimmiitteedd
TTeell 8866 775555 22667744 55666688 FFaaxx 8866 775555 22667744 55116688 47
Figure 51
Click next
Figure 52
Click Install
48
ww
wwwwwwffoossccaammccoomm
SShheennzzhheenn FFoossccaamm IInntteelllliiggeenntt TTeecchhnnoollooggyy CCoo LLiimmiitteedd
TTeell 8866 775555 22667744 55666688 FFaaxx 8866 775555 22667744 55116688 48
Figure 53
Only click Finish and the computer restarts upon installation completion
Re-login the camera and you can see the surveillance window
514 No Pictures Problems
The video streaming is transmitted by the ActiveX controller If ActiveX controller isnrsquot installed
correctly you will see no video image You can resolve this problem by this way
Download ActiveX controller and set the safety property of IE in the PC when you view it first
time IE browserToolInternet ProperSecurityCustom LevelActiveX control and
Plug-ins Three options of front should be set to be ldquoEnablerdquo The ActiveX programs read by the
computer will be stored As follows
Enable Download unsigned ActiveX controls
Enable Initialize and script ActiveX controls not marked as safe
Enable Run ActiveX controls and plug-ins
49
ww
wwwwwwffoossccaammccoomm
SShheennzzhheenn FFoossccaamm IInntteelllliiggeenntt TTeecchhnnoollooggyy CCoo LLiimmiitteedd
TTeell 8866 775555 22667744 55666688 FFaaxx 8866 775555 22667744 55116688 49
Figure 54
If you allow the ActiveX running but still could not see living video Please change another port
number to try Donrsquot use port 80 use any port between 1024 and 49151
Figure55
NOTE Make sure that your firewall or anti-virus software does not block the camera or ActiveX
If you could not see video please shut down firewall or anti-virus software to try again
50
ww
wwwwwwffoossccaammccoomm
SShheennzzhheenn FFoossccaamm IInntteelllliiggeenntt TTeecchhnnoollooggyy CCoo LLiimmiitteedd
TTeell 8866 775555 22667744 55666688 FFaaxx 8866 775555 22667744 55116688 50
515 I cannot see the video on Firefox or Safari or Google chrome
If you cannot see live video after login the camera it may be the reason that the defaults transmit
protocol of QuickTime streaming is not HTTP or the port is not 80
For Firefox Safari and Google chrome you should install Quick Time Player as the ActiveX
controller please configure the activex controller as the following picture
Select PreferencesmdashQuickTime Preferenceshellip
Figure 56
Choose HTTP as the transport protocol
Figure 57
51
ww
wwwwwwffoossccaammccoomm
SShheennzzhheenn FFoossccaamm IInntteelllliiggeenntt TTeecchhnnoollooggyy CCoo LLiimmiitteedd
TTeell 8866 775555 22667744 55666688 FFaaxx 8866 775555 22667744 55116688 51
516 I cannot see video on MAC OS
If you cannot see live video after login FOSCAM H264 camera it may be the reason that the
defaults transmit protocol of QuickTime streaming is not HTTP or the port is not 80
Please follow the below steps and make the protocol and port correct and you can see live video
then
Steps
Click ldquoGordquo ---------gt Choose ldquoUtilitiesrdquo ----------gt Open ldquoTerminalapprdquo ------------gt Check the
default protocol and port of QuickTime streaming by inputting the URL
ldquoqtdefaults read transportSettingsrdquo
If the protocol is not HTTP or the port is not 80 please input the URL
ldquoqtdefaults write transportSettings HTTP 80rdquo to change it
After changing it you can also check if it is successful by URL
ldquoqtdefaults read transportSettingsrdquo
Please refer to the below pictures for the above steps
Figure 58
52
ww
wwwwwwffoossccaammccoomm
SShheennzzhheenn FFoossccaamm IInntteelllliiggeenntt TTeecchhnnoollooggyy CCoo LLiimmiitteedd
TTeell 8866 775555 22667744 55666688 FFaaxx 8866 775555 22667744 55116688 52
Figure 59
Figure 510
517 Canrsquot access IP camera in internet
There are some reasons
1 ActiveX controller is not installed correctly (Figure51-53)
2 The port which camera used is blocked by Firewall or Anti-virus software Please change
another port number and try again (Figure55)
3 Port forwarding is not successful
53
ww
wwwwwwffoossccaammccoomm
SShheennzzhheenn FFoossccaamm IInntteelllliiggeenntt TTeecchhnnoollooggyy CCoo LLiimmiitteedd
TTeell 8866 775555 22667744 55666688 FFaaxx 8866 775555 22667744 55116688 53
Check these settings and make sure they are correct
518 UPnP always failed
UPnP only contains port forwarding in our recent software Sometimes it may be failed to do port
forwarding automatically because of firewall or anti-virus software It also has much relation with
routerrsquos security settings So we recommend you do port forwarding manually You can view
your camera in internet successfully after you do port forwarding manually in your
router(Figure316)
519 Canrsquot operate the cradle head
If you canrsquot operate the cradle head such as click the button but the cradle head can not
move Usually the cradle head canrsquot operate mainly because of wrong settings Please donrsquot
change the default settings or else you canrsquot operate it You can see the following figure which is
the default settings Sometimes you need to press the reset button and restore the default
settings
Figure511
52 Default Parameters
Default network Parameters
IP address obtain dynamically
Subnet mask obtain dynamically
Gateway obtain dynamically
DDNS Embedded FOSCAM DDNS Service
Username and password
Default admin username admin Default password admin
Default user username user Default password user
Default guest username guest Default password guest
54
ww
wwwwwwffoossccaammccoomm
SShheennzzhheenn FFoossccaamm IInntteelllliiggeenntt TTeecchhnnoollooggyy CCoo LLiimmiitteedd
TTeell 8866 775555 22667744 55666688 FFaaxx 8866 775555 22667744 55116688 54
53 Specifications
Specification FI8620
Image Sensor
Image Sensor 480TVL 14 SONY Color CCD Sensor
Optical variable times 10 times
Lens F 38-38mm F12
Mini Illumination multicolour 005Lux black and white0001Lux
Video
Video Formats Supports NTSC or PAL Formats
Image Compression H264
ImageFrame Rate 25fps(PAL Formats)30fps(NTSC Formats)Down adjustable
Image Resolution D1(720576)CIF(352288)QCIF(176144)
View H264 dual streaming
Focusing autohand-switchkeying automatic
digital continuous autofocus ulsg
Image adjust The brightness contrast is adjustable
White balance Automatic white balance
Backlight
compensation Automatic backlight compensation
SNR gt60DB (AGC OFF)
Network
Ethernet One 10100Mbps RJ-45
Supported Protocol TCPIPUDPIPHTTPSMTPFTPDHCPDNSDDNS
UPNPPOP3RTSP
Support IP address static IP address dynamic IP address
Alarm Alarm detection The motion detecting detection threshold Settings
Alarm inform Support EmailFTP etc alarm inform way
Hardware
Interface
POWER Interface DC 12V20A (EUUSAU adapter or other types optional)
Power Consumption ﹤6 Watts
Reset Buttons One Reset
Network Interface One 10100Mbps RJ-45
Environment
Operate Temper 0deg ~ 55degC (32degF ~ 131degF)
Operate Humidity 10 ~ 80 non-condensing
Storage Temper -10degC ~ 60deg (14degF ~ 140degF)
Storage Humidity 0 ~ 90 non-condensing
Physical
Horizontal speed 1-250deg S
Vertical speed 1-100deg S
PanTilt Angle Horizontal360deg amp Vertical 90deg
Dimension 270(L) x 170(W) x 260(H)mm
Net Weight 1935g
Gross Weight 2674g
PC
Requirements
CPU 20GHZ or above (suggested 30GHz)
Memory Size 256MB or above (suggested 10GHz)
Display Card 64M or above
55
ww
wwwwwwffoossccaammccoomm
SShheennzzhheenn FFoossccaamm IInntteelllliiggeenntt TTeecchhnnoollooggyy CCoo LLiimmiitteedd
TTeell 8866 775555 22667744 55666688 FFaaxx 8866 775555 22667744 55116688 55
Supported OS Microsoft Windows 2000XPVista Mac OS
Browser IE6 and above version or compatible browser Firefox Chrome
Safari or other standard browsers
Certificate CEFCC CEFCC
Software Upgrade Upgrade from network
Application Software H264 Camera Client
6 OBTAINING TECHNICAL SUPPORT
While we hope your experience with the IPCAM network camera is enjoyable and easy to use
you may experience some issues or have questions that this Userrsquos Guide has not answered
If you have problem with FOSCAM IP camera please first contact FOSCAM reseller for
solving the problems If our reseller cannot provide service please contact our service
department techfoscamcom
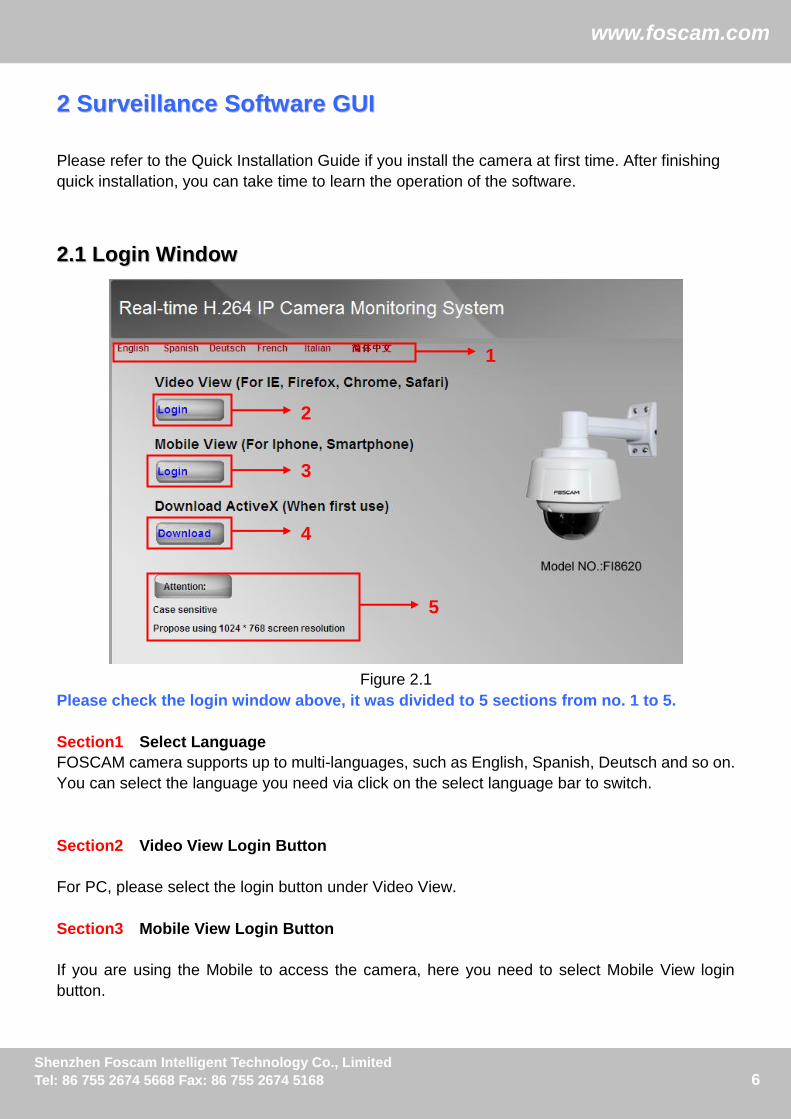
6
ww
wwwwwwffoossccaammccoomm
SShheennzzhheenn FFoossccaamm IInntteelllliiggeenntt TTeecchhnnoollooggyy CCoo LLiimmiitteedd
TTeell 8866 775555 22667744 55666688 FFaaxx 8866 775555 22667744 55116688 6
22 SSuurrvveeiillllaannccee SSooffttwwaarree GGUUII
Please refer to the Quick Installation Guide if you install the camera at first time After finishing
quick installation you can take time to learn the operation of the software
2211 LLooggiinn WWiinnddooww
Figure 21
Please check the login window above it was divided to 5 sections from no 1 to 5
Section1 Select Language
FOSCAM camera supports up to multi-languages such as English Spanish Deutsch and so on
You can select the language you need via click on the select language bar to switch
Section2 Video View Login Button
For PC please select the login button under Video View
Section3 Mobile View Login Button
If you are using the Mobile to access the camera here you need to select Mobile View login
button
1
2
3
4
5
7
ww
wwwwwwffoossccaammccoomm
SShheennzzhheenn FFoossccaamm IInntteelllliiggeenntt TTeecchhnnoollooggyy CCoo LLiimmiitteedd
TTeell 8866 775555 22667744 55666688 FFaaxx 8866 775555 22667744 55116688 7
Section4 Download ActiveX
For IE users the ActiveX have been embedded in the IP Camera Tool so if you have installed
the IP Camera Tool you need not download again If you use Firefox Google Chrome Safari or
others you should download and install QuickTime Player as the ActiveX from other website
For remote IE users first time you use the IPCAM you may need download and install the
ActiveX (Please read chapter 51 in Appendix about how to download and install the ActiveX)
Section5 Attention
For better viewing here we suggest using 1024768 screen resolution
Click the PC login button under Video View you will see the video window
For Internet Explorer
Figure 22
8
ww
wwwwwwffoossccaammccoomm
SShheennzzhheenn FFoossccaamm IInntteelllliiggeenntt TTeecchhnnoollooggyy CCoo LLiimmiitteedd
TTeell 8866 775555 22667744 55666688 FFaaxx 8866 775555 22667744 55116688 8
If you could not view living video after running the ActiveX only a red cross in the center
of the video or just a black screen Please change another port number to try
Make sure all firewall or antivirus software on your computer does not block the active download
and installation If you are unable to run the ActiveX control try shutting down the firewall or
antivirus program
For Firefox Google Chrome and Safari
Install the Quick Time Player and fill in user name and password then login you will see the
living video
Figure 23
9
ww
wwwwwwffoossccaammccoomm
SShheennzzhheenn FFoossccaamm IInntteelllliiggeenntt TTeecchhnnoollooggyy CCoo LLiimmiitteedd
TTeell 8866 775555 22667744 55666688 FFaaxx 8866 775555 22667744 55116688 9
22 Surveillance Window
Select the PC login mode and you will enter the surveillance window
Figure 24
For Visitor For Operator For Administrator
Camera supports three-level users management admin user and guest
The default ldquoadminrdquo username and password are all ldquoadminrdquo the default ldquouserrdquo username and
password are all ldquouserrdquo and the default ldquoguestrdquo username and password are all ldquoguestrdquo For first
using please go to For Administrator-gt User Settings panel to change the password and
against illegal access
Different users have different permissions Admin user has the highest authority He can do any settings User account can do settings below For Visitor and For Operator Guest account can do settings below For Visitor
1
2
3
5
6
7
4
10
ww
wwwwwwffoossccaammccoomm
SShheennzzhheenn FFoossccaamm IInntteelllliiggeenntt TTeecchhnnoollooggyy CCoo LLiimmiitteedd
TTeell 8866 775555 22667744 55666688 FFaaxx 8866 775555 22667744 55116688 10
Section1 View
The resolution contains D1(720576) CIF(352288) QCIF(176144) and Auto You can choose First Stream or Second Stream to adjust the view window
Note When the network bandwidth is bad yoursquod better select Second Stream and the video will
be more fluency
Section2 CaptureRecordPlaybackSet Path Buttons
Capture Click this icon the current living picture will be stored to a predetermined path
The default storage path is D disk You can click this button to change the storage path
Record Click the icon The camera will begin recording and store the recorded file to the
folder you set And the status column will display REC when recording Click again it will stop
recording The default storage path is D disk You can click this button to change the
storage path
Figure 25
11
ww
wwwwwwffoossccaammccoomm
SShheennzzhheenn FFoossccaamm IInntteelllliiggeenntt TTeecchhnnoollooggyy CCoo LLiimmiitteedd
TTeell 8866 775555 22667744 55666688 FFaaxx 8866 775555 22667744 55116688 11
Playback Click the button it will pop up a player And you can see the videos you have
stored in your computer
Figure 26
Set Path Set the storage path of photos and videos The default storage path is D disk
Note These buttons are controlled by the ActiveX controller therefore Firefox Google Chrome
and Safari cannot allow to these functions
Section3 PanTilt ZoomFocus Control
1------Up control button 2------Down control button
3------Left control button 4------Right control button
1
2
3 4
12
ww
wwwwwwffoossccaammccoomm
SShheennzzhheenn FFoossccaamm IInntteelllliiggeenntt TTeecchhnnoollooggyy CCoo LLiimmiitteedd
TTeell 8866 775555 22667744 55666688 FFaaxx 8866 775555 22667744 55116688 12
Zoom inout The lens has 10x optical zoom The biggest optical zoom time is 10 times
Focus +- This function can help you see more clearly
Section4 Preset Go PTZ Speed
1) Preset----------Support 8 preset position which is considered enough for DIY home amp small
business surveillance market
2) Set----------- Click Set to save the position you need the camera to remember
3) Go----------- Click Go to make the camera move the preset position
4) Number button from 1 to 8--------You can click the number button with preset position and the
camera will go to the preset position
5) PTZ Speed-------- The default PTZ speed is 45 you can change another one between 1 and
63 The larger the number the faster the speed will be
How to do preset position
We can start preset settings from position 1
Firstly select no 1 within the menu of Preset on the panel
Secondly move the camera and stop at a place where you want make preset position
Thirdly click set button to save it as position 1 and you have done preset of position 1
After that you can select no 2 within the menu of Preset on the panel and move the camera and
stop at another place and set as preset position 2 You can do all the 8 preset positions with this
method
If you want to see the preset position you have set such as the position 1 only select the set
no1 and click go button the camera will go to position no1
13
ww
wwwwwwffoossccaammccoomm
SShheennzzhheenn FFoossccaamm IInntteelllliiggeenntt TTeecchhnnoollooggyy CCoo LLiimmiitteedd
TTeell 8866 775555 22667744 55666688 FFaaxx 8866 775555 22667744 55116688 13
Section5 For Administrator
Path to Administrator Control Panel Click it and it will lead to Administrator Control Panel
Section6 OSD
If you have added time and camera name in the video you can see it in the surveillance window
Go to For Administrator ---Video panel and you can add camera name and time on the live
window Here you can change another device name The default device name is IP Camera
Go to For Administrator ---DateampTime settings panel and adjust the device time
Section7 Status bar
Figure 27
There is a status column below the view window (Figure27) 1) The current state of IPCAM
2) After the view has been digital amplified click the icon the view will be digital narrowed 3) Click the icon the view window will be digital amplified
4) Click the icon the view window will restore the original size
NOTE Firefox Google Chrome and Safari have not these functions because the ActiveX does
not support it
14
ww
wwwwwwffoossccaammccoomm
SShheennzzhheenn FFoossccaamm IInntteelllliiggeenntt TTeecchhnnoollooggyy CCoo LLiimmiitteedd
TTeell 8866 775555 22667744 55666688 FFaaxx 8866 775555 22667744 55116688 14
Onscreen Mouse Control
Put the mouse on the screen and you can see a arrow Press the mouse and the camerarsquos len
will move to the corresponding direction
For example put the mouse on the upper-right corner of the screen and you can see a arrow
press the mouse then the cameras lens will move toward the upper-right direction
When the icon has three arrows the speed of the rotation is fastest And when the icon has one
arrow the speed is lowest
Figure 28
Put the mouse at the center of the living video you will see the icon of the magnifying glass
(Figure 29) Press the left mouse and you can use the optical zoom
Figure 29
15
ww
wwwwwwffoossccaammccoomm
SShheennzzhheenn FFoossccaamm IInntteelllliiggeenntt TTeecchhnnoollooggyy CCoo LLiimmiitteedd
TTeell 8866 775555 22667744 55666688 FFaaxx 8866 775555 22667744 55116688 15
Right click on the screen you can see two graphic display modes Direct Draw and GDI The
default mode is Direct Draw and almost graphic card support this mode But some old graphic
card cannot display normally under Direct Draw you can select GDI to try again
Figure 210
NOTE
Under GDI mode you cannot see the motion detect region lines when set motion detection(For
more details read chapter 310 Motion Detection)
16
ww
wwwwwwffoossccaammccoomm
SShheennzzhheenn FFoossccaamm IInntteelllliiggeenntt TTeecchhnnoollooggyy CCoo LLiimmiitteedd
TTeell 8866 775555 22667744 55666688 FFaaxx 8866 775555 22667744 55116688 16
33 AAddvvaanncceedd CCaammeerraa SSeettttiinnggss Click the bar ldquoFor Administratorrdquo goes to Administrator Control Panel to make advanced camera
settings
31 Device Information
Click For Administrator you will see the Device Information
It contains Device ID firmware version of the camera and other status of the camera
Device ID It displays ldquoIP Camerardquo This ID is different form the camera name You can set any
camera name you like for the camera in ldquoFor Administratormdashgt VideomdashgtParenthesis Optionsrdquo
and the camera name can be showed at the video window but the device ID will always display
IP Camera
Network Connection LAN If the camera gets wired connection successfully here will show
LAN
Current Client It shows that how many people are viewing the video For example the Current
Client shows 0 that means no people are viewing the video If someone have logged in the
camera but do not open the video the Current Client will not change
Device Firmware VersionDevice Embedded Web UI Version The camerarsquos software
version
Mac Address Each camera has its own MAC ID For example Device ID is 00606E8C5058 the
same MAC ID sticker is found at the bottomback of the camera
17
ww
wwwwwwffoossccaammccoomm
SShheennzzhheenn FFoossccaamm IInntteelllliiggeenntt TTeecchhnnoollooggyy CCoo LLiimmiitteedd
TTeell 8866 775555 22667744 55666688 FFaaxx 8866 775555 22667744 55116688 17
32 Date amp Time Settings
There are four models for you to adjust time Manual setting Sync with computer time Network
Time Protocol and Keep current time choose one model and adjust the camera time Then
choose Time zone
Manual settings The administrator can enter the date and time manually Note that the date
and time format is [yyyymmdd] and [hhmmss]
Network Time Protocol It is a protocol which synchronizes computer clocks by periodically
querying an NTP server
Interval The interval time between last time and next time that the camera adjust time with Ntp
Server
Time zoneSelect the appropriate time zone from the list
Figure 31
If your country implements the Daylight Saving Time when you select the Time zone you can
see the following screen
18
ww
wwwwwwffoossccaammccoomm
SShheennzzhheenn FFoossccaamm IInntteelllliiggeenntt TTeecchhnnoollooggyy CCoo LLiimmiitteedd
TTeell 8866 775555 22667744 55666688 FFaaxx 8866 775555 22667744 55116688 18
Figure 32
The camera will adjust the daylight saving time automatically if you select ldquoAutomatically adjust
clock for daylight saving time changesrdquo
19
ww
wwwwwwffoossccaammccoomm
SShheennzzhheenn FFoossccaamm IInntteelllliiggeenntt TTeecchhnnoollooggyy CCoo LLiimmiitteedd
TTeell 8866 775555 22667744 55666688 FFaaxx 8866 775555 22667744 55116688 19
33 User Settings
The camera has set up 3-level user permissions user names are admin user guest and the
default passwords are admin user guest too
Different user has different permission Only admin can do advanced settings under For
Administrator page User account can operate For Visitor and For Operator page Guest account
only can do settings under For Visitor
Please reset the passwords at first using and prevent unauthorized users login the camera
Click Apply to save these settings
Figure 33
Note You cannot change the user name and the passwords cannot be null
20
ww
wwwwwwffoossccaammccoomm
SShheennzzhheenn FFoossccaamm IInntteelllliiggeenntt TTeecchhnnoollooggyy CCoo LLiimmiitteedd
TTeell 8866 775555 22667744 55666688 FFaaxx 8866 775555 22667744 55116688 20
34 Basic Network Settings
IP Configuration Type contains two types Fixed IP Address and Dynamic IP Address Set the
appropriate type for you Keep the camera in the same subnet of your router or computer
Fixed IP Address Select this option to manually assign a static IP address to the Network
Camera
Dynamic IP Address Select this option to obtain an available dynamic IP address assigned by
the DHCP server each time the camera is connected to the LAN
Figure 34 If you want to set a static IP for the camera you should keep the camera in the same subnet of
your router or computer The DNS Configuration Type has two types Manual DNS and From
DHCP Server If you donrsquot know the subnet mask gateway and DNS server you can check your
computerrsquos local area connection It contains all the information
The step is Control PanelNetwork ConnectionsDouble click Local Area Connections
Choose GeneralProperties You will see all the information in it
21
ww
wwwwwwffoossccaammccoomm
SShheennzzhheenn FFoossccaamm IInntteelllliiggeenntt TTeecchhnnoollooggyy CCoo LLiimmiitteedd
TTeell 8866 775555 22667744 55666688 FFaaxx 8866 775555 22667744 55116688 21
Figure 35
Figure 36
Click here
Set the same subnet
mask and gateway of
your camera with your PC
There are two DNS servers you
can set the same for your camera
Same with gateway is also OK
22
ww
wwwwwwffoossccaammccoomm
SShheennzzhheenn FFoossccaamm IInntteelllliiggeenntt TTeecchhnnoollooggyy CCoo LLiimmiitteedd
TTeell 8866 775555 22667744 55666688 FFaaxx 8866 775555 22667744 55116688 22
If you donrsquot know the DNS server you can use the same settings as the default Gateway
HTTP Port number The HTTP Port can be used to access the IPCAM on the LAN Usually it is
80 You can set any number between 1024 and 49151 too
After all settings click Apply You will see the following picture click OK and re-connect the
camera
Figure 37
RTSP port number Usually it is 554 You can set any number between 1024 and 49151 too
Click Apply and the camera will reboot
Enter rtsp IPRTSP port number11 or rtsp IPRTSP port number12 into the VLC you can
see the real-time preview WAN IP or LAN IP is OK If the RTSP port number is 554 you can
directly enter the following url rtsp IP11 or rtspIP12 The number ldquo11rdquo shows that you will
use first stream The numberrdquo12rdquo shows that you will use second stream For example
Enter rtsp1921681116911 in the VLC
RTSP Permission Checksum
On Select it and you need to enter the login username and password when you view the
real-time preview in the VLC
Off Select it and you do not need to enter the login username and password
Figure 38
23
ww
wwwwwwffoossccaammccoomm
SShheennzzhheenn FFoossccaamm IInntteelllliiggeenntt TTeecchhnnoollooggyy CCoo LLiimmiitteedd
TTeell 8866 775555 22667744 55666688 FFaaxx 8866 775555 22667744 55116688 23
Figure 39
You need to enter the user name and password if you select on for RTSP Permission Checksum
Click OK and you can see the real-time preview
Figure 310
24
ww
wwwwwwffoossccaammccoomm
SShheennzzhheenn FFoossccaamm IInntteelllliiggeenntt TTeecchhnnoollooggyy CCoo LLiimmiitteedd
TTeell 8866 775555 22667744 55666688 FFaaxx 8866 775555 22667744 55116688 24
Figure 311
NOTE 1 Yoursquod better not change the HTTP and RTSP port number at the same time because
you cannot submit successfully
2 After changing the RTSP or HTTP port number the camera will restart
3 If you cannot play the video in the VLC player please check the port mapping (Figure 316)
25
ww
wwwwwwffoossccaammccoomm
SShheennzzhheenn FFoossccaamm IInntteelllliiggeenntt TTeecchhnnoollooggyy CCoo LLiimmiitteedd
TTeell 8866 775555 22667744 55666688 FFaaxx 8866 775555 22667744 55116688 25
35 Remote Access
This section will tell you how to access the camera form WAN
Figure 312
Static IP user Users who have static IP addresses do not need to set DDNS service settings for remote access When you have finished connecting the camera using the LAN IP address and port forwarding you can access the camera directly from the Internet using the WAN IP address and port number
Click Show you will see the WAN IP as below
26
ww
wwwwwwffoossccaammccoomm
SShheennzzhheenn FFoossccaamm IInntteelllliiggeenntt TTeecchhnnoollooggyy CCoo LLiimmiitteedd
TTeell 8866 775555 22667744 55666688 FFaaxx 8866 775555 22667744 55116688 26
You can access the IP Camera from the Internet (remote access) Enter the WAN IP address and port number in IE browser or other browsers you use For example Http 218171601878888
Make sure port mapping (or also known as port forwarding) is successful You can do port mapping in two ways
1) Enter the setting page of the router to enable UPNP function Then login the camera as administrator choose UPnP Settings to enable UPNP and make sure the state is ldquoUPnP successrdquo
2) Do port forwarding manually (details Fig316)
For dynamic IP user
DDNS is a service that allows your IP Camera especially when assigned with a dynamic IP address to have a fixed host and domain name This means that even though your WAN IP address is constantly changing you will have a fixed hostname you can use to access your cameras at all times You can access the camera directly from the Internet using the hostname and port number
FOSCAM domain name Each Foscam camera has an embedded unique DDNS domain name the format of this domain name is xxxxxxmyfoscamorg On the camera body you can see the domain name sticker Here take cameramyfoscamorg for example Go to option of DDNS Service Settings on the administrator panel you can see the domain name(Figure 312)
Now you can use http Domain name + HTTP Port to access the camera via internet
Take hostname cameramyfoscamorg and HTTP Port no 8888 for example the accessing
link of the camera via internet would be http cameramyfoscamorg8888
27
ww
wwwwwwffoossccaammccoomm
SShheennzzhheenn FFoossccaamm IInntteelllliiggeenntt TTeecchhnnoollooggyy CCoo LLiimmiitteedd
TTeell 8866 775555 22667744 55666688 FFaaxx 8866 775555 22667744 55116688 27
Third Party Domain Name Settings
User can also use third part DDNS such as wwwno-ipcom www dyndnscom
Here take wwwno-ipcom for example
① Step 1 Go to the website wwwno-ipcom to create a free hostname
Firstly Login on wwwno-ipcom and click No-IP Free to register
Figure 313
Please register an account step by step according to instructions on wwwno-ipcom
After registration please login your email which used to register You will receive an email from
website please click the link to activate your ACCOUNT as indicated in email
Secondly Login the link with the registered username and password to create your
domain name
Click here to register
28
ww
wwwwwwffoossccaammccoomm
SShheennzzhheenn FFoossccaamm IInntteelllliiggeenntt TTeecchhnnoollooggyy CCoo LLiimmiitteedd
TTeell 8866 775555 22667744 55666688 FFaaxx 8866 775555 22667744 55116688 28
Figure 314
Figure 315
Please create the domain name step by step according to instructions on wwwno-ipcom
Step 2 DO DDNS Service Settings within the Camera
Please set Remote Access within the camera by hostname a user name and password
yoursquove got from wwwno-ipcom
29
ww
wwwwwwffoossccaammccoomm
SShheennzzhheenn FFoossccaamm IInntteelllliiggeenntt TTeecchhnnoollooggyy CCoo LLiimmiitteedd
TTeell 8866 775555 22667744 55666688 FFaaxx 8866 775555 22667744 55116688 29
Take hostname ycxgwpno-ipinfo user name foscam password foscam2012 for example
Firstly goes to option of Remote Access on the administrator panel
Secondly select No-Ip as a server in the Third Party DDNS
Thirdly fill foscam as DDNS user fill password foscam2012 as DDNS password fill
ycxgwpno-ipinfo as DDNS domain and server URL Then click save to make effect The
camera will restart and to take the DDNS settings effective
Please verify you have input the correct hostname user name and password
② Do port forwarding within the router
Example The camerarsquos LAN IP address is http19216813588
Firstly login the router goes to the menu of Port Forwarding or Port Trigger (or named Virtue Server on some brands of router) Take Linksys brand router as an example Login the
router and goes to Applications amp Gaming-gtSingle Port Forwarding
Secondly Create a new column by LAN IP address amp HTTP Port No of the camera within the
router showed as below
Figure 316
30
ww
wwwwwwffoossccaammccoomm
SShheennzzhheenn FFoossccaamm IInntteelllliiggeenntt TTeecchhnnoollooggyy CCoo LLiimmiitteedd
TTeell 8866 775555 22667744 55666688 FFaaxx 8866 775555 22667744 55116688 30
③ Use domain name to access the camera via internet
After the port forwarding is finished you can use the domain name+ http no to access the
camera via internet Take hostname ycxgwpno-ipinfo and http no 88for example the
accessing link of the camera via internet would be http ycxgwpno-ipinfo88
Upnp Port Forwarding If you select Enable that means you allow the IPCAM to open ports on the router automatically so that the video streams can be sent out form a LAN To utilize of this feature make sure that your router supports UPNP and it is activated Usually we recommend you do it manually (Figure 316)
31
ww
wwwwwwffoossccaammccoomm
SShheennzzhheenn FFoossccaamm IInntteelllliiggeenntt TTeecchhnnoollooggyy CCoo LLiimmiitteedd
TTeell 8866 775555 22667744 55666688 FFaaxx 8866 775555 22667744 55116688 31
36 Email Settings
If you want the camera to send emails when motion has been activated Email Settings will
need to be configured
Figure 317
Make sure your mailbox for sender supports SMTP Three recipients can be added to receive
images SMTP port is usually set as 25 If SMTP server supports SSI you should choose it The
subject and message cannot be Chinese characters
32
ww
wwwwwwffoossccaammccoomm
SShheennzzhheenn FFoossccaamm IInntteelllliiggeenntt TTeecchhnnoollooggyy CCoo LLiimmiitteedd
TTeell 8866 775555 22667744 55666688 FFaaxx 8866 775555 22667744 55116688 32
37 FTP Settings
If you want to upload images to your FTP server you can set FTP Settings
Figure 318
Figure 319
FTP server If your FTP server is set up in LAN you can set as Figure 318
If you have a FTP server which you can access on the internet you can set as Figure 319
FTP Port Usually the port is 21
If the FTP server mode is passive choose on or else choose off
Path The path of FTP that you plan to store images
Click Apply after settings
33
ww
wwwwwwffoossccaammccoomm
SShheennzzhheenn FFoossccaamm IInntteelllliiggeenntt TTeecchhnnoollooggyy CCoo LLiimmiitteedd
TTeell 8866 775555 22667744 55666688 FFaaxx 8866 775555 22667744 55116688 33
38 Auto Capture
The camera can capture pictures automatically at interval time if you have set auto capture
Figure 320
Snap interval The interval time between two snapshot actions The pictures will be stored to the
disk you set (you can set the storage path under ldquoFor Visitorrdquo)
Send E-mail Select it the camera will send email to you with the picture it has captured when
the camera alarmed
Click Apply after settings
34
ww
wwwwwwffoossccaammccoomm
SShheennzzhheenn FFoossccaamm IInntteelllliiggeenntt TTeecchhnnoollooggyy CCoo LLiimmiitteedd
TTeell 8866 775555 22667744 55666688 FFaaxx 8866 775555 22667744 55116688 34
39 Terminal
The camera has built-in cradle head yoursquod better not change the default settings (Figure 321)
or else you may not control the cradle head
Figure 321
310 Motion Detection
IP Camera supports Motion Detection when the motion has been detected it will send emails
or upload images to FTP
IP CAM supports four detection regions Choose the options dialog box before window1
window2 window3 window4 to enable the corresponding areas
For example choose window1Then you can see a box with a number at living video (Figure
322)
35
ww
wwwwwwffoossccaammccoomm
SShheennzzhheenn FFoossccaamm IInntteelllliiggeenntt TTeecchhnnoollooggyy CCoo LLiimmiitteedd
TTeell 8866 775555 22667744 55666688 FFaaxx 8866 775555 22667744 55116688 35
Figure 322
Move your mouse on the regional box and you can see the arrow icon then drag the regional
box to any position in the video
That means you choose window1
36
ww
wwwwwwffoossccaammccoomm
SShheennzzhheenn FFoossccaamm IInntteelllliiggeenntt TTeecchhnnoollooggyy CCoo LLiimmiitteedd
TTeell 8866 775555 22667744 55666688 FFaaxx 8866 775555 22667744 55116688 36
Figure 323
Move the mouse to the bottom right corner of the regional box When the mouse pattern changes
to ldquo rdquo you can change the size of the detection area
37
ww
wwwwwwffoossccaammccoomm
SShheennzzhheenn FFoossccaamm IInntteelllliiggeenntt TTeecchhnnoollooggyy CCoo LLiimmiitteedd
TTeell 8866 775555 22667744 55666688 FFaaxx 8866 775555 22667744 55116688 37
Figure 324
Move right or left and adjust the sensitivityClick apply after all settingsThe regional box
will blink with red color when something moving in your detection area
Drag it and change the size of
the alarm area
38
ww
wwwwwwffoossccaammccoomm
SShheennzzhheenn FFoossccaamm IInntteelllliiggeenntt TTeecchhnnoollooggyy CCoo LLiimmiitteedd
TTeell 8866 775555 22667744 55666688 FFaaxx 8866 775555 22667744 55116688 38
Figure 325
Note
1 If you add the dateamptime to the videodonrsquot put the detection window on the time area or else
the camera will alarm when the time change
2 If you have not set the motion detection areathe camera will not alarm at any time
3 Firefox Google chrome and Safari doesnrsquot have this function because the activex doesnrsquot
support it
4 Right click on the screen there are two graphic display modes Direct Draw and GDI Under
the GDI mode you cannot see the four detection regions when you select the window1window2
window3 window4
39
ww
wwwwwwffoossccaammccoomm
SShheennzzhheenn FFoossccaamm IInntteelllliiggeenntt TTeecchhnnoollooggyy CCoo LLiimmiitteedd
TTeell 8866 775555 22667744 55666688 FFaaxx 8866 775555 22667744 55116688 39
311 Alarm
IP CAM will send email or upload images when motion has been detected
Figure 326
Email Alarm Camera will send emails when motion is activated Make sure you have set Email
Settings first
Save Picture on the FTP Server To upload images to an FTP server when motion is detected
you must set FTP Settings first
Click Apply after settings
40
ww
wwwwwwffoossccaammccoomm
SShheennzzhheenn FFoossccaamm IInntteelllliiggeenntt TTeecchhnnoollooggyy CCoo LLiimmiitteedd
TTeell 8866 775555 22667744 55666688 FFaaxx 8866 775555 22667744 55116688 40
312 Schedule
If you want the camera alarm during the time you wish or all the time please choose Schedule
and set time range for motion alarm
Figure 327
There are two ways to set the alarm
1) Alarm at any time when motion is detected
Select All times and apply you settings the camera will alarm at any time when motion is
detected
2) Specify an alarm schedule
If you want the camera to alarm during a specify time you can select Use the week mode or Use
the work mode and set time range
Click apply the settings what you have done will take effect
If you click cancel the settings will come back to the status before your settings
If you want to reset all time range click clean
NOTE Adjust system time before set schedule
41
ww
wwwwwwffoossccaammccoomm
SShheennzzhheenn FFoossccaamm IInntteelllliiggeenntt TTeecchhnnoollooggyy CCoo LLiimmiitteedd
TTeell 8866 775555 22667744 55666688 FFaaxx 8866 775555 22667744 55116688 41
313 Video
Figure 328
Video format The format contains two kinds NTSC and PAL One camera only has one format
and you cannot change it
Resolution The camera supports First stream D1(704576)CIF(352288)QCIF(176144)
Second stream CIF(352288)QCIF(176144) The higher the resolution is the clearer video will
become But the code flux will become larger too and it will take up more bandwidth
Bit rate Generally speaking the larger the bit rate is the clearer video will become But the bit
rate configuration should combine well with the network bandwidth When the bandwidth is very
narrow and bit rate is large that will lead to video can not play well
42
ww
wwwwwwffoossccaammccoomm
SShheennzzhheenn FFoossccaamm IInntteelllliiggeenntt TTeecchhnnoollooggyy CCoo LLiimmiitteedd
TTeell 8866 775555 22667744 55666688 FFaaxx 8866 775555 22667744 55116688 42
Maximum frame rate When the video format is PAL the maximum frame rate is 25 fps When
the video format is NTSC the maximum frame rate is 30 fps You should lower frame rate when
the bandwidth is limited Normally when the frame rate above 15 you can achieve fluently video
Key Frame Interval The time between last key frame and next key frame
Bit rate control It has two models CBR and VBR If you choose CVR video encoder will be
coding on the basis of bit rate you set If you choose VBR video encoder will be coding not only
on the basis of bit rate but also consider video quality
Image Quality The smaller the value the better the image quality
Parenthesis options The camera name and time can be loaded to the video screen through
this option If you set as following picture (Figure 330) you will see the video as Figure329 The
camera name cannot be Chinese characters
Figure 329
Figure 330
43
ww
wwwwwwffoossccaammccoomm
SShheennzzhheenn FFoossccaamm IInntteelllliiggeenntt TTeecchhnnoollooggyy CCoo LLiimmiitteedd
TTeell 8866 775555 22667744 55666688 FFaaxx 8866 775555 22667744 55116688 43
314 Image Settings
Adjust the quality of the video by setting the image parameters
Figure 331
Brightness saturation contrast and hue are used to adjust the quality of the video Camera will
save your settings if you click apply If you want to quit settings you have done and restore the
status before your setting please click cancel The function of Default is used to restore the initial
settings
44
ww
wwwwwwffoossccaammccoomm
SShheennzzhheenn FFoossccaamm IInntteelllliiggeenntt TTeecchhnnoollooggyy CCoo LLiimmiitteedd
TTeell 8866 775555 22667744 55666688 FFaaxx 8866 775555 22667744 55116688 44
315 Initialize
Reboot Click reboot the infection is the same as plug the power and re-plug it
Factory default Click it all parameters will return to factory settings
Backup setting data If you donrsquot want to quit all parameters that yoursquove set You can click save
and all the parameters you set will be stored as a parameters bin file
Restore Click browse choose the correct bin file and then click ok to get all parameters which
you set before
Upgrade Click Browse choose the correct bin file and then click OK to upgrade Donrsquot shut
down the power during upgrade
Figure 332
316 Back
This will take you back to the video window
45
ww
wwwwwwffoossccaammccoomm
SShheennzzhheenn FFoossccaamm IInntteelllliiggeenntt TTeecchhnnoollooggyy CCoo LLiimmiitteedd
TTeell 8866 775555 22667744 55666688 FFaaxx 8866 775555 22667744 55116688 45
4 Other Settings
Use Mobile to login
If the camera has been linked to Internet set the parameters of the camera and router Make
sure the camera can be accessed by domain name and WAN IP
For example the WAN IP is1833754137 the domain name is ycxgwpno-ipinfo Then open
the mobile IE enter the following URL you can login the camera http
1833754137mobilehtml or
http1833754137wapwml or httpycxgwpno-ipinfomobilehtml or
http ycxgwpno-ipinfo wapwml
If the HTTP port num isnrsquot 80 you should add the port num to the URL
http1833754137portnummobilehtml
or http ycxgwpno-ipinfoport nummobilehtml
46
ww
wwwwwwffoossccaammccoomm
SShheennzzhheenn FFoossccaamm IInntteelllliiggeenntt TTeecchhnnoollooggyy CCoo LLiimmiitteedd
TTeell 8866 775555 22667744 55666688 FFaaxx 8866 775555 22667744 55116688 46
5 APPENDIX
51 Frequently Asked Questions
NOTE Any questions you would meet please check Network connections firstly Check the
working status revealed by the indicators on the network server hub exchange and network
card If abnormal check the network connections
511 I have forgotten the administrator password
To reset the administrator password you had better unplug the network cable firstly After that
press and hold down the RESET BUTTON about 10 seconds Releasing the reset button the
password will turn to the factory default
Default administrator username admin password admin
Default user username user password user
Default guest username guest password guest
512 Subnet doesnrsquot match
Check whether your ipcamera in the same subnet of your computer The step is Control PanelNetwork ConnectionsDbclick Local Area Connections Choose eneralProperties (Figure 3637) Check subnet mask IP address and gateways When you set IP address please make sure they are in the same subnet Otherwise you cant access camera
513 Download and install the ActiveX
Please click button in the Login interface Install the ActiveX after download
47
ww
wwwwwwffoossccaammccoomm
SShheennzzhheenn FFoossccaamm IInntteelllliiggeenntt TTeecchhnnoollooggyy CCoo LLiimmiitteedd
TTeell 8866 775555 22667744 55666688 FFaaxx 8866 775555 22667744 55116688 47
Figure 51
Click next
Figure 52
Click Install
48
ww
wwwwwwffoossccaammccoomm
SShheennzzhheenn FFoossccaamm IInntteelllliiggeenntt TTeecchhnnoollooggyy CCoo LLiimmiitteedd
TTeell 8866 775555 22667744 55666688 FFaaxx 8866 775555 22667744 55116688 48
Figure 53
Only click Finish and the computer restarts upon installation completion
Re-login the camera and you can see the surveillance window
514 No Pictures Problems
The video streaming is transmitted by the ActiveX controller If ActiveX controller isnrsquot installed
correctly you will see no video image You can resolve this problem by this way
Download ActiveX controller and set the safety property of IE in the PC when you view it first
time IE browserToolInternet ProperSecurityCustom LevelActiveX control and
Plug-ins Three options of front should be set to be ldquoEnablerdquo The ActiveX programs read by the
computer will be stored As follows
Enable Download unsigned ActiveX controls
Enable Initialize and script ActiveX controls not marked as safe
Enable Run ActiveX controls and plug-ins
49
ww
wwwwwwffoossccaammccoomm
SShheennzzhheenn FFoossccaamm IInntteelllliiggeenntt TTeecchhnnoollooggyy CCoo LLiimmiitteedd
TTeell 8866 775555 22667744 55666688 FFaaxx 8866 775555 22667744 55116688 49
Figure 54
If you allow the ActiveX running but still could not see living video Please change another port
number to try Donrsquot use port 80 use any port between 1024 and 49151
Figure55
NOTE Make sure that your firewall or anti-virus software does not block the camera or ActiveX
If you could not see video please shut down firewall or anti-virus software to try again
50
ww
wwwwwwffoossccaammccoomm
SShheennzzhheenn FFoossccaamm IInntteelllliiggeenntt TTeecchhnnoollooggyy CCoo LLiimmiitteedd
TTeell 8866 775555 22667744 55666688 FFaaxx 8866 775555 22667744 55116688 50
515 I cannot see the video on Firefox or Safari or Google chrome
If you cannot see live video after login the camera it may be the reason that the defaults transmit
protocol of QuickTime streaming is not HTTP or the port is not 80
For Firefox Safari and Google chrome you should install Quick Time Player as the ActiveX
controller please configure the activex controller as the following picture
Select PreferencesmdashQuickTime Preferenceshellip
Figure 56
Choose HTTP as the transport protocol
Figure 57
51
ww
wwwwwwffoossccaammccoomm
SShheennzzhheenn FFoossccaamm IInntteelllliiggeenntt TTeecchhnnoollooggyy CCoo LLiimmiitteedd
TTeell 8866 775555 22667744 55666688 FFaaxx 8866 775555 22667744 55116688 51
516 I cannot see video on MAC OS
If you cannot see live video after login FOSCAM H264 camera it may be the reason that the
defaults transmit protocol of QuickTime streaming is not HTTP or the port is not 80
Please follow the below steps and make the protocol and port correct and you can see live video
then
Steps
Click ldquoGordquo ---------gt Choose ldquoUtilitiesrdquo ----------gt Open ldquoTerminalapprdquo ------------gt Check the
default protocol and port of QuickTime streaming by inputting the URL
ldquoqtdefaults read transportSettingsrdquo
If the protocol is not HTTP or the port is not 80 please input the URL
ldquoqtdefaults write transportSettings HTTP 80rdquo to change it
After changing it you can also check if it is successful by URL
ldquoqtdefaults read transportSettingsrdquo
Please refer to the below pictures for the above steps
Figure 58
52
ww
wwwwwwffoossccaammccoomm
SShheennzzhheenn FFoossccaamm IInntteelllliiggeenntt TTeecchhnnoollooggyy CCoo LLiimmiitteedd
TTeell 8866 775555 22667744 55666688 FFaaxx 8866 775555 22667744 55116688 52
Figure 59
Figure 510
517 Canrsquot access IP camera in internet
There are some reasons
1 ActiveX controller is not installed correctly (Figure51-53)
2 The port which camera used is blocked by Firewall or Anti-virus software Please change
another port number and try again (Figure55)
3 Port forwarding is not successful
53
ww
wwwwwwffoossccaammccoomm
SShheennzzhheenn FFoossccaamm IInntteelllliiggeenntt TTeecchhnnoollooggyy CCoo LLiimmiitteedd
TTeell 8866 775555 22667744 55666688 FFaaxx 8866 775555 22667744 55116688 53
Check these settings and make sure they are correct
518 UPnP always failed
UPnP only contains port forwarding in our recent software Sometimes it may be failed to do port
forwarding automatically because of firewall or anti-virus software It also has much relation with
routerrsquos security settings So we recommend you do port forwarding manually You can view
your camera in internet successfully after you do port forwarding manually in your
router(Figure316)
519 Canrsquot operate the cradle head
If you canrsquot operate the cradle head such as click the button but the cradle head can not
move Usually the cradle head canrsquot operate mainly because of wrong settings Please donrsquot
change the default settings or else you canrsquot operate it You can see the following figure which is
the default settings Sometimes you need to press the reset button and restore the default
settings
Figure511
52 Default Parameters
Default network Parameters
IP address obtain dynamically
Subnet mask obtain dynamically
Gateway obtain dynamically
DDNS Embedded FOSCAM DDNS Service
Username and password
Default admin username admin Default password admin
Default user username user Default password user
Default guest username guest Default password guest
54
ww
wwwwwwffoossccaammccoomm
SShheennzzhheenn FFoossccaamm IInntteelllliiggeenntt TTeecchhnnoollooggyy CCoo LLiimmiitteedd
TTeell 8866 775555 22667744 55666688 FFaaxx 8866 775555 22667744 55116688 54
53 Specifications
Specification FI8620
Image Sensor
Image Sensor 480TVL 14 SONY Color CCD Sensor
Optical variable times 10 times
Lens F 38-38mm F12
Mini Illumination multicolour 005Lux black and white0001Lux
Video
Video Formats Supports NTSC or PAL Formats
Image Compression H264
ImageFrame Rate 25fps(PAL Formats)30fps(NTSC Formats)Down adjustable
Image Resolution D1(720576)CIF(352288)QCIF(176144)
View H264 dual streaming
Focusing autohand-switchkeying automatic
digital continuous autofocus ulsg
Image adjust The brightness contrast is adjustable
White balance Automatic white balance
Backlight
compensation Automatic backlight compensation
SNR gt60DB (AGC OFF)
Network
Ethernet One 10100Mbps RJ-45
Supported Protocol TCPIPUDPIPHTTPSMTPFTPDHCPDNSDDNS
UPNPPOP3RTSP
Support IP address static IP address dynamic IP address
Alarm Alarm detection The motion detecting detection threshold Settings
Alarm inform Support EmailFTP etc alarm inform way
Hardware
Interface
POWER Interface DC 12V20A (EUUSAU adapter or other types optional)
Power Consumption ﹤6 Watts
Reset Buttons One Reset
Network Interface One 10100Mbps RJ-45
Environment
Operate Temper 0deg ~ 55degC (32degF ~ 131degF)
Operate Humidity 10 ~ 80 non-condensing
Storage Temper -10degC ~ 60deg (14degF ~ 140degF)
Storage Humidity 0 ~ 90 non-condensing
Physical
Horizontal speed 1-250deg S
Vertical speed 1-100deg S
PanTilt Angle Horizontal360deg amp Vertical 90deg
Dimension 270(L) x 170(W) x 260(H)mm
Net Weight 1935g
Gross Weight 2674g
PC
Requirements
CPU 20GHZ or above (suggested 30GHz)
Memory Size 256MB or above (suggested 10GHz)
Display Card 64M or above
55
ww
wwwwwwffoossccaammccoomm
SShheennzzhheenn FFoossccaamm IInntteelllliiggeenntt TTeecchhnnoollooggyy CCoo LLiimmiitteedd
TTeell 8866 775555 22667744 55666688 FFaaxx 8866 775555 22667744 55116688 55
Supported OS Microsoft Windows 2000XPVista Mac OS
Browser IE6 and above version or compatible browser Firefox Chrome
Safari or other standard browsers
Certificate CEFCC CEFCC
Software Upgrade Upgrade from network
Application Software H264 Camera Client
6 OBTAINING TECHNICAL SUPPORT
While we hope your experience with the IPCAM network camera is enjoyable and easy to use
you may experience some issues or have questions that this Userrsquos Guide has not answered
If you have problem with FOSCAM IP camera please first contact FOSCAM reseller for
solving the problems If our reseller cannot provide service please contact our service
department techfoscamcom

7
ww
wwwwwwffoossccaammccoomm
SShheennzzhheenn FFoossccaamm IInntteelllliiggeenntt TTeecchhnnoollooggyy CCoo LLiimmiitteedd
TTeell 8866 775555 22667744 55666688 FFaaxx 8866 775555 22667744 55116688 7
Section4 Download ActiveX
For IE users the ActiveX have been embedded in the IP Camera Tool so if you have installed
the IP Camera Tool you need not download again If you use Firefox Google Chrome Safari or
others you should download and install QuickTime Player as the ActiveX from other website
For remote IE users first time you use the IPCAM you may need download and install the
ActiveX (Please read chapter 51 in Appendix about how to download and install the ActiveX)
Section5 Attention
For better viewing here we suggest using 1024768 screen resolution
Click the PC login button under Video View you will see the video window
For Internet Explorer
Figure 22
8
ww
wwwwwwffoossccaammccoomm
SShheennzzhheenn FFoossccaamm IInntteelllliiggeenntt TTeecchhnnoollooggyy CCoo LLiimmiitteedd
TTeell 8866 775555 22667744 55666688 FFaaxx 8866 775555 22667744 55116688 8
If you could not view living video after running the ActiveX only a red cross in the center
of the video or just a black screen Please change another port number to try
Make sure all firewall or antivirus software on your computer does not block the active download
and installation If you are unable to run the ActiveX control try shutting down the firewall or
antivirus program
For Firefox Google Chrome and Safari
Install the Quick Time Player and fill in user name and password then login you will see the
living video
Figure 23
9
ww
wwwwwwffoossccaammccoomm
SShheennzzhheenn FFoossccaamm IInntteelllliiggeenntt TTeecchhnnoollooggyy CCoo LLiimmiitteedd
TTeell 8866 775555 22667744 55666688 FFaaxx 8866 775555 22667744 55116688 9
22 Surveillance Window
Select the PC login mode and you will enter the surveillance window
Figure 24
For Visitor For Operator For Administrator
Camera supports three-level users management admin user and guest
The default ldquoadminrdquo username and password are all ldquoadminrdquo the default ldquouserrdquo username and
password are all ldquouserrdquo and the default ldquoguestrdquo username and password are all ldquoguestrdquo For first
using please go to For Administrator-gt User Settings panel to change the password and
against illegal access
Different users have different permissions Admin user has the highest authority He can do any settings User account can do settings below For Visitor and For Operator Guest account can do settings below For Visitor
1
2
3
5
6
7
4
10
ww
wwwwwwffoossccaammccoomm
SShheennzzhheenn FFoossccaamm IInntteelllliiggeenntt TTeecchhnnoollooggyy CCoo LLiimmiitteedd
TTeell 8866 775555 22667744 55666688 FFaaxx 8866 775555 22667744 55116688 10
Section1 View
The resolution contains D1(720576) CIF(352288) QCIF(176144) and Auto You can choose First Stream or Second Stream to adjust the view window
Note When the network bandwidth is bad yoursquod better select Second Stream and the video will
be more fluency
Section2 CaptureRecordPlaybackSet Path Buttons
Capture Click this icon the current living picture will be stored to a predetermined path
The default storage path is D disk You can click this button to change the storage path
Record Click the icon The camera will begin recording and store the recorded file to the
folder you set And the status column will display REC when recording Click again it will stop
recording The default storage path is D disk You can click this button to change the
storage path
Figure 25
11
ww
wwwwwwffoossccaammccoomm
SShheennzzhheenn FFoossccaamm IInntteelllliiggeenntt TTeecchhnnoollooggyy CCoo LLiimmiitteedd
TTeell 8866 775555 22667744 55666688 FFaaxx 8866 775555 22667744 55116688 11
Playback Click the button it will pop up a player And you can see the videos you have
stored in your computer
Figure 26
Set Path Set the storage path of photos and videos The default storage path is D disk
Note These buttons are controlled by the ActiveX controller therefore Firefox Google Chrome
and Safari cannot allow to these functions
Section3 PanTilt ZoomFocus Control
1------Up control button 2------Down control button
3------Left control button 4------Right control button
1
2
3 4
12
ww
wwwwwwffoossccaammccoomm
SShheennzzhheenn FFoossccaamm IInntteelllliiggeenntt TTeecchhnnoollooggyy CCoo LLiimmiitteedd
TTeell 8866 775555 22667744 55666688 FFaaxx 8866 775555 22667744 55116688 12
Zoom inout The lens has 10x optical zoom The biggest optical zoom time is 10 times
Focus +- This function can help you see more clearly
Section4 Preset Go PTZ Speed
1) Preset----------Support 8 preset position which is considered enough for DIY home amp small
business surveillance market
2) Set----------- Click Set to save the position you need the camera to remember
3) Go----------- Click Go to make the camera move the preset position
4) Number button from 1 to 8--------You can click the number button with preset position and the
camera will go to the preset position
5) PTZ Speed-------- The default PTZ speed is 45 you can change another one between 1 and
63 The larger the number the faster the speed will be
How to do preset position
We can start preset settings from position 1
Firstly select no 1 within the menu of Preset on the panel
Secondly move the camera and stop at a place where you want make preset position
Thirdly click set button to save it as position 1 and you have done preset of position 1
After that you can select no 2 within the menu of Preset on the panel and move the camera and
stop at another place and set as preset position 2 You can do all the 8 preset positions with this
method
If you want to see the preset position you have set such as the position 1 only select the set
no1 and click go button the camera will go to position no1
13
ww
wwwwwwffoossccaammccoomm
SShheennzzhheenn FFoossccaamm IInntteelllliiggeenntt TTeecchhnnoollooggyy CCoo LLiimmiitteedd
TTeell 8866 775555 22667744 55666688 FFaaxx 8866 775555 22667744 55116688 13
Section5 For Administrator
Path to Administrator Control Panel Click it and it will lead to Administrator Control Panel
Section6 OSD
If you have added time and camera name in the video you can see it in the surveillance window
Go to For Administrator ---Video panel and you can add camera name and time on the live
window Here you can change another device name The default device name is IP Camera
Go to For Administrator ---DateampTime settings panel and adjust the device time
Section7 Status bar
Figure 27
There is a status column below the view window (Figure27) 1) The current state of IPCAM
2) After the view has been digital amplified click the icon the view will be digital narrowed 3) Click the icon the view window will be digital amplified
4) Click the icon the view window will restore the original size
NOTE Firefox Google Chrome and Safari have not these functions because the ActiveX does
not support it
14
ww
wwwwwwffoossccaammccoomm
SShheennzzhheenn FFoossccaamm IInntteelllliiggeenntt TTeecchhnnoollooggyy CCoo LLiimmiitteedd
TTeell 8866 775555 22667744 55666688 FFaaxx 8866 775555 22667744 55116688 14
Onscreen Mouse Control
Put the mouse on the screen and you can see a arrow Press the mouse and the camerarsquos len
will move to the corresponding direction
For example put the mouse on the upper-right corner of the screen and you can see a arrow
press the mouse then the cameras lens will move toward the upper-right direction
When the icon has three arrows the speed of the rotation is fastest And when the icon has one
arrow the speed is lowest
Figure 28
Put the mouse at the center of the living video you will see the icon of the magnifying glass
(Figure 29) Press the left mouse and you can use the optical zoom
Figure 29
15
ww
wwwwwwffoossccaammccoomm
SShheennzzhheenn FFoossccaamm IInntteelllliiggeenntt TTeecchhnnoollooggyy CCoo LLiimmiitteedd
TTeell 8866 775555 22667744 55666688 FFaaxx 8866 775555 22667744 55116688 15
Right click on the screen you can see two graphic display modes Direct Draw and GDI The
default mode is Direct Draw and almost graphic card support this mode But some old graphic
card cannot display normally under Direct Draw you can select GDI to try again
Figure 210
NOTE
Under GDI mode you cannot see the motion detect region lines when set motion detection(For
more details read chapter 310 Motion Detection)
16
ww
wwwwwwffoossccaammccoomm
SShheennzzhheenn FFoossccaamm IInntteelllliiggeenntt TTeecchhnnoollooggyy CCoo LLiimmiitteedd
TTeell 8866 775555 22667744 55666688 FFaaxx 8866 775555 22667744 55116688 16
33 AAddvvaanncceedd CCaammeerraa SSeettttiinnggss Click the bar ldquoFor Administratorrdquo goes to Administrator Control Panel to make advanced camera
settings
31 Device Information
Click For Administrator you will see the Device Information
It contains Device ID firmware version of the camera and other status of the camera
Device ID It displays ldquoIP Camerardquo This ID is different form the camera name You can set any
camera name you like for the camera in ldquoFor Administratormdashgt VideomdashgtParenthesis Optionsrdquo
and the camera name can be showed at the video window but the device ID will always display
IP Camera
Network Connection LAN If the camera gets wired connection successfully here will show
LAN
Current Client It shows that how many people are viewing the video For example the Current
Client shows 0 that means no people are viewing the video If someone have logged in the
camera but do not open the video the Current Client will not change
Device Firmware VersionDevice Embedded Web UI Version The camerarsquos software
version
Mac Address Each camera has its own MAC ID For example Device ID is 00606E8C5058 the
same MAC ID sticker is found at the bottomback of the camera
17
ww
wwwwwwffoossccaammccoomm
SShheennzzhheenn FFoossccaamm IInntteelllliiggeenntt TTeecchhnnoollooggyy CCoo LLiimmiitteedd
TTeell 8866 775555 22667744 55666688 FFaaxx 8866 775555 22667744 55116688 17
32 Date amp Time Settings
There are four models for you to adjust time Manual setting Sync with computer time Network
Time Protocol and Keep current time choose one model and adjust the camera time Then
choose Time zone
Manual settings The administrator can enter the date and time manually Note that the date
and time format is [yyyymmdd] and [hhmmss]
Network Time Protocol It is a protocol which synchronizes computer clocks by periodically
querying an NTP server
Interval The interval time between last time and next time that the camera adjust time with Ntp
Server
Time zoneSelect the appropriate time zone from the list
Figure 31
If your country implements the Daylight Saving Time when you select the Time zone you can
see the following screen
18
ww
wwwwwwffoossccaammccoomm
SShheennzzhheenn FFoossccaamm IInntteelllliiggeenntt TTeecchhnnoollooggyy CCoo LLiimmiitteedd
TTeell 8866 775555 22667744 55666688 FFaaxx 8866 775555 22667744 55116688 18
Figure 32
The camera will adjust the daylight saving time automatically if you select ldquoAutomatically adjust
clock for daylight saving time changesrdquo
19
ww
wwwwwwffoossccaammccoomm
SShheennzzhheenn FFoossccaamm IInntteelllliiggeenntt TTeecchhnnoollooggyy CCoo LLiimmiitteedd
TTeell 8866 775555 22667744 55666688 FFaaxx 8866 775555 22667744 55116688 19
33 User Settings
The camera has set up 3-level user permissions user names are admin user guest and the
default passwords are admin user guest too
Different user has different permission Only admin can do advanced settings under For
Administrator page User account can operate For Visitor and For Operator page Guest account
only can do settings under For Visitor
Please reset the passwords at first using and prevent unauthorized users login the camera
Click Apply to save these settings
Figure 33
Note You cannot change the user name and the passwords cannot be null
20
ww
wwwwwwffoossccaammccoomm
SShheennzzhheenn FFoossccaamm IInntteelllliiggeenntt TTeecchhnnoollooggyy CCoo LLiimmiitteedd
TTeell 8866 775555 22667744 55666688 FFaaxx 8866 775555 22667744 55116688 20
34 Basic Network Settings
IP Configuration Type contains two types Fixed IP Address and Dynamic IP Address Set the
appropriate type for you Keep the camera in the same subnet of your router or computer
Fixed IP Address Select this option to manually assign a static IP address to the Network
Camera
Dynamic IP Address Select this option to obtain an available dynamic IP address assigned by
the DHCP server each time the camera is connected to the LAN
Figure 34 If you want to set a static IP for the camera you should keep the camera in the same subnet of
your router or computer The DNS Configuration Type has two types Manual DNS and From
DHCP Server If you donrsquot know the subnet mask gateway and DNS server you can check your
computerrsquos local area connection It contains all the information
The step is Control PanelNetwork ConnectionsDouble click Local Area Connections
Choose GeneralProperties You will see all the information in it
21
ww
wwwwwwffoossccaammccoomm
SShheennzzhheenn FFoossccaamm IInntteelllliiggeenntt TTeecchhnnoollooggyy CCoo LLiimmiitteedd
TTeell 8866 775555 22667744 55666688 FFaaxx 8866 775555 22667744 55116688 21
Figure 35
Figure 36
Click here
Set the same subnet
mask and gateway of
your camera with your PC
There are two DNS servers you
can set the same for your camera
Same with gateway is also OK
22
ww
wwwwwwffoossccaammccoomm
SShheennzzhheenn FFoossccaamm IInntteelllliiggeenntt TTeecchhnnoollooggyy CCoo LLiimmiitteedd
TTeell 8866 775555 22667744 55666688 FFaaxx 8866 775555 22667744 55116688 22
If you donrsquot know the DNS server you can use the same settings as the default Gateway
HTTP Port number The HTTP Port can be used to access the IPCAM on the LAN Usually it is
80 You can set any number between 1024 and 49151 too
After all settings click Apply You will see the following picture click OK and re-connect the
camera
Figure 37
RTSP port number Usually it is 554 You can set any number between 1024 and 49151 too
Click Apply and the camera will reboot
Enter rtsp IPRTSP port number11 or rtsp IPRTSP port number12 into the VLC you can
see the real-time preview WAN IP or LAN IP is OK If the RTSP port number is 554 you can
directly enter the following url rtsp IP11 or rtspIP12 The number ldquo11rdquo shows that you will
use first stream The numberrdquo12rdquo shows that you will use second stream For example
Enter rtsp1921681116911 in the VLC
RTSP Permission Checksum
On Select it and you need to enter the login username and password when you view the
real-time preview in the VLC
Off Select it and you do not need to enter the login username and password
Figure 38
23
ww
wwwwwwffoossccaammccoomm
SShheennzzhheenn FFoossccaamm IInntteelllliiggeenntt TTeecchhnnoollooggyy CCoo LLiimmiitteedd
TTeell 8866 775555 22667744 55666688 FFaaxx 8866 775555 22667744 55116688 23
Figure 39
You need to enter the user name and password if you select on for RTSP Permission Checksum
Click OK and you can see the real-time preview
Figure 310
24
ww
wwwwwwffoossccaammccoomm
SShheennzzhheenn FFoossccaamm IInntteelllliiggeenntt TTeecchhnnoollooggyy CCoo LLiimmiitteedd
TTeell 8866 775555 22667744 55666688 FFaaxx 8866 775555 22667744 55116688 24
Figure 311
NOTE 1 Yoursquod better not change the HTTP and RTSP port number at the same time because
you cannot submit successfully
2 After changing the RTSP or HTTP port number the camera will restart
3 If you cannot play the video in the VLC player please check the port mapping (Figure 316)
25
ww
wwwwwwffoossccaammccoomm
SShheennzzhheenn FFoossccaamm IInntteelllliiggeenntt TTeecchhnnoollooggyy CCoo LLiimmiitteedd
TTeell 8866 775555 22667744 55666688 FFaaxx 8866 775555 22667744 55116688 25
35 Remote Access
This section will tell you how to access the camera form WAN
Figure 312
Static IP user Users who have static IP addresses do not need to set DDNS service settings for remote access When you have finished connecting the camera using the LAN IP address and port forwarding you can access the camera directly from the Internet using the WAN IP address and port number
Click Show you will see the WAN IP as below
26
ww
wwwwwwffoossccaammccoomm
SShheennzzhheenn FFoossccaamm IInntteelllliiggeenntt TTeecchhnnoollooggyy CCoo LLiimmiitteedd
TTeell 8866 775555 22667744 55666688 FFaaxx 8866 775555 22667744 55116688 26
You can access the IP Camera from the Internet (remote access) Enter the WAN IP address and port number in IE browser or other browsers you use For example Http 218171601878888
Make sure port mapping (or also known as port forwarding) is successful You can do port mapping in two ways
1) Enter the setting page of the router to enable UPNP function Then login the camera as administrator choose UPnP Settings to enable UPNP and make sure the state is ldquoUPnP successrdquo
2) Do port forwarding manually (details Fig316)
For dynamic IP user
DDNS is a service that allows your IP Camera especially when assigned with a dynamic IP address to have a fixed host and domain name This means that even though your WAN IP address is constantly changing you will have a fixed hostname you can use to access your cameras at all times You can access the camera directly from the Internet using the hostname and port number
FOSCAM domain name Each Foscam camera has an embedded unique DDNS domain name the format of this domain name is xxxxxxmyfoscamorg On the camera body you can see the domain name sticker Here take cameramyfoscamorg for example Go to option of DDNS Service Settings on the administrator panel you can see the domain name(Figure 312)
Now you can use http Domain name + HTTP Port to access the camera via internet
Take hostname cameramyfoscamorg and HTTP Port no 8888 for example the accessing
link of the camera via internet would be http cameramyfoscamorg8888
27
ww
wwwwwwffoossccaammccoomm
SShheennzzhheenn FFoossccaamm IInntteelllliiggeenntt TTeecchhnnoollooggyy CCoo LLiimmiitteedd
TTeell 8866 775555 22667744 55666688 FFaaxx 8866 775555 22667744 55116688 27
Third Party Domain Name Settings
User can also use third part DDNS such as wwwno-ipcom www dyndnscom
Here take wwwno-ipcom for example
① Step 1 Go to the website wwwno-ipcom to create a free hostname
Firstly Login on wwwno-ipcom and click No-IP Free to register
Figure 313
Please register an account step by step according to instructions on wwwno-ipcom
After registration please login your email which used to register You will receive an email from
website please click the link to activate your ACCOUNT as indicated in email
Secondly Login the link with the registered username and password to create your
domain name
Click here to register
28
ww
wwwwwwffoossccaammccoomm
SShheennzzhheenn FFoossccaamm IInntteelllliiggeenntt TTeecchhnnoollooggyy CCoo LLiimmiitteedd
TTeell 8866 775555 22667744 55666688 FFaaxx 8866 775555 22667744 55116688 28
Figure 314
Figure 315
Please create the domain name step by step according to instructions on wwwno-ipcom
Step 2 DO DDNS Service Settings within the Camera
Please set Remote Access within the camera by hostname a user name and password
yoursquove got from wwwno-ipcom
29
ww
wwwwwwffoossccaammccoomm
SShheennzzhheenn FFoossccaamm IInntteelllliiggeenntt TTeecchhnnoollooggyy CCoo LLiimmiitteedd
TTeell 8866 775555 22667744 55666688 FFaaxx 8866 775555 22667744 55116688 29
Take hostname ycxgwpno-ipinfo user name foscam password foscam2012 for example
Firstly goes to option of Remote Access on the administrator panel
Secondly select No-Ip as a server in the Third Party DDNS
Thirdly fill foscam as DDNS user fill password foscam2012 as DDNS password fill
ycxgwpno-ipinfo as DDNS domain and server URL Then click save to make effect The
camera will restart and to take the DDNS settings effective
Please verify you have input the correct hostname user name and password
② Do port forwarding within the router
Example The camerarsquos LAN IP address is http19216813588
Firstly login the router goes to the menu of Port Forwarding or Port Trigger (or named Virtue Server on some brands of router) Take Linksys brand router as an example Login the
router and goes to Applications amp Gaming-gtSingle Port Forwarding
Secondly Create a new column by LAN IP address amp HTTP Port No of the camera within the
router showed as below
Figure 316
30
ww
wwwwwwffoossccaammccoomm
SShheennzzhheenn FFoossccaamm IInntteelllliiggeenntt TTeecchhnnoollooggyy CCoo LLiimmiitteedd
TTeell 8866 775555 22667744 55666688 FFaaxx 8866 775555 22667744 55116688 30
③ Use domain name to access the camera via internet
After the port forwarding is finished you can use the domain name+ http no to access the
camera via internet Take hostname ycxgwpno-ipinfo and http no 88for example the
accessing link of the camera via internet would be http ycxgwpno-ipinfo88
Upnp Port Forwarding If you select Enable that means you allow the IPCAM to open ports on the router automatically so that the video streams can be sent out form a LAN To utilize of this feature make sure that your router supports UPNP and it is activated Usually we recommend you do it manually (Figure 316)
31
ww
wwwwwwffoossccaammccoomm
SShheennzzhheenn FFoossccaamm IInntteelllliiggeenntt TTeecchhnnoollooggyy CCoo LLiimmiitteedd
TTeell 8866 775555 22667744 55666688 FFaaxx 8866 775555 22667744 55116688 31
36 Email Settings
If you want the camera to send emails when motion has been activated Email Settings will
need to be configured
Figure 317
Make sure your mailbox for sender supports SMTP Three recipients can be added to receive
images SMTP port is usually set as 25 If SMTP server supports SSI you should choose it The
subject and message cannot be Chinese characters
32
ww
wwwwwwffoossccaammccoomm
SShheennzzhheenn FFoossccaamm IInntteelllliiggeenntt TTeecchhnnoollooggyy CCoo LLiimmiitteedd
TTeell 8866 775555 22667744 55666688 FFaaxx 8866 775555 22667744 55116688 32
37 FTP Settings
If you want to upload images to your FTP server you can set FTP Settings
Figure 318
Figure 319
FTP server If your FTP server is set up in LAN you can set as Figure 318
If you have a FTP server which you can access on the internet you can set as Figure 319
FTP Port Usually the port is 21
If the FTP server mode is passive choose on or else choose off
Path The path of FTP that you plan to store images
Click Apply after settings
33
ww
wwwwwwffoossccaammccoomm
SShheennzzhheenn FFoossccaamm IInntteelllliiggeenntt TTeecchhnnoollooggyy CCoo LLiimmiitteedd
TTeell 8866 775555 22667744 55666688 FFaaxx 8866 775555 22667744 55116688 33
38 Auto Capture
The camera can capture pictures automatically at interval time if you have set auto capture
Figure 320
Snap interval The interval time between two snapshot actions The pictures will be stored to the
disk you set (you can set the storage path under ldquoFor Visitorrdquo)
Send E-mail Select it the camera will send email to you with the picture it has captured when
the camera alarmed
Click Apply after settings
34
ww
wwwwwwffoossccaammccoomm
SShheennzzhheenn FFoossccaamm IInntteelllliiggeenntt TTeecchhnnoollooggyy CCoo LLiimmiitteedd
TTeell 8866 775555 22667744 55666688 FFaaxx 8866 775555 22667744 55116688 34
39 Terminal
The camera has built-in cradle head yoursquod better not change the default settings (Figure 321)
or else you may not control the cradle head
Figure 321
310 Motion Detection
IP Camera supports Motion Detection when the motion has been detected it will send emails
or upload images to FTP
IP CAM supports four detection regions Choose the options dialog box before window1
window2 window3 window4 to enable the corresponding areas
For example choose window1Then you can see a box with a number at living video (Figure
322)
35
ww
wwwwwwffoossccaammccoomm
SShheennzzhheenn FFoossccaamm IInntteelllliiggeenntt TTeecchhnnoollooggyy CCoo LLiimmiitteedd
TTeell 8866 775555 22667744 55666688 FFaaxx 8866 775555 22667744 55116688 35
Figure 322
Move your mouse on the regional box and you can see the arrow icon then drag the regional
box to any position in the video
That means you choose window1
36
ww
wwwwwwffoossccaammccoomm
SShheennzzhheenn FFoossccaamm IInntteelllliiggeenntt TTeecchhnnoollooggyy CCoo LLiimmiitteedd
TTeell 8866 775555 22667744 55666688 FFaaxx 8866 775555 22667744 55116688 36
Figure 323
Move the mouse to the bottom right corner of the regional box When the mouse pattern changes
to ldquo rdquo you can change the size of the detection area
37
ww
wwwwwwffoossccaammccoomm
SShheennzzhheenn FFoossccaamm IInntteelllliiggeenntt TTeecchhnnoollooggyy CCoo LLiimmiitteedd
TTeell 8866 775555 22667744 55666688 FFaaxx 8866 775555 22667744 55116688 37
Figure 324
Move right or left and adjust the sensitivityClick apply after all settingsThe regional box
will blink with red color when something moving in your detection area
Drag it and change the size of
the alarm area
38
ww
wwwwwwffoossccaammccoomm
SShheennzzhheenn FFoossccaamm IInntteelllliiggeenntt TTeecchhnnoollooggyy CCoo LLiimmiitteedd
TTeell 8866 775555 22667744 55666688 FFaaxx 8866 775555 22667744 55116688 38
Figure 325
Note
1 If you add the dateamptime to the videodonrsquot put the detection window on the time area or else
the camera will alarm when the time change
2 If you have not set the motion detection areathe camera will not alarm at any time
3 Firefox Google chrome and Safari doesnrsquot have this function because the activex doesnrsquot
support it
4 Right click on the screen there are two graphic display modes Direct Draw and GDI Under
the GDI mode you cannot see the four detection regions when you select the window1window2
window3 window4
39
ww
wwwwwwffoossccaammccoomm
SShheennzzhheenn FFoossccaamm IInntteelllliiggeenntt TTeecchhnnoollooggyy CCoo LLiimmiitteedd
TTeell 8866 775555 22667744 55666688 FFaaxx 8866 775555 22667744 55116688 39
311 Alarm
IP CAM will send email or upload images when motion has been detected
Figure 326
Email Alarm Camera will send emails when motion is activated Make sure you have set Email
Settings first
Save Picture on the FTP Server To upload images to an FTP server when motion is detected
you must set FTP Settings first
Click Apply after settings
40
ww
wwwwwwffoossccaammccoomm
SShheennzzhheenn FFoossccaamm IInntteelllliiggeenntt TTeecchhnnoollooggyy CCoo LLiimmiitteedd
TTeell 8866 775555 22667744 55666688 FFaaxx 8866 775555 22667744 55116688 40
312 Schedule
If you want the camera alarm during the time you wish or all the time please choose Schedule
and set time range for motion alarm
Figure 327
There are two ways to set the alarm
1) Alarm at any time when motion is detected
Select All times and apply you settings the camera will alarm at any time when motion is
detected
2) Specify an alarm schedule
If you want the camera to alarm during a specify time you can select Use the week mode or Use
the work mode and set time range
Click apply the settings what you have done will take effect
If you click cancel the settings will come back to the status before your settings
If you want to reset all time range click clean
NOTE Adjust system time before set schedule
41
ww
wwwwwwffoossccaammccoomm
SShheennzzhheenn FFoossccaamm IInntteelllliiggeenntt TTeecchhnnoollooggyy CCoo LLiimmiitteedd
TTeell 8866 775555 22667744 55666688 FFaaxx 8866 775555 22667744 55116688 41
313 Video
Figure 328
Video format The format contains two kinds NTSC and PAL One camera only has one format
and you cannot change it
Resolution The camera supports First stream D1(704576)CIF(352288)QCIF(176144)
Second stream CIF(352288)QCIF(176144) The higher the resolution is the clearer video will
become But the code flux will become larger too and it will take up more bandwidth
Bit rate Generally speaking the larger the bit rate is the clearer video will become But the bit
rate configuration should combine well with the network bandwidth When the bandwidth is very
narrow and bit rate is large that will lead to video can not play well
42
ww
wwwwwwffoossccaammccoomm
SShheennzzhheenn FFoossccaamm IInntteelllliiggeenntt TTeecchhnnoollooggyy CCoo LLiimmiitteedd
TTeell 8866 775555 22667744 55666688 FFaaxx 8866 775555 22667744 55116688 42
Maximum frame rate When the video format is PAL the maximum frame rate is 25 fps When
the video format is NTSC the maximum frame rate is 30 fps You should lower frame rate when
the bandwidth is limited Normally when the frame rate above 15 you can achieve fluently video
Key Frame Interval The time between last key frame and next key frame
Bit rate control It has two models CBR and VBR If you choose CVR video encoder will be
coding on the basis of bit rate you set If you choose VBR video encoder will be coding not only
on the basis of bit rate but also consider video quality
Image Quality The smaller the value the better the image quality
Parenthesis options The camera name and time can be loaded to the video screen through
this option If you set as following picture (Figure 330) you will see the video as Figure329 The
camera name cannot be Chinese characters
Figure 329
Figure 330
43
ww
wwwwwwffoossccaammccoomm
SShheennzzhheenn FFoossccaamm IInntteelllliiggeenntt TTeecchhnnoollooggyy CCoo LLiimmiitteedd
TTeell 8866 775555 22667744 55666688 FFaaxx 8866 775555 22667744 55116688 43
314 Image Settings
Adjust the quality of the video by setting the image parameters
Figure 331
Brightness saturation contrast and hue are used to adjust the quality of the video Camera will
save your settings if you click apply If you want to quit settings you have done and restore the
status before your setting please click cancel The function of Default is used to restore the initial
settings
44
ww
wwwwwwffoossccaammccoomm
SShheennzzhheenn FFoossccaamm IInntteelllliiggeenntt TTeecchhnnoollooggyy CCoo LLiimmiitteedd
TTeell 8866 775555 22667744 55666688 FFaaxx 8866 775555 22667744 55116688 44
315 Initialize
Reboot Click reboot the infection is the same as plug the power and re-plug it
Factory default Click it all parameters will return to factory settings
Backup setting data If you donrsquot want to quit all parameters that yoursquove set You can click save
and all the parameters you set will be stored as a parameters bin file
Restore Click browse choose the correct bin file and then click ok to get all parameters which
you set before
Upgrade Click Browse choose the correct bin file and then click OK to upgrade Donrsquot shut
down the power during upgrade
Figure 332
316 Back
This will take you back to the video window
45
ww
wwwwwwffoossccaammccoomm
SShheennzzhheenn FFoossccaamm IInntteelllliiggeenntt TTeecchhnnoollooggyy CCoo LLiimmiitteedd
TTeell 8866 775555 22667744 55666688 FFaaxx 8866 775555 22667744 55116688 45
4 Other Settings
Use Mobile to login
If the camera has been linked to Internet set the parameters of the camera and router Make
sure the camera can be accessed by domain name and WAN IP
For example the WAN IP is1833754137 the domain name is ycxgwpno-ipinfo Then open
the mobile IE enter the following URL you can login the camera http
1833754137mobilehtml or
http1833754137wapwml or httpycxgwpno-ipinfomobilehtml or
http ycxgwpno-ipinfo wapwml
If the HTTP port num isnrsquot 80 you should add the port num to the URL
http1833754137portnummobilehtml
or http ycxgwpno-ipinfoport nummobilehtml
46
ww
wwwwwwffoossccaammccoomm
SShheennzzhheenn FFoossccaamm IInntteelllliiggeenntt TTeecchhnnoollooggyy CCoo LLiimmiitteedd
TTeell 8866 775555 22667744 55666688 FFaaxx 8866 775555 22667744 55116688 46
5 APPENDIX
51 Frequently Asked Questions
NOTE Any questions you would meet please check Network connections firstly Check the
working status revealed by the indicators on the network server hub exchange and network
card If abnormal check the network connections
511 I have forgotten the administrator password
To reset the administrator password you had better unplug the network cable firstly After that
press and hold down the RESET BUTTON about 10 seconds Releasing the reset button the
password will turn to the factory default
Default administrator username admin password admin
Default user username user password user
Default guest username guest password guest
512 Subnet doesnrsquot match
Check whether your ipcamera in the same subnet of your computer The step is Control PanelNetwork ConnectionsDbclick Local Area Connections Choose eneralProperties (Figure 3637) Check subnet mask IP address and gateways When you set IP address please make sure they are in the same subnet Otherwise you cant access camera
513 Download and install the ActiveX
Please click button in the Login interface Install the ActiveX after download
47
ww
wwwwwwffoossccaammccoomm
SShheennzzhheenn FFoossccaamm IInntteelllliiggeenntt TTeecchhnnoollooggyy CCoo LLiimmiitteedd
TTeell 8866 775555 22667744 55666688 FFaaxx 8866 775555 22667744 55116688 47
Figure 51
Click next
Figure 52
Click Install
48
ww
wwwwwwffoossccaammccoomm
SShheennzzhheenn FFoossccaamm IInntteelllliiggeenntt TTeecchhnnoollooggyy CCoo LLiimmiitteedd
TTeell 8866 775555 22667744 55666688 FFaaxx 8866 775555 22667744 55116688 48
Figure 53
Only click Finish and the computer restarts upon installation completion
Re-login the camera and you can see the surveillance window
514 No Pictures Problems
The video streaming is transmitted by the ActiveX controller If ActiveX controller isnrsquot installed
correctly you will see no video image You can resolve this problem by this way
Download ActiveX controller and set the safety property of IE in the PC when you view it first
time IE browserToolInternet ProperSecurityCustom LevelActiveX control and
Plug-ins Three options of front should be set to be ldquoEnablerdquo The ActiveX programs read by the
computer will be stored As follows
Enable Download unsigned ActiveX controls
Enable Initialize and script ActiveX controls not marked as safe
Enable Run ActiveX controls and plug-ins
49
ww
wwwwwwffoossccaammccoomm
SShheennzzhheenn FFoossccaamm IInntteelllliiggeenntt TTeecchhnnoollooggyy CCoo LLiimmiitteedd
TTeell 8866 775555 22667744 55666688 FFaaxx 8866 775555 22667744 55116688 49
Figure 54
If you allow the ActiveX running but still could not see living video Please change another port
number to try Donrsquot use port 80 use any port between 1024 and 49151
Figure55
NOTE Make sure that your firewall or anti-virus software does not block the camera or ActiveX
If you could not see video please shut down firewall or anti-virus software to try again
50
ww
wwwwwwffoossccaammccoomm
SShheennzzhheenn FFoossccaamm IInntteelllliiggeenntt TTeecchhnnoollooggyy CCoo LLiimmiitteedd
TTeell 8866 775555 22667744 55666688 FFaaxx 8866 775555 22667744 55116688 50
515 I cannot see the video on Firefox or Safari or Google chrome
If you cannot see live video after login the camera it may be the reason that the defaults transmit
protocol of QuickTime streaming is not HTTP or the port is not 80
For Firefox Safari and Google chrome you should install Quick Time Player as the ActiveX
controller please configure the activex controller as the following picture
Select PreferencesmdashQuickTime Preferenceshellip
Figure 56
Choose HTTP as the transport protocol
Figure 57
51
ww
wwwwwwffoossccaammccoomm
SShheennzzhheenn FFoossccaamm IInntteelllliiggeenntt TTeecchhnnoollooggyy CCoo LLiimmiitteedd
TTeell 8866 775555 22667744 55666688 FFaaxx 8866 775555 22667744 55116688 51
516 I cannot see video on MAC OS
If you cannot see live video after login FOSCAM H264 camera it may be the reason that the
defaults transmit protocol of QuickTime streaming is not HTTP or the port is not 80
Please follow the below steps and make the protocol and port correct and you can see live video
then
Steps
Click ldquoGordquo ---------gt Choose ldquoUtilitiesrdquo ----------gt Open ldquoTerminalapprdquo ------------gt Check the
default protocol and port of QuickTime streaming by inputting the URL
ldquoqtdefaults read transportSettingsrdquo
If the protocol is not HTTP or the port is not 80 please input the URL
ldquoqtdefaults write transportSettings HTTP 80rdquo to change it
After changing it you can also check if it is successful by URL
ldquoqtdefaults read transportSettingsrdquo
Please refer to the below pictures for the above steps
Figure 58
52
ww
wwwwwwffoossccaammccoomm
SShheennzzhheenn FFoossccaamm IInntteelllliiggeenntt TTeecchhnnoollooggyy CCoo LLiimmiitteedd
TTeell 8866 775555 22667744 55666688 FFaaxx 8866 775555 22667744 55116688 52
Figure 59
Figure 510
517 Canrsquot access IP camera in internet
There are some reasons
1 ActiveX controller is not installed correctly (Figure51-53)
2 The port which camera used is blocked by Firewall or Anti-virus software Please change
another port number and try again (Figure55)
3 Port forwarding is not successful
53
ww
wwwwwwffoossccaammccoomm
SShheennzzhheenn FFoossccaamm IInntteelllliiggeenntt TTeecchhnnoollooggyy CCoo LLiimmiitteedd
TTeell 8866 775555 22667744 55666688 FFaaxx 8866 775555 22667744 55116688 53
Check these settings and make sure they are correct
518 UPnP always failed
UPnP only contains port forwarding in our recent software Sometimes it may be failed to do port
forwarding automatically because of firewall or anti-virus software It also has much relation with
routerrsquos security settings So we recommend you do port forwarding manually You can view
your camera in internet successfully after you do port forwarding manually in your
router(Figure316)
519 Canrsquot operate the cradle head
If you canrsquot operate the cradle head such as click the button but the cradle head can not
move Usually the cradle head canrsquot operate mainly because of wrong settings Please donrsquot
change the default settings or else you canrsquot operate it You can see the following figure which is
the default settings Sometimes you need to press the reset button and restore the default
settings
Figure511
52 Default Parameters
Default network Parameters
IP address obtain dynamically
Subnet mask obtain dynamically
Gateway obtain dynamically
DDNS Embedded FOSCAM DDNS Service
Username and password
Default admin username admin Default password admin
Default user username user Default password user
Default guest username guest Default password guest
54
ww
wwwwwwffoossccaammccoomm
SShheennzzhheenn FFoossccaamm IInntteelllliiggeenntt TTeecchhnnoollooggyy CCoo LLiimmiitteedd
TTeell 8866 775555 22667744 55666688 FFaaxx 8866 775555 22667744 55116688 54
53 Specifications
Specification FI8620
Image Sensor
Image Sensor 480TVL 14 SONY Color CCD Sensor
Optical variable times 10 times
Lens F 38-38mm F12
Mini Illumination multicolour 005Lux black and white0001Lux
Video
Video Formats Supports NTSC or PAL Formats
Image Compression H264
ImageFrame Rate 25fps(PAL Formats)30fps(NTSC Formats)Down adjustable
Image Resolution D1(720576)CIF(352288)QCIF(176144)
View H264 dual streaming
Focusing autohand-switchkeying automatic
digital continuous autofocus ulsg
Image adjust The brightness contrast is adjustable
White balance Automatic white balance
Backlight
compensation Automatic backlight compensation
SNR gt60DB (AGC OFF)
Network
Ethernet One 10100Mbps RJ-45
Supported Protocol TCPIPUDPIPHTTPSMTPFTPDHCPDNSDDNS
UPNPPOP3RTSP
Support IP address static IP address dynamic IP address
Alarm Alarm detection The motion detecting detection threshold Settings
Alarm inform Support EmailFTP etc alarm inform way
Hardware
Interface
POWER Interface DC 12V20A (EUUSAU adapter or other types optional)
Power Consumption ﹤6 Watts
Reset Buttons One Reset
Network Interface One 10100Mbps RJ-45
Environment
Operate Temper 0deg ~ 55degC (32degF ~ 131degF)
Operate Humidity 10 ~ 80 non-condensing
Storage Temper -10degC ~ 60deg (14degF ~ 140degF)
Storage Humidity 0 ~ 90 non-condensing
Physical
Horizontal speed 1-250deg S
Vertical speed 1-100deg S
PanTilt Angle Horizontal360deg amp Vertical 90deg
Dimension 270(L) x 170(W) x 260(H)mm
Net Weight 1935g
Gross Weight 2674g
PC
Requirements
CPU 20GHZ or above (suggested 30GHz)
Memory Size 256MB or above (suggested 10GHz)
Display Card 64M or above
55
ww
wwwwwwffoossccaammccoomm
SShheennzzhheenn FFoossccaamm IInntteelllliiggeenntt TTeecchhnnoollooggyy CCoo LLiimmiitteedd
TTeell 8866 775555 22667744 55666688 FFaaxx 8866 775555 22667744 55116688 55
Supported OS Microsoft Windows 2000XPVista Mac OS
Browser IE6 and above version or compatible browser Firefox Chrome
Safari or other standard browsers
Certificate CEFCC CEFCC
Software Upgrade Upgrade from network
Application Software H264 Camera Client
6 OBTAINING TECHNICAL SUPPORT
While we hope your experience with the IPCAM network camera is enjoyable and easy to use
you may experience some issues or have questions that this Userrsquos Guide has not answered
If you have problem with FOSCAM IP camera please first contact FOSCAM reseller for
solving the problems If our reseller cannot provide service please contact our service
department techfoscamcom
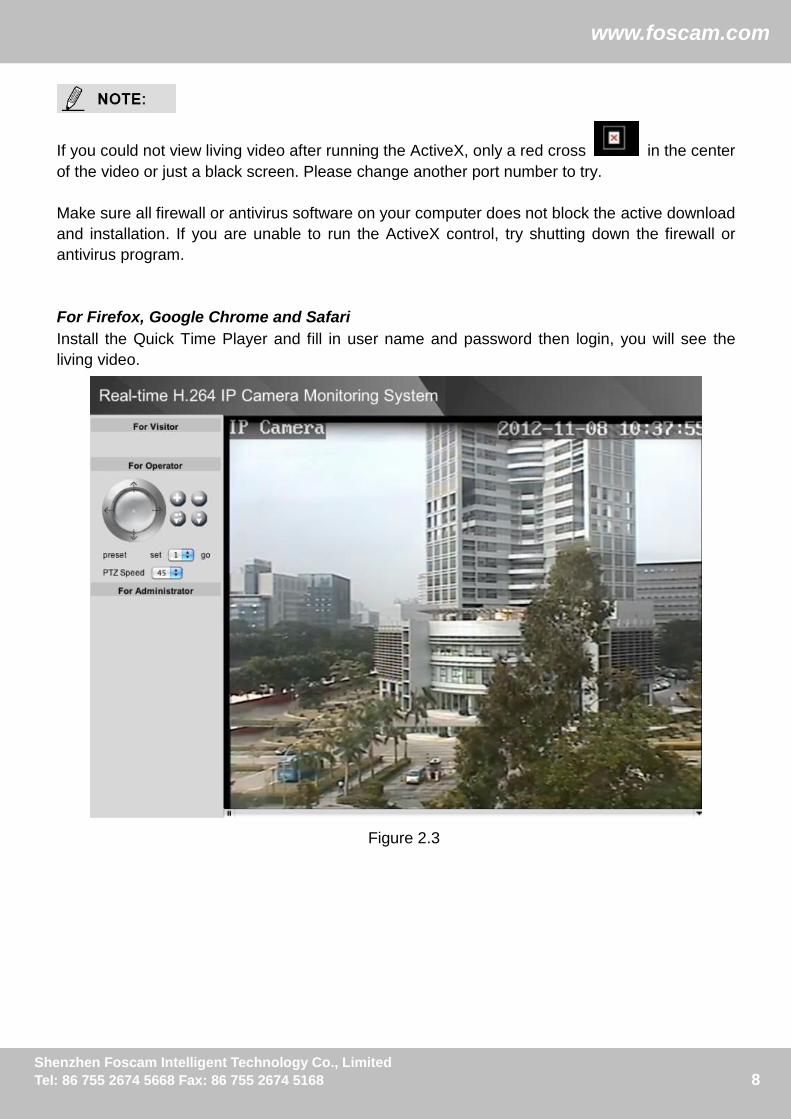
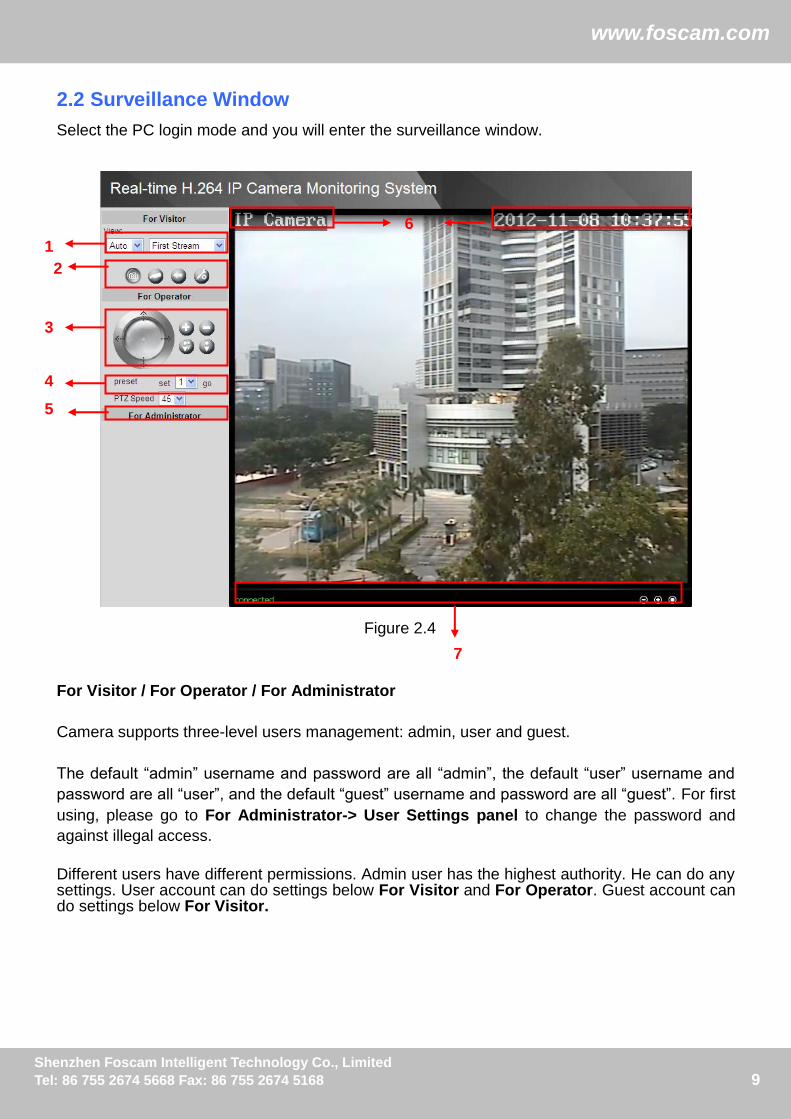
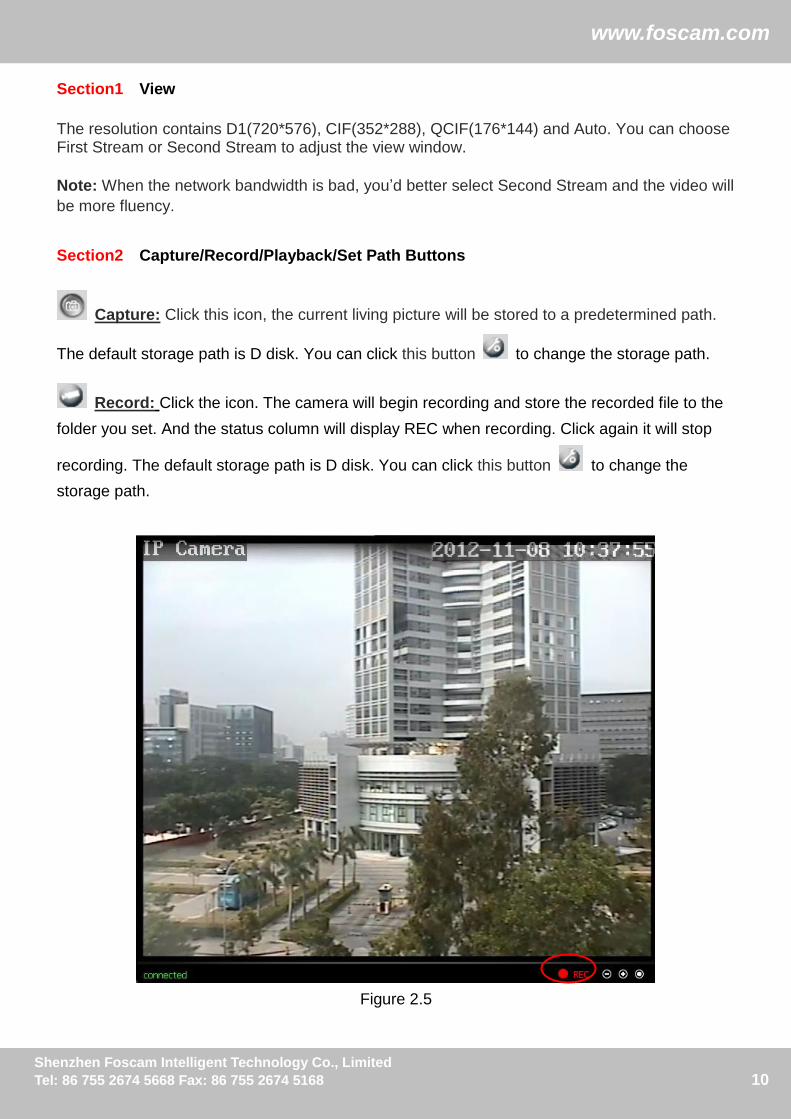
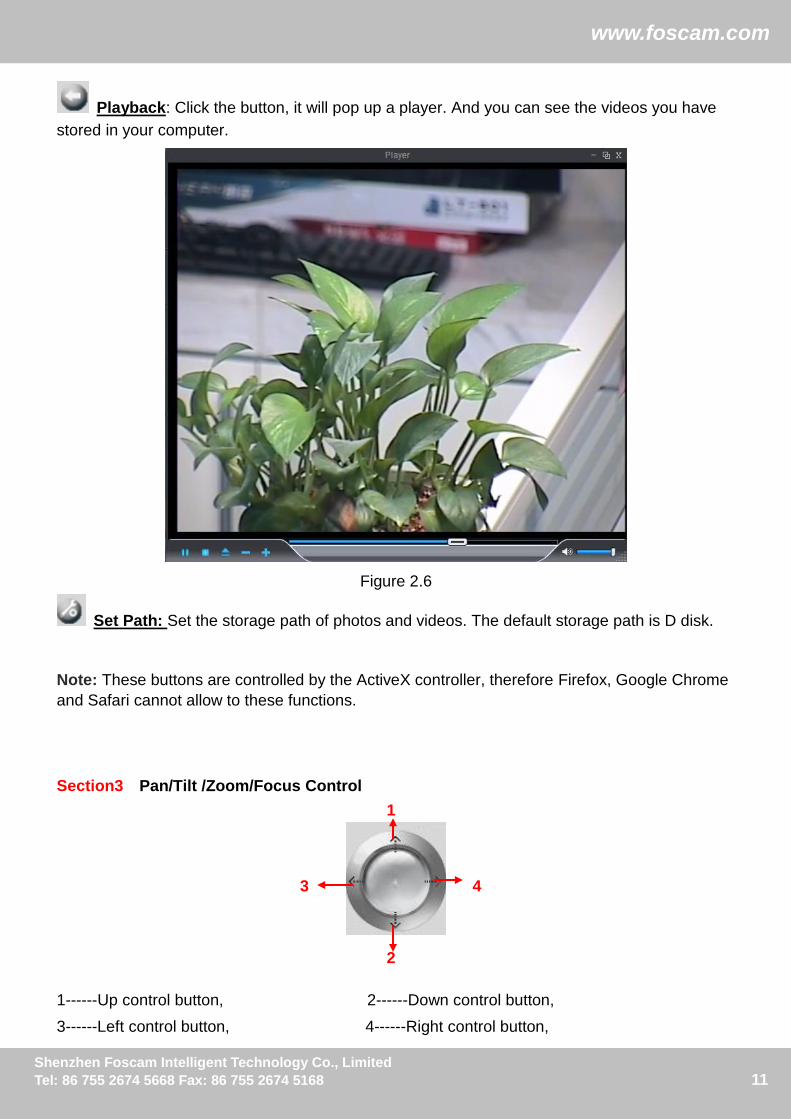
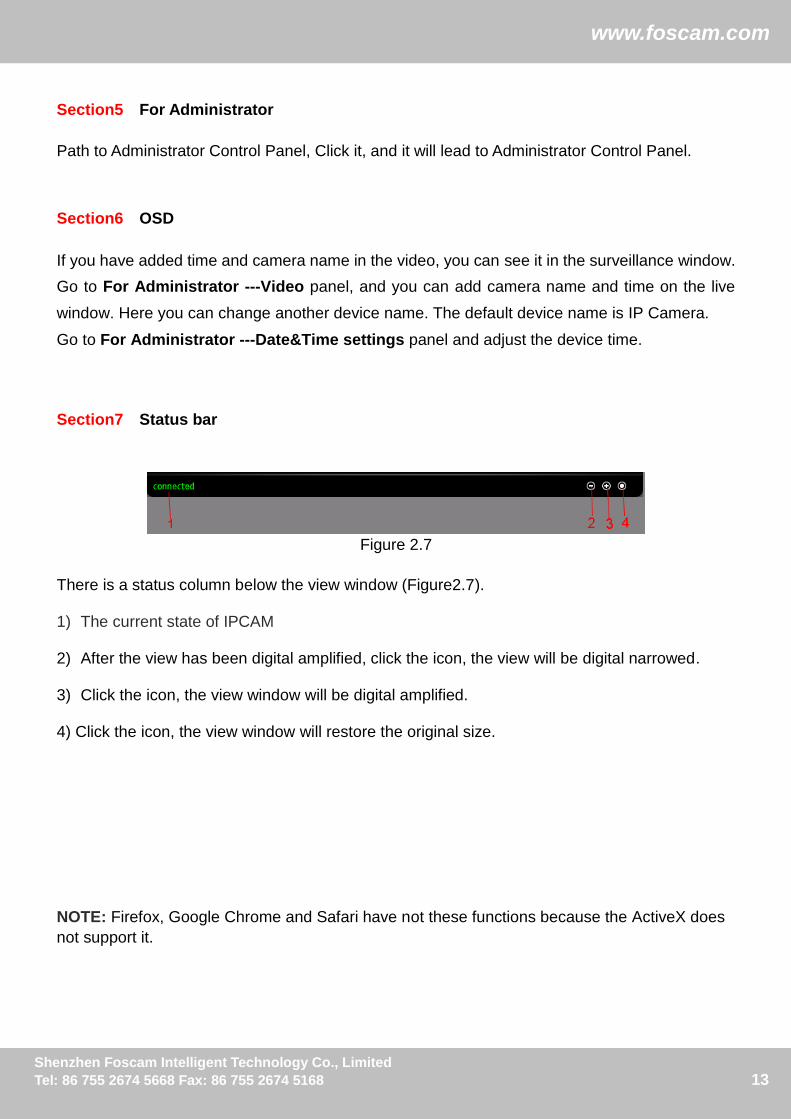
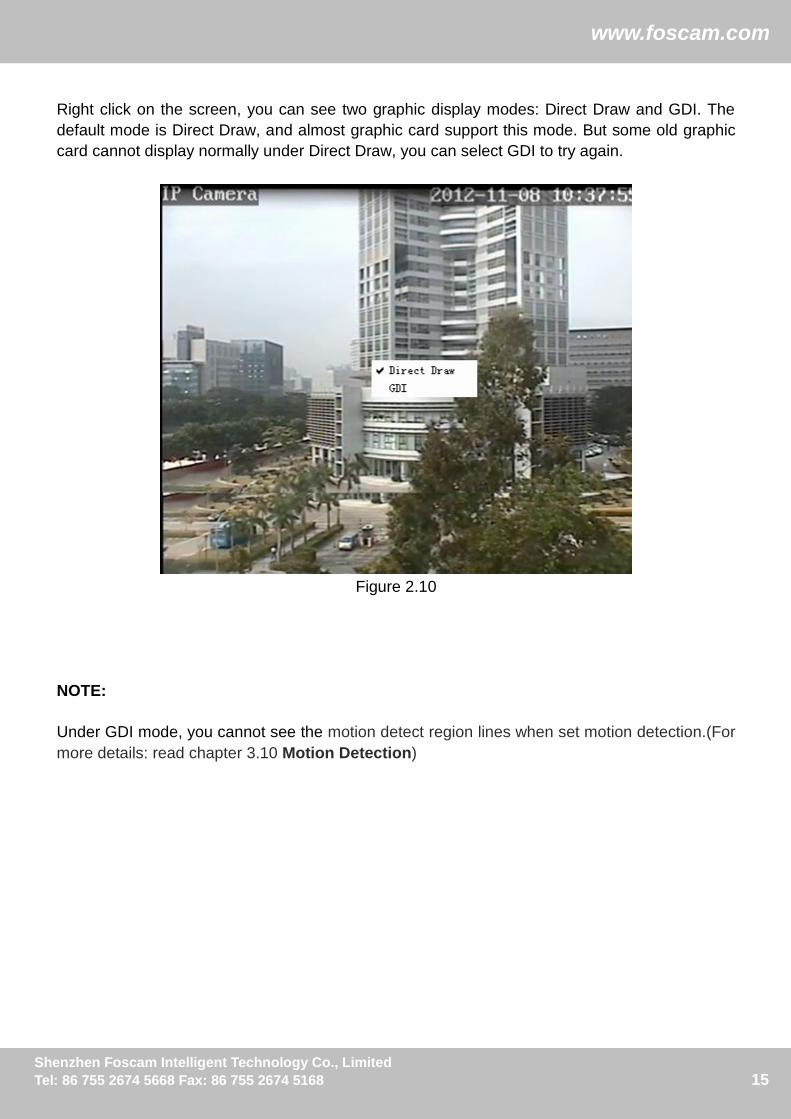
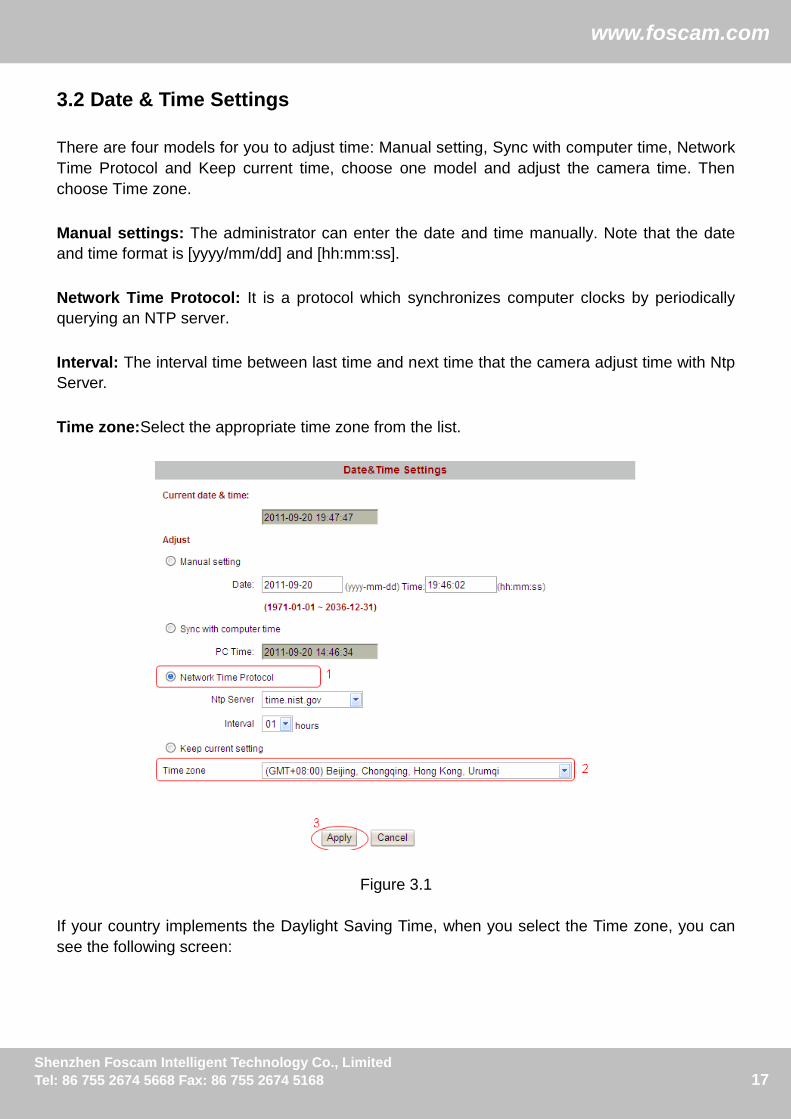
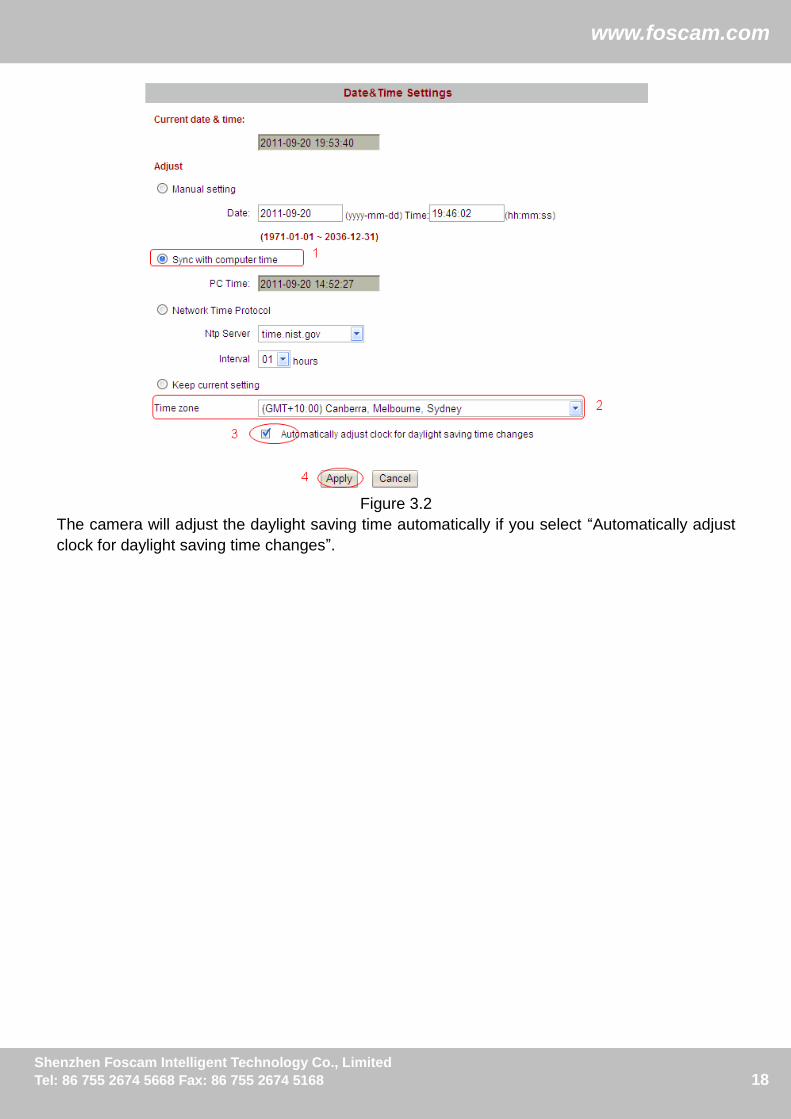
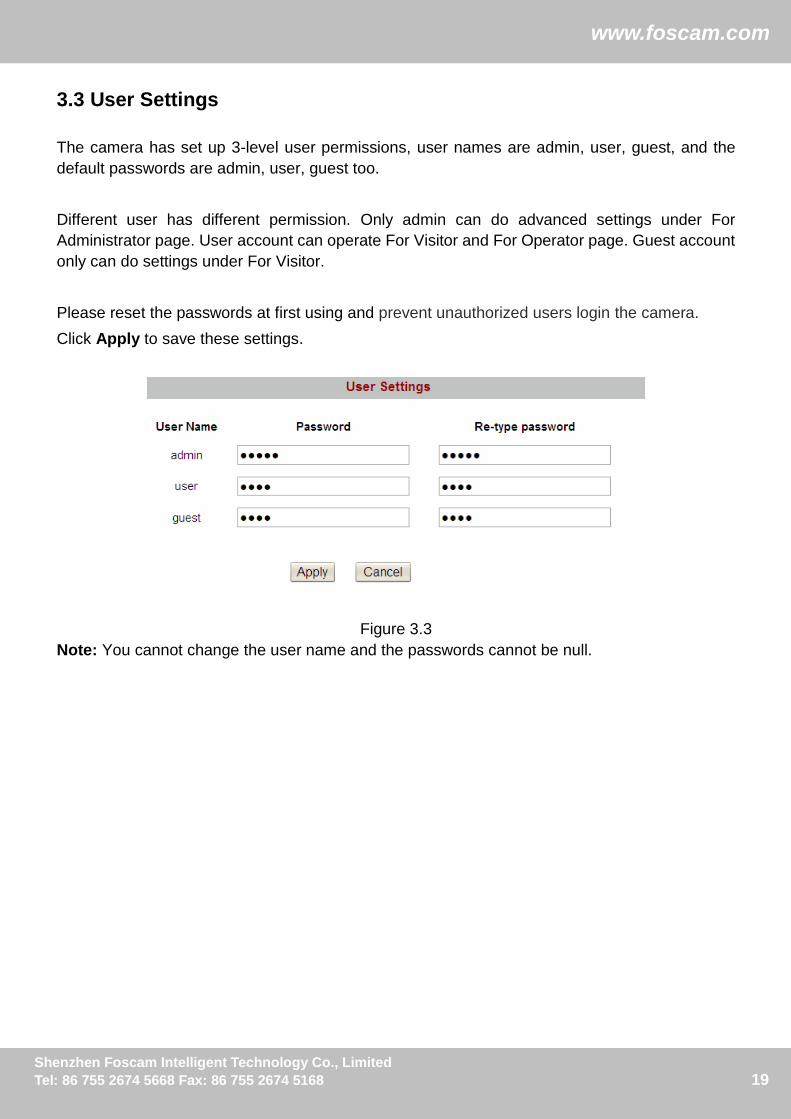
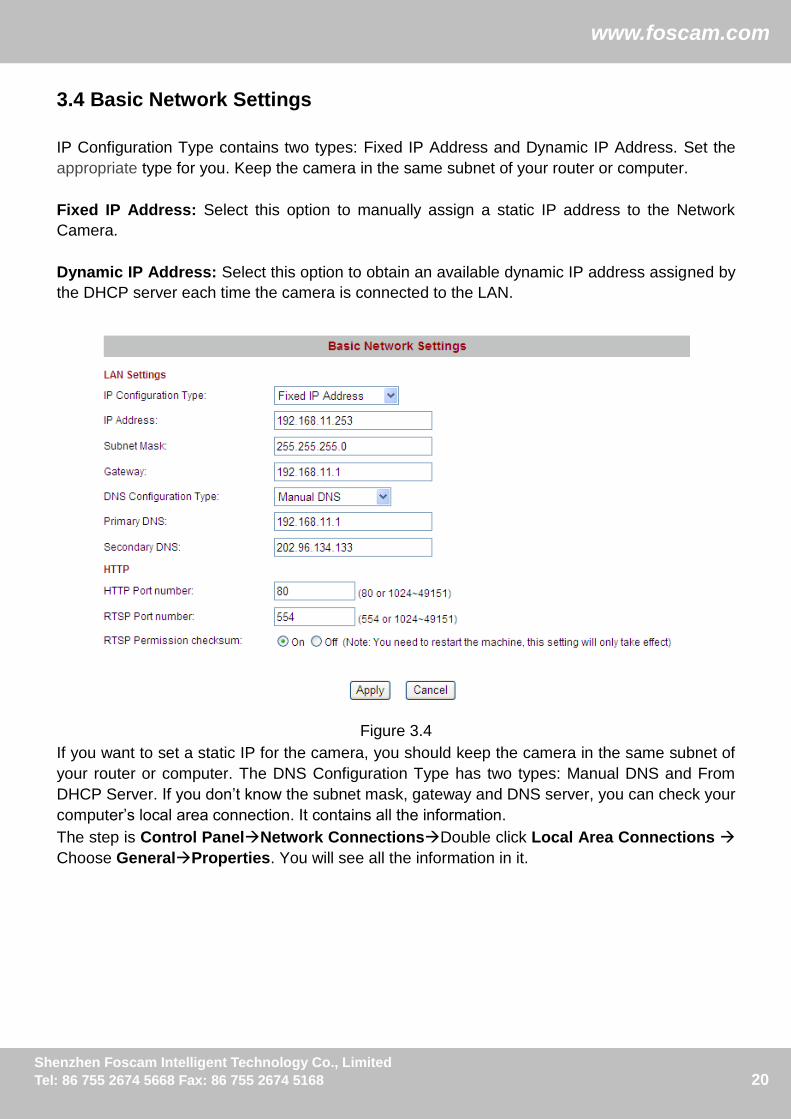
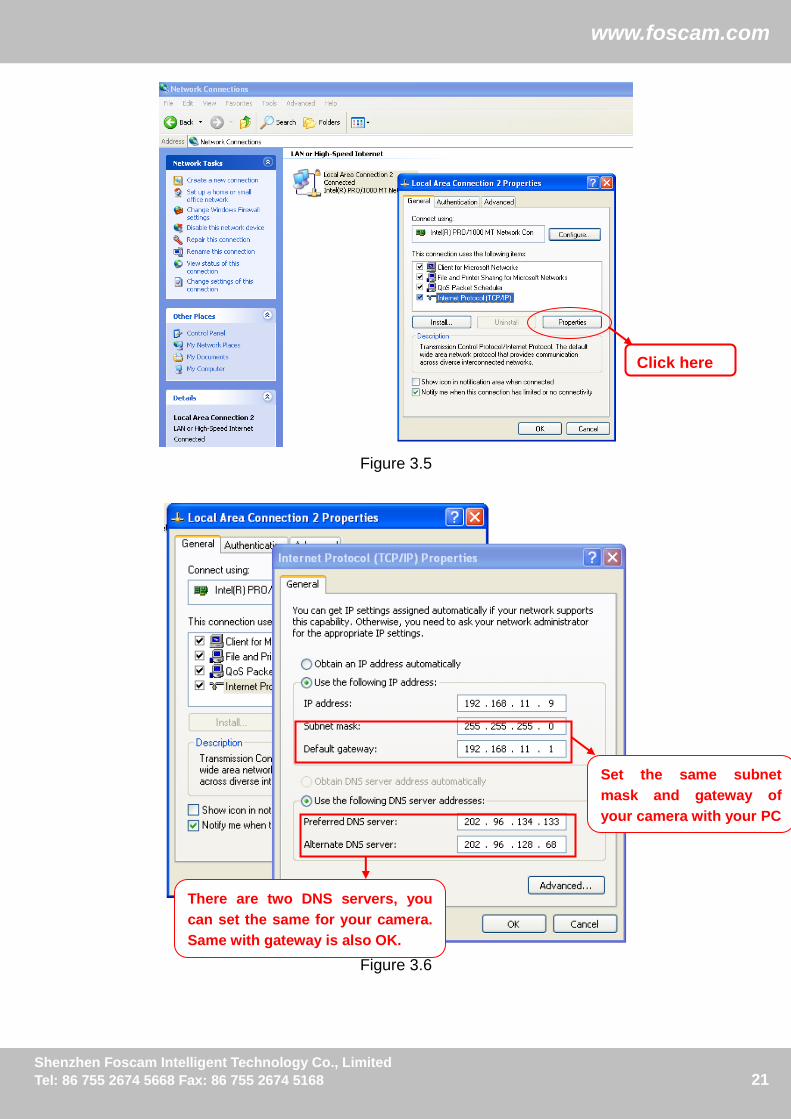
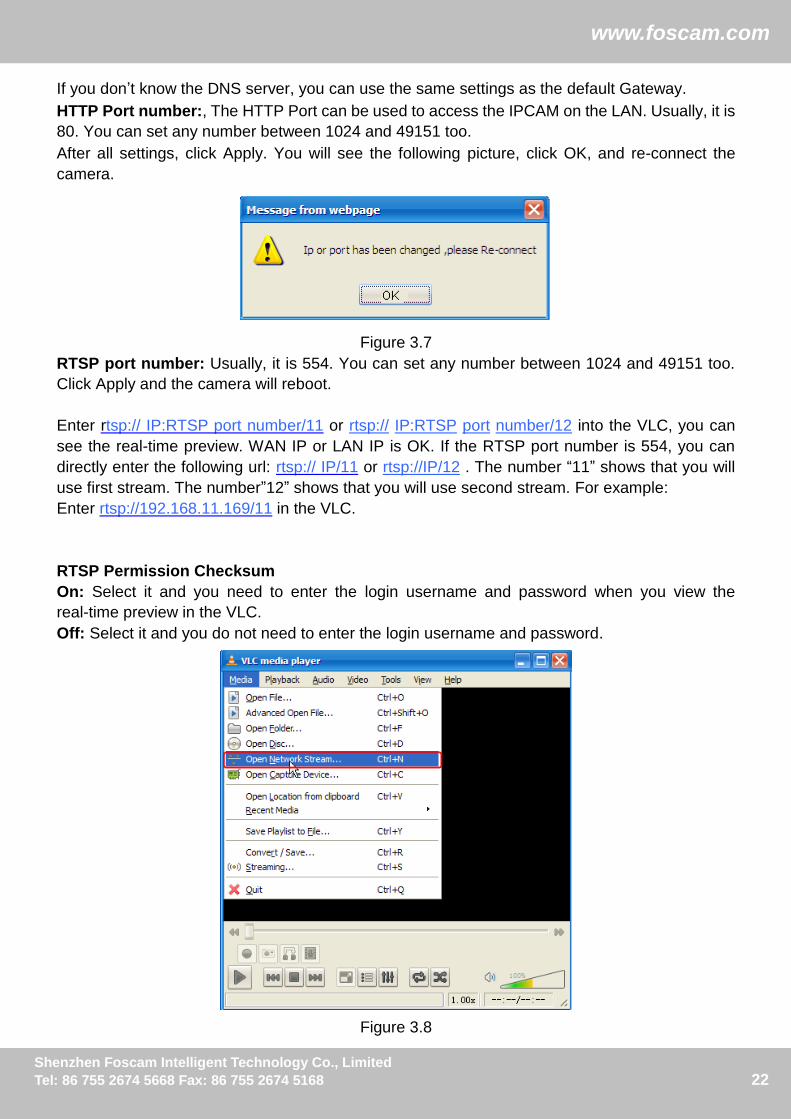
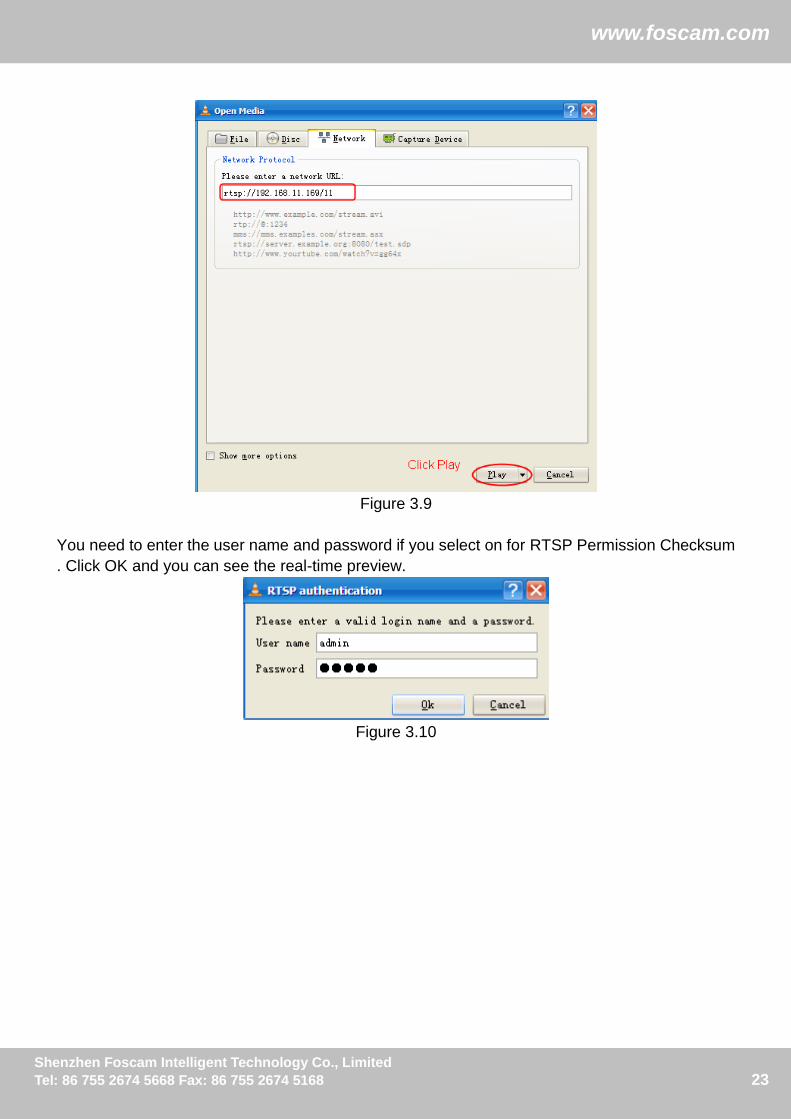
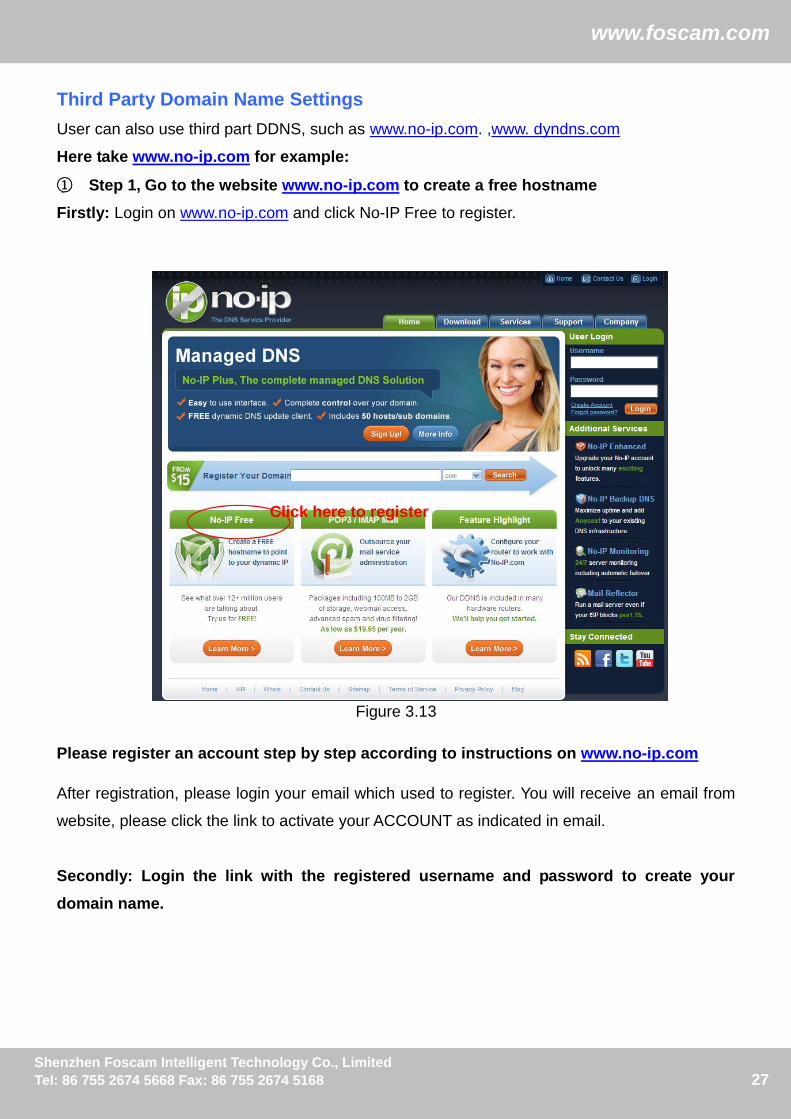
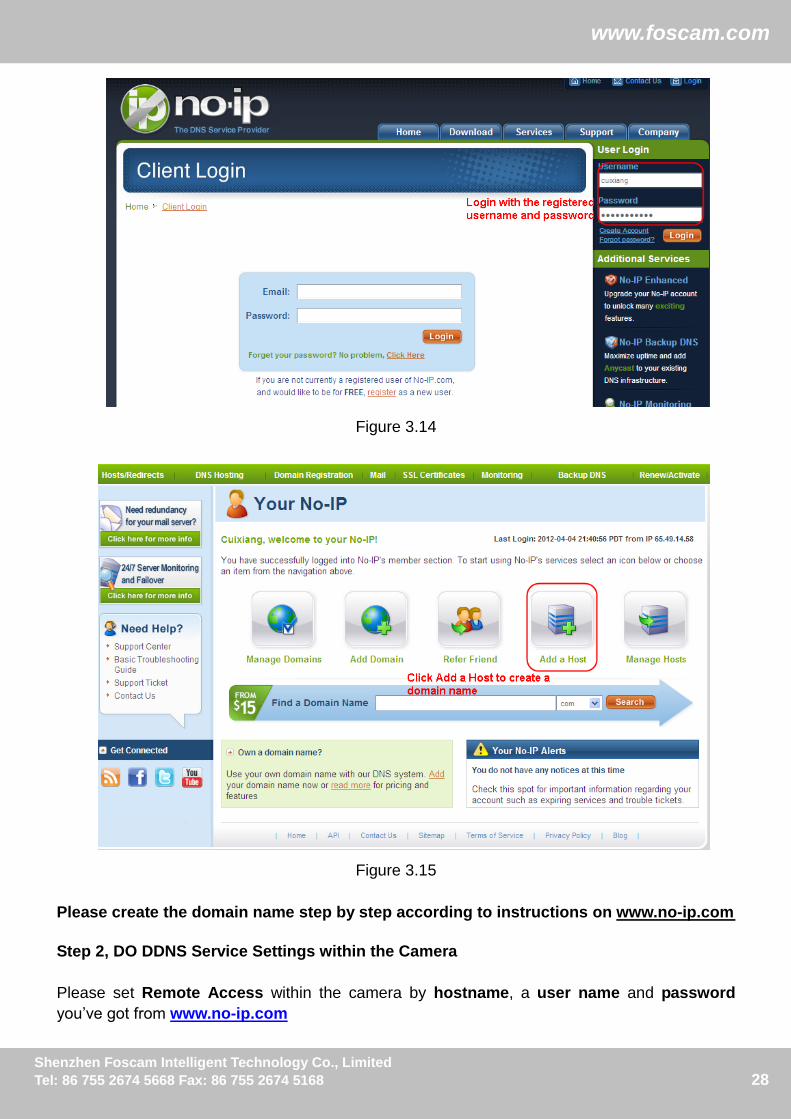
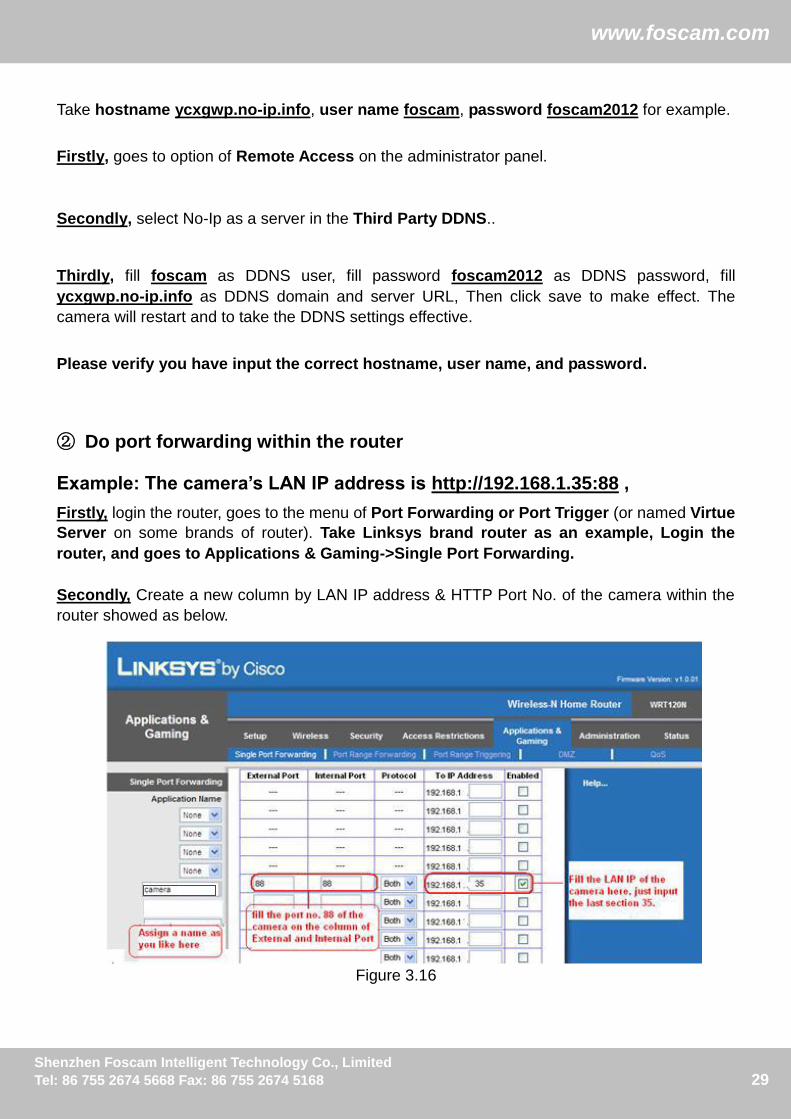
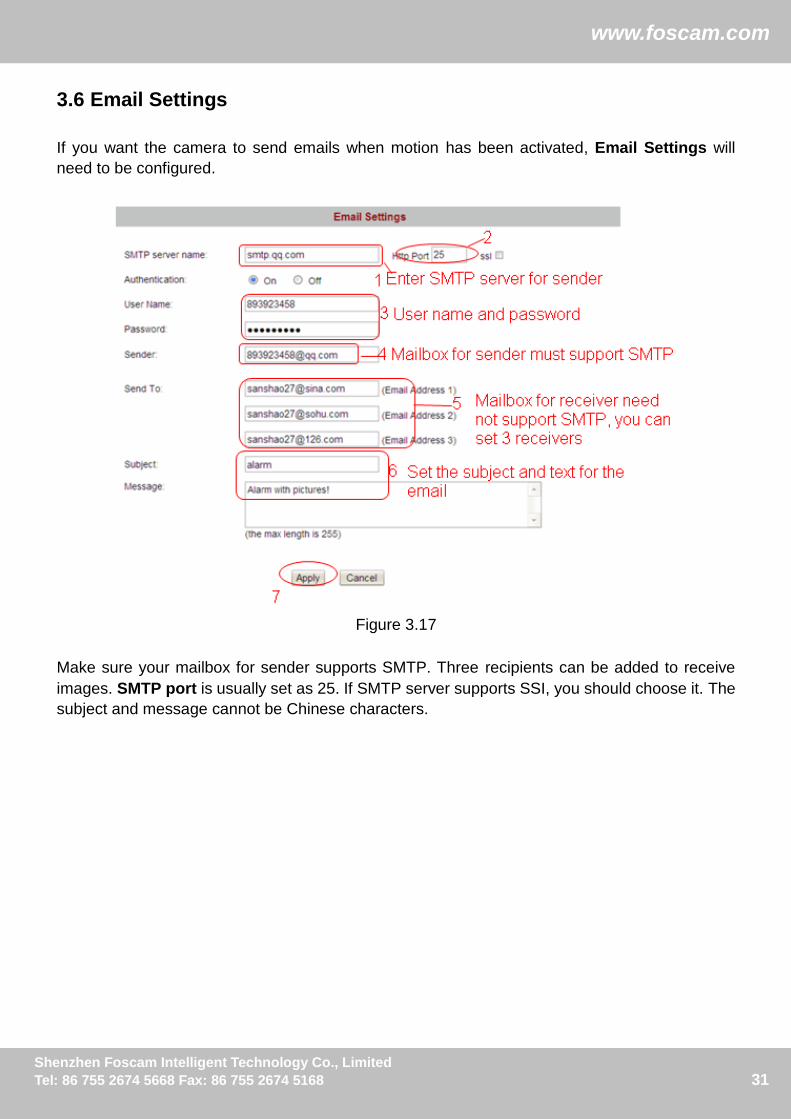
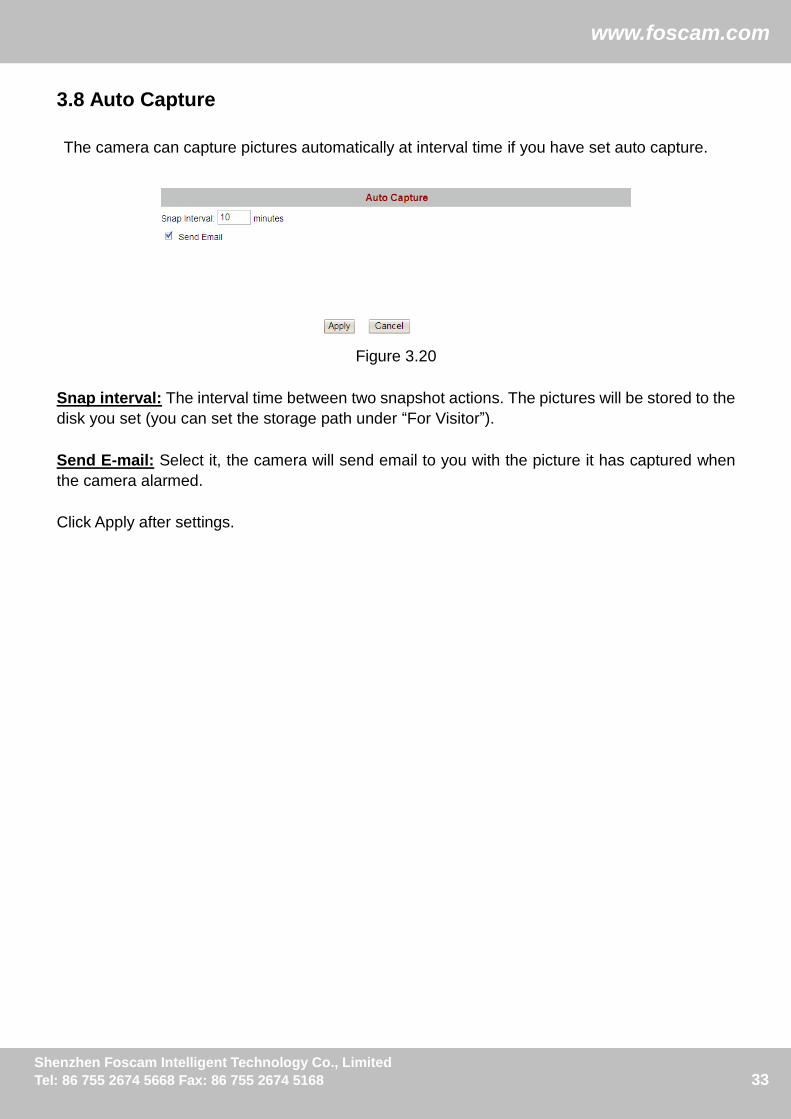
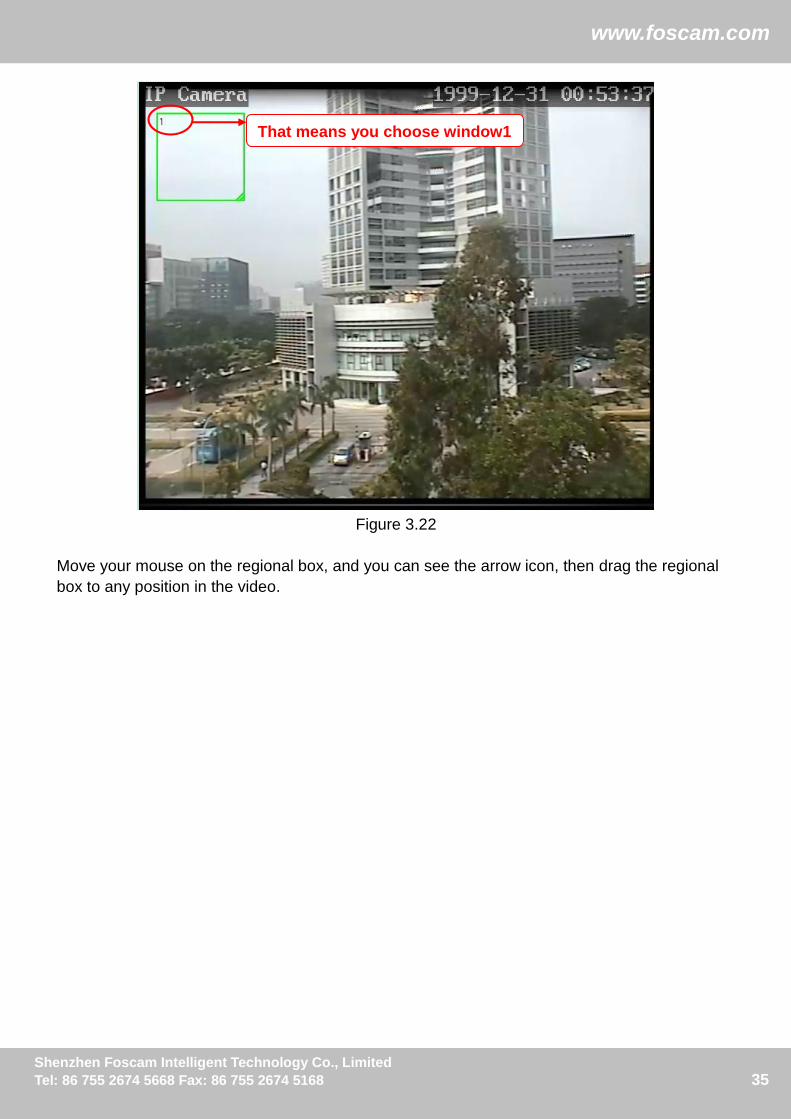
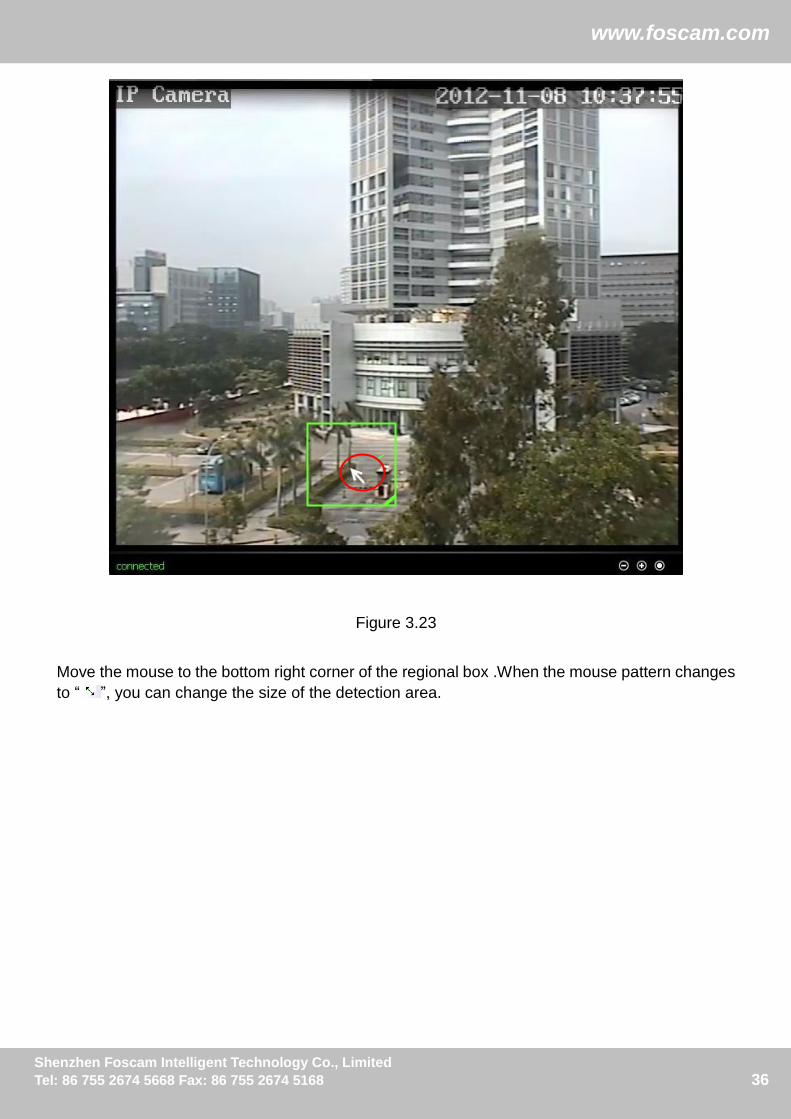
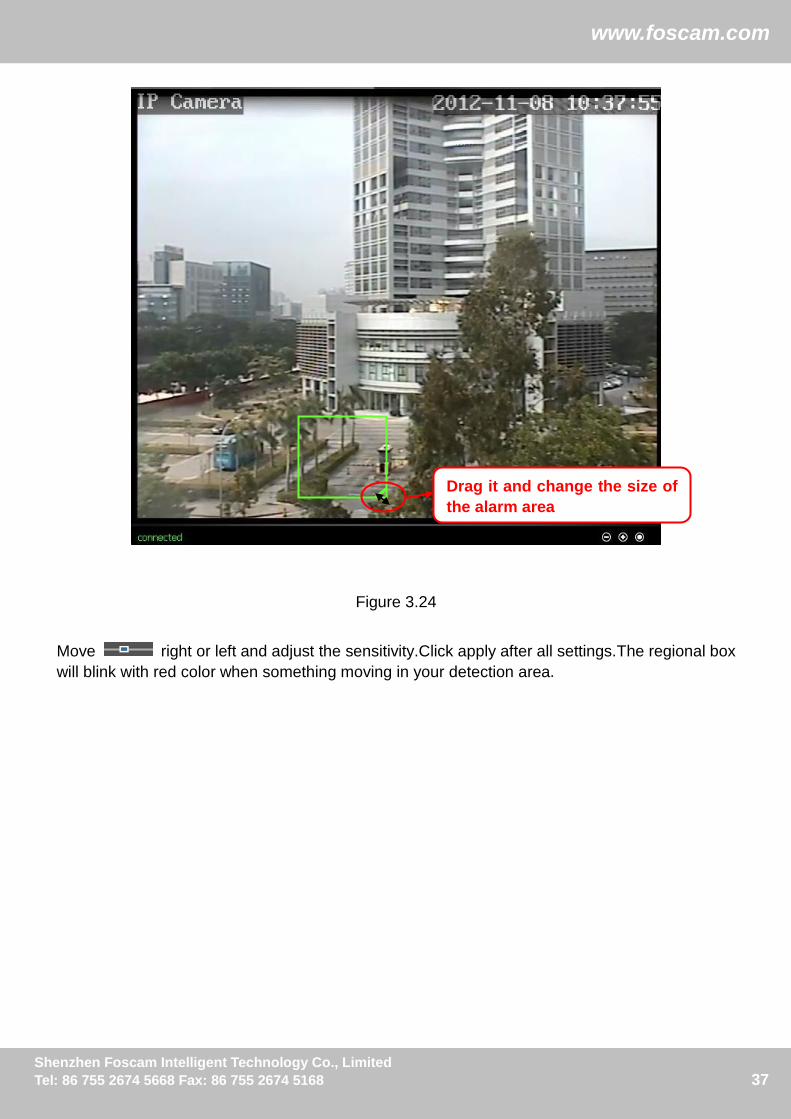
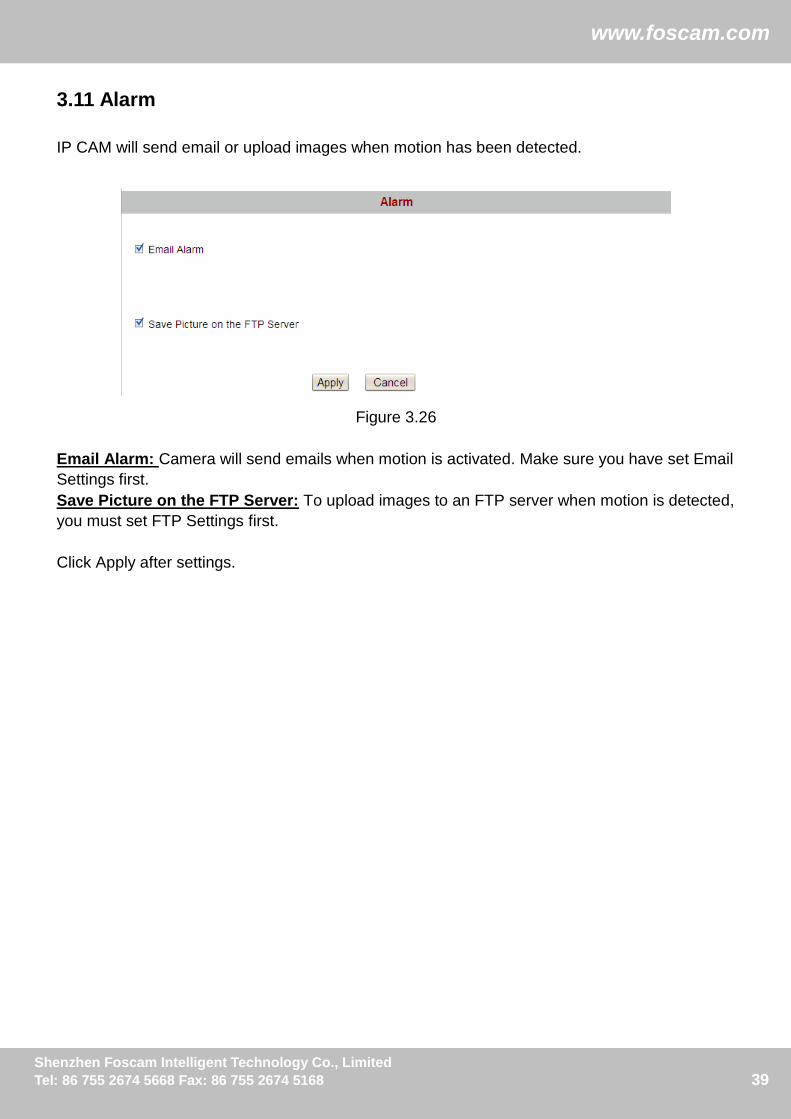
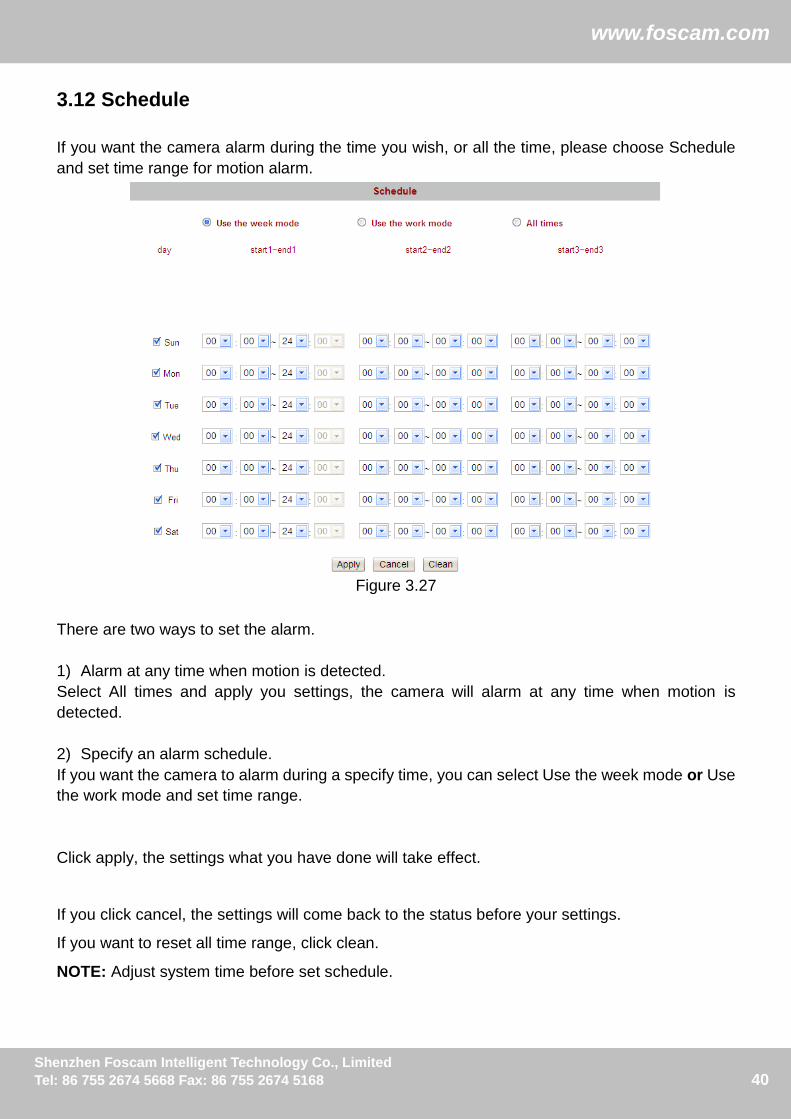
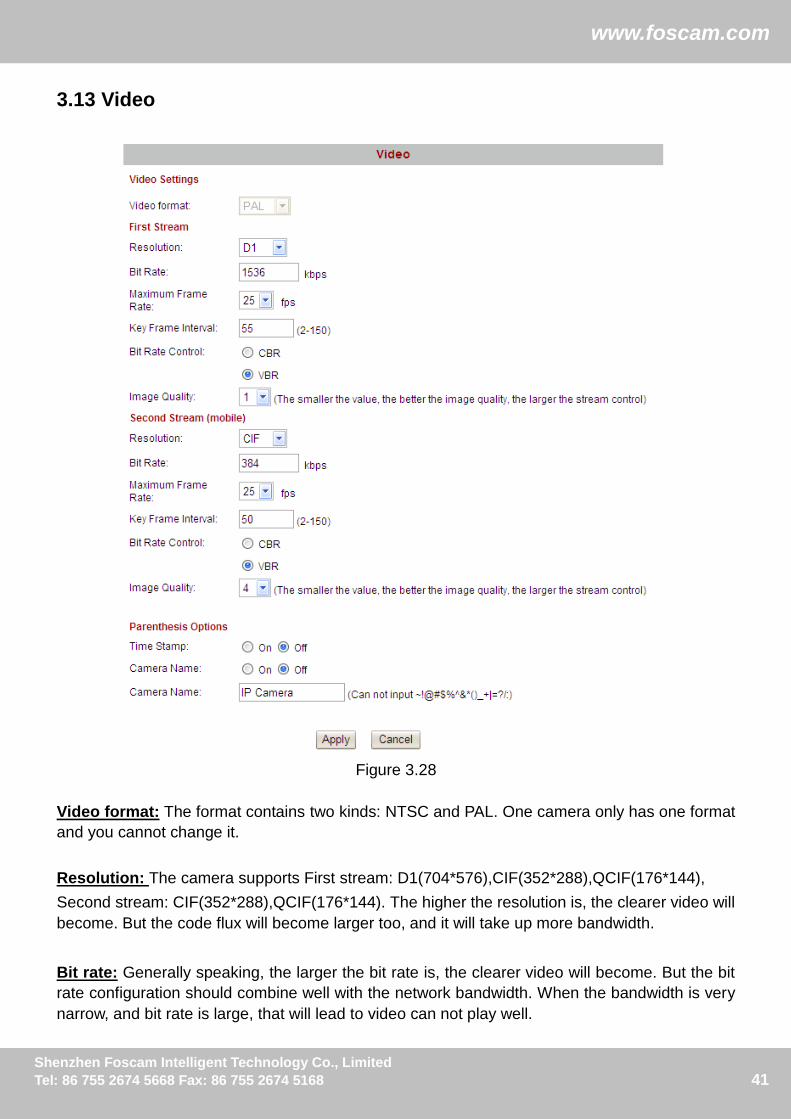
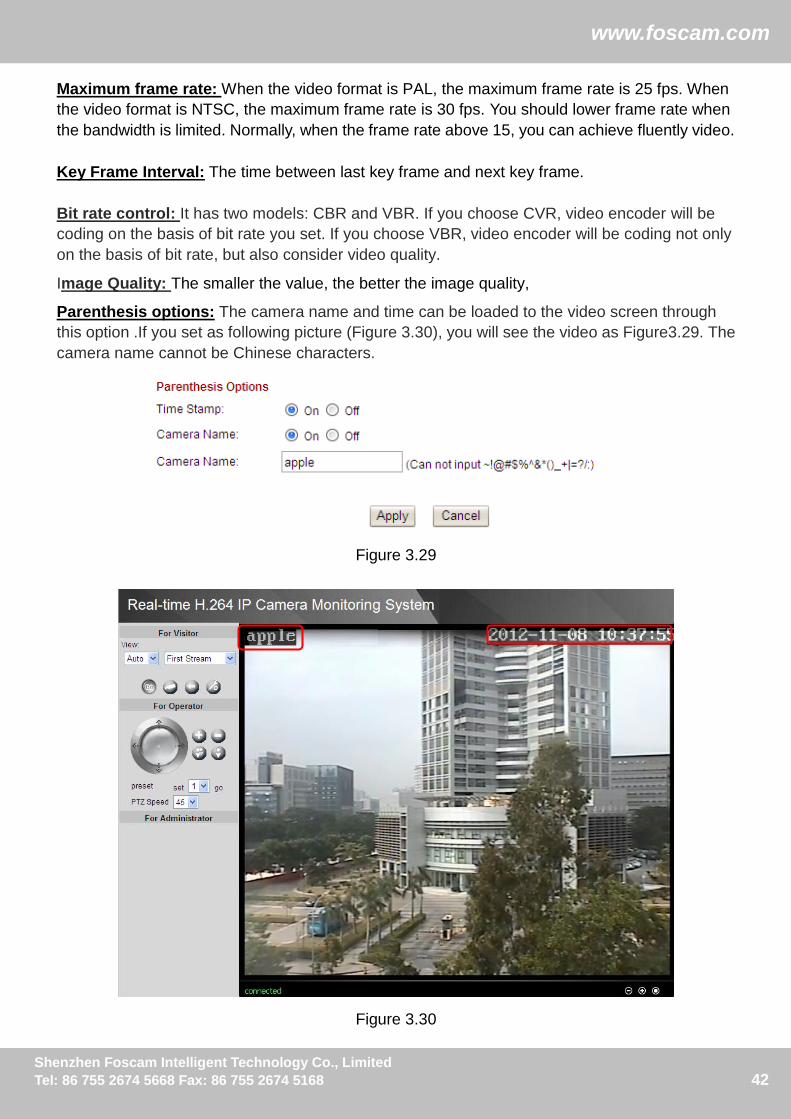
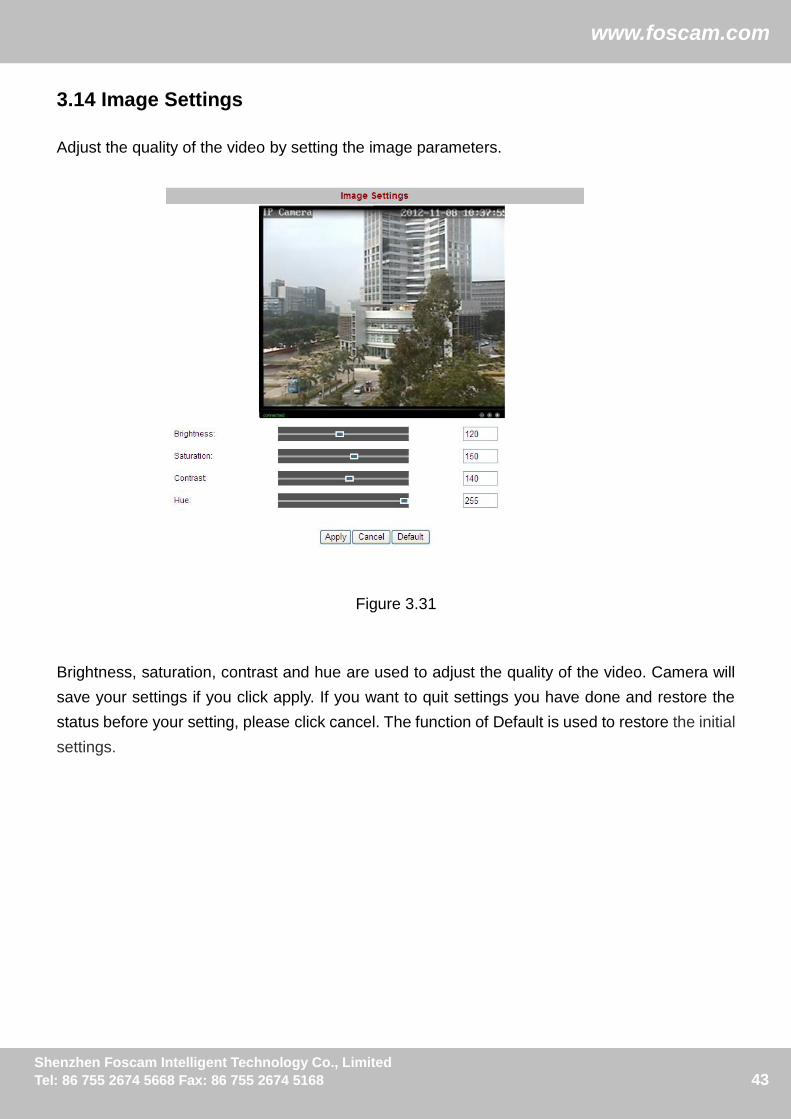
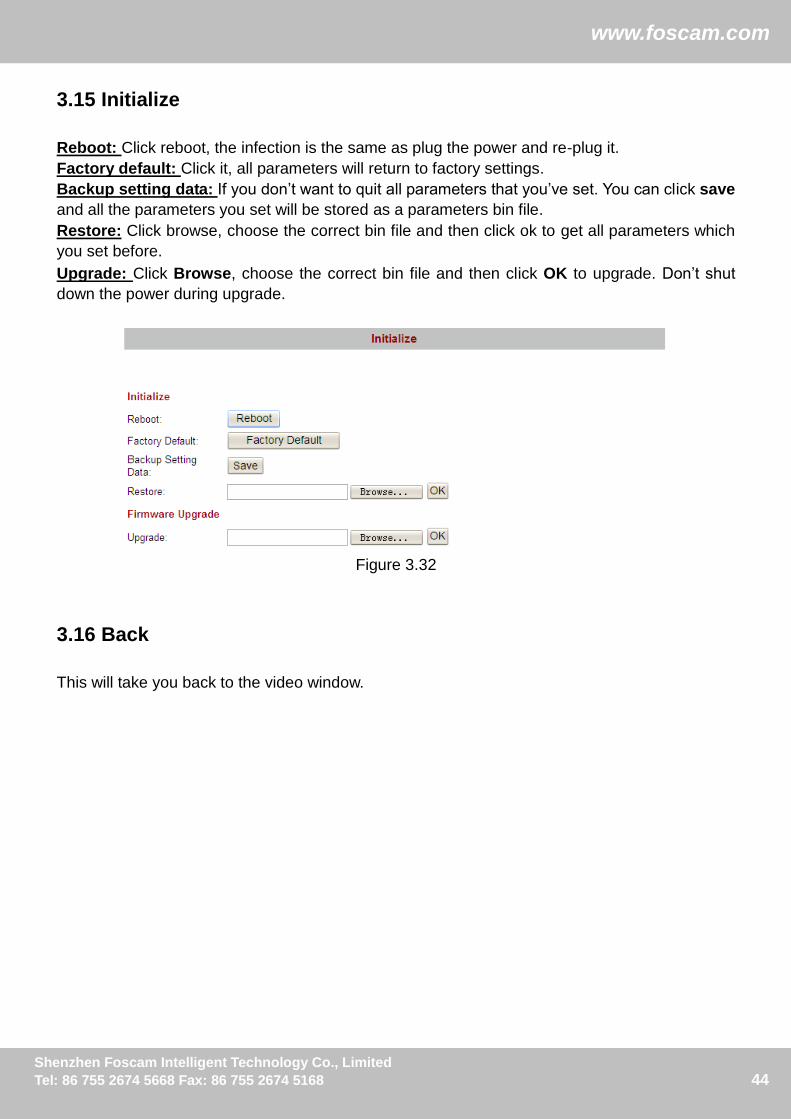
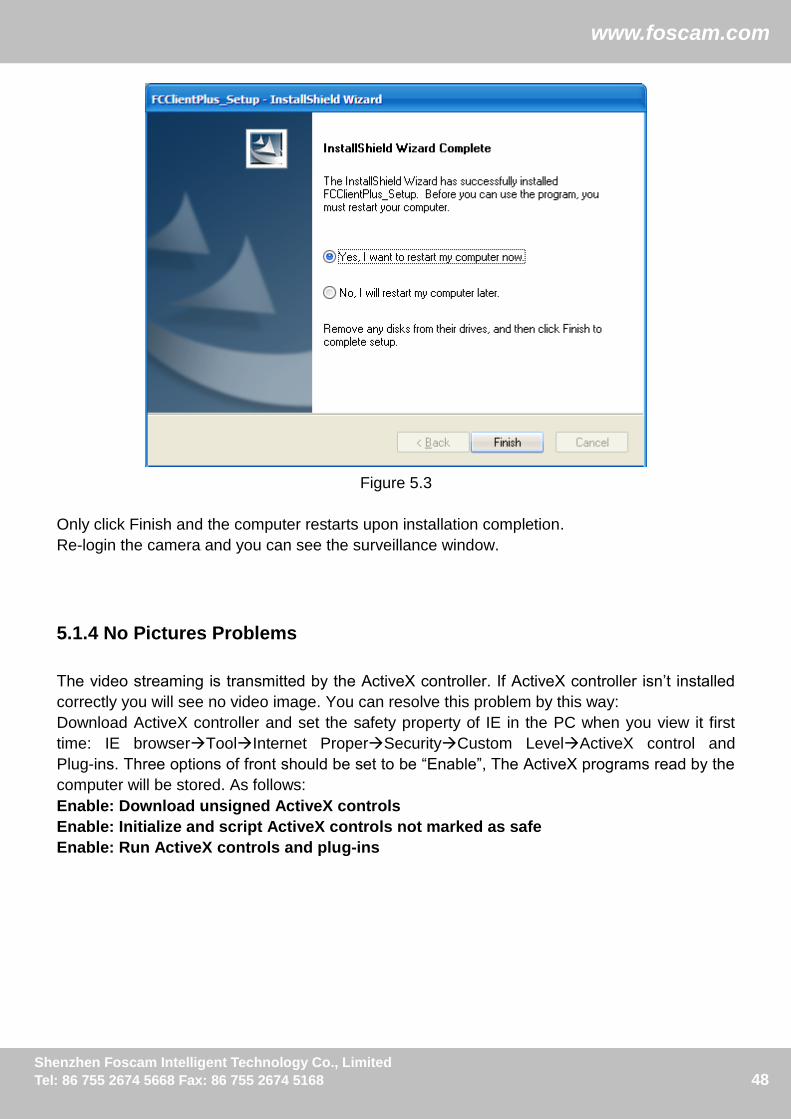
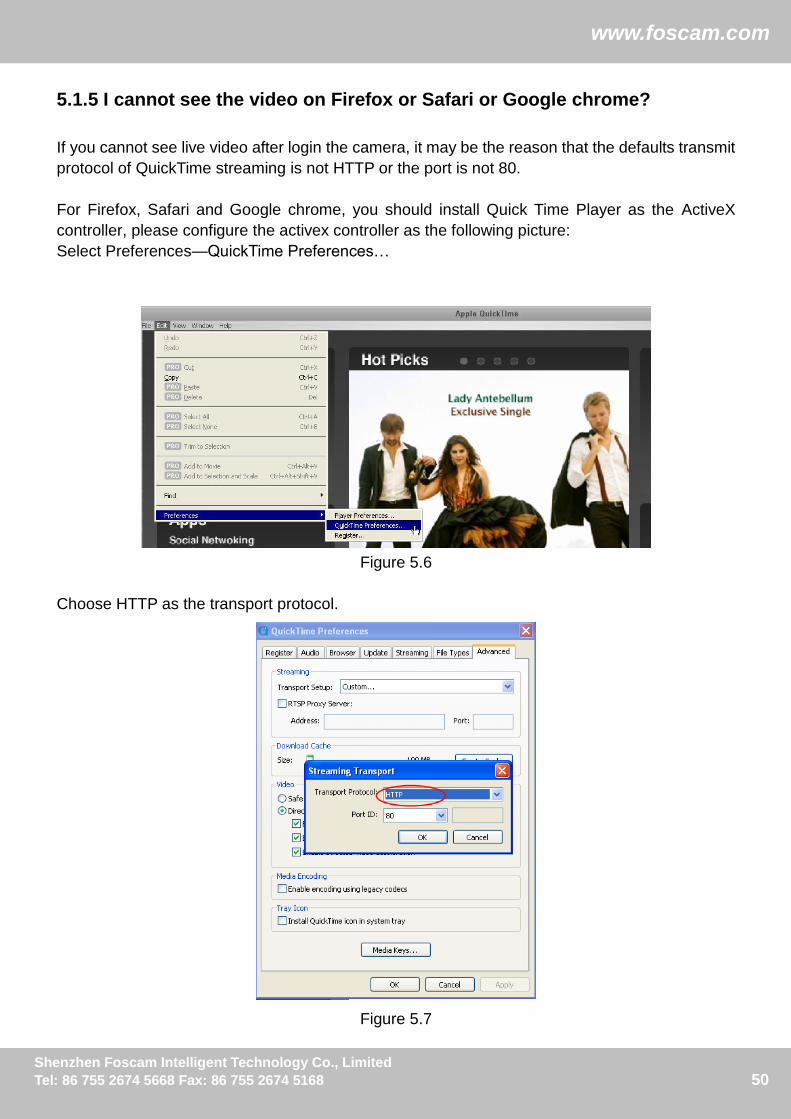
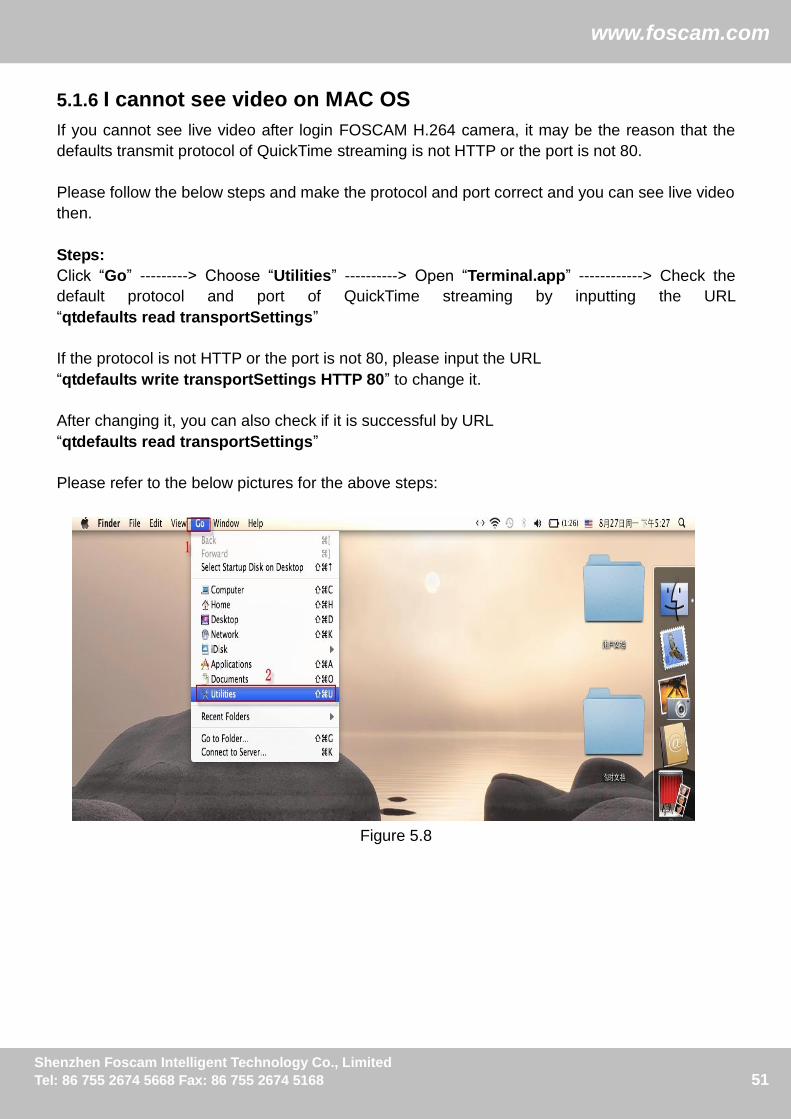
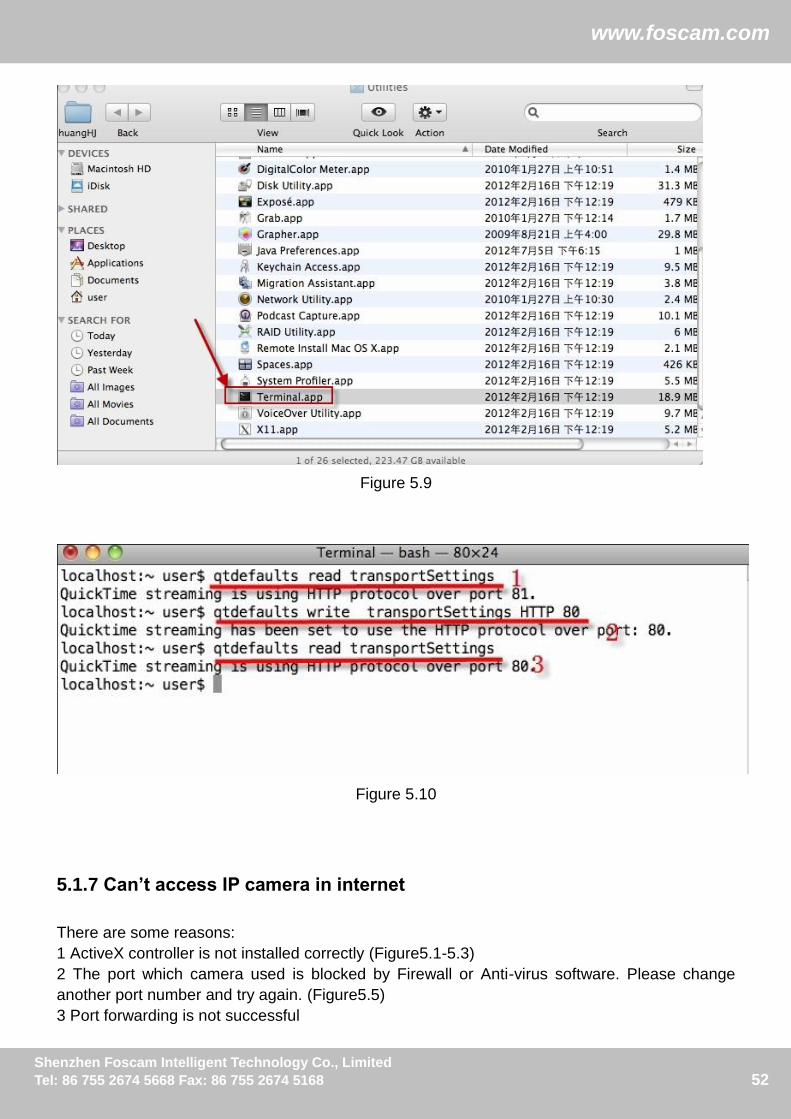
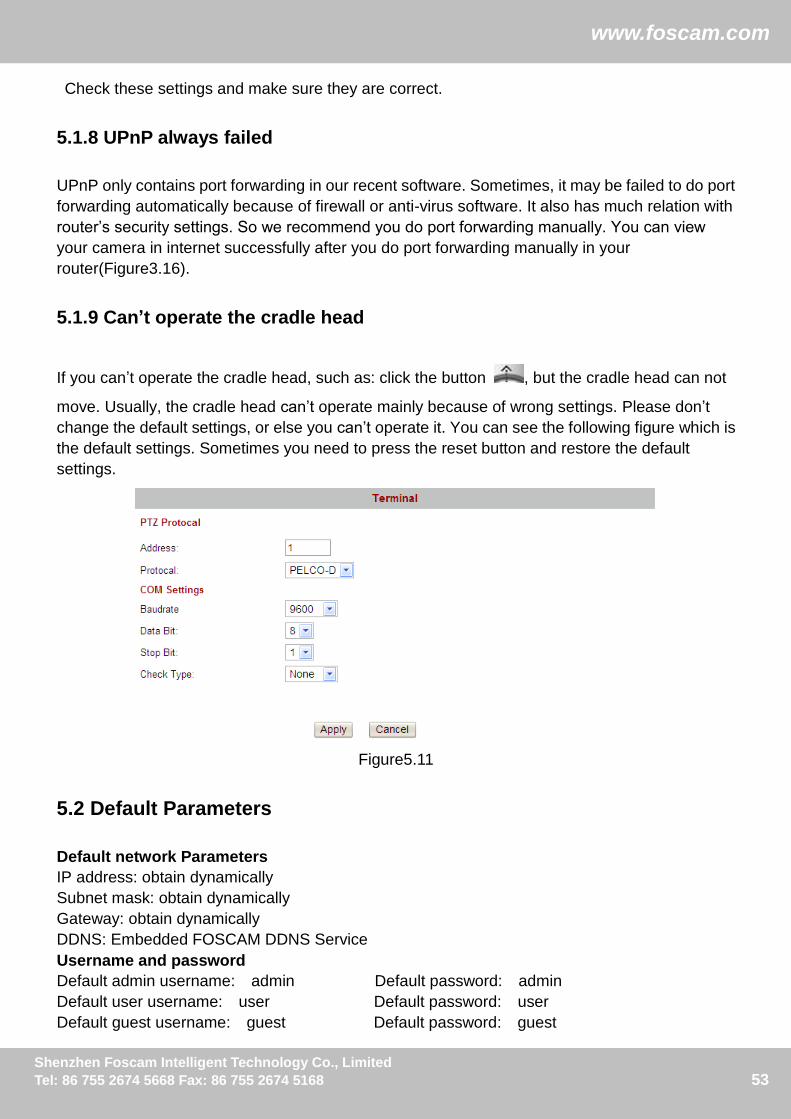


![7장 운동량과 충돌 - Hanyangoptics.hanyang.ac.kr/~choh/degree/[2013-1] general... · : 물체 1의 최종속도는 같은 방향을 유지하나 크기가 줄어든다. 2) m](https://static.fdocuments.es/doc/165x107/5fc95f317bd5b570d23702b7/7-eee-eoe-chohdegree2013-1-general-e-1-oeee.jpg)