


Idiomas
Páginas
Jurídico


Lluís Companys, 51-53 - 08400 Granollers (Barcelona) SpainTel. +(34) 93 870 42 08 - Fax +(34) 93 870 98 11
E-mail: [email protected] - Website: www.cepex.com
Angle seat regulator valveVanne de régulation à siège inclinéVálvula de asiento inclinado reguladora
Características2Presión máxima: 16 kg/cm = PN 16
Par de cierre: 15 Nm
ATENCION: En caso de cerrar completamente la válvula, no superar el par de apriete indicado con el fin de no deformar las juntas.
Characteristics2Pressure rating: 16 kg/cm = NP 16
Closing torque: 15 Nm
WARNING: In case the valve is completely closed, do not surpass indicated closing torque in order to prevent O-rings to become deformed.
Caractéristiques2Pression maximale: 16 kg/cm = PN 16
Couple de fermeture: 15 Nm
ATTENTION : en cas de fermeture complète de la vanne, ne pas dépasser le couple de fermeture afin de ne pas déformer les joints.
Description / Description / Descripción Material / Matière / Material
1. Plug / Bouchon / Tapón PP2. Screw / Vis / Tornillo Inox.3. Handwheel / Volant / Volante ABS4. Bonnetnut / Ecrou / Tuerca PVC5. Bonnet / Presse de retenue / Prensa retén PVC6. Sealing rings / Joints de retenue / Juntas retén PE7. Sealing stop / Butée de retenue / Tope retén PVC8. Conical seat / Siège conique / Asiento cónico PVC9. Sealing gasket / Joint de fermeture / Junta cierre PE10. Safety pin / Goujon de sûreté / Pasador seguro PVC11. Stem / Axe / Eje PVC12. Body / Corps / Cuerpo PVC13. End connector / Manchon / Manguito PVC14. Union nut / Ecrou / Tuerca PVC15. O-ring / Joint torique / Junta tórica EPDM
Components / Composants / Componentes
End connections
Always position the valve with the arrow pointing in the direction of flow.There are several options for valve mounting on the line:(12.1) Three-piece(12.2) Male threaded(12.3) Female solvent socket(12.4) Male solvent socketIn the case of solvent socket unions, we recommend CEPEX adhesive.
Assembly instructions
• Mount the two sealing rings (6) on the stem (11).• Insert the sealing stop (7) and mount the conical
seat (6), then secure by means of the safety pin (10).
• Screw the bonnet (5) onto the stem (11) until half the tapered area is visible.
• Mount the unit on the body (12), securing it with the nut (4).
• Insert the handwheel (3) in its housing in the stem (11) and secure with the screw (2).
• Insert the plug (1).
Raccordement au système
Orienter la vanne en tenant compte du sens du flux indiqué par la flèche.La vanne permet différents types de montage sur la ligne(12.1) Système de raccordement trois pièces(12.2) Raccord mâle fileté(12.3) Raccord femelle à coller(12,4) Raccord mâle à collerPour les raccords à coller, nous conseillons d'utiliser de la colle CEPEX.
Instructions de montage
• Monter les deux joints de retenue (6) sur l'axe (11)• Introduire la butée de retenue (7) et monter le
siège conique (8); fixer au moyen du goujon de sûreté (10).
• Visser la presse de retenue (5) sur l'axe (11) jusqu'à ce que la moitié de la zone graduée soit visible.
• Monter l'ensemble dans le corps (12) et le fixer à l'aide de l'écrou (4).
• Introduire le volant (3) dans le logement prévu sur l'axe (11) et le fixer à l'aide de la vis (2).
• En dernier lieu, mettre le bouchon (1) en place.
Conexiones al sistema
Orientar la válvula teniendo en cuenta la flecha que indica el sentido del flujo.La válvula ofrece varios sistemas de montaje a la línea:(12.1) Por medio de unión tres piezas(12.2) Unión rosca macho(12.3) Unión para encolar hembra(12.4) Unión para encolar machoEn el caso de las uniones para encolar, recomendamos el uso de la cola CEPEX.
Instrucciones de montaje
• Montar las dos juntas reten (6) en el eje (11).• Introducir el tope reten (7) y montar el asiento
cónico (8), fijar por medio del clip seguro (10).• Roscar la prensa reten (5) en el eje (11) hasta que
sea visible la mitad de la zona graduada.• Montar el conjunto en el cuerpo (12) fijándolo por
medio de la tuerca (4).• Introducir el volante (3) en su alojamiento del eje
(11) y fijar por medio del tornillo (2).• Finalmente colocar el tapón (1).
Charts / Graphiques / Gráficas
(as a function of flow rate)(en fonction du débit)
(en función del caudal)
(open valve)(vanne ouverte)(válvula abierta)
Performance / Performances / Rendimiento
N1 5
-
D
½"
1
0,001
0,01
0,1
1
10 100 1000
-
DN
15
"½
0 10
10
20
20
30
30
40
40
50
50
60
60
70
70
80
80
90
90
100
100
• WE RESERVE THE RIGHT TO CHANGE ALL OR PART OF THE FEATURES OF THE
ARTICLES OR CONTENTS OF THIS DOCUMENT, WITHOUT PRIOR NOTICE.
• NOUS NOUS RÉSERVONS LE DROIT DE MODIFIER TOTALEMENT OU EN PARTIE
LES CARACTERISTIQUES DE NOS ARTICLES OU LE CONTENU DE CE DOCUMENT
SANS PRÉ-AVIS.
• NOS RESERVAMOS EL DERECHO DE CAMBIAR TOTAL O PARCIALMENTE LAS
CARACTERISTICAS DE NUESTROS ARTICULOS O CONTENIDO DE ESTE DOCUMENTO
SIN PREVIO AVISO.
12.2 12.3 12.4
1
2
3
4
5
11
6
7
8
9
12.1
15
13
14
10
ENGLISH FRANCAIS ESPAÑOL
Pressure loss / Perte de charge / Pérdida de carga
Rel
ativ
e flo
w c
oeffi
cien
t (%
)C
oeffi
cien
t de
flux
rela
tif (
%)
Coe
ficie
nte
de fl
ujo
rela
tivo
(%)
Opening / Ouverture / Apertura - (%)
Pre
ssur
e lo
ss (
bar)
Per
te d
e ch
arge
(ba
rs)
Pér
dida
de
carg
a (b
ar)
Flow rate / Débit / Caudal - (l/min)
ED
ICIÓ
N:
200
- D
. L. B
. -
CO
PY
RIG
HT
M
AR
ZO
115
716
© C
EP
EX
HO
LDIN
G, S
.A. -
ALL
RIG
HT
S R
ES
ER
VE
D
®
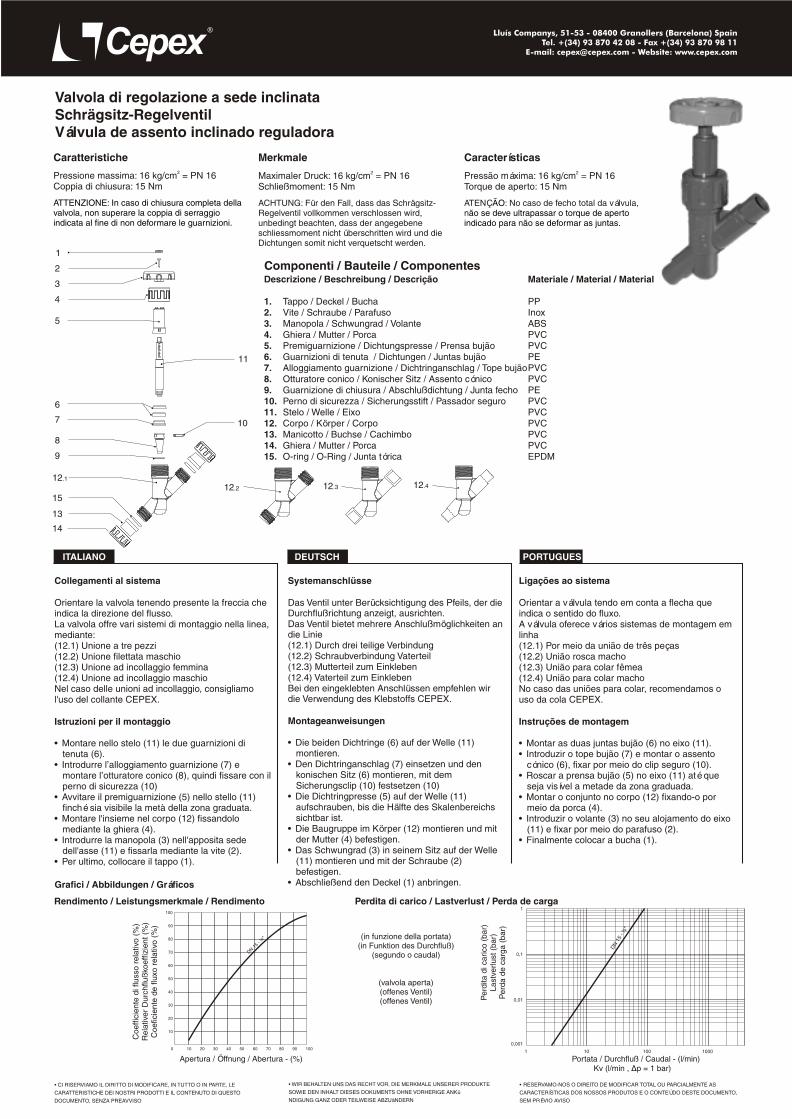
Valvola di regolazione a sede inclinataSchrägsitz-RegelventilVálvula de assento inclinado reguladora
Características2Pressão máxima: 16 kg/cm = PN 16
Torque de aperto: 15 Nm
ATENÇ : No caso de fecho total da válvula, n
n
ÃOão se deve ultrapassar o torque de aperto
indicado para ão se deformar as juntas.
Caratteristiche2Pressione massima: 16 kg/cm = PN 16
Coppia di chiusura: 15 Nm
ATTENZIONE: In caso di chiusura completa della valvola, non superare la coppia di serraggio indicata al fine di non deformare le guarnizioni.
Merkmale2Maximaler Druck: 16 kg/cm = PN 16
Schließmoment: 15 Nm
ACHTUNG: Für den Fall, dass das Schrägsitz-Regelventil vollkommen verschlossen wird, unbedingt beachten, dass der angegebene schliessmoment nicht überschritten wird und die Dichtungen somit nicht verquetscht werden.
Descrizione / Beschreibung / Descrição Materiale / Material / Material
1. Tappo / Deckel / Bucha PP2. Vite / Schraube / Parafuso Inox3. Manopola / Schwungrad / Volante ABS4. Ghiera / Mutter / Porca PVC 5. Premiguarnizione / Dichtungspresse / Prensa bujão PVC6. Guarnizioni di tenuta / Dichtungen / Juntas bujão PE7. Alloggiamento guarnizione / Dichtringanschlag / Tope bujãoPVC8. Otturatore conico / Konischer Sitz / Assento cónico PVC9. Guarnizione di chiusura / Abschlußdichtung / Junta fecho PE10. Perno di sicurezza / Sicherungsstift / Passador seguro PVC11. Stelo / Welle / Eixo PVC12. Corpo / Körper / Corpo PVC13. Manicotto / Buchse / Cachimbo PVC14. Ghiera / Mutter / Porca PVC15. O-ring / O-Ring / Junta tórica EPDM
Componenti / Bauteile / Componentes
Collegamenti al sistema
Orientare la valvola tenendo presente la freccia che indica la direzione del flusso.La valvola offre vari sistemi di montaggio nella linea, mediante:(12.1) Unione a tre pezzi(12.2) Unione filettata maschio(12.3) Unione ad incollaggio femmina(12.4) Unione ad incollaggio maschioNel caso delle unioni ad incollaggio, consigliamo l'uso del collante CEPEX.
Istruzioni per il montaggio
• Montare nello stelo (11) le due guarnizioni di tenuta (6).
• Introdurre l’alloggiamento guarnizione (7) e montare l’otturatore conico (8), quindi fissare con il perno di sicurezza (10)
• Avvitare il premiguarnizione (5) nello stello (11) finché sia visibile la metà della zona graduata.
• Montare l'insieme nel corpo (12) fissandolo mediante la ghiera (4).
• Introdurre la manopola (3) nell'apposita sede dell'asse (11) e fissarla mediante la vite (2).
• Per ultimo, collocare il tappo (1).
Systemanschlüsse
Das Ventil unter Berücksichtigung des Pfeils, der die Durchflußrichtung anzeigt, ausrichten.Das Ventil bietet mehrere Anschlußmöglichkeiten an die Linie(12.1) Durch drei teilige Verbindung(12.2) Schraubverbindung Vaterteil(12.3) Mutterteil zum Einkleben(12.4) Vaterteil zum EinklebenBei den eingeklebten Anschlüssen empfehlen wir die Verwendung des Klebstoffs CEPEX.
Montageanweisungen
• Die beiden Dichtringe (6) auf der Welle (11) montieren.
• Den Dichtringanschlag (7) einsetzen und den konischen Sitz (6) montieren, mit dem Sicherungsclip (10) festsetzen (10)
• Die Dichtringpresse (5) auf der Welle (11) aufschrauben, bis die Hälfte des Skalenbereichs sichtbar ist.
• Die Baugruppe im Körper (12) montieren und mit der Mutter (4) befestigen.
• Das Schwungrad (3) in seinem Sitz auf der Welle (11) montieren und mit der Schraube (2) befestigen.
• Abschließend den Deckel (1) anbringen.
Ligações ao sistema
Orientar a válvula tendo em conta a flecha que indica o sentido do fluxo.A válvula oferece vários sistemas de montagem em linha(12.1) Por meio da união de três peças(12.2) União rosca macho(12.3) União para colar fêmea(12.4) União para colar machoNo caso das uniões para colar, recomendamos o uso da cola CEPEX.
Instruções de montagem
• Montar as duas juntas bujão (6) no eixo (11).• Introduzir o tope bujão (7) e montar o assento
cónico (6), fixar por meio do clip seguro (10).• Roscar a prensa bujão (5) no eixo (11) até que
seja visível a metade da zona graduada.• Montar o conjunto no corpo (12) fixando-o por
meio da porca (4).• Introduzir o volante (3) no seu alojamento do eixo
(11) e fixar por meio do parafuso (2).• Finalmente colocar a bucha (1).
Grafici / Abbildungen / Gráficos
(in funzione della portata)(in Funktion des Durchfluß)
(segundo o caudal)
(valvola aperta)(offenes Ventil)(offenes Ventil)
Rendimento / Leistungsmerkmale / Rendimento
N1 5
-
D
½"
1
0,001
0,01
0,1
1
10 100 1000
-
DN
15
"½
0 10
10
20
20
30
30
40
40
50
50
60
60
70
70
80
80
90
90
100
100
• CI RISERVIAMO IL DIRITTO DI MODIFICARE, IN TUTTO O IN PARTE, LE
CARATTERISTICHE DEI NOSTRI PRODOTTI E IL CONTENUTO DI QUESTO
DOCUMENTO, SENZA PREAVVISO
• WIR BEHALTEN UNS DAS RECHT VOR, DIE MERKMALE UNSERER PRODUKTE
SOWIE DEN INHALT DIESES DOKUMENTS OHNE VORHERIGE ANKü
NDIGUNG GANZ ODER TEILWEISE ABZUäNDERN
• RESERVAMO-NOS O DIREITO DE MODIFICAR TOTAL OU PARCIALMENTE AS
CARACTERÍSTICAS DOS NOSSOS PRODUTOS E O CONTEÚDO DESTE DOCUMENTO,
SEM PRÉVIO AVISO
12.2 12.3 12.4
1
2
3
4
5
11
6
7
8
9
12.1
15
13
14
10
ITALIANO DEUTSCH PORTUGUES
Perdita di carico / Lastverlust / Perda de carga
Coe
ffici
ente
di f
luss
o re
lativ
o (%
)R
elat
iver
Dur
chflu
ßko
effiz
ient
(%
)C
oefic
ient
e de
flux
o re
lativ
o (%
)
Apertura / Öffnung / Abertura - (%)
Per
dita
di c
aric
o (b
ar)
Last
verlu
st (
bar)
Per
da d
e ca
rga
(bar
)
Portata / Durchfluß / Caudal - (l/min)
® Lluís Companys, 51-53 - 08400 Granollers (Barcelona) SpainTel. +(34) 93 870 42 08 - Fax +(34) 93 870 98 11
E-mail: [email protected] - Website: www.cepex.com
Top Related