Cómo conservar los alimentos y no morir en el intento. · Gure helburu nagusia janaria...
111
Cómo conservar los alimentos y no morir en el intento. Euskara An IAM Project made by: Maitane Alonso Monasterio Marta Cámara Castresana
Transcript of Cómo conservar los alimentos y no morir en el intento. · Gure helburu nagusia janaria...
Cómo conservar los alimentos
y no morir en el intento.
Euskara
An IAM Project made by:
Maitane Alonso Monasterio
Marta Cámara Castresana
2
Esker onak eman nahi dizkiegu honako hauei, haien
ezinbesteko laguntzagatik: Harakintza S.COOP, Kilse S.L,
Ameztoi Anaiak eta Luis Thate.
3
Aurkibidea
- Laburpena
- Sarrera
➢ Metodo fisikoak
➢ Metodo kimikoak
➢ Arazoa eta proiektuaren zergatia
- Helburuak
- Metodologia
I. Etapa: Diseinu teknologikoa
➢ Ikerketa
➢ Materialak eta aurrekontua
➢ Diseinua eta eraikuntza
➢ Erabiltzeko modua
II. Etapa: Ikerketa zientifikoa
➢ Ikerketa
➢ Kontaktu fasea
➢ Produktuaren prestakuntza

4
➢ Produktuaren ontziratzea
➢ Ikasketa eta barneratze fasea
➢ Kontzientziazio bideoa
➢ Esperimentua
- Emaitzak
- Ondorioa
- Bibliografia
5
Laburpena
Gure proiektuaren sintesi bat eransten dugu laburpen gisa. Izan ere, bere
ulermena errazten du.
Sarrera
Gizakia betidanik kezkatu da bere elikaduraz. Urritasun garaian janaria
kontserbatzeko metodoak garatzen hasi zen. Gairik ikasienetariko bat izan da
denboran zehar, zeinari buruz ikertzaileak eta enpresak etengabe ari diren
ikerketak egiten.
Jakien kontserbazioa produktuaren jatorrizko ezaugarri eta propietateak
aldatzen dituzten agenteen eragina inhibitzean datzan prozesua da. Nahiz eta
agente hauek produktuarekin zerikusirik izan ez dezaketen, mikroorganismoak
esaterako; produktuaren parte diren eta alda dezaketen entzimak ere aurki
ditzakegu. Teknika hauen helburua da haien balio elikagarria aldatu gabe
elikagai iraunkorragoak lortzea.
Kontserbatzeko prozedurak aldatzen eta hobetzen joan dira denbora igaro
ahala, eta gaur egun era askotakoak dira, zentzu guztietan. Bi talde orokorretan
sailka daitezke: metodo fisikoak eta kimikoak.
Metodo fisikoak
Metodo fisikoak bi talde nagusitan sailka daitezke. Lehenengoak
mikroorganismoen hazkuntza inhibitzen du, bere garapenerako desegokiak
diren baldintzak sortuz. Metodo hauen adibide dira tenperatura baxuak
(hozketa, izozketa eta ultra izozketa), eta lehorketa (lehortzea, kontzentratuak
6
eta liofilizazioa). Gainera, aipagarria da hutsean ontziratzea, atmosfera
babeslean ontziratzea eta tratamendu berri batzuetan ontziratzea bezalako
kontserbatzeko teknika fisikoen garrantzia.
Bigarren taldearen zeregina mikroorganismoak suntsitzea da. Prozedura
garrantzitsuenak tratamendu termikoak, tenperatura altuak (pasteurizazioa, ur
irakinarekin egosketa eta esterilizazioa) eta erradiazio ionizatzaileak erabiltzen
dituzten tratamenduak dira. Aipagarria da duela gutxi sortu den teknika berri
bat: mikroorganismoak suntsitzeko presio altuan egiten den pasteurizazioa.
Metodo kimikoak
Metodo kimikoak produktua kimikoki aldarazten duten substantziak gehitzen
dituztenak dira. Gainera, propietateak aldatzen dizkiete, kontsumitzaileentzat
erakargarriagoak izan daitezen.
Bi talde garrantzitsu aurki ditzakegu. Lehenengoak produktuaren propietate
organoleptikoak aldatzen ditu. Talde honen barruan koka ditzakegu gatzitzea,
ontzea, hartzidura, azukrea gehitzea, keztaketa, marinatzea eta eskabetxatzea
bezalako tratamenduak. Kontserbagarri batzuk ere talde honetan sar ditzakegu.
Bigarren taldearen barnean, hau da, produktuaren propietate organoleptikoak
ezinbestez aldatzen ez dituenen artean, kontserbagarri eta elikagai-gehigarri
batzuk aurki ditzakegu.
Arazoa eta proiektuaren zergatia
Azken talde honek kezka handi bat sorrarazten digu gaur egun. Duela mende
bat arte, jaten zenaren zati handi bat prozesatze-teknika errazak zituzten
elikagaiak ziren, baina momentu batera heldu gara non ekonomia osasuna
7
baino garrantzitsuagoa bihurtu den. Proiektu hau gure elikadurari buruzko
larritasun batetik sortu da. Izan ere, jaten duguna gara.
Munduan ekoizten diren elikagaien %30a baino gehiago kontserbatzeko
arazoen erruz galtzen da. Honek ez dakartza soilik kontserbatzeko teknika txar
batengatik sor daitezkeen osasun arazoak, baita ekoitzitako elikagaien zati
handi bat bota behar izatea ere.
Urte bakoitzean milaka pertsona hil egiten dira gaizki kontserbaturiko edo
infektaturiko elikagaiak kontsumitzeagatik. Nazio Batuen Erakundetik adierazi
dute kontserbatuta ez dauden elikagaiak mundu garaikidean dagoen arazorik
larrienetako bat direla
Heriotza hauei guztiei gosearen erruz hiltzen direnak gehitzen badizkiegu,
mundu mailako arazo baten aurrean gaude. Eraginkorra eta iraunkorra den,
baina aldi berean kaltegarria ez den kontserbazio teknika batekin, arazo biak
saihestu genitzake.
Alde batetik, munduko ekoizpenetik galtzen den %30a, egunero gosez bizi
diren pertsonak elikatzeko erabili daiteke. Horrela, munduko gosetearen zati bat
desagerraraziko genuke. Bestetik, kontserbazio txar batekin erlazionaturiko
arazoak eta aldi berean haiek dakartzaten gaixotasunak kanporatuko genituzke.
Jakinda mundu mailako arazo hau guztion esku dagoela, etxean elikagaiak
kontserbatzeko lan egitea erabaki dugu, etxe guztietan hau egingo balitz
arazoaren konponbidea aurkituko genukeelako.
Mundu garaikide honetan, kontserbazio teknika txarrek dakartzaten arazoak
oso zabalduta daude. Gaur egungo kontserbazio metodoek ezin diote elikagai
naturalez gero eta gehiago arduratzen den bezeroaren eskaerari erantzun.
8
Kontserbazio teknika eza edo kontserbazio teknika txar bat hainbat
gaixotasunen eta heriotzaren eragile dira. Gaur egun, jendeak erosketak
egitean ez du erabilitako kontserbazio metodoa hautematen.
Gero eta jende gehiagok erreparatzen dion arren ontziari, normalean ez dute
erabilitako teknika kontuan hartzen eta hortaz, ez dakite produktu horrek zer
iraupen duen. Honek produktuaren bizitza erabilgarriaren kalkulu okerra eragin
dezake eta hortaz epez kanpo jatea.
Epez kanpoko produktu bat janez gero, denborarekin produktuan agertu
zitezkeen mikroorganismoengatik gaixotu gaitezke. Herrialde garatuetan
gaixotasun honek ez luke ondorio larriegirik izango, kasu larriren bat ez bada,
baina herrialde ez garatuetan hilgarria izan liteke. Gainera, askotan garrantzia
kentzen zaie kontserbazio metodoei, euren inguruan informazio gutxi
dagoelako.
Pertsona asko kontserbazio teknikak alde batera uzten hasi dira. Naturalagoa
den zerbait bilatu nahi dute, baina hori oso kaltegarria izan liteke. Kontserbazio
metodo ezak produktuaren hondatze azkarra dakar. Gaur egungo gizartea ez
dago prest produzitzen duen guztia berehala kontsumitzeko, baina prest dago
kontserbazio teknikak baztertzeko.
Teknika hauek gabe, janari asko baztertuko genuke. Jendea gosez hiltzen den
mundu honetan ezin dugu egoera hori onartu. Gainera, sortuko liratekeen
mikroorganismoek eragindako heriotza eta gaixotasun kopurua handituko
litzateke.
9
Helburuak
Gure helburu nagusia janaria kontserbatzeko metodo iraunkor bat aurkitzea da,
kaltegarria ez dena. Horretarako, elikagai sektoreak irrikatzen duen iraungitze-
data lortzen saiatuko gara, kalte egin diezaguketen produktu kimikoak erabili
gabe.
Helburua hau izanda, antzinatik elikagaiak kontserbatzeko erabili diren metodo
fisikoak eta kimikoak aztertu ditugu. Gainera, albo-kalte barik iraunkortasuna
bilatuko duen proposamen teknologiko bat jaurtiko dugu.
Gure proiektuaren atal zientifikoari dagokionez, hainbat kontserbazio metodo
ikertu ditugu. Konkretuki, hutsean ontziratzea eta atmosfera babeslean
ontziratzea, giroko atmosfera duen erretilu zigilatu batekin konparatuko ditugu.
Kontserbazio teknika fisiko hauetan kontserbagarriak dituzten eta
kontserbagarriak ez dauzkaten produktuak sartu ditugu.
Ikerketa honekin, zenbait kontserbazio metodoren abantailak eta desabantailak
ezagutuko ditugu, baita denbora luzean duten eragina ere. Modu honetan,
kaltegarria izan gabe kontserbazio metodorik eraginkorrena zein den aurkitzen
saiatuko gara.
Gainera, proiektuaren atal teknologikorako guk sortutako eta diseinatutako
diseinu teknologikoa jaurti nahi dugu, zeinarekin osasuntsua eta iraunkorra den
beste aukera bat proposatu nahi dugun, ohiko kontserbazio-metodoak hobetu
nahian.
Modu honetan, gure diseinuaren erabilpenarekin, kontserbazio txar batengatik
etxeetan sortutako arazoak baztertuko eta produktuen biziraupena luzatuko
dugu, geroago kontsumitu ahal izateko eta ez baztertzeko.
10
Bestalde, jendea mundu mailako arazo honetaz konturatzea nahi dugu.
Horregatik, zenbait kontserbazio-metodorekin ontziratutako produktuen laginak
utzi ditugu giroko tenperaturan, eta hainbat argazki lotuz bideo bat sortuko
dugu. Bideo honen bitartez gizartea ohartarazi nahi dugu hotzaren katea
apurtzeak eta kontserbazio-metodoak gaizki erabiltzeak dakartzaten arazoez.
Gure helburu nagusia haien berezko propietateak eta ezaugarriak aldatu gabe
elikagaien biziraupena luzatzea eta gizartea arazoaz konturatzea da, guztion
artean arazo honi konponbidea eman diezaiokegulako.
Horretarako, hainbat kontserbazio teknika konparatuko ditugu. Haien artean
hutsean ontziratzea, atmosfera babeslean ontziratzea, giroko atmosferarekin
erretilu zigilatuan ontziratzea, eta gure diseinu teknologikoarekin ontziratzea
daude.
Honenbestez, gure helburua da haragikietan kontserbazio-metodorik
eraginkorrena zein den aurkitzea, kontserbagarrien erabilpenaren eragina
aztertzea eta metodo tradizionalak hobetzen saiatuko den aukera bat lortzen
saiatzea.
Metodologia
Proiektu hau aurrera eramateko beharrezkoak izan diren faseak modu honetan
zatitu ditugu:
Lehenengo fasea: diseinu teknologikoa
Lehenengo etapa honetan diseinu teknologiko bat prestatu eta geroago eraiki
dugu. Diseinu honen bidez, elikagai industriak irrikatzen duten iraungitze-data
lortzen saiatuko gara. produktuaren propietateak aldatu barik. Gure asmoa
elikadura osasuntsuagoa lortzea da, iraungitze dataren erruz hainbeste
produktu xahutu gabe.

11
1.1. Ikerketa
Ozonoa hiru atomo oxigenoz osatutako konposatua da, zeinaren funtzio
ezagunena eguzkiaren erradiazio ultramoreetatik babestea da; baina,
oxidatzaile eta desinfektatzaile bikaina ere bada.
Gas urdin-argi eta aldakorra da, giroko tenperaturan usain mina daukana.
Ekaitz elektrikoetan antzeman dezakegu, baita ekipamendu elektrikoaren hurbil
ere, Van Marun filosofo herbeheretarrak 1785.urtean esan zuenaren arabera.
-112ºC–ko tenperaturara heltzean likido urdin bizi batean kondentsatzen da.
Presio eta tenperatura baldintza normaletan, ozonoa oxigenoa baino 13 aldiz
disolbagarriagoa da, baina airean oxigeno gehiago dagoenez, uretan ere
kontzentrazio handiagoan agertzen da.
Ozonoa lurrazaletik 50 kilometrora kokatuta dago eta geruza bat sortzen du.
Geruza honen zeregina erradiazio ultramorea atmosferan sar dadin ekiditea da.
Gas ezegonkor bat da, oso lurrunkorra eta oxigeno normalean (O2) eta oxigeno
sortuberrian deskonposa daiteke. Sortu berria den oxigenoa oxidatzaile sendoa
da, eta horregatik da desinfektatzaile ona.
1. Taulan ozonoaren zenbait propietate ikus ditzakegu.
1. Taula: Ozonoaren propietateak
Ozonoaren propietateak
Izen kimikoa Ozonoa
Masa molekular erlatiboa 48g/L
Bolumen molarra 22,4m3
PTN/K mol
Formula enpirikoa O3
CAS erregistro zenbakia 10028-15-6
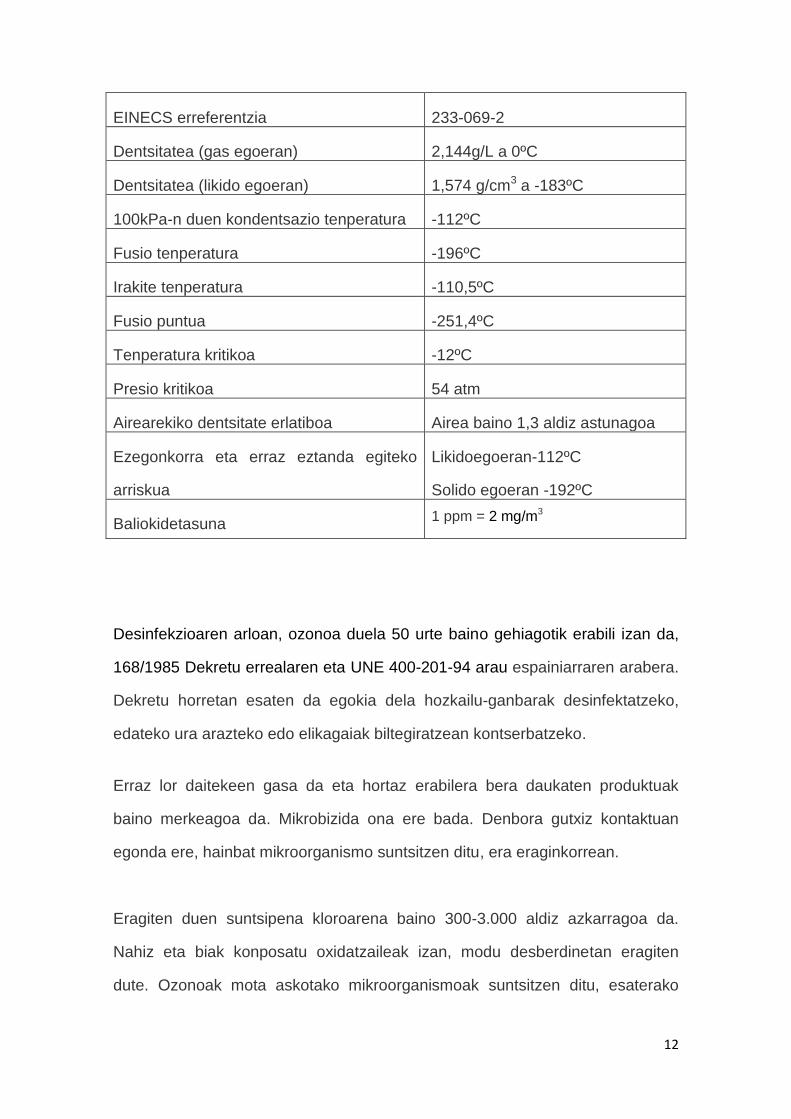
12
EINECS erreferentzia 233-069-2
Dentsitatea (gas egoeran) 2,144g/L a 0ºC
Dentsitatea (likido egoeran) 1,574 g/cm3 a -183ºC
100kPa-n duen kondentsazio tenperatura -112ºC
Fusio tenperatura -196ºC
Irakite tenperatura -110,5ºC
Fusio puntua -251,4ºC
Tenperatura kritikoa -12ºC
Presio kritikoa 54 atm
Airearekiko dentsitate erlatiboa Airea baino 1,3 aldiz astunagoa
Ezegonkorra eta erraz eztanda egiteko
arriskua
Likidoegoeran-112ºC
Solido egoeran -192ºC
Baliokidetasuna 1 ppm = 2 mg/m3
Desinfekzioaren arloan, ozonoa duela 50 urte baino gehiagotik erabili izan da,
168/1985 Dekretu errealaren eta UNE 400-201-94 arau espainiarraren arabera.
Dekretu horretan esaten da egokia dela hozkailu-ganbarak desinfektatzeko,
edateko ura arazteko edo elikagaiak biltegiratzean kontserbatzeko.
Erraz lor daitekeen gasa da eta hortaz erabilera bera daukaten produktuak
baino merkeagoa da. Mikrobizida ona ere bada. Denbora gutxiz kontaktuan
egonda ere, hainbat mikroorganismo suntsitzen ditu, era eraginkorrean.
Eragiten duen suntsipena kloroarena baino 300-3.000 aldiz azkarragoa da.
Nahiz eta biak konposatu oxidatzaileak izan, modu desberdinetan eragiten
dute. Ozonoak mota askotako mikroorganismoak suntsitzen ditu, esaterako
13
bakteriak, birusak, lizunak edo legamiak, elikagai arrunten azalean maiz
agertzen direnak.
Konposatuaren ezegonkortasunagatik, honelako erabileretan sorgailu batzuen
bitartez ekoiztu behar da erabiliko den tokian. Tresna hauen funtzionamendua
erraza da: oxigeno korrontea bi elektrodoen artetik pasatzen dute. Modu
honetan, boltaje jakin bat aplikatzean elektroien korronte bat pasatzen da
elektrodoen arteko espaziotik. Gasak hortik zirkulatzen du. Elektroiek oxigeno
molekulen disasoziazioa gauzatuko dute eta geroago ozonoa sortuko.
Ozonoaren jarduteko modurik nagusiena zelula paretaren oxidazio zuzena da.
Oxidazio honek paretaren apurketa dakar eta zelularen organuluak eta
osagaiak zelulatik kanpo aterako dira. Modu berean, ozonoa uretan
desintegratzean gertatzen den hidroxilo erradikalen produkzioak efektu berdina
lortzen du.
Ozonoak ez ditu bakarrik mikroorganismoen paretak kaltetzen, azido nukleikoak
(ADN eta ARN) ere kaltetzen ditu. Horrela, karbonoaren eta nitrogenoaren
arteko loturak apurtuko dira eta horrek despolimerizazioa dakar.
Hortaz, mikroorganismoak ez dira gai ozonoaren aurkako immunitatea
garatzeko beste produktu batzuekin gertatzen den bezala. Ozonoa eraginkorra
da bakteriak, birusak, nematodoak, onddoak, esporak, kisteak eta protozooak
erasotzeko.(Rice, 1984; Owens, 2000; Lezcano, 1999).
Beste alde batetik, kontzentrazio txikiagoa eta denbora gutxiago behar du beste
desinfektatzaile batzuekin konparatuz gero, euren artean kloroa, kloro dioxidoa
eta monokloraminak. Gainera, substantzia zitoplasmatikoak oxidatzen ditu
kloroak bakarrik zelularen bizi-zentroak erasotzen dituen bitartean. Horregatik,
14
kloroa ez da beti eraginkorra. Izan ere, mikroorganismo batzuk osatu
daitezke.(Bitton, 1994).
1.2 Materialak eta aurrekontua
Gure diseinu teknologikoa gauzatzeko 2. taulan aurkezten ditugun materialak
behar izan ditugu
2. Taula. Diseinu teknologikoaren aurrekontua
Materialak Prezioa Kantitatea Amaierako
prezioa
Ozono generadorea 54€ 1 54€
Kutxak 12€ 2 24€
Xafla zulatua airearen
fluxua kanalizatzeko
Birziklatua
(0€)
1 Birziklatua
(0€)
Haizegailua 13€ 1 13€
Material elektrikoa
(kableak, erregeletak …)
8€ - 8€
Etengailuak 1€ 2 2€
Abiadura erregulatzailea 3€ 1 3€
Energia iturriak (12V) 15€ 2 30€
Erremintak - - -
Amaierako prezioa - - 134€
1.3 Diseinua eta eraikuntza
Lehenengo eta behin gure proposamena diseinatu genuen. Ozonoarekin lan
egitea erabaki genuen, oso desinfektatzaile ona izan arren, erraz lortzen da eta
nahiko merkea da. Hartara, etxeetan erabili ahalko genuke.
Gure helburua korronte finko eta jarraitua sortzea zen, ontziratze eremua
desinfektatuta mantenduko zuena. Horrela, jakiak ozonoarekin trataturiko tokian
15
prozesatuko ziren. Tratamenduaren ostean, eremu horretan ontziratuko
genituen desinfekzioa mantentzeko asmoz.
Ozonoa bultzatzeko eta fluxu jarraitua sortzeko, haizegailu bat erabiltzea
erabaki genuen. Bi abiadura eman genizkion, tentsioa jaitsiz erabilera
desberdinetarako. Kutxak eta xafla zulatua erabiliz, ozonoarekin trataturiko aire
zirkuitu itxi bat sortu genuen. Modu honetan, giroa ahalik eta desinfektatuen
egongo zen eta hortaz bi kutxen erdian ontziratu genezake.
Tamaina txikikoak izan zitezen saiatu ginen eta atal arriskutsurik gabeak. Izan
ere, gure helburua etxeetan aplikatzea da, botatzen ditugun soberakinak gal ez
daitezen.
Horregatik, 12Vko korronte jarraitua erabili genuen. Manipulatuko dugun
eremua izango denez, garrantzitsua da bere segurtasuna bermatzea, etxeetan
erabiliko dugula kontuan hartuz. Gainera, erabiltzeko erraza izan dadin saiatu
gara, edonork erabiltzeko modua izan dezan.
Diseinatu eta gero, praktikara eramatea erabaki genuen, gure arrazonamendua
bideragarria zen ikusteko asmoz. Lehenengo
eta behin material guztiak lortu genituen.
Denbora luzea eman genuen, haietako batzuk
internetetik eskatu behar izan genituelako. Atal
guztiak lortu genituenean, ozono generadorea
frogatzea erabaki genuen. Ordu laurden batez
hozkailuan utzi genuen. Usaina asko hobetu
zen.
Haizegailuarekin konektatzea erabaki genuen,
bi atal garrantzitsuenak aldi berean frogatzeko.
Momentu horretan gure lehenengo arazoa aurkitu genuen: ozono generadoreak
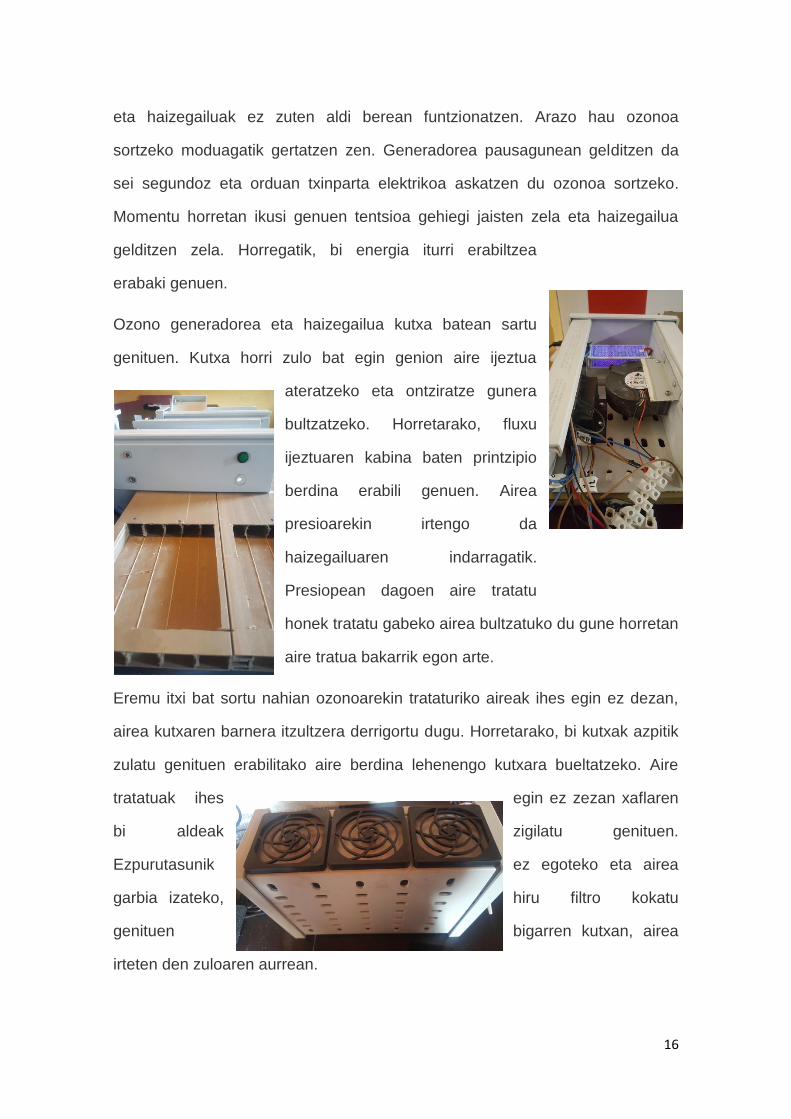
16
eta haizegailuak ez zuten aldi berean funtzionatzen. Arazo hau ozonoa
sortzeko moduagatik gertatzen zen. Generadorea pausagunean gelditzen da
sei segundoz eta orduan txinparta elektrikoa askatzen du ozonoa sortzeko.
Momentu horretan ikusi genuen tentsioa gehiegi jaisten zela eta haizegailua
gelditzen zela. Horregatik, bi energia iturri erabiltzea
erabaki genuen.
Ozono generadorea eta haizegailua kutxa batean sartu
genituen. Kutxa horri zulo bat egin genion aire ijeztua
ateratzeko eta ontziratze gunera
bultzatzeko. Horretarako, fluxu
ijeztuaren kabina baten printzipio
berdina erabili genuen. Airea
presioarekin irtengo da
haizegailuaren indarragatik.
Presiopean dagoen aire tratatu
honek tratatu gabeko airea bultzatuko du gune horretan
aire tratua bakarrik egon arte.
Eremu itxi bat sortu nahian ozonoarekin trataturiko aireak ihes egin ez dezan,
airea kutxaren barnera itzultzera derrigortu dugu. Horretarako, bi kutxak azpitik
zulatu genituen erabilitako aire berdina lehenengo kutxara bueltatzeko. Aire
tratatuak ihes egin ez zezan xaflaren
bi aldeak zigilatu genituen.
Ezpurutasunik ez egoteko eta airea
garbia izateko, hiru filtro kokatu
genituen bigarren kutxan, airea
irteten den zuloaren aurrean.

17
Bigarren kutxa hau ontziratzeko materiala gordetzeko izan liteke (adibidez
labanak). Modu honetan garbi eta infektatu gabe mantenduko genituzke.
Horrela, beste kontaminazio modu bat ekidingo genuke. Izan ere, elikagaiak
material infektatuarekin tratatzean, haiek ere infekta daitezke.
Kommutadore bat eta tentsio erreduzitzaile bat erabiliz (elektronika dendako
arduradunak esan bezala), haizegailuari bi abiadura emateko gai izan ginen.
Geldoena materiala esterilizatzeko erabil genezake, horretarako ez baitugu
hainbeste presio behar. Azkarrena ontziratzeko da. Horregatik, bi posizioko
etengailu bat jarri genuen, haizegailuari, posizioaren arabera, 6V edo 12V
iristeko. Lehenengo posizioan materiala esterilizatzeko erabil genezake eta
bigarrenean ontziratzeko.
Aurkitu genuen azken arazoa izan zen ijeztzea ez
zela guztiz perfektua. Izan ere, aldeetako batetik
aire gehiago botatzen baitzuen. Konpontzeko,
deflektore bat kokatu genuen, airea norabide
zuzenean bultza zezan. Azkenik, azkeneko
ukituak eman genizkion, izkinak zigilatuz eta bere
itxura hobetzeko.
I. eranskinean gure makinaren planoak eta argazkiak ikus ditzakezue.
1.4 Erabiltzeko modua
Lehen aipatu dugun bezala, erabiltzeko modu erraza duen makina da. Izan ere,
bere helburua edonork bere etxean erabiltzea da.
Lehenengo bi energia iturriak etxeko entxufeetara konektatu behar dira.
Garrantzitsua da entxufeak 220Vko korronte alternoa izatea. Gero, lehenengo
kutxan dagoen etengailu biribila sakatuko dugu. Modu honetan, ozono
generadorea piztuko da.

18
Ozonoa sortzen hasten denean, beste etengailua bere bi posizioetako batera
mugitzen dugu. Oso erraza da ozonoa noiz sortzen ari den jakitea. Izan ere,
argia, soinua eta usaina antzeman ditzakegu. Etengailua
lehenengo posiziora mugituz gero, materiala esterilizatzeko
moduan jarriko da. Bigarren posizioan jarriz gero,
ontziratzeko moduan egongo da. Bere posizioa nahi dugun
funtzioaren araberakoa izango da. Momentu horretan zirkuitu
itxi batean fluxu jarraitua izango dugu. Minutu bat
funtzionatzen uztea komeni da, ontziratze eremuan dagoen aire guztiak ozonoa
duela ziurtatzeko.
Denbora honetan, gure funtzioa desinfektatzea bada, materiala ontziratze
kaxan utzi dezakegu desinfektatzeko. Gure funtzioa ontziratzea bada, minutu
hori pasatzean ontziratzen has gaitezke. Horretarako, produktua eta erretilua
ontziratze eremuan kokatuko ditugu. Segundo batzuk pasatzen utziko ditugu
korrontea erretilutik pasatzeko. Azkenik, estalkia jarriko diogu erretiluari eta aire
tratatuarekin ontziraturiko erretilua daukagu.
Gure funtzio bakarra materiala desinfektatzea izango balitz, materiala dagokion
posizioan kokatu beharko genuke, materiala bigarren kutxan sartu eta denbora
tarte txiki batez funtzionatzen utziko genuke.
Makina itzaltzeko, etengailu biribila berriro sakatu behar da, ozono generadorea
itzaltzeko eta bi posizioko etengailua bere posizio originalera itzuli behar da.
Azkenik, makina desentxufatu egingo dugu.
Bigarren etapa: ikerketa zientifikoa
19
Gure proiektuaren bigarren etapa honetan ikerketa zientifiko bat egin dugu,
gaur egungo kontserbazio tekniken eraginkortasuna eta jasangarritasuna
frogatzeko.
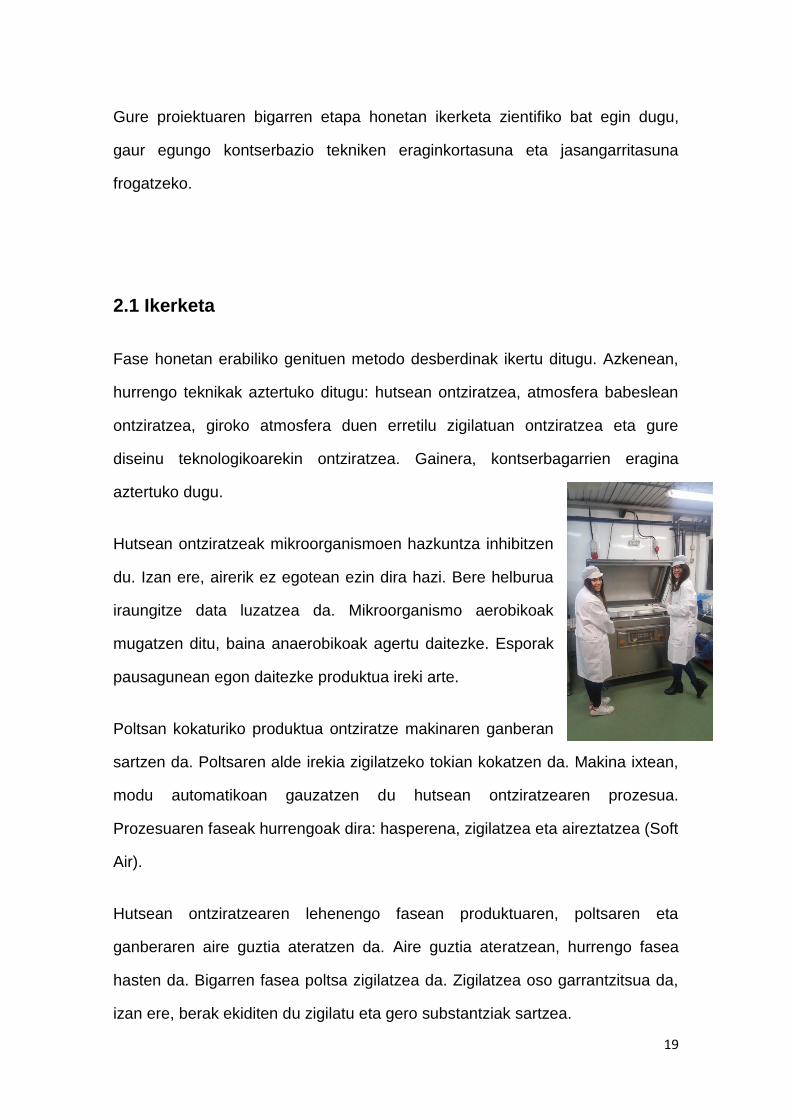
2.1 Ikerketa
Fase honetan erabiliko genituen metodo desberdinak ikertu ditugu. Azkenean,
hurrengo teknikak aztertuko ditugu: hutsean ontziratzea, atmosfera babeslean
ontziratzea, giroko atmosfera duen erretilu zigilatuan ontziratzea eta gure
diseinu teknologikoarekin ontziratzea. Gainera, kontserbagarrien eragina
aztertuko dugu.
Hutsean ontziratzeak mikroorganismoen hazkuntza inhibitzen
du. Izan ere, airerik ez egotean ezin dira hazi. Bere helburua
iraungitze data luzatzea da. Mikroorganismo aerobikoak
mugatzen ditu, baina anaerobikoak agertu daitezke. Esporak
pausagunean egon daitezke produktua ireki arte.
Poltsan kokaturiko produktua ontziratze makinaren ganberan
sartzen da. Poltsaren alde irekia zigilatzeko tokian kokatzen da. Makina ixtean,
modu automatikoan gauzatzen du hutsean ontziratzearen prozesua.
Prozesuaren faseak hurrengoak dira: hasperena, zigilatzea eta aireztatzea (Soft
Air).
Hutsean ontziratzearen lehenengo fasean produktuaren, poltsaren eta
ganberaren aire guztia ateratzen da. Aire guztia ateratzean, hurrengo fasea
hasten da. Bigarren fasea poltsa zigilatzea da. Zigilatzea oso garrantzitsua da,
izan ere, berak ekiditen du zigilatu eta gero substantziak sartzea.

20
Atmosfera babeslean ontziratzea erretiluko airea ateratzean eta gero nahi
dugun gasa edo gasen nahastea injektatzean datza. Gas hauek produktuaren
beharrei egokituta daude. Gehien erabiltzen diren gasak oxigenoa, karbono
dioxidoa, nitrogenoa edo euren arteko konbinaketak dira. Ontziratze mota
honekin produktuak bere propietateak mantentzen ditu eta kontserbagarriekin
itxura gorria mantentzen.
Kontserbagarririk gabe kolore marroia hartuko luke oxigeno faltagatik. Hori
horrela bada ere, kontserbagarririk gabe eta oxigenoa
injektatuz eragin berdina lor dezakegu. Prozesu hau
mioglobinak determinatzen du, burdinaren egoera
kontuan hartuz.
Produktu bat atmosfera babeslean ontziratzeko,
makina sofistikatuak behar dira ontziratze ganberako
airea ateratzeko eta gas desberdin batez edo nahaste
batez ordezkatzeko. Gainera, gero erretilua zigilatu
behar du, produktua bakarrik atmosfera babeslearekin
kontaktuan egoteko.
Haragi freskoa (adibidez txahal urrixa) atmosfera babeslean ontziratzeak arazo
bat dakar. Alde batetik, haragiaren usteltzea eragiten duten bakterioak
aerobikoak dira. Beraz, egokiena oxigeno gutxi duen atmosfera babeslea
izango litzateke. Beste alde batetik, haragiaren kasuan, garrantzitsua da
haragia saltzeko gorri mantentzea. Airearekin kontaktuan egotean, marroi
bilakatzen da.
Haragiaren kolorea mioglobina deritzon proteina batek definitzen du. Proteina
more bat da oxigenoarekin erreakzionatzean oximioglobina (gorria) eta
21
metamioglobina (marroia) sortzen dituena. Airean, oxigeno kontzentrazioak
metamioglobina sortzea errazten du eta hortaz haragia marroi bilakatzen da.
Oxigeno kontzentrazio altuagoekin, aukera gehiago daude oximioglobina
produzitzeko eta hortaz itxura hobea mantentzeko. Gas nahaste egokiarekin,
(normalean %60-%80 oxigenoduna), haragiak bere kolore gorria mantentzen
du. Arazoa da oxigeno honek guztiak bakteria aerobikoei mesede egiten diela.
Karbono dioxidoak euren garapena ekiditen du. Hortaz, nahastean oxigenoa
eta karbono dioxidoa elkartzen baditugu, soluzioa aurkitu dugu.
Giroko atmosferan eta erretilu zigilatuan ontziratzea ez da metodo komertzial
bat, baina saiatzea erabaki genuen, beste metodoak atmosfera aldatu gabe
gertatuko zenarekin konparatu nahi genituelako. Haragia erretilu batean kokatu
genuen eta zigilatu genuen. Modu honetan, ontziratzeko momentuan zeukan
atmosfera mantenduko zuen.
Gure diseinu teknologikoarekin ontziratzea gure hipotesia egia zela
baieztatzeko egin dugu. Teknika berri bat da, oraindik aplikatu ez dena ikertu
den arren.
Kontserbagarriak substantzia natural eta artifizialak dira, elikagaien
kontserbazioan erabiltzen direnak mikroorganismoen aurka. Kontserbagarriak
erabiliz, janariaren hondatzea ekidingo dugu, denbora jakin batean, baldintza
jakin batzuetan. Naturalak edo artifizialak izan daitezke.
Egiten duten kaltearen arabera sailka daitezke kontserbagarriak (ez dute
kalterik egiten, kalterik ez egitea ez da unibertsalki onartzen, toxikoak dira eta
ez dago ziurtasunik toxikoak diren edo ez kategoriak ditugu). Jaki bakar batean
hainbat erabiltzen dira. Izan ere, bakoitzak mikroorganismo mota bati erasotzen
dio eta produktu bat hondatzean hainbat mikroorganismo moten erruagatik izan
22
ohi da. Gaur egun 30 kontserbagarri baimendu daude, haietako asko
antioxidatzaileak. 14k efektu sekundarioak dituzte.
Mikroorganismoek ez diete kontserbagarriei erresistentzia garatzen
antibiotikoekin gertatzen ez den bezala. Haien funtzio nagusiak jakiak
kontserbatzea, fabrikazioa erraztea, itxura, testura edo zaporea hobetzea edo
osagai batzuen falta ezkutatzea. Adibidez frutazko jogurt batean marrubirik ez
jartzea edo saltxitxa batean haragi gutxiago jartzea.
Kontserbagarri gehienek ez dute kalterik egiten, baina batzuk arriskutsuak izan
daitezke. Beste batzuk onurak arriskuak baino handiagoak direlako erabiltzen
dira. Elikagai Segurtasuneko Europako Agentziak (EFSA) haietako batzuk
berriro aztertzen ari da ikerketa berrien ondorioz.
Guztiak kaltegarriak izan ez arren, haietako asko ez dira beharrezkoak
(adibidez gehigarriak eta koloratzaileak). Kontuan hartu behar dugu beti izango
direla produktuaren propietate naturalak aldatzen dituzten substantziak eta
hortaz saihestu behar ditugu.
2.2 Kontaktu fasea
Lehenengo eta behin, Kilse S.Lko tekniko batekin kontaktuan jarri ginen,
(enpresa horrek 30 urte daramatza makinekin lan egiten, haien artean
ontziratzeko makinak), sektorean espezializatua dena proiektu onen gidaria
izateko. Izan ere, inork ez du gai hau hobeto ezagutzen harekin egunero lan
egiten duenak baino.
Gero, sektorean lan egiten duten enpresekin kontaktuan jarri ginen eta
ontziratzeko tokia eskatu genien. Harakintza S.COOPek bere instalazioak utzi
zizkigun goiz oso batez ontziratzeko eta Ameztoi Anaiak enpresak bere
23
instalazioetatik bisita bat eskaini zigun. Gainera, Luis Thatek beste bisita bat
eskaini zigun bere saltxitxa fabrikatik.
2.3 Produktuaren prestakuntza
Gaur egun existitzen diren kontserbazio metodoak ikertu ostean, 2017ko
martxoaren 2an Zorrotzara abiatu ginen Kilse S.Lko teknikoarekin. Han,
Harakintza S.COOPeko instalazioak ezagutu genituen. Goiz osoan Kilse S.L ko
teknikariaren eta Harakintza S.COOPeko kalitate arduradunaren eta produkzio
arduradunaren gidaripean egon ginen.Euren eguneroko lana eta gaur egun
existitzen diren metodo desberdinak azaldu zizkiguten.
Gainera, gure produktuaren prestakuntzan aholkatu
ziguten.
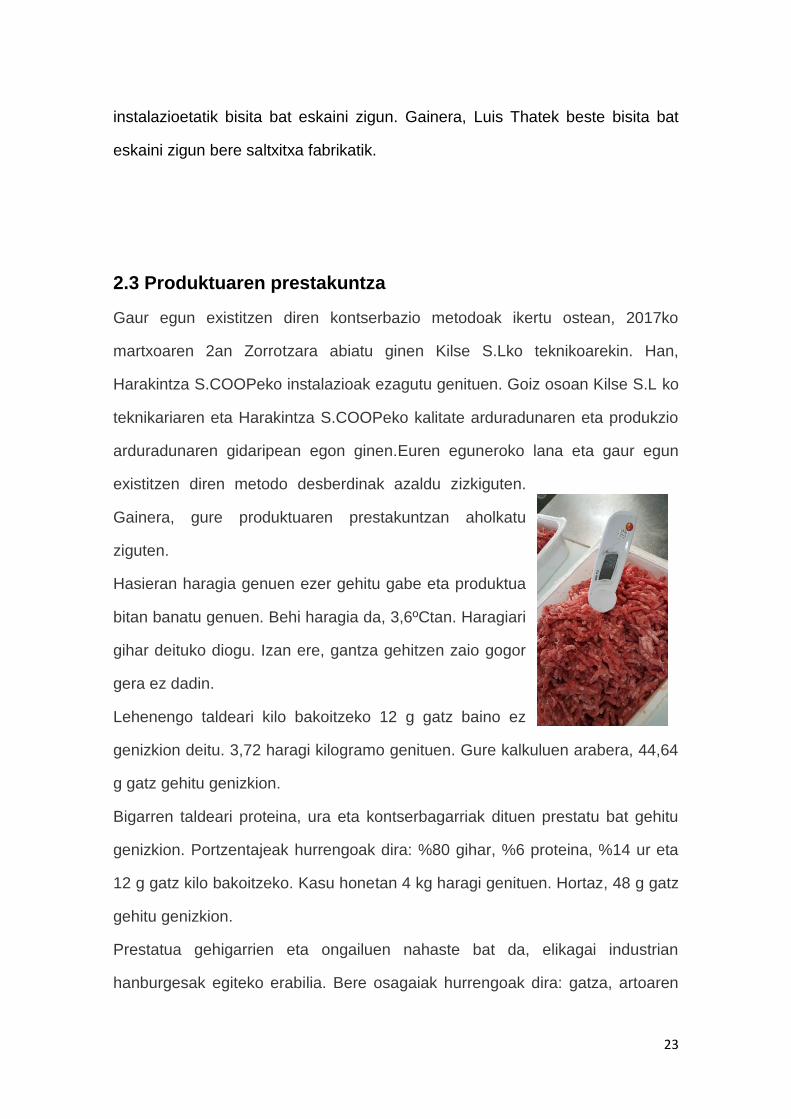
Hasieran haragia genuen ezer gehitu gabe eta produktua
bitan banatu genuen. Behi haragia da, 3,6ºCtan. Haragiari
gihar deituko diogu. Izan ere, gantza gehitzen zaio gogor
gera ez dadin.
Lehenengo taldeari kilo bakoitzeko 12 g gatz baino ez
genizkion deitu. 3,72 haragi kilogramo genituen. Gure kalkuluen arabera, 44,64
g gatz gehitu genizkion.
Bigarren taldeari proteina, ura eta kontserbagarriak dituen prestatu bat gehitu
genizkion. Portzentajeak hurrengoak dira: %80 gihar, %6 proteina, %14 ur eta
12 g gatz kilo bakoitzeko. Kasu honetan 4 kg haragi genituen. Hortaz, 48 g gatz
gehitu genizkion.
Prestatua gehigarrien eta ongailuen nahaste bat da, elikagai industrian
hanburgesak egiteko erabilia. Bere osagaiak hurrengoak dira: gatza, artoaren
24
almidoia, espeziak, sulfito sodikoa (E-221),zitrato sodikoa (E-331), askorbato
sodikoa (E-301),kotxinilla (E-120) eta maitodextrina koadyubante teknologikoa.
Gehitu genion urak egun batzuk pasatu behar zituen ganbera batean 4ºC baino
tenperatura txikiagoan. Ur honek osagaien disoluzioa errazten du eta
hanburgesa biguntzen du. Proteinaren zeregin nagusia uraren zati bat
birxurgatzea da bere funtzioa bete duenean. Horrela, hanburgesa trinkotu
egiten da. Guk soja pikortsua erabili genuen.
Osagai guztiak deskribatu eta gero, nola prestatu genuen azalduko dugu. Guk
burutu genituen prozesu guzti hauek. Lehenengo kontserbagarriak dituen
haragiaren prozesua deskribatuko dugu.
Lehenengo eta behin giharra genuen, 3,6ºCtan. Haragi hau pikatzaile batetik
pasatu genuen gure ikerketa hanburgesetan egin nahi genuelako. Gero,
prestatua pisatu genuen. Oso garrantzitsua da prestatua momentuan pisatzea.
Izan ere, arauak daude erabili daitekeen kantitatea
neurtzeko. Hurrengo pausua prestatua urarekin irabiagailu
baten bidez nahastea izan zen.
Hurrenik, haragiari proteina gehitu genion eta oratu genuen.
Gero, ura eta prestatua gehitu genizkion. Azkenik, guztia
elkarrekin oratu genuen. Garrantzitsua da esatea ez dela
gehiegi oratu behar, bestela haragia lokaztu daiteke. 4kg haragi
kontserbagarriekin lortu dugu 5ºCtara.
Kontserbagarririk ez zuen haragia prestatzea errazagoa izan zen. 44,64 g gatz
baino ez genizkion gehitu (3,72 haragi kilogramori) eta oratu genuen.
Gogoratu nahiko genuke azken talde hau ez dela saltzen gaur egun saltzen
denarekin ia guztia kontserbagarriekin eta gehigarriekin saltzen delako. Modu
honetan, iraungitze data luzatzeaz gain produktuaren kantitate gehiago lortzen
da prezio merkeagoan.
25
Bi haragiak prestatuta izan genituenean, makina bat erabili genuen
hanburgesak osatzeko. Kantitate handiak direnean, makina batzuek prozesua
automatikoki egiten dute.
Horretarako, produktuaren 100g pisatzen genituen eta makinatik pasatu eta
hanburgesa itxura eman ostean bi plastikoen artean jartzen genuen zegokion
erretiluen.
Mota bakoitzeko bost hanburgesa egin genituen eta sobratu zen haragiarekin
gehiago egin genituen dastamen froga egiteko.
2.4 Produktuaren ontziratzea
Haragi guztia lortu genuenean, ontziratzeari ekin genion. Lehenengo eta behin
hutsean ontziratzeko makina bat erabili genuen 10 hanburgesa ontziratzeko: 5
kontserbagarriekin eta 5 kontserbagarririk gabe.
Gero, kantitate berbera ontziratu genuen atmosfera babeslean. Gure gasen
nahastea hurrengoa izan zen: %70 oxigeno eta %30 karbono dioxido. Jarraian,
kantitate berdina ontziratu genuen giroko atmosfera duen erretilu zigilatuan.
Azkenik, gure diseinu teknologikoarekin ontziratu genuen lehen azaldu dugun
bezala. Hanburgesa guztiak izan genituenean, hozkailura eraman genituen.
Garraioa hotzean egin genuen hotzaren katea ez apurtzeko.
2.5 Ikasketa eta barneratze fasea
Hanburgesak utzi eta gero Zestoara joan ginen
(Gipuzkoa). Han, teknikoak eta Ameztoi Anaiak
lantegiko profesionalek elikagaien kontserbazioa
fabrika handietan nola gertatzen den azaldu ziguten.
Fabrika osoa bisitatzeko aukera izan genuen eta
elikagaiak nola ekoizten, ontziratzen eta
kontserbatzen diren ikusi genuen.
26
Modu honetan, elikagaien kontserbazioa beste ikuspuntu batetik ikusi genuen
eta ikasitako teoria guztia barneratu genuen.
Gainera, pasteurizazio instalazioak bisitatu ahal izan genituen enpresa honek
euren esnea Euskal Herriko abeltzainei erosi eta gero eurek pasteurizatzen eta
tratatzen dutelako. Euren arazketa instalazioak ere bisitatu genituen. Izan ere,
euren hondakin guztiak arazten dituzte isurbidera bota baino lehen.
Luis Thateren saltxitxa fabrika Zientzia Azoka baino lehen bisitatzeko aukera
izango dugu.
2.6 Kontzientziaziorako bideoa
Mota bakoitzeko hanburgesa bana banatzea erabaki genuen zortzi
hanburgesako talde bat sortuz. Lauk
kontserbagarriak zituzten eta lauk ez. Hurrengo
metodoetan ontziratuta zeuden: hutsean
ontziratua, atmosfera babeslean ontziratua,
erretilu zigilatuan ontziratua eta gure diseinu
teknologikoarekin ontziratua.
Kartelen bidez sailkatu eta gero hozkailutik atera
genituen eta laborategian utzi genituen 17,5ºCko
tenperaturan eta %50eko hezetasunean.
Honen helburua hotzaren katea apurtzeak dakartzan arriskuak erakustea da.
Gaur egungo metodoekin ditugun aurrerakuntzekin ere, tenperatura baxuen
menpe gaude jakiak kontserbatzeko.
Askotan jendea ez da
konturatzen jakiak hozkailutik
kanpo uzteak dakarren
arriskuaz eta gertatzen
denean, beste metodo batean
27
ontziratuta zegoenez inporta ez duela inporta diote.
Egia esateko, ezinbesteko neurria da eta ez betetzeak gaixotasunen eta
intoxikazioen kausa izan liteke. Horregatik, gizartea arrisku honetaz
kontzientziatzeko esperimentu bat egin dugu.
Lehen aipaturiko hanburgesak hilabete batez utzi genituen euren eboluzioa
ikusteko. Bideo batean bildu ditugu denboran zehar gertaturiko aldaketak. Izan
ere, modurik dinamiko eta ikusgarriena da jendeari azaltzeko.
Go-Pro baten bidez egunero hiru aldiz joaten ginen irudiak ateratzera. Egunero
ateratzen genituen argazkiak 8:00, 11:30 eta 15:00etan. Argazkiak puntu eta
angelu berdinetik ateratzeko erretiluen gainean posizio bat hautatu eta markatu
genuen.
Produktuaren erantzuna azkarra izan zen. Hotzaren katea apurtu bezain laster
nahiko azkar hondatu ziren. Lehenengo eta behin kontserbagarririk ez zituzten
hanburgesak kolore berdexka eta horixka hartu zuten. Bitartean,
kontserbagarriak zituztenek kolorea mantendu zuten.
Denbora igaro ahala lizuna agertzen hasi zen kontserbagarriak zituzten
hanburgesetan haragia belzten zen bitartean. Kontserbagarririk ez zutenek
kolorea errekuperatu bazuten ere, kontserbagarriak zituztenek itxura hobea
mantendu zuten.
Nabarmendu beharko genuke
kontserbagarririk ez duen eta hutsean
ontziratuta dagoen hanburgesak likido
hori bat askatzen zuela.
Kontserbagarriak zituenak, aldiz, bere kolorea mantendu zuen.
Erretilu zigilatuan zeudenak husten hasi ziren plastikoak hanburgesa ukitu
gabe. Atmosfera babeslean zeudenak, berriz, bakteria aerobikoen eraginez
puztu ziren.
28
Kontserbagarriak zituzten guztiek ur asko bota zuten denbora igaro ahala. Gure
diseinuan ontziratuta zegoena besteen erritmoa jarraitu zuen. Ez zen hutsean
ontziraturikoa bezain ondo egon, baina besteak baino hobeto egon zen.
Azkenean okerren zegoena atmosfera babeslekoa zen. Izan ere, ez zen
kolorea errekuperatzera ailegatu. Nabarmena izan zen erretilu zigilatuan
zegoena hura baino hobeto egotea.
Azkenean ondoen zegoena hutsean ontziraturikoa izan zen. Desberdintasun
nagusia kontserbagarriek markatu dute. Egia da denbora gehiago iraun dutela,
baina behin hondatzen hasi eta ezin zen prozesua geldiarazi. Besteetan,
hobekuntza bat ere ikusi genuen denbora aurrera zihoanean. Lizuna bakarrik
kontserbagarriak zituztenetan agertu zen.
Zientzia Azokan aurkeztuko dugun bideoan bi hilabetetako eboluzioa ikusi
ahalko da argazkiak ateratzen jarraituko dugulako. Bideo honetan lehenengo
hilabetearen emaitzak ikus ditzakegu.
2.7 Esperimentua
Benetako analisiak mota bakoitzeko lau hanburgesekin egin genituen,
hozkailuan 4ºCko tenperaturan mantendu genituenak. Bi talde nagusitan
sailkatu genituen analisiak egun desberdinetan egingo genituelako
kontserbagarriak zituzten edo ez kontutan hartuta.
Lehenengo eta behin dastamen froga bat egin genuen kontserbagarrien
erabilerak ezartzen duen desberdintasuna ikusteko. Frijitzean, kontserbagarriak
zituztenak kolore arrosa hartzen zuten kontserbagarririk ez zituztenak grisa
hartzen zuten bitartean.
Froga hamar pertsonekin egin genuen. Guztiek esan zuten ez zeukatela
zerikusirik bi taldeetako zaporeek. Kontserbagarririk ez zutenek zapore eta
testura hobeak zituzten. Guztiek esan zuten posible izango balitz
kontserbagarririk gabe erosiko lituzketela hanburgesak.

29
Gero, benetako analisiari ekin genion. Analisien hasiera bateko maiztasuna
zazpi egunekoa da kontserbagarriak dituzten hanburgesentzat eta bost
egunekoa kontserbagarririk ez zutenentzat. Denbora aurrera joan ahala,
maiztasuna eboluzioari egokitu genion.
Hurrengo aldagaientzako frogak egin genituen: pHa, usaina eta itxura. Analisi
fisiko bat egitea erabaki genuen pH neurtzaile digital batekin eboluzioa
kontrolatzerakoan ahal bezain zehatzak izateko asmoz. Adituek froga hau
gomendatu ziguten guztiz objektiboa delako eta benetako egoera erakusten
dizulako itxura eta usaina alde batera utziz.
Itxura neurtzea erabaki genuen jendeak erosketak egiterakoan ikusten duena
delako eta hortaz benetan saltzen duena. Gainera, usaina neurtu genuen
zaporearekin erlazionatuta dagoelako. Ez genuen denboran zehar dastamen
frogarik egin intoxikazio arriskua zegoelako.
Magnitude guztiak bost pertsona desberdinek baloratu dituzte. Azkeneko biak
batetik hamarrera puntuatu dituzte, hamarra puntuazio onena izanik. Guztien
abiapuntua itxura eta usain ideala izan dira 103koa.
PHari dagokionez, 5,75eko pH batetik hasten gara. Denbora aurrera joan ahala,
haragiak pH azidoagoa lortzen dugu. Aldaketa hau modu honetan gertatzen da:
animalia sakrifikatu eta gero, muskulua haragi bihurtzen da. Haragi esaten
diogu rigor mortisa eta gero gertatzen diren aldaketa biokimikoen emaitzari.
Fase honetan, giharra azidoago bilakatzen da. Izan ere, atsedenean dagoen
gihar batean ATPa delako atsedenean mantentzen duena.
Odolak eta nutrienteek zirkulatzeari uztean, metabolismo anaerobiko bat
aktibatzen da energia erreserbak (glukogenoa) ATP bihurtzeko tenperatura
konstante eta estrukturaren integritatea mantentzeko. ATP hau glukogenoa
azido laktikoan degradatuz lortzen da. Zirkulazio sistemak ezin du erretiratu eta
hortaz pH a jaisten du. Behi haragian, hasiera batean pH 7 ko balorea

30
bazeukan ere, sakrifikatu eta 36 ordura 5,5 edo 5,8 arteko baloreak hartzen
ditu.
Hala ere, pH a muskulu motaren arabera desberdina da. Kontrakzio zuriko
zuntzak dituztenak 5,5eko baloreak hartzen dituzte eta kontrakzio gorriko
zuntzak dituztenak 6ko baloreetara ailegatzen dira. Sakrifikatu aurretik lan
gehien egin duten muskuluek pH altuena izango dute. PH ak azidotasuna
neurtzen du. Animalia heriotza baino lehen tratatu izan zen moduak eta bere
energia kopuruak pHa aldarazi dezake. Haragian, pH behera doa, denbora
igaro ahala haragia azidoago bihurtuz.
Emaitzak
Oraingoan kontserbazio-metodo guztiekin egin dugun ikerketaren emaitzak
aztertuko ditugu. Gehigarririk ez zuten hanburgesak 5,75eko pHarekin hasi
ziren, eta usain eta itxura ezin hobeak zeuzkaten. Frogak 5 eguneko tarteetan
egin ziren.
Lehenengo analisian, pH balio guztiak 5,42 eta 5,31 artean mantendu ziren.
Balio guztiak jaitsi egin ziren. Hutsean ontziratuta zegoena bakarrik izan zen
bere kondizioan jarraitu zuena. Besteen itxura aldatu zen, kolore berdexka
hartu zuten. Gure diseinu teknologikoarekin ontziratuta zegoena ilundu egin
zen, baina ez zuen besteen kolore berdexka hartu.
Bigarren analisian, pH mailak 5,14 eta 5,02 artekoak izan ziren. Guztien balioa
jaitsi zen. Erretilu zigilatuan eta aldatutako atmosferan ontziratuta zeuden
hanburgesak usain eta itxura txarra daukate. Hutsean ontziratuta zegoenaren
usaina okerrera egin zuen, baina itxura ona mantendu zuen. Gure diseinuarekin
ontziratuta zegoena ez zuen usain txarrik aurkeztu, eta barrutik zeukan kolore
gorria ikus zitekeen.

31
Hirugarren analisian pH balioak 5,21 eta 4,97 artean mantendu ziren. Hutsean
ontziratua eta erretilu zigilatuan ontziratuaren balioak jaitsi ziren, ozonoa
erabiliz ontziratu zena eta aldatutako atmosferan ontziratutakoarenak, ordea,
igo egin ziren. Erretilu zigilatukoa eta aldaturiko atmosferakoak usain eta itxura
oso txarrak adierazi zituzten. Gure diseinukoaren itxura okerragotu egin zen,
baina barrutik itxura eta usain onak izaten jarraitzen zuen. Hutsean ontziraturiko
hanburgesan likido hori bat aurkitu genuen, eta usain txarra zuen. Itxura ilundu
zitzaion, baina ez zen guztiz txarra.
Azkenengo analisian 5,58 eta 4,97 arteko pH balioak erakutsi dituzte. Gure
diseinu teknologikoan ontziratu genuenaren pH igo da, eta erretilu zigilatukoa
jaitsi egin da. Beste biak, aldiz, haien pH balioak mantendu dituzte, Erretilu
zigilatuz eta aldatutako atmosferaz ontziratutako hanburgesak itxura eta usain
oso txarrak aurkeztu dituzte. Besteak ere okerrera joan dira, baina ez da
hainbesterako izan.
Beste alde batetik, kontserbagarriak zeuzkaten hanburgesa guztiak pH balio
idealarekin hasi ziren: 5,75. Lau metodoetan ontziratu genituenak usain eta
itxura ezinhobeak zituzten. Hauen kasuan, analisiak 7 egunetan behin egin
genituen.
Lehenengo azterketan pH balioak 5,74 eta 5,62 artean zeuden, hau da, guztien
pH balioa jaitsi zen lehenengo zazpi egunetan. Azpimarragarria da gure
diseinuarekin ontziratu zena, bere pH maila ia ez zelako aldatu (5,74).
Orokorrean ez zuten itxura txarra aurkezten, ezta usain txarrik ere.
Bigarren analisian pH balioak 5,86 eta 5,75 artekoak izan ziren. Hanburgesa
guztietan egon zen igoera bat. Erretilu zigilatuan eta aldatutako atmosferan
ontziratuta zeudenak usain bizia erakutsi zuten, baina ez txarra. Hutsean
32
ontziratutakoak itxuraz berdin jarraitzen zuen, baina besteak ilunduta ikusi
genituen.
Hirugarren analisian pH balioak 4,95 eta 5,80 artekoak dira. Balore guztiak jatsi
dira. Hutsean ontziraturiko hanburgesa kanpoan utziz, beste guztiek lizuna
dute. Gure diseinu teknologikoan ontziraturikoa kanpoan utziz guztiek usain
bizia dute. Guztiek dute itxura orokor ona.
Azken analisian pH baloreak 6,78 eta 4,76 artean daude. Guztiak jaitsi dira. Bai
atmosfera babeslean ontziraturikoak eta bai erretilu zigilatu eta giroko
atmosferan ontziraturikoak kolore argia eta lizuna dute. Hutsean ontziraturikoak
itxura okerragoa du, izan ere, ilundu da eta plastifikatuta egongo balitz bezalako
itxura du. Bere usaina bizia da, baina ez txarra. Gure diseinu teknologikoarekin
ontziraturikoak ez du usain txarrik eta oso itxura du barnean kanpoan lizuna
badu ere.
Nabarmendu beharko genuke bi taldeetan atmosfera babeslean ontziratuta
zeudenak denborarekin puzten direla eta erretilu zigilatuan eta giroko
atmosferan zeudenak husten direla plastikoak hanburgesa ukitu arte.
Kontserbagarriak zituzten guztiek ur asko bota dute.
Emaitzak Excel dokumentu batean dokumentatu ditugu, grafiko eta taulen bidez
hobeto konparatzeko.
Emaitzak analizatzean deigarria iruditu zaizkigu analisien arteko
desberdintasunak. Izan ere, guk uste genuen bakarrik okerragotuko zirela,
baina momentu batzuetan hobekuntzak ikusi ditugu. Honek hurrengo prozesua
gauzatzen ari zela erakutsi digu:
33
Hasierako fasean mikroorganismoak ez dira biderkatzen. Gero, azelerazio
positiboaren fasean hazkuntza eta biderkatze abiadura modu konstantean
hazten da. Toxinak agertzen dira biderkatze abiadura maximoa delako.
Azelerazio negatiboaren fasean, biderkatze abiadura txikitzen da
mikroorganismo kopuruak gora egiten duen heinean. Fase egonkorrean
mikroorganismo kopurua konstantea da. Azkenean, suntsipen fasean
mikroorganismo kopurua txikitzen da.
Hau azalpen posible bat izan liteke, emaitzetan hobekuntzak eta okerragotzeak
agertzea den anomaliari.
Froga hauek egitean ikusi dugu gure diseinuak bi erabilera posible dituela.
Lehenengoa elikagaien ontziratzea da. Haren bidez beste modu batean
galduko ziren elikagaiei beste aukera bat ematen diegu. Izan ere, ez da
normala etxean ontziratze makinak izatea.
Normalean behin irekita jaten ez badira, bota egiten dira; baina gure diseinua
erabilita berriro gorde daitezke, geroago jateko. Gainera, gure diseinua etxean
ditugun tupperrekin erabili dezakegu.
Alde batetik, gure makinaren erabilerarekin jaki hauek aprobetxatuko genituzke
bigarren aukera bat emanez. Beste alde batetik, lehenengo aldiz ontziratzeko
ere erabil daiteke, industrian adibidez.
Bigarren erabilera materialaren desinfekzioa da. Erabilera honi esker egunero
erabiltzen ditugun eta jakiekin kontaktuan dauden materialak desinfektatu nahi
ditugu.
Gure adibidea sukaldeko materiala da, jende asko ez delako konturatzen
mikroorganismo kaltegarriz libre dagoen material baten garrantziak elikagaiak

34
kontserbatzerakoan. Gure diseinu teknologikoa edozein erreminta
desinfektatzeko ere erabili daiteke.
Gainera, gure diseinu teknologikoarekin jakiak modu industrialez ontziratzeaz
gain etxean ere erraz ontzira ditzakegula guztiok erabili izan ditugun tupper rak
erabiliz. Horrela, ez dugu jakirik alferrik galduko.
Ondorioak
Gure diseinu teknologikoari dagokionez uste dugu norabide onean goazela
gaur egun komertzializatzen diren metodoen emaitza berdinak edo hobeak lortu
dituelako.
Hala ere, badakigu oraindik gauzak ditugula hobetzeko. Horren adibide da aire
tratatuaren fluxua hobeto kanalizatzea. Hobekuntza hauek guztiak Zientzia
Azokaren egunerako (06/05/2017) prest izaten saiatuko gara. Gainera, analisi
sakonago bat egitea gustatuko litzaiguke ozonoak elikagaietan duen eragina
ikusteko. Izan ere, uste dugu badagoela tokia bai zientzia munduan eta bai
merkatuan gure asmakuntzarentzat.
Gure diseinua modu industrialean egina izango balitz, apustu berria izan liteke
sektorearentzat. Kontserbagarririk ez zutenetan pH onena lortu du (altuena) eta
horrek aditzera ematen digu. Gainera, barrukoaren itxura ez da batere aldatu
eta ez du besteek bezalako usain txarrik lortu.
Kontserbagarriak zituztenetan, besteen antzeko pH a mantendu du eta usaina
besteena baino hobea da. Itxura ez da txarra, baina lizuna agertzeagatik
puntuazioa jaitsi behar izan diogu. Lizuna agertzeak ez gaitu arduratzen,
besteetan ere agertu delako oso denbora epe luzea izan baita.
35
Hortaz, metodo eraginkor, jasangarria, ekonomikoa eta osasuntsua dela uste
dugu, kontutan hartu beharko zena elikagai industrian.
Gure analisiak egin eta gero gure ondorioa da desberdintasun nagusia
kontserbagarrien erabilerak markatu duela. Ontziratzeari dagokionez, esango
genuke gaur egungo metodorik onena hutsean ontziratzea dela, bai
kontserbagarriekin eta bai kontserbagarririk gabe propietateak hoberen
mantendu dituelako.
Bibliografia
- http://www.alimenta-accion.com/2013/11/metodos-de-conservacion-de-
los_18.html
- http://www.alimenta-accion.com/2013/11/metodos-de-conservacion-de-
los_24.html
- http://www.alimenta-accion.com/2013/08/propiedades-organoque-i.html
- http://www.naturalcastello.com/tecnicas-conservacion-alimentos-metodos-
quimicos/
- http://caebis.cnea.gov.ar/IdEN/CONOC_LA_ENERGIA_NUCX/CAPITULO_5
_Difusion/LA_TECNOLOGIA_NUCLEAR/Preservacion_alimentos.htm
- http://www.produccion-
animal.com.ar/produccion_ovina/produccion_ovina_carne/146carne.pdf
- http://atmosferaprotectora.es/applications/modified-atmosphere-packaging-
fresh-meat
- https://www.boe.es/buscar/doc.php?id=DOUE-L-2011-82261
- https://www.ocu.org/
- http://eur-lex.europa.eu/eli/reg/2008/1333/oj
- https://www.ecured.cu/Conservaci%C3%B3n_de_alimentos#Principios_en_que
_se_basa_la_conservaci.C3.B3n_de_los_alimentos
- http://www.efinde.com/descargas/UNE_400201=1994.pdf
- https://www.boe.es/buscar/doc.php?id=BOE-A-1985-2644
36
Aurreko iturriak kontsultatu arren, gure ustez inork ez du gai hau hobeto ezagutzen
egunero berarekin lan egiten dutenak baino. Horregatik, gure proiektua hurrengo
profesionalen azalpenetan oinarritzen dugu:
- Kilse S.L ko zerbitzu teknikoa
- Harakintza S. COOP eko profesionalak
- Ameztoi Anaiak enpresako profesionalak
37
Cómo conservar los alimentos
y no morir en el intento.
English
An IAM Project made by:
Maitane Alonso Monasterio
Marta Cámara Castresana
38
We would like to thanks Harakintza S.COOP, Kilse S.L, Luis
Thate and Ameztoi Anaiak, which are companies with a
long trajectory dedicated to the food industry, because
without them, this Project would not have been possible.
39
Index
- Summary
- Introduction
➢Physical methods
➢Chemical methods
➢Problem and reason of the project
- Goals
- Methodology
III. Stage: Our technological design
➢ Research
➢ Materials and budget
➢ Design and construction
➢ Way of use
IV. Stage: Scientific investigation
➢ Research
➢ Contact phase
➢ Preparation of the product
40
➢ Packaging of the product
➢ Learning and interiorization
➢ Video to raise awareness
➢ Experiment
- Results
- Conclusions
- Bibliography
41
Summary
We attach a summary of our project on a triptych because it makes it easier to
understand.
Introduction
Human beings have always been worried about their diet. During the time of
scarcity, we found the need to conserve food and began to develop techniques
for its conservation. This is one of the most studied subjects over time, on which
researchers and companies are continuously conducting studies.
Food preservation is a process which tries to inhibit the action of agents that
may alter the characteristics and original properties of the product. Although
these agents may be foreign to the product, such as microorganisms; we also
find enzymes that being part of the product can modify it. The purpose of these
techniques is to achieve a longer expiry date without altering their nutritional
value and maintaining the same sensorial characteristics.
Conservation procedures have been changing and improving as time has gone
by and today they are diverse and varied in every way. They can be classified
into two general groups, depending on whether they are physical or chemical
techniques.
Physical methods
When we focus on physical methods, there are two general groups that are
worth mentioning. The first one inhibits the growth of microorganisms creating
inappropriate conditions for their development. Low temperatures (refrigeration,
freezing and ultra-freezing), and drying (drying, concentrates and lyophilisation)
42
are examples of this group. We would also like to remark the importance of
physical preservation techniques such as vacuum packaging, packaging in a
modified atmosphere and new treatments that extend the useful life of products
when these are associated with cold methods.
The purpose of the second group is to destroy such microorganisms. The most
remarkable procedures are thermal treatments with high temperatures
(pasteurization, blanching, cooking and sterilization) and treatments with
ionizing radiations. A new and innovative technique that is worth mentioning is
pasteurization by high pressure to destruct microorganisms.
Chemical methods
Regarding chemical methods, we could define them by saying that they are
those based on the addition of substances that act by chemically modifying the
product. They usually try to make it more palatable to the consumer by
modifying their properties.
Two main groups stand out. The former one modifies the organoleptic
properties of the product. Within this type, we find treatments such as salting,
curing, fermentation, sugar addition, smoking, marinating and pickling. Some
preservatives also belong to this group. Within the second group, which does
not necessarily alter the organoleptic properties, we find some preservatives
and food additives.
Problem and reason of the project
The latter group is a major concern today. Until a century ago, much of what
was eaten was food with simple processing techniques, but we have reached a
43
point in which economy has become more important than health. Our project
surges from a concern about our diet as we are what we eat.
More than 30% of the world food production is lost due to conservation
problems. This does not only imply health problems that may arise from a bad
conservation technic, but that a large part of food must be discarded.
Every year thousands of people die from eating infected or expired products.
From the UN they warn that non-preserved products are one of the greatest
health problems of our contemporary world. If to these deaths we add the
millions of people who die of hunger, we face a problem of global magnitude.
With an effective, sustainable and non-harmful conservation technique, we
could avoid both problems.
On the one hand, that 30% of the world production that is lost could be used to
feed all those people who suffer from hunger every day and thus eradicate part
of the world's hunger. On the other hand, we would eliminate all the problems
related to poor food preservation and the diseases they entail.
Knowing that this global problem is in the hands of everyone, we have decided
to contribute by working on the conservation of food in our homes because if
this happened in every household we would solve this problem.
The problem of poor conservation technique is widespread in this contemporary
world. Current conservation methods do not respond to the demand of a society
that is increasingly aware of the importance of the natural products.
Lack of food conservation or poor conservation techniques are responsible for
deaths and illnesses for a variety of reasons. Nowadays when people are going
to buy they do not notice the conservation method employed.

44
Although more and more people notice the packaging, they do not usually take
into account the technique and therefore do not know its duration. This leads to
a poor estimation of the useful life of the product and it may be consumed once
it is no longer valid.
Therefore, people may develop illnesses due to microorganisms that appear in
the products over time. In more developed countries this disease would not be
so relevant unless it was a serious case, but in developing countries it could be
deadly.
In addition, these methods are often downplayed by the lack of knowledge
about them.
Not only that, but many people have begun to put aside conservation
techniques looking for something more natural and that can be very harmful.
The lack of a conservation technic implies a rapid deterioration of the product.
Our society is not ready to immediately consume everything it produces, but it is
willing to leave conservation methods aside.
Without these conservation techniques, a lot of food would be discarded. This is
a fact, that in a world in which people starve to death, we cannot afford. In
addition, the number of deaths and diseases created by microorganisms that
would increase.
Goals
Our main goal is to find a conservation method that is sustainable without being
harmful. By doing this, we will try to achieve the useful life that the food sector
craves without adding chemicals that may result hurtful.
45
We have studied the different methods, both physical and chemical, through
which food has traditionally been preserved over meat products. We also
launch a technological proposal that will seek longer durability without adverse
effects.
Regarding the scientific part of our project, we have investigated various
methods of conservation. We have focused on the different types of packaging
(vacuum and modified atmosphere) and compared them with a sealed container
with unmodified atmosphere. On these physical conservation methods, we have
included products with and without chemical preservatives to observe their
evolution.
With this research, we will discover the advantages and disadvantages of the
different conservation methods and their effect on a long period of time. In this
way, we will try to find out which is the most sustainable conservation method
that is not harmful.
In addition, for the technological part of the project, we launch a technological
design created and designed by us with which we propose a sustainable and
healthy alternative to try to improve traditional conservation methods.
In this way, with the use of our design in our homes, we intend to eradicate the
problems caused by a poor conservation method and lengthen the useful life of
the product so that it can be consumed later and is not discarded.
We also aim to raise awareness of this problem of global magnitude. Therefore,
we will leave samples of products preserved in different methods outside of the
fridge and through a series of photos we will assemble a video. With this video
we intend to alert the population of the dangers of breaking the cold chain and
misusing conservation methods.
46
Our main goal is to extend the useful life of the food without altering its original
properties and to raise awareness, since all of us can solve this problem.
With this goal in mind, different conservation methods have been compared,
such as vacuum packaging, packaging in a modified atmosphere, packaging in
a sealed tray in an atmosphere of the environment and packaging with our
technological design.
Therefore, we can say that our objective is on the one hand to discover the
most effective method of conservation in meat products, to analyse the
difference established by the use of preservatives and to try to achieve an
alternative to traditional methods with our technological design.
Methodology
We have divided the steps of this project as follows:
First stage: Technological design
In the first stage we have designed and subsequently built a technological
design with which we aim to achieve the expiration date that the food industry
longs without altering the properties of the product. By doing this, we intend to
achieve a healthier diet without wasting so many products because of their
expiration date.
1.1. Research
Ozone is a compound formed by three oxygen atoms, whose best known
function is to protect against the dangerous ultraviolet radiation of the sun; but it
is also a powerful oxidizer and disinfectant with great variety of uses.
47
It is a pale blue and unstable gas, which at room temperature is characterized
by a pungent smell. It is often perceptible during electrical storms, as well as in
the proximity of electrical equipment, as evidenced by the Dutch philosopher
Van Marun in 1785. At a temperature of -112 ° C it condenses to an intense
blue liquid. Under normal pressure and temperature conditions, ozone is
thirteen times more soluble in water than oxygen, but because of the higher
oxygen concentration in air, oxygen is dissolved in water more than ozone.
Ozone is about 50 kilometres above the surface of the Earth and it forms a layer
that is responsible for preventing ultraviolet radiation from entering our
atmosphere. It is an unstable gas, not very soluble and very volatile. It can be
decomposed into normal oxygen (O2) and nascent oxygen. Nascent oxygen is
a strong oxidizer, which gives ozone its disinfecting power.
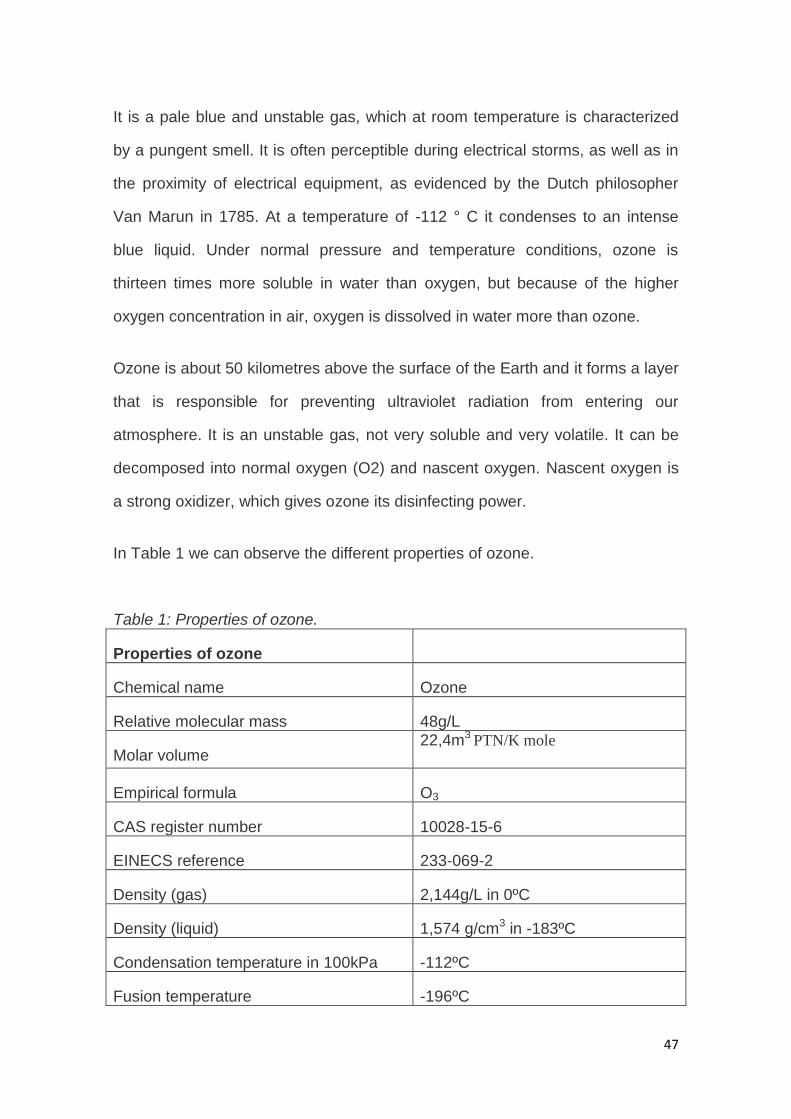
In Table 1 we can observe the different properties of ozone.
Table 1: Properties of ozone.
Properties of ozone
Chemical name Ozone
Relative molecular mass 48g/L
Molar volume 22,4m3
PTN/K mole
Empirical formula O3
CAS register number 10028-15-6
EINECS reference 233-069-2
Density (gas) 2,144g/L in 0ºC
Density (liquid) 1,574 g/cm3 in -183ºC
Condensation temperature in 100kPa -112ºC
Fusion temperature -196ºC
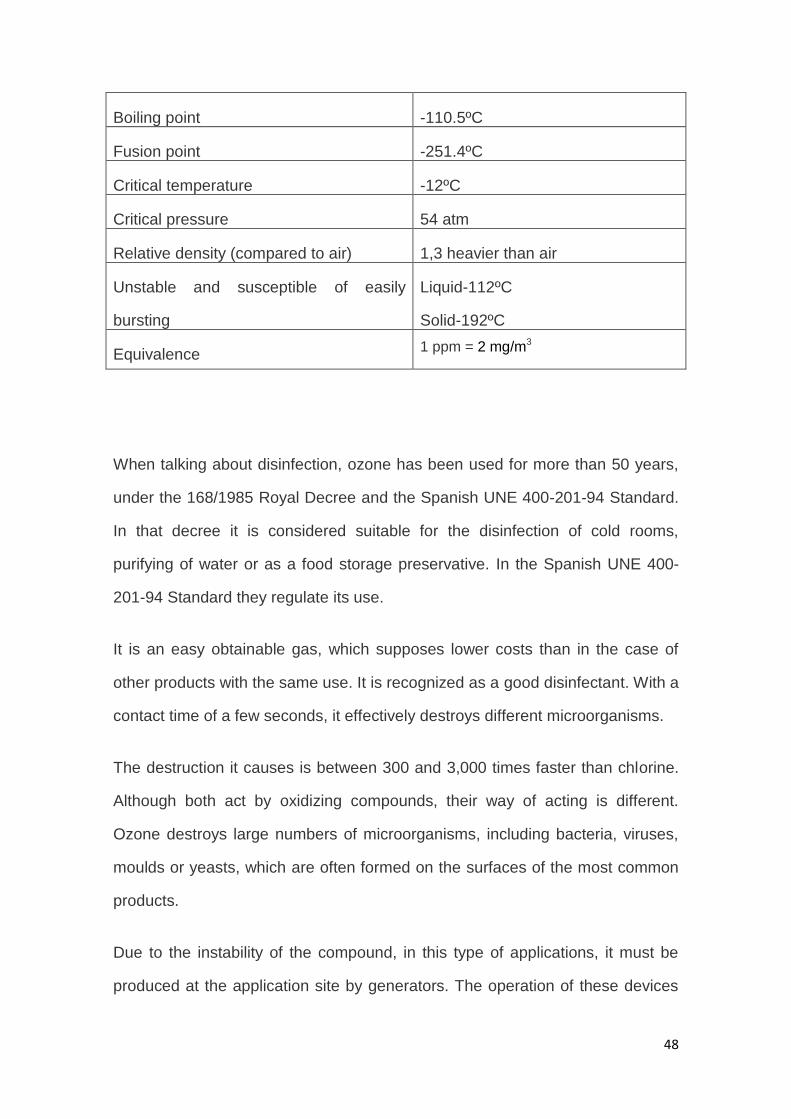
48
Boiling point -110.5ºC
Fusion point -251.4ºC
Critical temperature -12ºC
Critical pressure 54 atm
Relative density (compared to air) 1,3 heavier than air
Unstable and susceptible of easily
bursting
Liquid-112ºC
Solid-192ºC
Equivalence 1 ppm = 2 mg/m3
When talking about disinfection, ozone has been used for more than 50 years,
under the 168/1985 Royal Decree and the Spanish UNE 400-201-94 Standard.
In that decree it is considered suitable for the disinfection of cold rooms,
purifying of water or as a food storage preservative. In the Spanish UNE 400-
201-94 Standard they regulate its use.
It is an easy obtainable gas, which supposes lower costs than in the case of
other products with the same use. It is recognized as a good disinfectant. With a
contact time of a few seconds, it effectively destroys different microorganisms.
The destruction it causes is between 300 and 3,000 times faster than chlorine.
Although both act by oxidizing compounds, their way of acting is different.
Ozone destroys large numbers of microorganisms, including bacteria, viruses,
moulds or yeasts, which are often formed on the surfaces of the most common
products.
Due to the instability of the compound, in this type of applications, it must be
produced at the application site by generators. The operation of these devices
49
is simple: they pass an oxygen stream through two electrodes. In this way,
when applying a determined voltage, a current of electrons is caused in the
space delimited by the electrodes. That is where the gas flows. These electrons
will cause the dissociation of the oxygen molecules that later will form the
ozone.
Direct oxidation of the cell wall is its main course of action. This oxidation
causes the breaking of said wall, thus causing the cellular constituents to
emerge outside the cell. Likewise, the production of hydroxyl radicals as a
consequence of the disintegration of ozone in water has an effect similar to that
described.
The damage produced on microorganisms is not limited to the oxidation of their
wall: ozone also causes damage to the constituents of nucleic acids (DNA and
RNA), causing the rupture of carbon nitrogen bonds, which leads to a
depolymerisation.
Microorganisms, therefore, are not able to develop immunity to ozone as they
do when they face other compounds. Ozone is effective, therefore, in the
elimination of bacteria, viruses, protozoa, nematodes, fungi, cell aggregates,
spores and cysts. (Rice, 1984; Owens, 2000; Lezcano, 1999).
It also acts at a lower concentration and with less contact time than other
disinfectants such as chlorine, chlorine dioxide and monochloramines. In
addition, ozone, as previously indicated, oxidizes cytoplasmic substances,
whereas chlorine only produces a destruction of vital centres of the cell, which
sometimes does not become effective as microorganisms manage to recover
(Bitton, 1994).

50
1.2 Materials and budget
In order to make our technological design we have needed the following
materials that we present on the Table 2.
Table 2. Budget of our technological design
Materials Price Quantity Final price
Ozone generator 54€ 1 54€
Boxes 12€ 2 24€
Holey sheet to canalise
the flow of the air
Recycled
(0€)
1 Recycled
(0€)
Fan 13€ 1 13€
Electric material (cable,
circuit boards…)
8€ - 8€
Switch 1€ 2 2€
Speed regulator 3€ 1 3€
Power source (12V) 15€ 2 30€
Tools - - -
Final price - - 134€
1.3 Design and construction
First of all, we designed our technological proposal. We decided to work with
ozone since it is a gas that despite its sterilizing properties it is cheap to get and
could be applied in our home scale project.
Our main goal was to create a fixed and continuous ozone stream that would
keep the packaging area disinfected. In this way, food would be processed in
51
that area treated with ozone. After their treatment they would be packaged in
the same area, maintaining the disinfection.
To boost the ozone current and create a continuous flow, we decided to use a
fan and give it two speeds reducing the voltage for different uses. Through the
boxes and the perforated sheet, we created an air flow circuit treated with
ozone. In this way, it would be possible to pack in the middle of both boxes
resulting in an environment as sterile as possible.
We tried to make it of a small size and without dangerous parts due to our final
objective of applying it in the homes to conserve better different products on a
daily basis. It can also be used with Tupperware that you may have at home.
That is why we use direct current at 12V. As it is an area that we are going to be
manipulating, it is important to ensure its safety taking into account the purpose
of its home use. In addition, we tried to make it easy to use so that all kinds of
people can manipulate it without any risk.
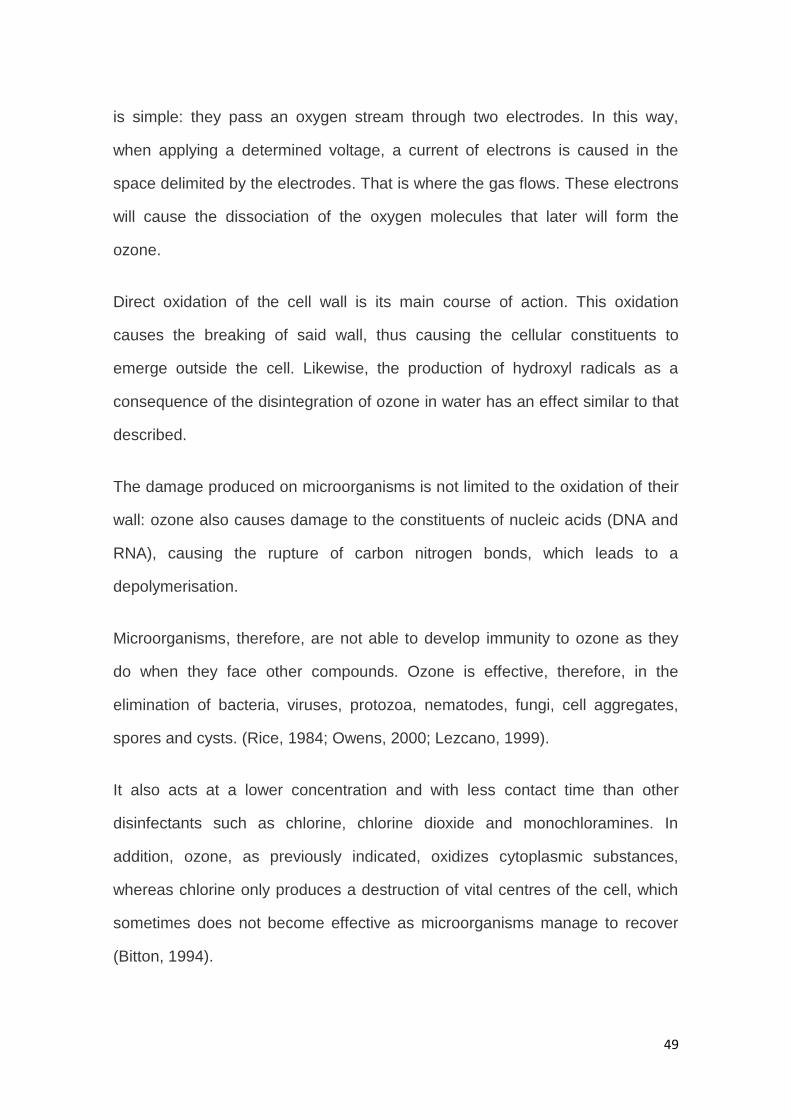
Once designed, we decided to put it into practice to be able to test if our
reasoning was viable. First, we got all the necessary
components and we stored them. This took quite some
time since we had to order some parts over the internet.
When we got all the components, we decided to test the
functioning of the ozone generator. In order to do this,
we left it for a quarter of an hour in a refrigerator. As we
could see there was a great improvement in the smell.
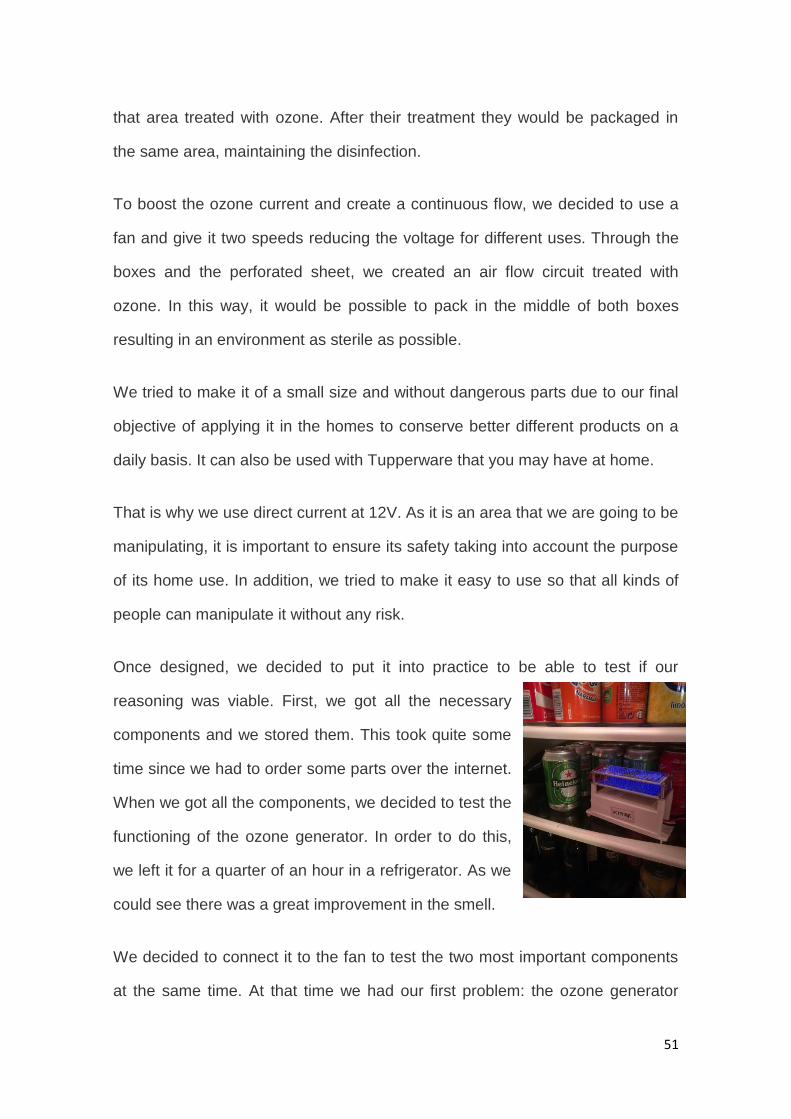
We decided to connect it to the fan to test the two most important components
at the same time. At that time we had our first problem: the ozone generator
52
and the fan did not work at the same time. This happened because of the way
to generate ozone. The generator remains at rest for six
seconds until it releases an electric discharge to
generate ozone. That is when we saw that the voltage of
the power supply was dropping too much and the fan
stopped. Therefore, we decided to use two power
supplies.
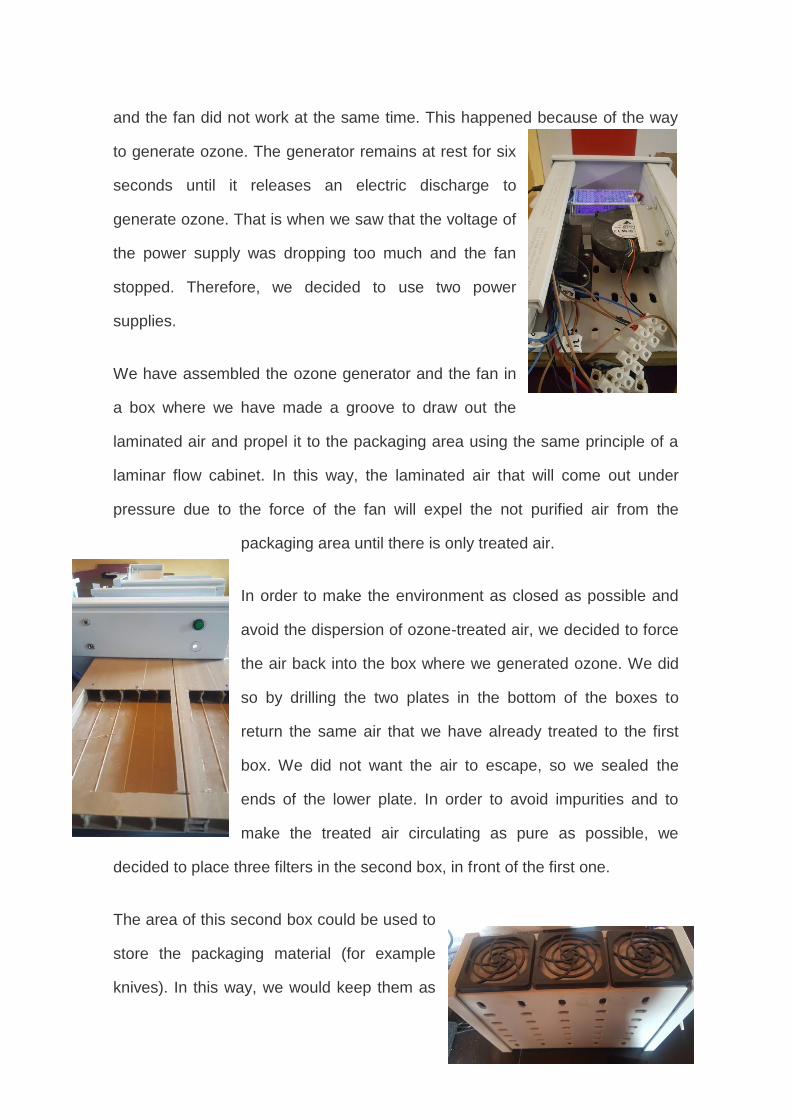
We have assembled the ozone generator and the fan in
a box where we have made a groove to draw out the
laminated air and propel it to the packaging area using the same principle of a
laminar flow cabinet. In this way, the laminated air that will come out under
pressure due to the force of the fan will expel the not purified air from the
packaging area until there is only treated air.
In order to make the environment as closed as possible and
avoid the dispersion of ozone-treated air, we decided to force
the air back into the box where we generated ozone. We did
so by drilling the two plates in the bottom of the boxes to
return the same air that we have already treated to the first
box. We did not want the air to escape, so we sealed the
ends of the lower plate. In order to avoid impurities and to
make the treated air circulating as pure as possible, we
decided to place three filters in the second box, in front of the first one.
The area of this second box could be used to
store the packaging material (for example
knives). In this way, we would keep them as
53
disinfected as possible and avoid another source of product contamination that
occurs when using non-disinfected materials.
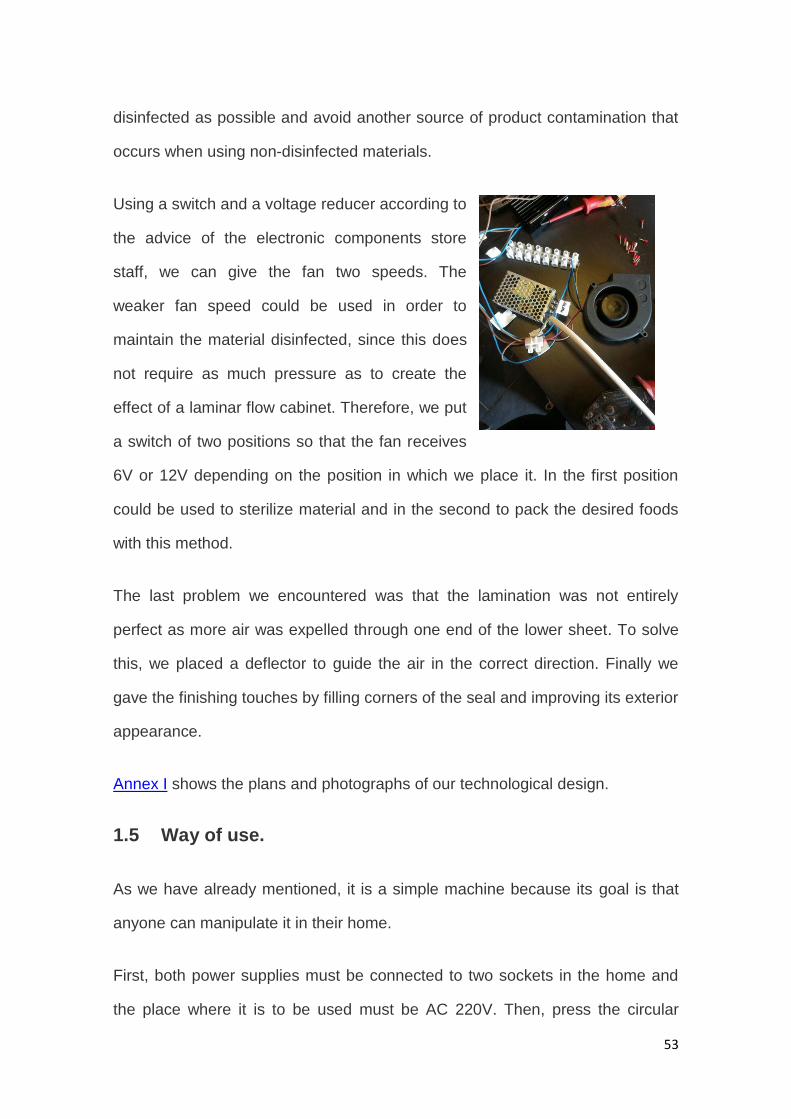
Using a switch and a voltage reducer according to
the advice of the electronic components store
staff, we can give the fan two speeds. The
weaker fan speed could be used in order to
maintain the material disinfected, since this does
not require as much pressure as to create the
effect of a laminar flow cabinet. Therefore, we put
a switch of two positions so that the fan receives
6V or 12V depending on the position in which we place it. In the first position
could be used to sterilize material and in the second to pack the desired foods
with this method.
The last problem we encountered was that the lamination was not entirely
perfect as more air was expelled through one end of the lower sheet. To solve
this, we placed a deflector to guide the air in the correct direction. Finally we
gave the finishing touches by filling corners of the seal and improving its exterior
appearance.
Annex I shows the plans and photographs of our technological design.
1.5 Way of use.
As we have already mentioned, it is a simple machine because its goal is that
anyone can manipulate it in their home.
First, both power supplies must be connected to two sockets in the home and
the place where it is to be used must be AC 220V. Then, press the circular
54
switch located at the end of the first box. By doing this we will start up the ozone
generator.
Once it is generated, which is easily verifiable due to the light, sound and smell
emitted by the electric discharge to generate ozone, we move the switch from
two positions to the second position. This will start up the fan in the packaging
mode. You must choose the gear taking into account the desired function. At
this point we will have a continuous flow in a
closed circuit. It is advisable to let it circulate for
about one minute to ensure that the air in the
packaging area is treated entirely.
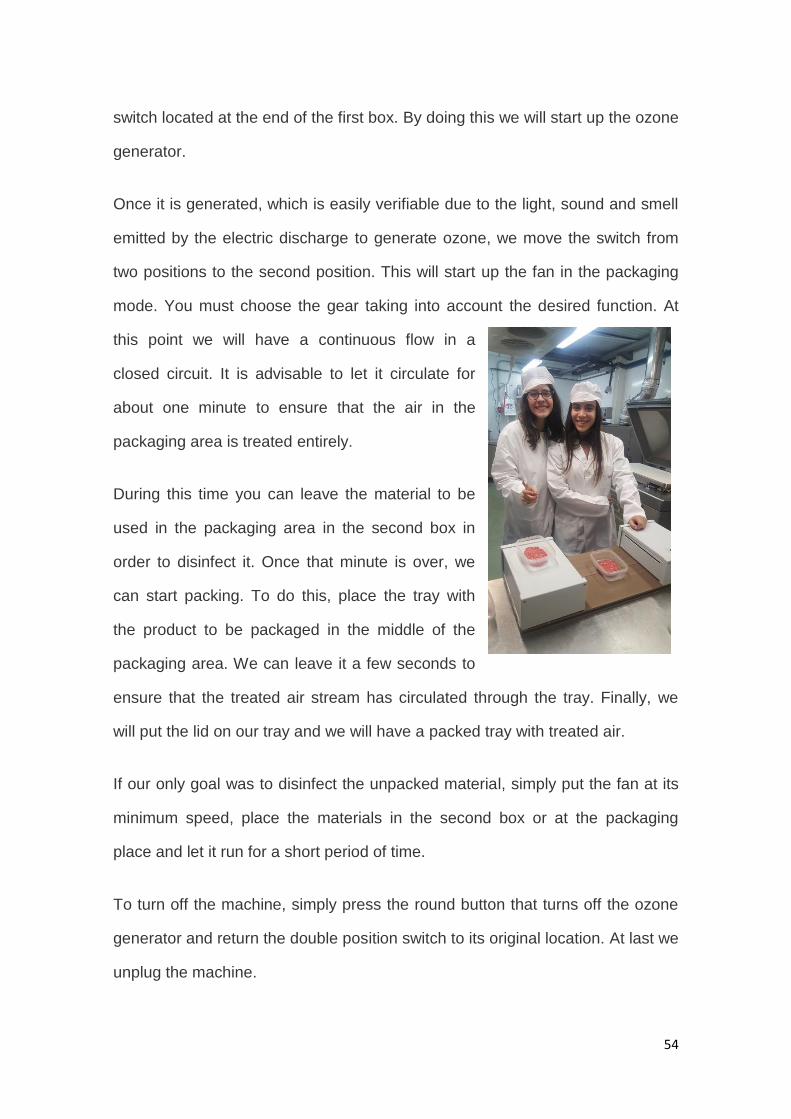
During this time you can leave the material to be
used in the packaging area in the second box in
order to disinfect it. Once that minute is over, we
can start packing. To do this, place the tray with
the product to be packaged in the middle of the
packaging area. We can leave it a few seconds to
ensure that the treated air stream has circulated through the tray. Finally, we
will put the lid on our tray and we will have a packed tray with treated air.
If our only goal was to disinfect the unpacked material, simply put the fan at its
minimum speed, place the materials in the second box or at the packaging
place and let it run for a short period of time.
To turn off the machine, simply press the round button that turns off the ozone
generator and return the double position switch to its original location. At last we
unplug the machine.
55
Second stage: Scientific investigation
In the second stage of our project we have carried out a scientific investigation
in order to analyse the effectiveness and sustainability of the current
conservation methods.
2.1 Research
In this phase we have investigated the different methods that we were going to
use. Finally we decided to focus on the following techniques: vacuum
packaging, packaging with modified atmosphere, packaging with sealed tray
(with ambient atmosphere) and packaging with our technological design. In
addition, we will also study the use of preservatives.
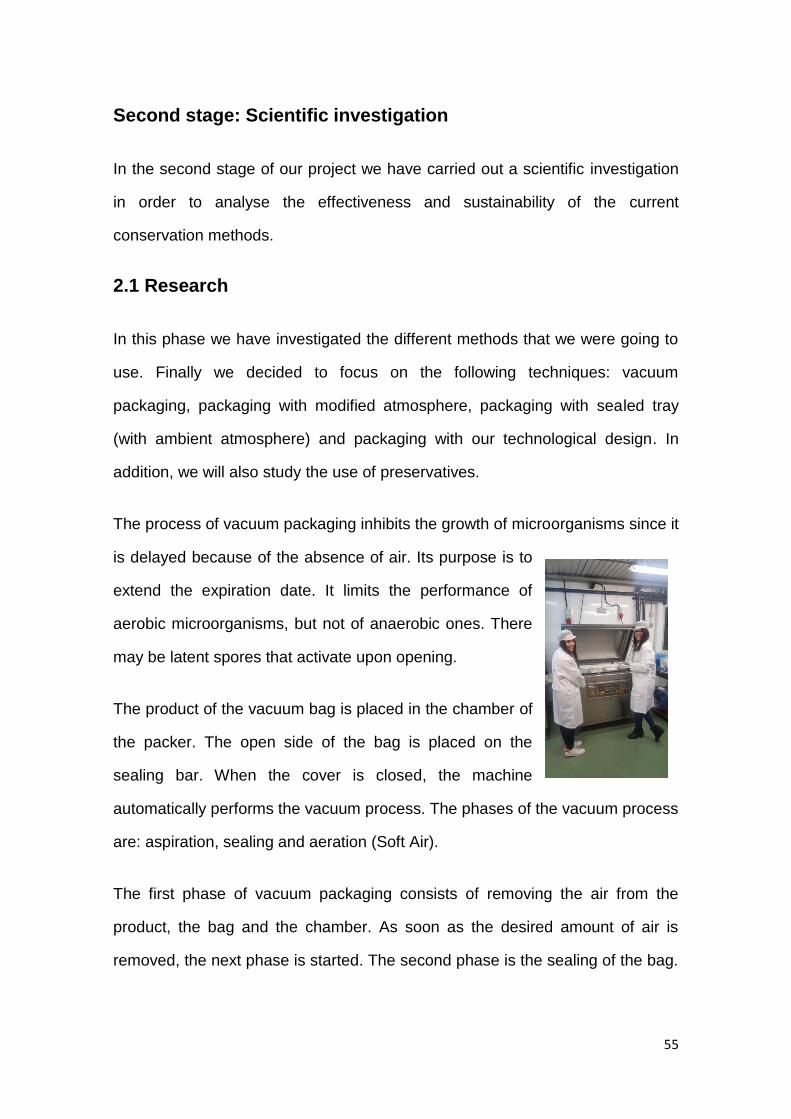
The process of vacuum packaging inhibits the growth of microorganisms since it
is delayed because of the absence of air. Its purpose is to
extend the expiration date. It limits the performance of
aerobic microorganisms, but not of anaerobic ones. There
may be latent spores that activate upon opening.
The product of the vacuum bag is placed in the chamber of
the packer. The open side of the bag is placed on the
sealing bar. When the cover is closed, the machine
automatically performs the vacuum process. The phases of the vacuum process
are: aspiration, sealing and aeration (Soft Air).
The first phase of vacuum packaging consists of removing the air from the
product, the bag and the chamber. As soon as the desired amount of air is
removed, the next phase is started. The second phase is the sealing of the bag.
56
This hermetic seal is of special importance since it is what prevents any
substance from entering.
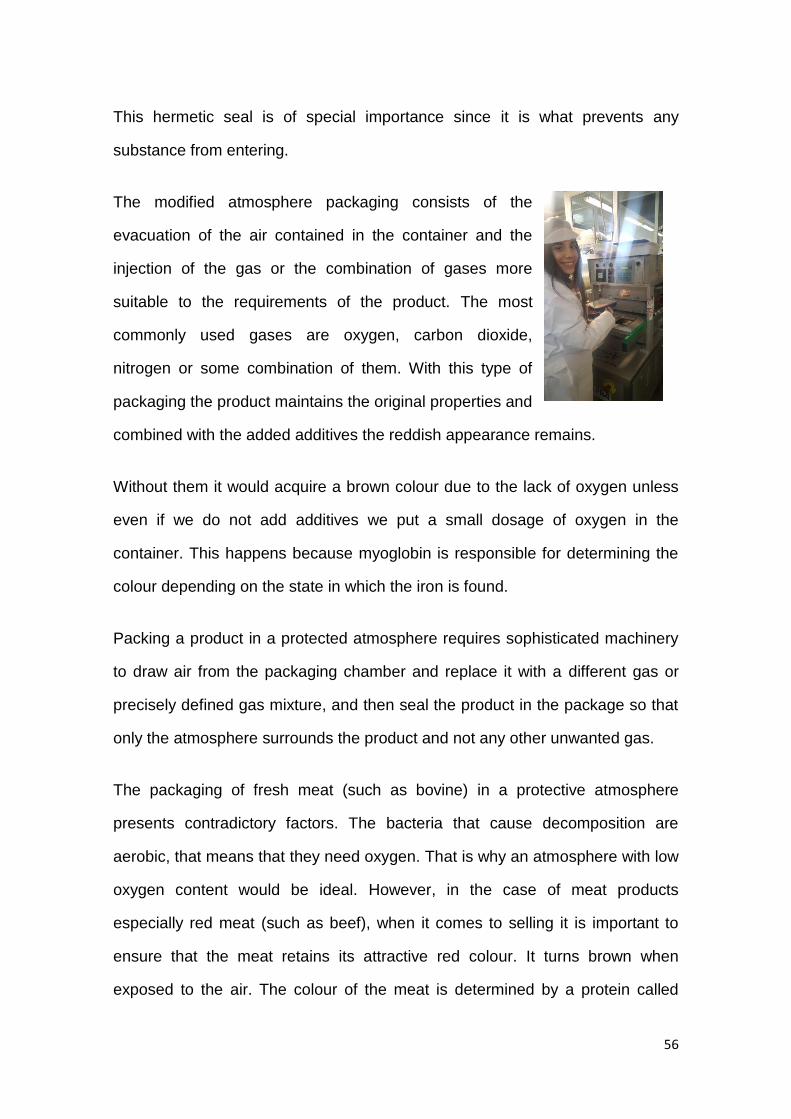
The modified atmosphere packaging consists of the
evacuation of the air contained in the container and the
injection of the gas or the combination of gases more
suitable to the requirements of the product. The most
commonly used gases are oxygen, carbon dioxide,
nitrogen or some combination of them. With this type of
packaging the product maintains the original properties and
combined with the added additives the reddish appearance remains.
Without them it would acquire a brown colour due to the lack of oxygen unless
even if we do not add additives we put a small dosage of oxygen in the
container. This happens because myoglobin is responsible for determining the
colour depending on the state in which the iron is found.
Packing a product in a protected atmosphere requires sophisticated machinery
to draw air from the packaging chamber and replace it with a different gas or
precisely defined gas mixture, and then seal the product in the package so that
only the atmosphere surrounds the product and not any other unwanted gas.
The packaging of fresh meat (such as bovine) in a protective atmosphere
presents contradictory factors. The bacteria that cause decomposition are
aerobic, that means that they need oxygen. That is why an atmosphere with low
oxygen content would be ideal. However, in the case of meat products
especially red meat (such as beef), when it comes to selling it is important to
ensure that the meat retains its attractive red colour. It turns brown when
exposed to the air. The colour of the meat is determined by a protein called
57
myoglobin that is found in the tissue. It is a purple protein that reacts with the
oxygen becoming: oximioglobin (red), and metamioglobin (brown). In the air, the
concentration of oxygen favours the formation of metamioglobin that turns meat
brown.
With higher oxygen concentration, there are better chances of producing
intense red oximioglobin thus maintaining a good appearance. With the
appropriate gas mixture (usually between 60% and 80% oxygen) the meat
retains its palatable colour. It is true that meat needs more oxygen, but this
favours aerobic bacteria. Carbon dioxide can greatly inhibit the development of
these aerobic bacteria. Therefore, if the rest of the compound is carbon dioxide,
it will stop the development of the microorganisms that decompose the meat.
The sealed tray packaging we made is not a commercial method, but we
decided to do it because we wanted to compare the different methods with how
it would be without altering the atmosphere surrounding the product. We simply
placed the meat on a tray and sealed it. In this way, it would preserve the
atmosphere of the environment at the time of packaging.
We have done the packaging with our technological design to check if our
hypothesis was true. It is a new technique that has not been applied yet even
though it has been investigated.
Preservatives are natural and artificial substances used in the preservation of
products against the action of microorganisms, in order to prevent their
deterioration for a certain time under certain storage conditions. They can be of
natural or artificial origin.
They can be classified depending on their safety (harmless, safety not
universally accepted, recognized toxicity and doubtful toxicity). In a single
58
product several of them are often used as each one attacks a type of
microorganism. When food is deteriorated, it normally happens because of
more than one microorganism.
At present there are 30 authorized preservatives, many of them are antioxidants
and 14 have a secondary effect. Microorganisms do not develop resistance to
preservatives as opposed to antibiotics. The main functions of preservatives are
to preserve food, to facilitate its manufacture, to improve its appearance or
texture, to increase or improve its flavour or to compensate for the scarcity of
some ingredients, such as putting fewer strawberries in a fruit yogurt or less
meat in a sausage.
Most of them are harmless, but some can be harmful. Others are used because
their benefits outweigh their risks. Many are being reassessed by the European
Food Safety Authority (EFSA) as new research has put their safety in doubt.
Although not all of them are harmful, they are often unnecessary, particularly
when we talk about additives and especially colouring. We must bear in mind
that they are still substances that alter the natural properties of food and
therefore should be avoided as far as possible.
2.2 Contact phase
First, we got in touch with a technician from Kilse SL (company that has been
dedicated to working with machines, including food preservation for more than
30 years), specialist in the field to guide us in this project because we believe
that there is no one better to guide that those who work with it every day.
Secondly, we got in touch with companies dedicated to the food sector and
asked for a site to be able to package. Harakintza S.COOP agreed to leave us
their facilities during a morning to be able to pack our products using their
59
machines and Ameztoi Anaiak offered us a visit to all their facilities. Luis Thate
also offered us a visit to his facilities.
2.3 Preparation of the product.
After finding information about current conservation methods, on the morning of
2 March 2017, accompanied by the Kilse SL technician, we went to Harakintza
S. COOP in Zorroza. Once we were there, we were offered advice by the
technician of Kilse SL, the person in charge of quality and the head of
production of the company. They explained what they did on a daily basis and
the different conservation methods. They also advised us when preparing our
product.
First we had meat without adding anything and we proceeded
to divide the product in two. The meat we used was beef at
3.6ºC. We will call lean to the meat since some fat is added to
it. This step is essential because if you add no fat it stays
hard.
To the first group we only added 12 g of salt per kilo. We had 3.72 kg of meat.
According to our calculations, we added 44.64 g of salt.
To the second group we added protein, water and a preparation with
preservatives. In this case it was 80% lean, 6% protein, 14% water and 12g of
salt per kilo. We used 60 g of preparation per kilo of product. We were going to
achieve 4 kg of product. We therefore added 240 g of the preparation and 48 g
of salt.
The preparation is a mixture of additives and condiments for alimentary use in
the manufacture of hamburgers. Its composition is as follows: salt, corn starch,
60
spices, sodium sulphite (E-221), sodium citrate (E-331), sodium ascorbate (E-
301), cochineal (E-120) and maitodextrin.
The water that we added had to be a few days in the chamber at less than 4ºC
so that the chlorine was gone. This water facilitates the dissolution of the
components besides not allowing the hamburger to be so hard. The main
function of the protein is to absorb part of the water once its function is done
and help to compact the hamburger. The protein we used was granulated soy.
After describing all the components of our meat, we will proceed to describe its
preparation for the packaging. All the meat and all the processes were made by
us.
First we will expose the process of the meat with preservatives. Firstly, we had
the lean at 3.6 ° C. We passed this lean through a mincer since our study was
going to be realized on burgers.
Secondly, we weighed the preparation. It is important to weigh it at the moment
to ensure the amount that we are going to throw as there is a regulation that
limits the amount. Then, using a blender, we mixed the
preparation with water.
Thirdly, we added the protein (granulated soybeans) to
the meat and kneaded it. Next we added the
preparation and the water.
Finally, we kneaded everything together. We must pay
special attention to not kneading too much as it could
get muddy. We have achieved 4 kg of beef with
additives and preservatives at 5 ° C.
61
Preparing the meat without preservatives was easier since we simply had to
add 44.64 g (for 3.72 kg of meat) of salt and knead it. We want to point out that
this last group we have prepared is not marketed since today almost everything
is sold with preservatives and additives. This happens for lengthening the useful
life of the product, but it is also true that more quantity of product is obtained
more economically.
Once we had the two groups ready, we used a machine to form it. When it
comes to large quantities, there are machines that perform the process
automatically.
In order to do this we weighed 100 g of the product, which after passing it
through the machine and crushing it to form hamburgers, we placed it between
two strips of plastic that were placed in the corresponding tray.
We made 5 samples of each type and we left some extra ones that we would
later use for another to perform a taste analysis.
2.4 Packaging of the product
After obtaining all the meat, we proceeded to pack it. First we used a vacuum
packaging machine where we packed 10 hamburgers, 5 with preservatives and
5 without them.
Then we packed the same amount with modified atmosphere. We used 70%
oxygen and 30% carbon dioxide. After that we packed the same number of
burgers on a sealed tray with ambient atmosphere. In this way, we could check
their evolution in our daily environment.
Finally, we proceeded to pack with our technological design in the way we have
explained previously. Once we had all the burgers packed, we took them to the

62
refrigerator in which they would be preserved. In order not to break the cold
chain, we carried them in a cold transport.
2.5 Learning and interiorization
After leaving the hamburgers, we went to Zestoa (Gipuzkoa) where the
technician and professionals of the company Ameztoi Anaiak explained how the
maintenance of food on a large scale works.
We had the opportunity to visit the whole factory and see first-hand and
explained by those who work with it every day the real conditions in which they
prepare, pack and preserve the products in a large company. By doing this, we
discovered the different methods of conservation
from another point of view and internalized all the
theory learned so far.
We were also able to visit a pasteurization facility as
this company purchases its milk from cattle farmers
in the Basque Country and pasteurize it and treat it
themselves. Finally, we had the opportunity of visiting
their purification facilities, as they are also
responsible for treating their waste before pouring it
into the drain.
In addition, before the Elhuyar Zientzia Azoka we will have the opportunity to
visit the facilities of Luis Thate where we will discover first-hand how a company
dedicated especially to meat products works.
2.6 Video to raise awareness
We decided to separate a hamburger of each type, thus achieving a group of
eight hamburgers, four with preservatives and four without them, packaged in
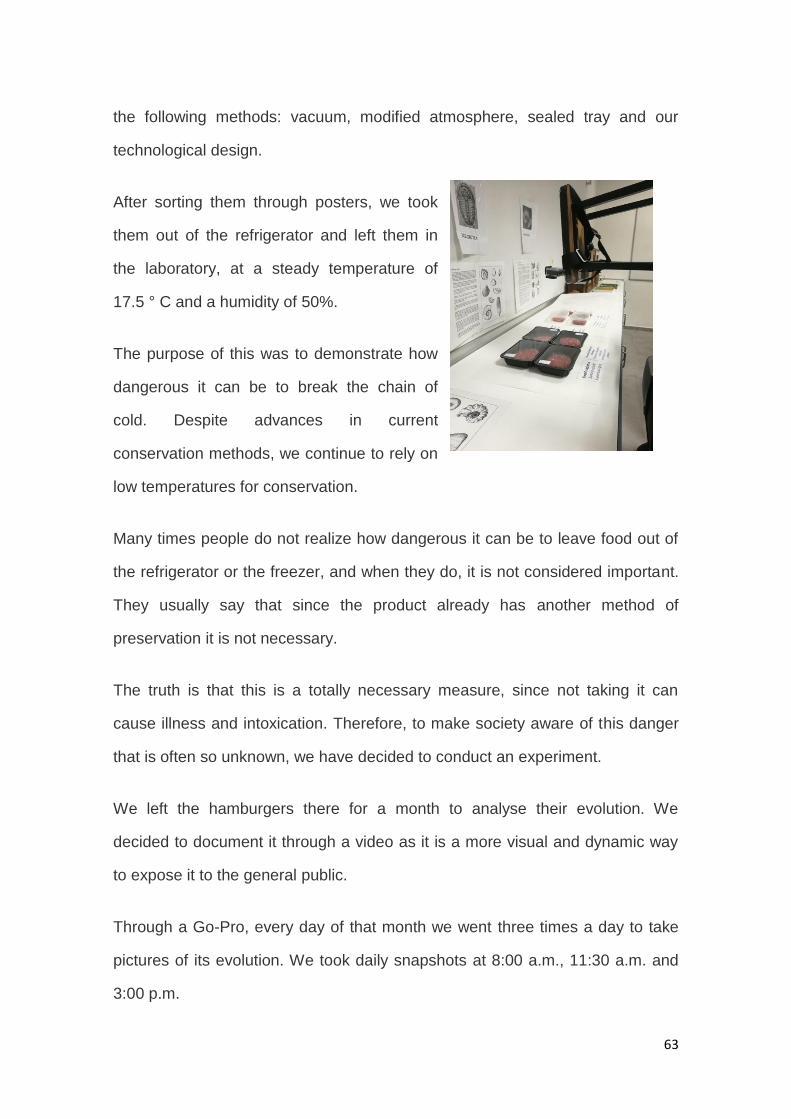
63
the following methods: vacuum, modified atmosphere, sealed tray and our
technological design.
After sorting them through posters, we took
them out of the refrigerator and left them in
the laboratory, at a steady temperature of
17.5 ° C and a humidity of 50%.
The purpose of this was to demonstrate how
dangerous it can be to break the chain of
cold. Despite advances in current
conservation methods, we continue to rely on
low temperatures for conservation.
Many times people do not realize how dangerous it can be to leave food out of
the refrigerator or the freezer, and when they do, it is not considered important.
They usually say that since the product already has another method of
preservation it is not necessary.
The truth is that this is a totally necessary measure, since not taking it can
cause illness and intoxication. Therefore, to make society aware of this danger
that is often so unknown, we have decided to conduct an experiment.
We left the hamburgers there for a month to analyse their evolution. We
decided to document it through a video as it is a more visual and dynamic way
to expose it to the general public.
Through a Go-Pro, every day of that month we went three times a day to take
pictures of its evolution. We took daily snapshots at 8:00 a.m., 11:30 a.m. and
3:00 p.m.
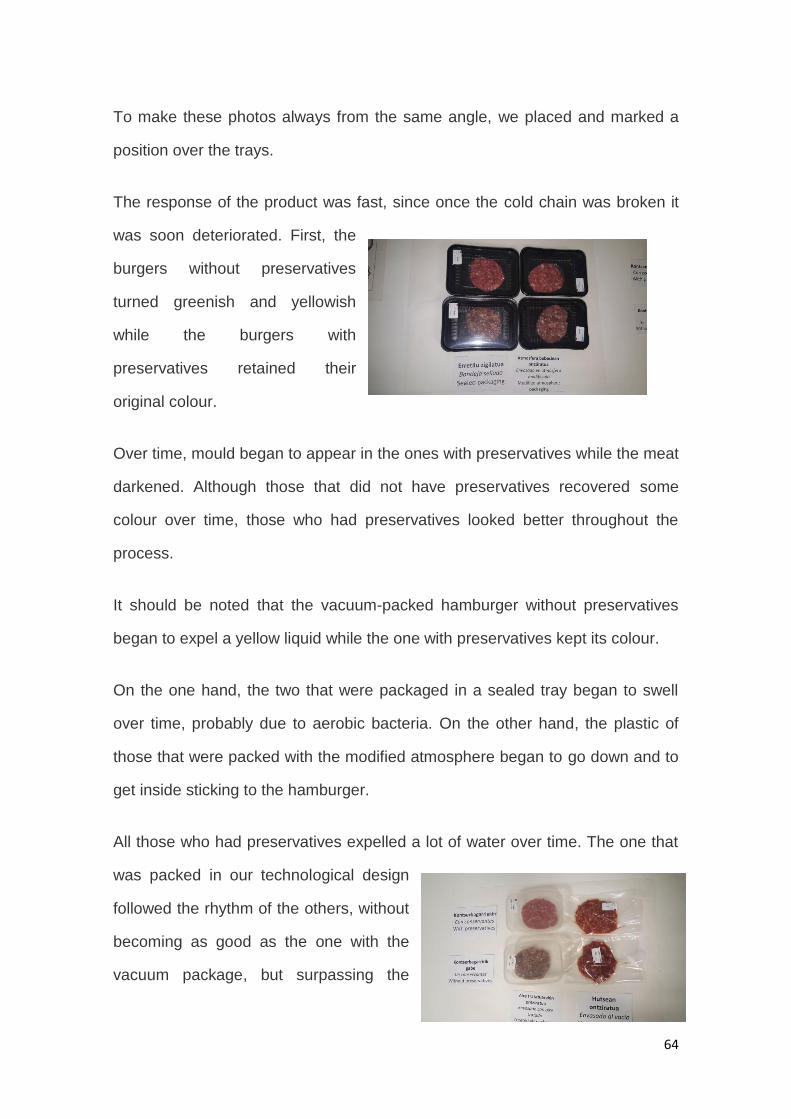
64
To make these photos always from the same angle, we placed and marked a
position over the trays.
The response of the product was fast, since once the cold chain was broken it
was soon deteriorated. First, the
burgers without preservatives
turned greenish and yellowish
while the burgers with
preservatives retained their
original colour.
Over time, mould began to appear in the ones with preservatives while the meat
darkened. Although those that did not have preservatives recovered some
colour over time, those who had preservatives looked better throughout the
process.
It should be noted that the vacuum-packed hamburger without preservatives
began to expel a yellow liquid while the one with preservatives kept its colour.
On the one hand, the two that were packaged in a sealed tray began to swell
over time, probably due to aerobic bacteria. On the other hand, the plastic of
those that were packed with the modified atmosphere began to go down and to
get inside sticking to the hamburger.
All those who had preservatives expelled a lot of water over time. The one that
was packed in our technological design
followed the rhythm of the others, without
becoming as good as the one with the
vacuum package, but surpassing the
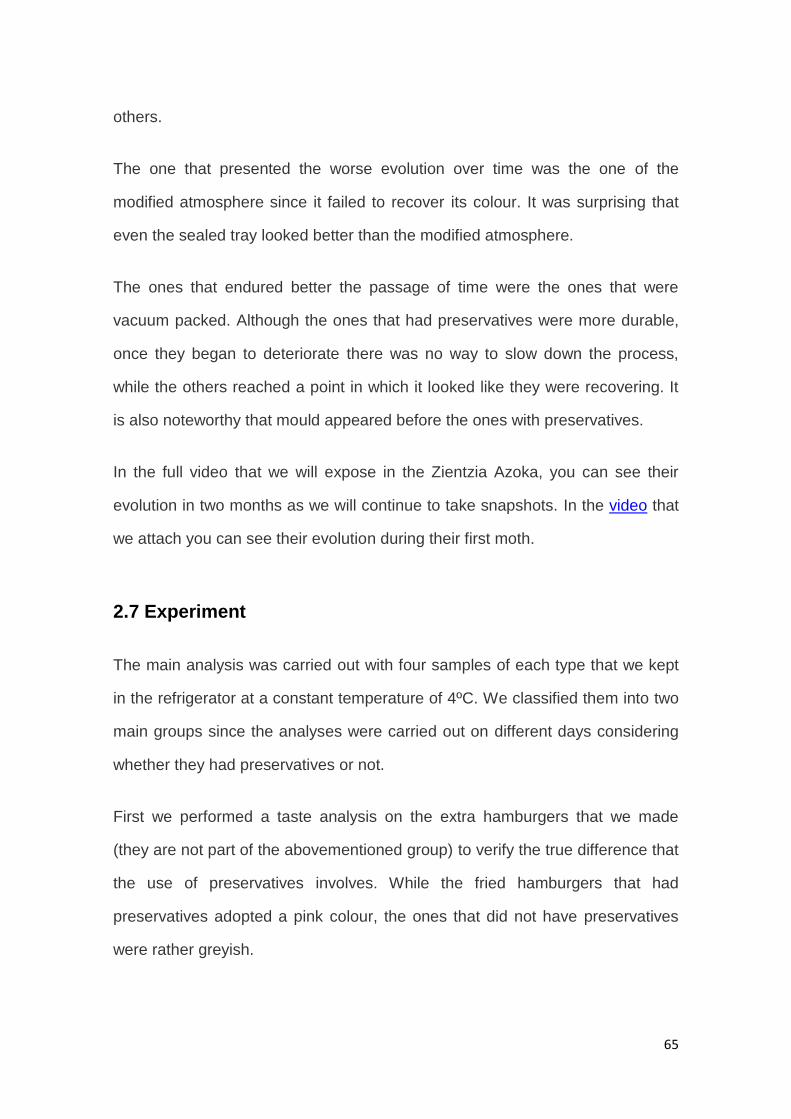
65
others.
The one that presented the worse evolution over time was the one of the
modified atmosphere since it failed to recover its colour. It was surprising that
even the sealed tray looked better than the modified atmosphere.
The ones that endured better the passage of time were the ones that were
vacuum packed. Although the ones that had preservatives were more durable,
once they began to deteriorate there was no way to slow down the process,
while the others reached a point in which it looked like they were recovering. It
is also noteworthy that mould appeared before the ones with preservatives.
In the full video that we will expose in the Zientzia Azoka, you can see their
evolution in two months as we will continue to take snapshots. In the video that
we attach you can see their evolution during their first moth.
2.7 Experiment
The main analysis was carried out with four samples of each type that we kept
in the refrigerator at a constant temperature of 4ºC. We classified them into two
main groups since the analyses were carried out on different days considering
whether they had preservatives or not.
First we performed a taste analysis on the extra hamburgers that we made
(they are not part of the abovementioned group) to verify the true difference that
the use of preservatives involves. While the fried hamburgers that had
preservatives adopted a pink colour, the ones that did not have preservatives
were rather greyish.
66
We conducted the test with ten people. The totality of them stated that there
was an incredible difference between the tastes of both groups. Those that
lacked preservatives had a much better taste and texture. Everyone said they
would rather buy those even though they are not for sale.
Subsequently, we proceeded to do the real analysis. The frequency of the tests
starts with five days for those which do not have preservatives and seven for
the ones which do. Over time, the waiting time is adjusted to the evolution of the
product.
We have based our study on the following variables: pH, smell and appearance.
We decided to perform a physical analysis using a digital pH-meter to be as
accurate as possible when monitoring the evolution. Experts recommended this
test as it is completely objective and you can check the true state of the product
beyond its appearance or smell.
We also valued the aspect of the meat since at the time of buying it is what is
the customer is going to see and what really sells. We also evaluated the smell
because of its intense relation with the flavour. We did not value the taste
because of the risk of intoxication that exists when eating expired products.
Both magnitudes have been valued by five different people and scored from
one to ten with ten being the best value. In all of them we started with an ideal
look and smell (10) since at first all of them were identical.
Regarding the pH, we started with a value of 5.75. Over time meat tends to
reach a more acid pH. This happens as follows: once the animal is sacrificed,
the muscle becomes flesh. We denominate meat to the result of the
biochemical changes post mortem. In rigor mortis, the muscle has to become
acidic. This happens because in a resting muscle it is the ATP that keeps the

67
muscle relaxed. Once the blood and nutrients have ceased, an anaerobic
metabolism is activated to transform energy reserves (glycogen) into ATP to
maintain the temperature and structural integrity. This ATP is obtained by the
degradation of glycogen in lactic acid. As it cannot be removed by the blood
system, it causes a drop in pH. Therefore, in cows, it descends from values
close to 7 to values between 5.5 and 5.7 in about 36 hours.
Even so, the pH varies depending on the type of muscle. Those with white
contraction fibres reach values of 5.5; while those with red contraction fibres do
not fall below 6. The muscles that work the most before slaughter are the ones
with the highest pH. The pH quantifies the acidity, how the animal was treated
before death and its energy levels. Over time, the pH tends to lower by
becoming a more acid meat.
Results
We will now analyse the results of the complete analysis with all conservation
methods. Regarding hamburgers that had no additives, they all started with an
ideal pH of 5.75 and an ideal look and smell (10). The tests were performed
with a difference of 5 days between them.
In the first analysis, all pH values were between 5.42 and 5.31. They all
descended. The only one that maintained its appearance was the one of the
vacuum package. The appearance of the others began to turn greenish. The
one that was packed with our technological design was obscured, but it does
not show the greenish tone of the others.
In the second analysis the pH levels were between 5.02 and 5.14. They all
descended. Both the sealed tray and the modified atmosphere presented very
68
poor appearance and smell. The smell of the one with the vacuum package had
worsened, but it kept looking good. The one packaged with our technological
design did not present bad smell and it maintained a red aspect in the interior.
In the third analysis pH levels were between 5.21 and 4.97. Vacuum packaging
and packaging with a sealed tray present a decrease while the ones with ozone
and packaging with modified atmosphere had increased their pH. The sealed
tray and the modified atmosphere had a very bad smell and a poor appearance.
Our technological design had a worse appearance despite maintaining a good
appearance on the inside, but it still did not present a bad smell. Vacuum
packaging presented a yellow liquid and a smell that smelt like expired meat.
The colour is dark, but not bad.
In the last analysis they have presented values of pH between 4.97 and 5.58.
Our technological design has raised the pH and the vacuum and modified
atmosphere have maintained their values. The sealed tray has lowered the pH
level. Both the modified atmosphere and the sealed tray present very poor
appearance and smell. The rest have gotten worse, but there is not such a
great difference.
Regarding the hamburgers that had preservatives, all of them started with an
ideal pH of 5.75 and an ideal smell and look (10). The different analyses in this
case were carried out seven days apart.
In the first analysis we found pH values between 5.62 and 5.74. There had been
a drop of pH in all of them. We noted that the packaging with our technological
design since it hardly changed the pH (5.74). In general they looked good and
did not present a bad smell.
69
In the second analysis the pH values varied between 5.86 and 5.75. There had
been a rise in pH in all of them. The modified atmosphere and the sealed tray
had a strong, but not a bad smell. The vacuum remained intact, but the others
were a little darkened.
In the third analysis the pH varied between 4.95 and 5.80. All values had gone
down. Except the vacuum packaging all of them had some mould. All of them
except for the packaging with our technological design presented a strong
smell. All of them looked good overall.
In the final analysis, the pH values were between 5.78 and 4.76. All of them had
gone down. Both the modified atmosphere and the sealed tray had a very clear
colour and quite a lot of mould. The one of the vacuum package presented a
worse aspect since it is quite dark and it looks as if it were laminated. Its smell
was strong, but it was not bad. The packaging with our technological design did
not present bad a smell and it had a very good interior appearance even though
we could appreciate some mould on the outside.
It should be noted that in both groups the modified atmosphere tend to swell
with time and the sealed tray to deflate and stick the plastic in. All those who
had preservatives expelled a lot of water.
The results are documented in an Excel document since it is easier to compare
them with tables and graphs.
While we were analysing the results, we thought that the differences between
tests had been striking. Although we thought that the variants would only
become worse, there are times in which improvements have been made. That
is when we discovered the phases of the multiplication of microorganisms.
70
In an initial phase there is no multiplication of germs. Then, in the positive
acceleration phase the growth rate and the cell division process increases
continuously. The toxins appear since the maximum multiplication speed is
reached.
In the negative acceleration phase, the rate of multiplication decreases even
though the number of germs increases. In the stationary phase the number of
microorganisms remains constant. Finally, in the destruction phases, the
number of microorganisms decreases.
This could be a possible explanation for the anomalies that occur in the results
by interweaving improvements and worsening.
In performing these tests, we have appreciated that our design has two main
uses. The first function is the one of food packaging by which we intend to
extend the expiry date on a healthy way of foods that otherwise would be
discarded. It is not very common to have machines of packaging in at home.
That is why once opened the foods, if they do not get to be consumed, they end
up being discarded.
With the use of our product we intend to lengthen the useful life of these
products giving them a second chance of being consumed before their
deterioration. On the other hand, we do not rule out its use for the first
packaging of products.
Our product is a good option to pack products when they are produced, but it is
important to take into account that it can also be used to preserve food once it is
already cooked. This would be an innovation at homes because normally
leftovers tend to be thrown away, but with our design they will be able to be
consumed later.
71
The second function is the disinfection of the material. By using this function we
intend to eliminate the microorganisms that may exist in the different materials
that we use in our day to day.
Our example is based on the cooking material, since many people do not
realize the importance of a material free of microorganisms in the conservation
of food. This technological design could also be used in the disinfection of any
type of tool.
In addition, we wanted to emphasize that with our technological design not only
can the food be packaged industrially, but can be packaged in the home in the
Tupperware we use normally. In this way, you can take advantage of
unconsumed products.
Conclusions
Regarding our technological design we believe that we are on the right track
since it has lived up to the commercialized conservation methods.
We know still have things to improve, such as channelling the airflow better. We
will try to finalize these details for the day of the Zientzia Azoka, the 05/06/2017.
In addition, we would like to conduct a deeper analysis of the effect of ozone on
food as we believe that there is a gap in both the scientific and labour markets
for our project.
Our technological design has lived up to the current conservation methods,
which is a great achievement for a homemade machine. If it were built at an
industrial level, with some modifications, it could be a new bet in this sector.
72
In those without preservatives it has achieved a higher pH (less acid) than the
others, which suggests a better condition. In addition, the interior appearance
has remained intact. It has not developed as badly smell as the others, probably
due to gas.
In those with preservatives, it maintains a pH similar to the others. It is worth
noting the smell that is quite better than the others. It does not look bad, better
than the others, but due to the development of some mould the score has been
lowered. This fact does not worry us because the others have also developed
some since it has been a long period of time.
Therefore, we consider it a sustainable, economic and healthy method that
should be taken into account.
After our analyses we conclude that the biggest difference has been marked by
the use of preservatives. In relation to the packaging methods, our conclusion is
that the best method of preservation in meat products nowadays is vacuum
packaging both with and without preservatives, since it is the one that best
maintains the product with the passage of time.
Bibliography
- http://www.alimenta-accion.com/2013/11/metodos-de-conservacion-de-
los_18.html
- http://www.alimenta-accion.com/2013/11/metodos-de-conservacion-de-
los_24.html
- http://www.alimenta-accion.com/2013/08/propiedades-organoque-i.html
- http://www.naturalcastello.com/tecnicas-conservacion-alimentos-metodos-
quimicos/
- http://caebis.cnea.gov.ar/IdEN/CONOC_LA_ENERGIA_NUCX/CAPITULO_5
_Difusion/LA_TECNOLOGIA_NUCLEAR/Preservacion_alimentos.htm

73
- http://www.produccion-
animal.com.ar/produccion_ovina/produccion_ovina_carne/146carne.pdf
- http://atmosferaprotectora.es/applications/modified-atmosphere-packaging-
fresh-meat
- https://www.boe.es/buscar/doc.php?id=DOUE-L-2011-82261
- https://www.ocu.org/
- http://eur-lex.europa.eu/eli/reg/2008/1333/oj
- https://www.ecured.cu/Conservaci%C3%B3n_de_alimentos#Principios_en_que
_se_basa_la_conservaci.C3.B3n_de_los_alimentos
- http://www.efinde.com/descargas/UNE_400201=1994.pdf
- https://www.boe.es/buscar/doc.php?id=BOE-A-1985-2644
Even if we have consulted the abovementioned sources, we believe that nobody knows
this subject better that those professionals that work with it every day. That is why we
base our project on the explanations offered by:
- Kilse S.L’s technical service
- Harakintza S. COOP’s professionals
- Ameztoi Anaiak’s professionals

74
Cómo conservar los alimentos
y no morir en el intento.
Español
An IAM Project made by:
Maitane Alonso Monasterio
Marta Cámara Castresana

75
Nos gustaría agradecer a Harakintza S.COOP, a Kilse S.L, a
Luis Thate y a Ameztoi Anaiak; todas ellas empresas con
una larga trayectoria dedicada al sector de la
alimentación, su colaboración, ya que sin ellos este
proyecto no habría sido viable.
76
Índice
- Resumen
- Introducción
➢Métodos físicos
➢Métodos químicos
➢Problema y por qué del proyecto
- Objetivos
- Metodología
V. Etapa: Diseño tecnológico
➢ Investigación
➢ Materiales y presupuesto
➢ Diseño y construcción
➢ Forma de utilización
VI. Etapa: Investigación científica
➢ Investigación
➢ Fase de contacto
➢ Preparación del producto
77
➢ Envasado del producto
➢ Aprendizaje e interiorización
➢ Video para la concienciación
➢ Experimento
- Resultados
- Conclusiones
- Bibliografía
78
Resumen
Adjuntamos una síntesis de nuestro proyecto en un tríptico ya que facilita su
comprensión.
Introducción
El ser humano siempre se ha preocupado por su alimentación. Durante la
época de escasez, el hombre encontró la necesidad de conservar alimentos y
empezó a desarrollar técnicas para su conservación. Se trata de uno de los
temas más estudiados a lo largo del tiempo, sobre el que investigadores y
empresas están continuamente realizando estudios.
La conservación de alimentos es un proceso en el que se trata de inhibir la
acción de agentes que alteren las características y propiedades originales del
producto. A pesar de que estos agentes puedan ser ajenos al producto, como
los microorganismos; también encontramos enzimas que siendo parte del
producto pueden llegar a modificarlo. El propósito de estas técnicas es lograr
alimentos más duraderos sin que su valor nutritivo sea alterado y siga
manteniendo las características sensoriales propias del mismo.
Los procedimientos de conservación han ido cambiando y mejorando a medida
que ha transcurrido el tiempo y hoy en día son diversos y variados, en todos los
sentidos. Pueden ser clasificados en dos grupos generales, según se trate de
técnicas físicas o químicas.
Métodos físicos
Al centrarse en los métodos físicos, cabe mencionar dos grupos generales. El
primero inhibe el crecimiento de los microorganismos creando condiciones
inadecuadas para su desarrollo. Ejemplos de estos métodos son las bajas
temperaturas (refrigeración, congelación y ultra congelación), y la desecación
79
(secado, concentrados y liofilización). Además, es remarcable la importancia de
técnicas físicas de conservación como el envasado al vacío, el envasado en
una atmosfera modificada y nuevos tratamientos que prolongan la vida útil de
los alimentos cuando estos se asocian especialmente a los métodos de frío.
El cometido del segundo grupo es destruir dichos microorganismos. Los
procedimientos más destacables son los tratamientos térmicos con altas
temperaturas (pasteurización, escaldado, cocción y esterilización) y los
tratamientos con radiaciones ionizantes. Cabe mencionar una última y
novedosa técnica que es la pasteurización por alta presión para la destrucción
de los microorganismos.
Métodos químicos
Respecto a los métodos químicos, son los que se basan en la adición de
substancias que actúan modificando químicamente el producto. Además, tratan
de hacerlo más apetecible para el consumidor modificando sus propiedades.
Destacan dos grupos principales. El primero modifica las propiedades
organolépticas del producto. Dentro de este tipo encontramos tratamientos
como la salazón, el curado, la fermentación, adición de azúcar, el ahumado, el
adobo y el escabeche. Además, algunos conservantes también pertenecen a
este grupo. Dentro del segundo grupo, que no necesariamente altera las
propiedades organolépticas, encontramos algunos conservantes y aditivos
alimentarios.
Problema y por qué del proyecto
Este último grupo es una gran preocupación hoy en día. Hasta hace un siglo
gran parte de lo que se comía era alimentos con técnicas de procesado
sencillas, pero hemos llegado a un punto en el que la economía se ha vuelto

80
más importante que la salud. Nuestro proyecto surge de una inquietud sobre
nuestra alimentación ya que somos lo que comemos.
Más del 30% de la producción mundial de alimentos se pierde por problemas
en la conservación. Esto no solo implica los problemas de salud que pueden
surgir a raíz de una mala técnica para conservar, si no que se trata de una gran
parte de comida que debe ser desechada.
Cada año mueren miles de personas por la consumición de alimentos
infectados o caducados. Desde la ONU advierten que los alimentos no
conservados son uno de los mayores problemas de salud del mundo
contemporáneo. Si a estas muertes le añadimos los millones de personas que
fallecen debido al hambre, nos encontramos ante un problema de magnitud
mundial. Con una técnica de conservación efectiva, sostenible y que no sea
dañina, podríamos evitar ambos problemas.
Por un lado, ese 30% de la producción mundial que se pierde, podría ser
utilizado para alimentar a todas esas personas que sufren día a día por el
hambre y así erradicar una parte del hambre mundial. Por otro lado,
eliminaríamos todos los problemas relacionados con la mala conservación de
alimentos y las enfermedades que conllevan.
Sabiendo que este problema mundial está en manos de todos, hemos decidido
aportar nuestro granito de arena trabajando en la conservación de alimentos en
un ámbito casero, ya que si esto sucediera en todos los hogares daríamos
solución a este problema.
El problema de una mala técnica de conservación está muy extendido en este
mundo contemporáneo. Los métodos de conservación actuales no responden a
la demanda de un cliente cada vez más concienciado con la importancia que
tiene lo natural.
81
La falta de conservación de alimentos o una mala técnica de conservación son
responsables de muertes y enfermedades por diversas causas. Hoy en día
cuando la gente va a comprar no repara en el método de conservación
empleado.
A pesar de que cada vez más gente se fija en el envase, no suelen tener en
cuenta la técnica utilizada y por tanto desconocen su duración. Esto lleva a una
mala estimación de la vida útil del producto y puede ser consumido una vez
que ya no es válido.
Por tanto, las personas pueden enfermar debido a los microorganismos que
aparecen en los productos con el paso del tiempo. En los países más
desarrollados esta enfermedad no tendría tanta relevancia a no ser que se
tratara de algún caso grave, pero en los países en desarrollo podría ser mortal.
Además, muchas veces se le resta importancia a estos métodos por la falta de
conocimiento que hay sobre ellos.
Mucha gente ha empezado a dejar de lado las técnicas de conservación
buscando algo más natural y eso puede ser muy dañino. La falta de métodos
para conservar implica el rápido deterioro del producto. La sociedad de hoy en
día no está preparada para consumir inmediatamente todo lo que produce,
pero sin embargo, está dispuesta a dejar los métodos de conservación de lado.
Sin estas técnicas de conservación se desecharía mucha comida, cosa que en
un mundo en el que la gente se muere de hambre no nos lo podemos permitir.
Además, aumentarían los fallecimientos y enfermedades creados por los
microorganismos que se desarrollarían.
82
Objetivos
Nuestro objetivo principal es buscar un método de conservación que sea
sostenible sin ser dañino. Para ello, intentaremos lograr la vida útil que anhela
el sector alimentario sin adicionar sustancias químicas que pueden resultarnos
perjudiciales.
Con este fin hemos estudiado diferentes métodos tanto físicos como químicos
mediante los cuales se han conservado tradicionalmente los alimentos y
lanzamos una propuesta tecnológica que buscará una mayor durabilidad sin
efectos adversos.
Respecto a la parte científica de nuestro proyecto, en la que investigamos
diversos métodos de conservación, nos hemos centrado en los diferentes tipos
de envasado (vacío y atmosfera modificada) y los hemos comparado con un
envase sellado con atmosfera sin modificar. Sobre estos métodos de
conservación físicos, hemos incluido productos con y sin conservantes
químicos para observar su evolución.
Con esta investigación, descubriremos las ventajas y desventajas de los
diferentes métodos de conservación y su efecto en los productos a largo plazo.
De esta forma, intentaremos averiguar cuál es el método de conservación más
sostenible sin ser perjudicial.
Además, para la parte tecnológica del proyecto, lanzamos un diseño
tecnológico creado y diseñado por nosotras con el que pretendemos plantear
una alternativa sostenible y saludable para mejorar los métodos de
conservación tradicionales.
De esta manera, con la utilización de nuestro diseño en los hogares,
pretendemos que se erradiquen los problemas causados por una mala

83
conservación y alargar la vida útil del producto para su posterior consumición y
que no sea desechado.
Además, pretendemos concienciar a la gente sobre este problema de magnitud
mundial. Por eso, dejaremos muestras de productos conservados en diferentes
métodos a temperatura ambiente y mediante una serie de fotos montaremos un
video. Con este video pretendemos alertar a la población de los peligros que
conlleva romper la cadena del frio y utilizar mal los métodos de conservación.
Nuestro objetivo principal es alargar la vida útil de los alimentos sin alterar sus
propiedades originales y concienciar a la población ya que entre todos
podemos darle solución a este problema.
Para ello se han comparado diferentes métodos de conservación como el
envasado al vacío, el envasado en una atmosfera modificada, el envasado en
una bandeja sellada en atmosfera del ambiente y el envasado con nuestro
diseño tecnológico.
Por tanto, podemos decir que nuestro objetivo es por un lado descubrir cuál es
el método de conservación más eficaz en productos cárnicos, analizar la
diferencia marcada por el uso de conservantes e intentar lograr una alternativa
a los métodos tradicionales con nuestro diseño tecnológico.
Metodología
Hemos dividido las etapas necesarias para la realización de este proyecto de la
siguiente forma:
Primera etapa: Diseño tecnológico
En esta primera etapa hemos diseñado y posteriormente construido un diseño
tecnológico con el que pretendemos lograr la fecha de caducidad que anhelan
el sector alimentario sin alterar las propiedades del producto. De esta manera
84
pretendemos lograr una alimentación más sana sin malgastar tantos productos
por su caducidad.
1.2. Investigación
El ozono es un compuesto formado por tres átomos de oxígeno, cuya función
más conocida es la de protección frente a la peligrosa radiación ultravioleta del
sol; pero también es un potente oxidante y desinfectante con gran variedad de
utilidades.
Se trata de un gas azul pálido e inestable, que a temperatura ambiente
se caracteriza por un olor picante, perceptible a menudo durante las
tormentas eléctricas, así como en la proximidad de equipos eléctricos, según
evidenció el filósofo holandés Van Marun en el año 1785. A una
temperatura de –112ºC condensa a un líquido azul intenso. En condiciones
normales de presión y temperatura, el ozono es trece veces más soluble en
agua que el oxígeno, pero debido a la mayor concentración de oxígeno en
aire, éste se encuentra disuelto en el agua en mayor medida que el
ozono.
El ozono se encuentra a unos 50 kilómetros encima de la superficie de la Tierra
y forma una capa, que es la responsable de evitar que la radiación ultravioleta
entre en nuestra atmosfera. Se trata de un gas inestable, poco soluble, muy
volátil y se puede descomponer en oxígeno normal (O2) y en oxígeno naciente.
El oxígeno naciente se trata de un fuerte oxidante, que le da su poder
desinfectante.
En la Tabla 1 podemos observar las distintas propiedades del ozono.
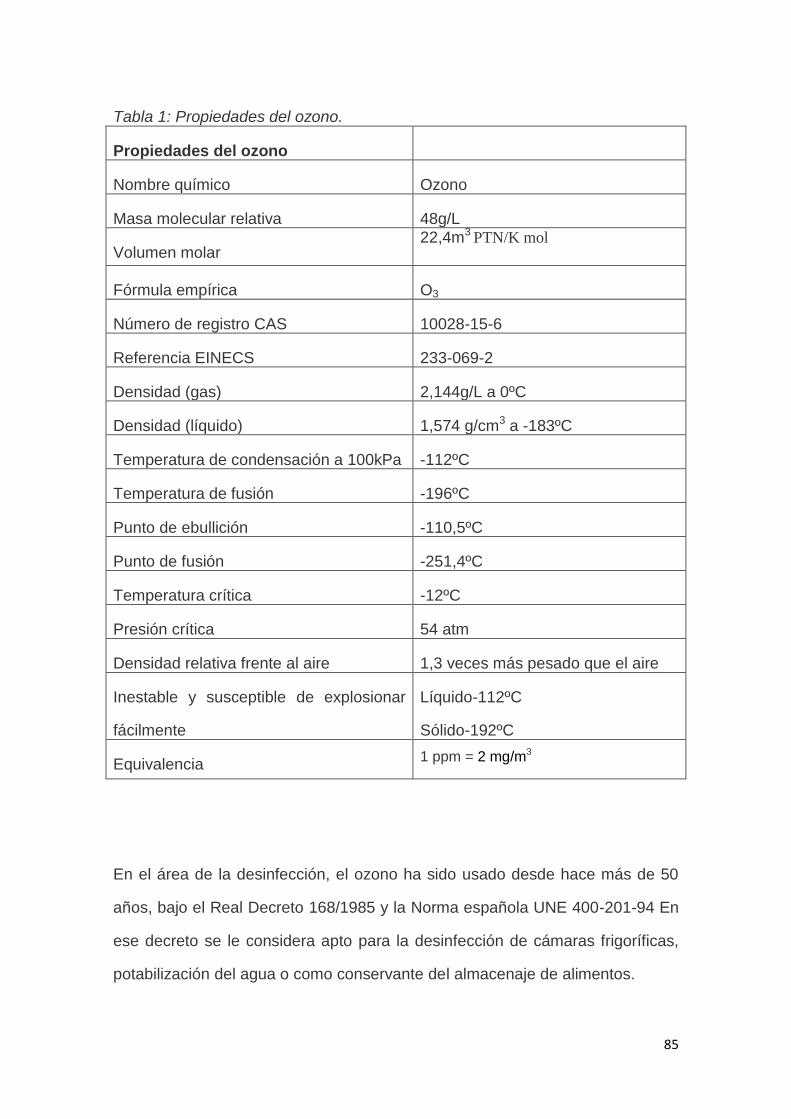
85
Tabla 1: Propiedades del ozono.
Propiedades del ozono
Nombre químico Ozono
Masa molecular relativa 48g/L
Volumen molar 22,4m3
PTN/K mol
Fórmula empírica O3
Número de registro CAS 10028-15-6
Referencia EINECS 233-069-2
Densidad (gas) 2,144g/L a 0ºC
Densidad (líquido) 1,574 g/cm3 a -183ºC
Temperatura de condensación a 100kPa -112ºC
Temperatura de fusión -196ºC
Punto de ebullición -110,5ºC
Punto de fusión -251,4ºC
Temperatura crítica -12ºC
Presión crítica 54 atm
Densidad relativa frente al aire 1,3 veces más pesado que el aire
Inestable y susceptible de explosionar
fácilmente
Líquido-112ºC
Sólido-192ºC
Equivalencia 1 ppm = 2 mg/m3
En el área de la desinfección, el ozono ha sido usado desde hace más de 50
años, bajo el Real Decreto 168/1985 y la Norma española UNE 400-201-94 En
ese decreto se le considera apto para la desinfección de cámaras frigoríficas,
potabilización del agua o como conservante del almacenaje de alimentos.
86
Es un gas fácil de conseguir, lo que supone costes menores que en el caso de
otros productos con el mismo uso. Está reconocido como uno buen
microbicida. Con un tiempo de contacto muy breve, de unos pocos segundos,
destruye de manera eficaz diferentes microorganismos.
La destrucción que provoca es entre 300 y 3.000 veces más veloz que el cloro.
A pesar de que ambos se tratan de compuestos oxidantes, su forma de actuar
es diferente. El ozono destruye gran cantidad de microorganismos, entre ellos
bacterias, virus, mohos o levaduras, que se forman a menudo en las superficies
de los alimentos más comunes.
Debido a la inestabilidad del compuesto, en este tipo de aplicaciones, éste
debe ser producido en el sitio de aplicación mediante unos generadores.
El funcionamiento de estos aparatos es sencillo: pasan una corriente de
oxígeno a través de dos electrodos. De esta manera, al aplicar un voltaje
determinado, se provoca una corriente de electrones en el espacio delimitado
por los electrodos, que es por el cual circula el gas. Estos electrones
provocarán la disociación de las moléculas de oxígeno que posteriormente
formarán el ozono.
La oxidación directa de la pared celular constituye su principal modo de
acción. Esta oxidación provoca la rotura de dicha pared, propiciando así
que los constituyentes celulares salgan al exterior de la célula.
Asimismo, la producción de radicales hidroxilo como consecuencia de la
desintegración del ozono en el agua, provoca un efecto similar al expuesto.
Los daños producidos sobre los microorganismos no se limitan a la
oxidación de su pared: el ozono también causa daños a los
constituyentes de los ácidos nucleicos (ADN y ARN), provocando la
ruptura de enlaces carbono nitrógeno, lo que da lugar a una despolimerización.
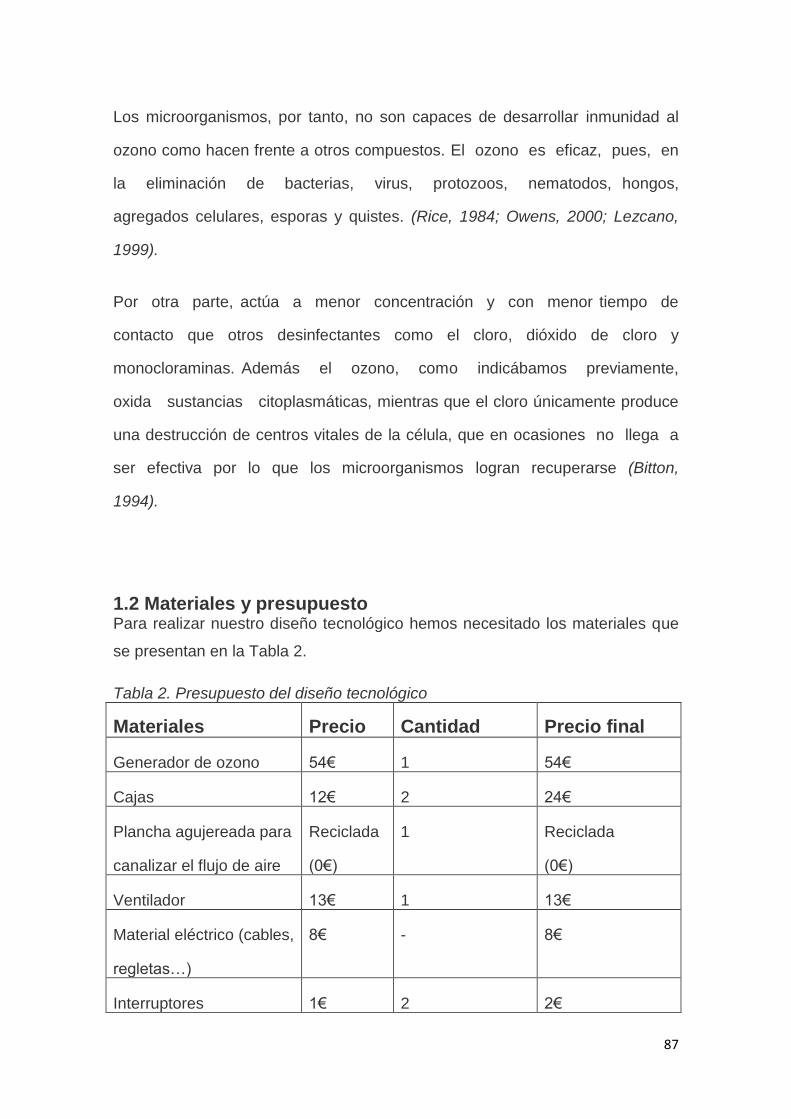
87
Los microorganismos, por tanto, no son capaces de desarrollar inmunidad al
ozono como hacen frente a otros compuestos. El ozono es eficaz, pues, en
la eliminación de bacterias, virus, protozoos, nematodos, hongos,
agregados celulares, esporas y quistes. (Rice, 1984; Owens, 2000; Lezcano,
1999).
Por otra parte, actúa a menor concentración y con menor tiempo de
contacto que otros desinfectantes como el cloro, dióxido de cloro y
monocloraminas. Además el ozono, como indicábamos previamente,
oxida sustancias citoplasmáticas, mientras que el cloro únicamente produce
una destrucción de centros vitales de la célula, que en ocasiones no llega a
ser efectiva por lo que los microorganismos logran recuperarse (Bitton,
1994).
1.2 Materiales y presupuesto Para realizar nuestro diseño tecnológico hemos necesitado los materiales que
se presentan en la Tabla 2.
Tabla 2. Presupuesto del diseño tecnológico
Materiales Precio Cantidad Precio final
Generador de ozono 54€ 1 54€
Cajas 12€ 2 24€
Plancha agujereada para
canalizar el flujo de aire
Reciclada
(0€)
1 Reciclada
(0€)
Ventilador 13€ 1 13€
Material eléctrico (cables,
regletas…)
8€ - 8€
Interruptores 1€ 2 2€
88
Regulador de velocidad 3€ 1 3€
Fuentes de alimentación
(12V)
15€ 2 30€
Herramientas - - -
Precio final - - 134€
1.3 Diseño y construcción
En primer lugar diseñamos nuestra propuesta tecnológica. Decidimos trabajar
con el ozono ya que es un gas que a pesar de sus propiedades esterilizantes
es barato de conseguir y podría ser aplicado en nuestro proyecto a escala
casera.
Nuestro objetivo era crear una corriente fija y continua de ozono que
mantuviese la zona de envasado desinfectada. De esta forma, los alimentos
serían procesados en esa zona tratada con ozono. Tras su tratamiento serían
envasados en la misma zona, manteniendo la desinfección.
Para impulsar el ozono y crear un flujo continuo, decidimos utilizar un ventilador
y darle dos velocidades reduciendo la tensión para los diferentes usos.
Mediante las cajas y la plancha agujereada, creamos un circuito de flujo de aire
tratado con ozono. De esta forma, sería posible envasar en medio de ambas
dando lugar a un ambiente lo más estéril posible.
Tratamos que fuese de un tamaño pequeño y sin partes peligrosas debido a
nuestro objetivo final de aplicarla en los hogares para aprovechar y conservar
mejor los diferentes alimentos.
Es por ello que usamos corriente continua a 12V. Al tratarse de una zona que
vamos a estar manipulando, es importante asegurar su seguridad teniendo en
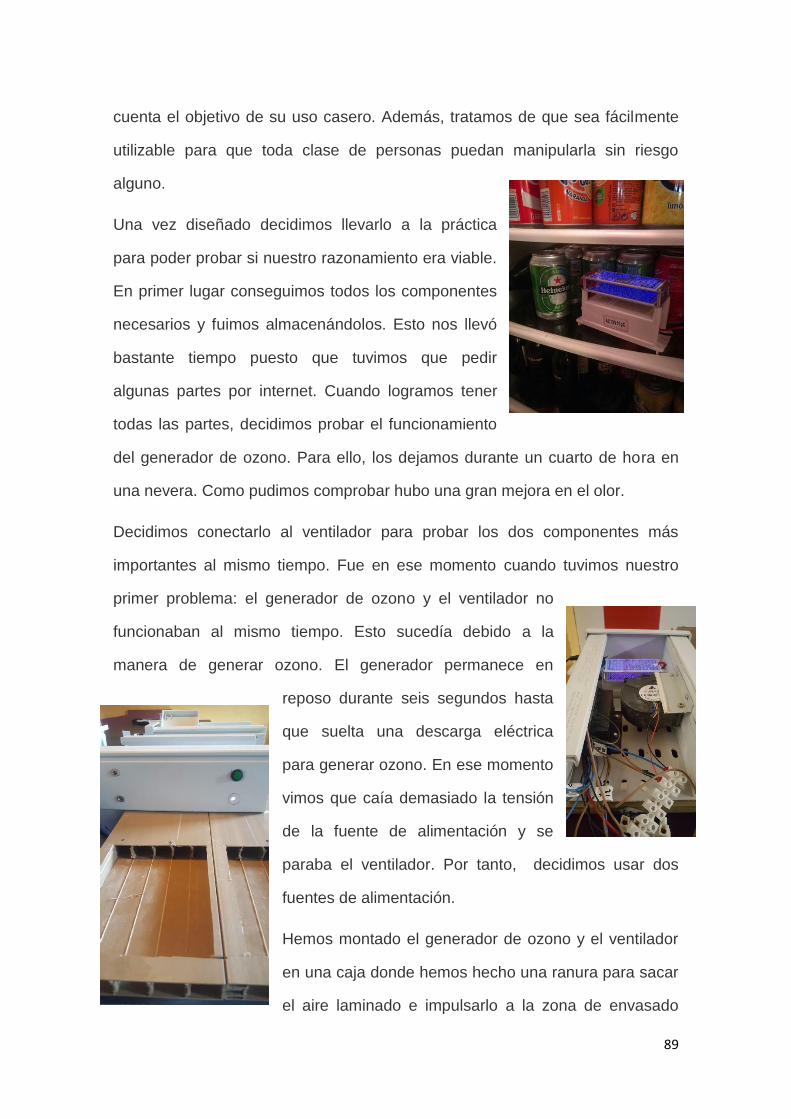
89
cuenta el objetivo de su uso casero. Además, tratamos de que sea fácilmente
utilizable para que toda clase de personas puedan manipularla sin riesgo
alguno.
Una vez diseñado decidimos llevarlo a la práctica
para poder probar si nuestro razonamiento era viable.
En primer lugar conseguimos todos los componentes
necesarios y fuimos almacenándolos. Esto nos llevó
bastante tiempo puesto que tuvimos que pedir
algunas partes por internet. Cuando logramos tener
todas las partes, decidimos probar el funcionamiento
del generador de ozono. Para ello, los dejamos durante un cuarto de hora en
una nevera. Como pudimos comprobar hubo una gran mejora en el olor.
Decidimos conectarlo al ventilador para probar los dos componentes más
importantes al mismo tiempo. Fue en ese momento cuando tuvimos nuestro
primer problema: el generador de ozono y el ventilador no
funcionaban al mismo tiempo. Esto sucedía debido a la
manera de generar ozono. El generador permanece en
reposo durante seis segundos hasta
que suelta una descarga eléctrica
para generar ozono. En ese momento
vimos que caía demasiado la tensión
de la fuente de alimentación y se
paraba el ventilador. Por tanto, decidimos usar dos
fuentes de alimentación.
Hemos montado el generador de ozono y el ventilador
en una caja donde hemos hecho una ranura para sacar
el aire laminado e impulsarlo a la zona de envasado
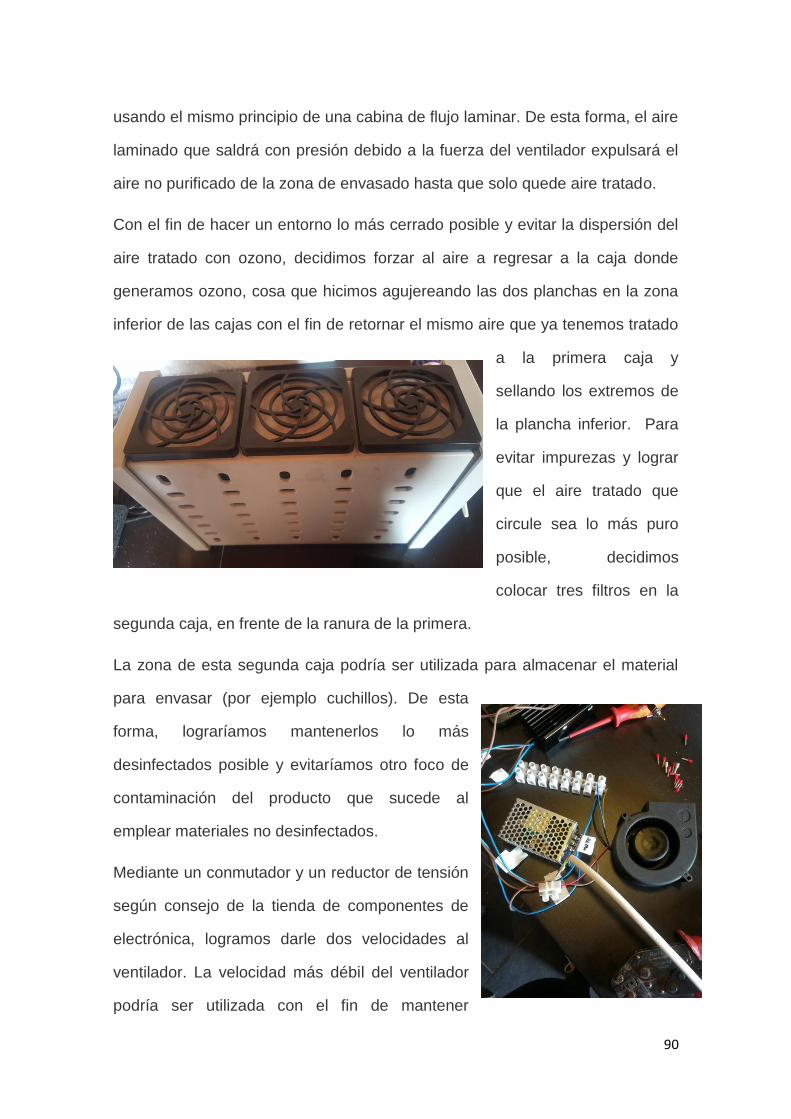
90
usando el mismo principio de una cabina de flujo laminar. De esta forma, el aire
laminado que saldrá con presión debido a la fuerza del ventilador expulsará el
aire no purificado de la zona de envasado hasta que solo quede aire tratado.
Con el fin de hacer un entorno lo más cerrado posible y evitar la dispersión del
aire tratado con ozono, decidimos forzar al aire a regresar a la caja donde
generamos ozono, cosa que hicimos agujereando las dos planchas en la zona
inferior de las cajas con el fin de retornar el mismo aire que ya tenemos tratado
a la primera caja y
sellando los extremos de
la plancha inferior. Para
evitar impurezas y lograr
que el aire tratado que
circule sea lo más puro
posible, decidimos
colocar tres filtros en la
segunda caja, en frente de la ranura de la primera.
La zona de esta segunda caja podría ser utilizada para almacenar el material
para envasar (por ejemplo cuchillos). De esta
forma, lograríamos mantenerlos lo más
desinfectados posible y evitaríamos otro foco de
contaminación del producto que sucede al
emplear materiales no desinfectados.
Mediante un conmutador y un reductor de tensión
según consejo de la tienda de componentes de
electrónica, logramos darle dos velocidades al
ventilador. La velocidad más débil del ventilador
podría ser utilizada con el fin de mantener

91
material esterilizado, ya que para ello no es necesaria tanta presión como para
crear el efecto de una cabina de flujo laminar. Por ello, pusimos un interruptor
de dos posiciones para que al ventilador le lleguen 6V o 12V en función de la
posición en la que lo coloquemos. En la primera posición podría ser utilizado
para esterilizar material y en la segunda para envasar los alimentos deseados
con este método.
El último problema que nos encontramos fue que la laminación no era
totalmente perfecta ya que se expulsaba más aire por uno de los extremos de
la plancha inferior. Para solucionarlo situamos un deflector para guiar el aire en
la dirección correcta. Finalmente le dimos los retoques finales rellenando
esquinas del sellado y mejorando su aspecto exterior.
En el anexo I se muestran los planos y fotografías de nuestro diseño
tecnológico.
1.6 Forma de utilización.
Como ya hemos mencionado se trata de una máquina de uso sencillo ya que
su objetivo es que cualquier persona sea capaz de manipularla en su hogar.
En primer lugar se deben conectar las dos fuentes de alimentación a dos
enchufes del hogar o del lugar en el que se vaya a utilizar que debe ser de
corriente alterna a 220V. Después presionaremos el interruptor circular que se
sitúa en el extremo de la primera caja. De esta manera pondremos en
funcionamiento el generador de ozono.
Una vez que esté generando, lo cual es fácilmente comprobable debido a la
luz, sonido y olor que emite la descarga eléctrica que genera el ozono,
movemos el interruptor de dos posiciones a la segunda posición. Esto pondrá
en marcha el ventilador en el modo de envasado. Se debe elegir la marcha en
relación a la función deseada. En este momento tendremos un flujo continuo en
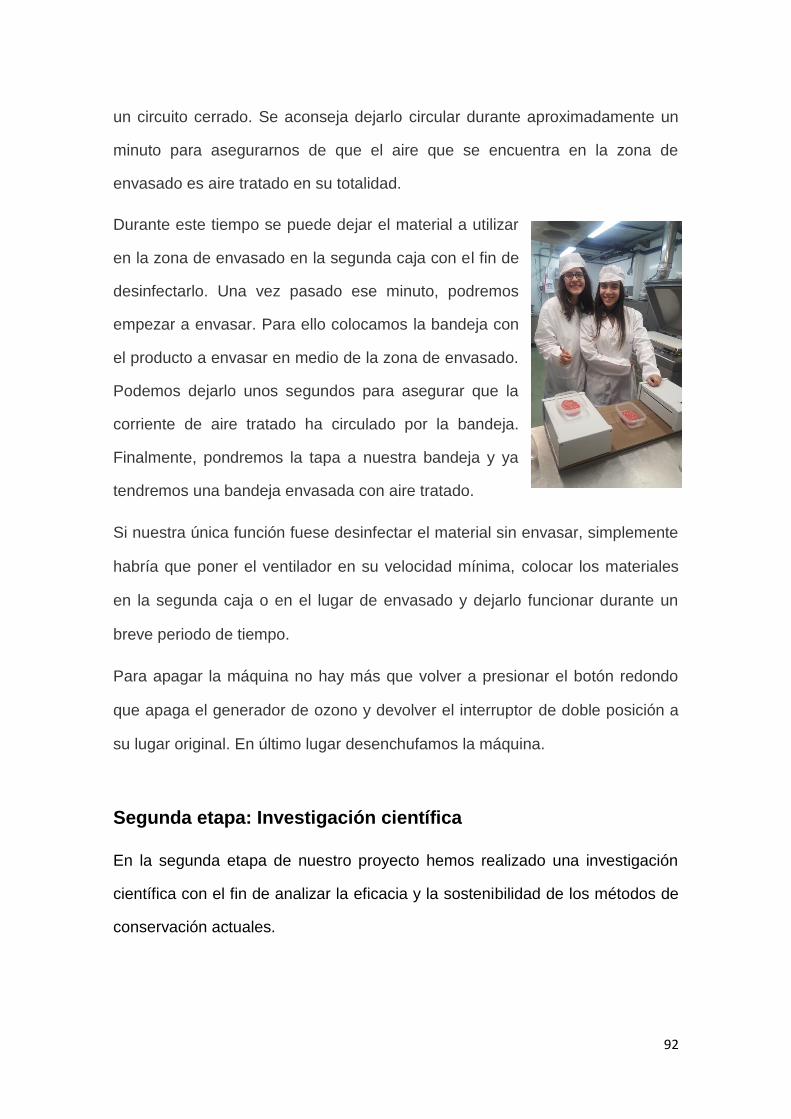
92
un circuito cerrado. Se aconseja dejarlo circular durante aproximadamente un
minuto para asegurarnos de que el aire que se encuentra en la zona de
envasado es aire tratado en su totalidad.
Durante este tiempo se puede dejar el material a utilizar
en la zona de envasado en la segunda caja con el fin de
desinfectarlo. Una vez pasado ese minuto, podremos
empezar a envasar. Para ello colocamos la bandeja con
el producto a envasar en medio de la zona de envasado.
Podemos dejarlo unos segundos para asegurar que la
corriente de aire tratado ha circulado por la bandeja.
Finalmente, pondremos la tapa a nuestra bandeja y ya
tendremos una bandeja envasada con aire tratado.
Si nuestra única función fuese desinfectar el material sin envasar, simplemente
habría que poner el ventilador en su velocidad mínima, colocar los materiales
en la segunda caja o en el lugar de envasado y dejarlo funcionar durante un
breve periodo de tiempo.
Para apagar la máquina no hay más que volver a presionar el botón redondo
que apaga el generador de ozono y devolver el interruptor de doble posición a
su lugar original. En último lugar desenchufamos la máquina.
Segunda etapa: Investigación científica
En la segunda etapa de nuestro proyecto hemos realizado una investigación
científica con el fin de analizar la eficacia y la sostenibilidad de los métodos de
conservación actuales.
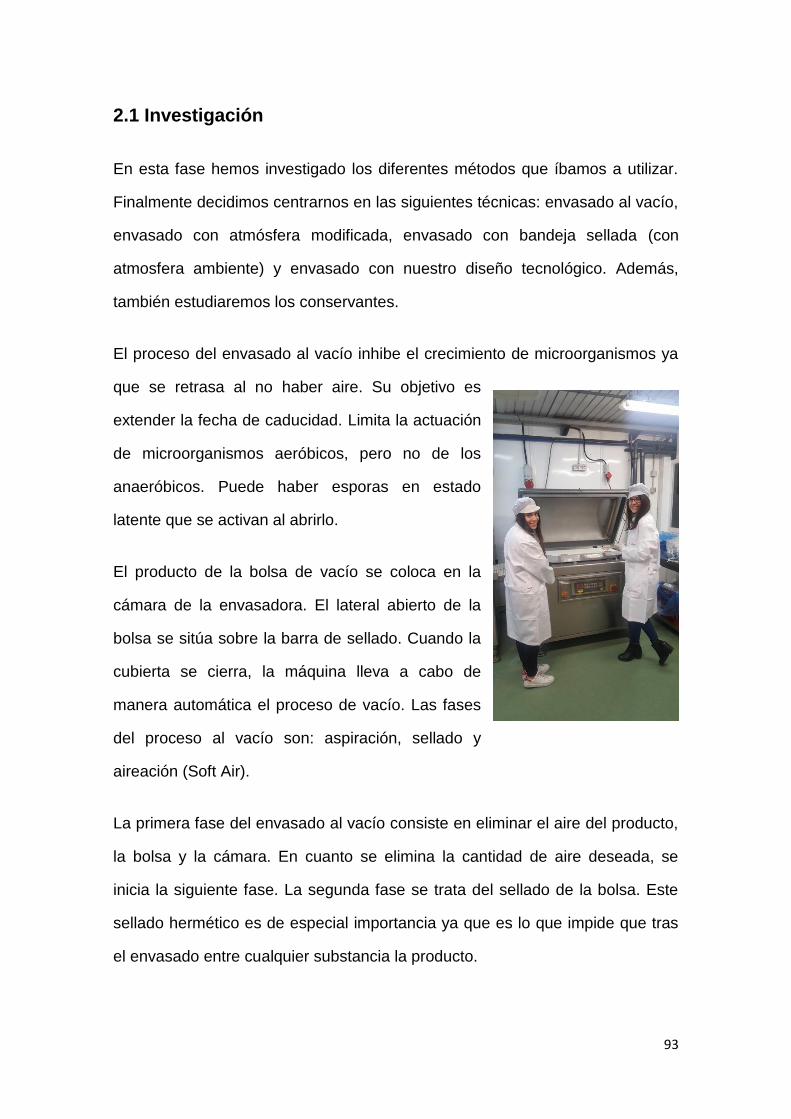
93
2.1 Investigación
En esta fase hemos investigado los diferentes métodos que íbamos a utilizar.
Finalmente decidimos centrarnos en las siguientes técnicas: envasado al vacío,
envasado con atmósfera modificada, envasado con bandeja sellada (con
atmosfera ambiente) y envasado con nuestro diseño tecnológico. Además,
también estudiaremos los conservantes.
El proceso del envasado al vacío inhibe el crecimiento de microorganismos ya
que se retrasa al no haber aire. Su objetivo es
extender la fecha de caducidad. Limita la actuación
de microorganismos aeróbicos, pero no de los
anaeróbicos. Puede haber esporas en estado
latente que se activan al abrirlo.
El producto de la bolsa de vacío se coloca en la
cámara de la envasadora. El lateral abierto de la
bolsa se sitúa sobre la barra de sellado. Cuando la
cubierta se cierra, la máquina lleva a cabo de
manera automática el proceso de vacío. Las fases
del proceso al vacío son: aspiración, sellado y
aireación (Soft Air).
La primera fase del envasado al vacío consiste en eliminar el aire del producto,
la bolsa y la cámara. En cuanto se elimina la cantidad de aire deseada, se
inicia la siguiente fase. La segunda fase se trata del sellado de la bolsa. Este
sellado hermético es de especial importancia ya que es lo que impide que tras
el envasado entre cualquier substancia la producto.
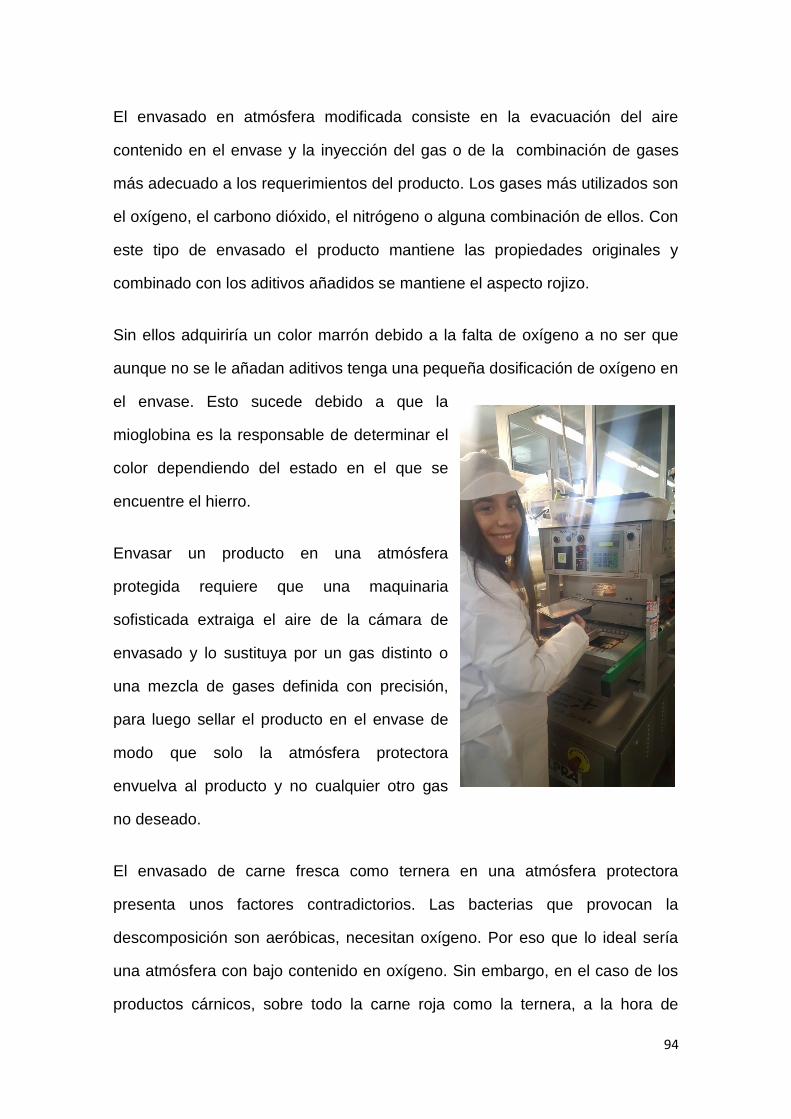
94
El envasado en atmósfera modificada consiste en la evacuación del aire
contenido en el envase y la inyección del gas o de la combinación de gases
más adecuado a los requerimientos del producto. Los gases más utilizados son
el oxígeno, el carbono dióxido, el nitrógeno o alguna combinación de ellos. Con
este tipo de envasado el producto mantiene las propiedades originales y
combinado con los aditivos añadidos se mantiene el aspecto rojizo.
Sin ellos adquiriría un color marrón debido a la falta de oxígeno a no ser que
aunque no se le añadan aditivos tenga una pequeña dosificación de oxígeno en
el envase. Esto sucede debido a que la
mioglobina es la responsable de determinar el
color dependiendo del estado en el que se
encuentre el hierro.
Envasar un producto en una atmósfera
protegida requiere que una maquinaria
sofisticada extraiga el aire de la cámara de
envasado y lo sustituya por un gas distinto o
una mezcla de gases definida con precisión,
para luego sellar el producto en el envase de
modo que solo la atmósfera protectora
envuelva al producto y no cualquier otro gas
no deseado.
El envasado de carne fresca como ternera en una atmósfera protectora
presenta unos factores contradictorios. Las bacterias que provocan la
descomposición son aeróbicas, necesitan oxígeno. Por eso que lo ideal sería
una atmósfera con bajo contenido en oxígeno. Sin embargo, en el caso de los
productos cárnicos, sobre todo la carne roja como la ternera, a la hora de
95
vender es importante asegurarse de que la carne conserve su color rojo
atractivo. Al exponerse al aire se vuelve marrón. El color de la carne lo
determina una proteína llamada mioglobina que se encuentra en el tejido. Se
trata de una proteína púrpura que al reaccionar con el oxígeno se transforma
en: la oximioglobina (roja), y la metamioglobina (marrón). En el aire, la
concentración de oxígeno favorece la formación de metamioglobina que vuelve
la carne marrón.
Con mayores concentraciones de oxígeno, hay más posibilidades de producir
oximioglobina de color rojo intenso de esta forma manteniendo un buen
aspecto. Con la combinación de gases apropiada (por lo general entre un 60 y
un 80 por ciento de oxígeno) la carne conserva su color apetecible. Además, la
carne de vacuno necesita más oxígeno, pero este favorece las bacterias
aeróbicas. El dióxido de carbono puede inhibir en gran medida el desarrollo de
estas bacterias aeróbicas. Por tanto, si el resto del compuesto es carbono
dióxido, detendrá el desarrollo de los microorganismos que descomponen la
carne.
El envasado a bandeja sellada que realizamos no se trata de un método
comercial, pero aun así decidimos realizarlo porque queríamos comparar los
diferentes métodos con cómo sería sin alterar la atmósfera que rodea el
producto. Simplemente colocamos la carne en una bandeja y la sellamos. De
esta forma, conservaría la atmosfera del ambiente en el momento de
envasado.
El envasado con nuestro diseño tecnológico lo hemos hecho para comprobar si
nuestra hipótesis era cierta. Se trata de una novedosa técnica que todavía no
ha sido aplicada a pesar de que se ha investigado.
96
Los conservantes son sustancias naturales y artificiales usadas en la
preservación de los alimentos ante la acción de los microorganismos, con el fin
de impedir su deterioro por un tiempo determinado bajo ciertas condiciones de
almacenamiento. Pueden ser de origen natural o artificial.
Se pueden clasificar dependiendo de su inocuidad (inocuos, inocuidad no
admitida universalmente, toxicidad reconocida y toxicidad dudosa). En un solo
alimento se suelen utilizar varios ya que cada uno ataca a un tipo de
microorganismo y cuando se deteriora un alimento es por más de uno. En la
actualidad hay 30 autorizados, muchos de ellos son antioxidantes y 14 tienen
un efecto conservador secundario.
Los microorganismos no desarrollan resistencia a los conservantes al contrario
de lo que sucede con los antibióticos. Las funciones principales de los
conservantes son conservar los alimentos, facilitar su fabricación, mejorar su
aspecto o textura, aumentar o mejorar su sabor o compensar la escasez de
algunos ingredientes, como poner menos fresas en un yogur de frutas o menos
carne en una salchicha.
La mayoría de ellos son inocuos, pero algunos pueden ser perjudiciales. Otros
se usan porque sus beneficios son mayores que sus riesgos. Muchos están
siendo reevaluados por la Agencia Europea de Seguridad Alimentaria (EFSA)
ya que nuevas investigaciones han puesto su inocuidad en duda.
A pesar de que no todos sean dañinos, muchas veces son totalmente
innecesarios, particularmente cuando hablamos de aditivos y sobre todo
colorantes. Debemos tener en cuenta que no dejan de ser substancias que
alteran las propiedades naturales de los alimentos y por tanto se deben evitar
en la medida de lo posible.
97
2.2 Fase de contacto
En primer lugar, nos pusimos en contacto con un técnico de Kilse S.L.,
(empresa que lleva 30 años dedicándose a trabajar con máquinas, entre ellas
de conservación de alimentos), especialista en el sector para contar con su
guía en este proyecto ya que no hay nadie mejor para guiarte que quien trabaja
con ello día a día.
En segundo lugar, nos pusimos en contacto con empresas dedicadas al sector
alimentario y pedimos un sitio para poder envasar. Harakintza S.COOP accedió
a dejarnos sus instalaciones durante una mañana para poder envasar y
Ameztoi Anaiak nos ofertó una visita por todas sus instalaciones. Luis Thate
también nos ofertó una visita por sus instalaciones.
2.3 Preparación del producto
Tras habernos informado sobre los métodos de conservación actuales, la
mañana del dos de marzo de 2017 acompañadas por el técnico de Kilse SL,
fuimos a Harakintza S.COOP, en Zorroza. Allí, contamos con el asesoramiento
del técnico de Kilse SL, la responsable de calidad y el jefe de producción de la
empresa. Nos explicaron lo que hacían y los diferentes métodos de
conservación. Además, nos asesoraron a la hora de preparar nuestro producto.
Primero teníamos carne sin haberle añadido nada y dividimos en dos el
producto. Se trata de carne de vacuno a 3,6ºC. A la carne la denominaremos
magro ya que se le añade un poco de grasa. Este paso resulta imprescindible
porque si no se queda dura.
Al primer grupo únicamente le añadimos 12 g de sal por kilo. Contábamos con
3,72 kg de carne. Según nuestros cálculos, le adicionamos 44,64 g de sal.
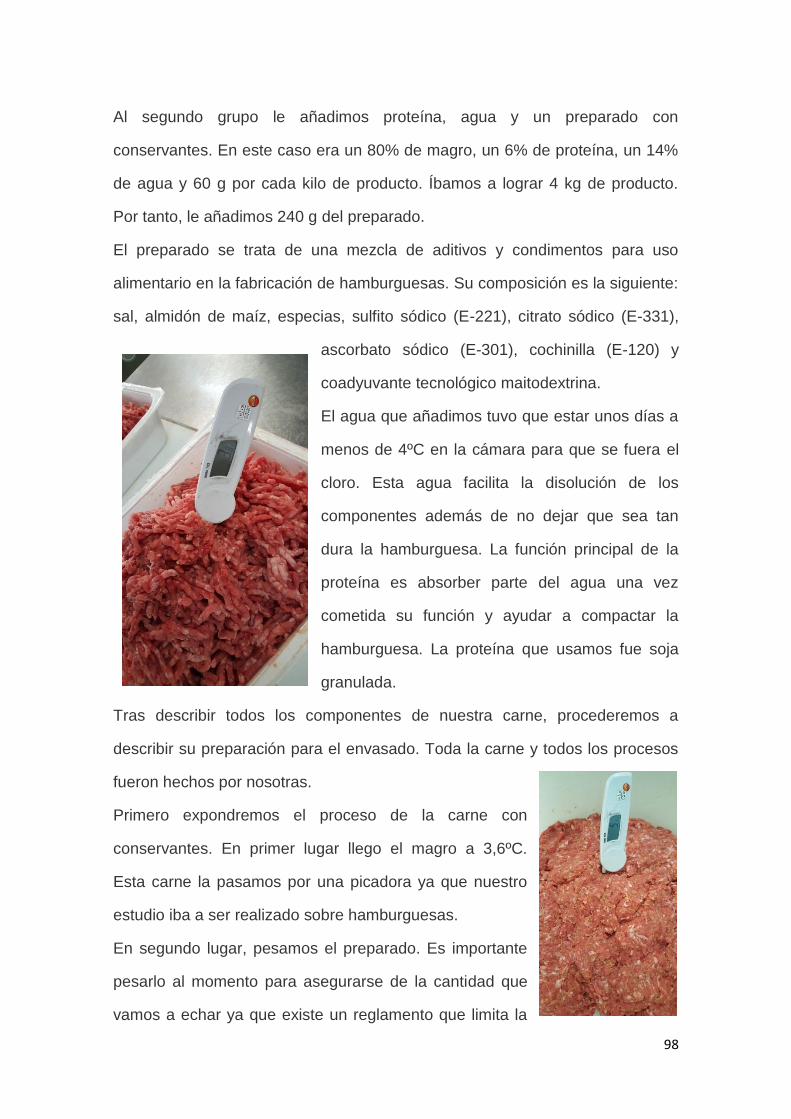
98
Al segundo grupo le añadimos proteína, agua y un preparado con
conservantes. En este caso era un 80% de magro, un 6% de proteína, un 14%
de agua y 60 g por cada kilo de producto. Íbamos a lograr 4 kg de producto.
Por tanto, le añadimos 240 g del preparado.
El preparado se trata de una mezcla de aditivos y condimentos para uso
alimentario en la fabricación de hamburguesas. Su composición es la siguiente:
sal, almidón de maíz, especias, sulfito sódico (E-221), citrato sódico (E-331),
ascorbato sódico (E-301), cochinilla (E-120) y
coadyuvante tecnológico maitodextrina.
El agua que añadimos tuvo que estar unos días a
menos de 4ºC en la cámara para que se fuera el
cloro. Esta agua facilita la disolución de los
componentes además de no dejar que sea tan
dura la hamburguesa. La función principal de la
proteína es absorber parte del agua una vez
cometida su función y ayudar a compactar la
hamburguesa. La proteína que usamos fue soja
granulada.
Tras describir todos los componentes de nuestra carne, procederemos a
describir su preparación para el envasado. Toda la carne y todos los procesos
fueron hechos por nosotras.
Primero expondremos el proceso de la carne con
conservantes. En primer lugar llego el magro a 3,6ºC.
Esta carne la pasamos por una picadora ya que nuestro
estudio iba a ser realizado sobre hamburguesas.
En segundo lugar, pesamos el preparado. Es importante
pesarlo al momento para asegurarse de la cantidad que
vamos a echar ya que existe un reglamento que limita la
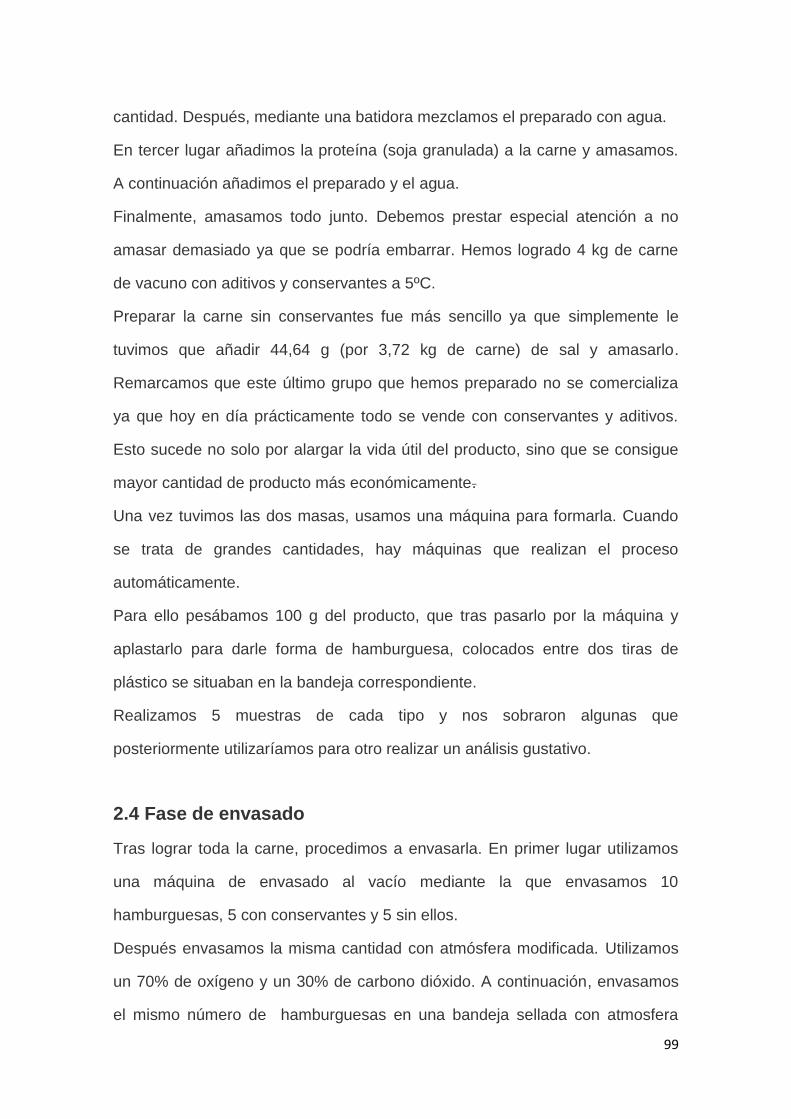
99
cantidad. Después, mediante una batidora mezclamos el preparado con agua.
En tercer lugar añadimos la proteína (soja granulada) a la carne y amasamos.
A continuación añadimos el preparado y el agua.
Finalmente, amasamos todo junto. Debemos prestar especial atención a no
amasar demasiado ya que se podría embarrar. Hemos logrado 4 kg de carne
de vacuno con aditivos y conservantes a 5ºC.
Preparar la carne sin conservantes fue más sencillo ya que simplemente le
tuvimos que añadir 44,64 g (por 3,72 kg de carne) de sal y amasarlo.
Remarcamos que este último grupo que hemos preparado no se comercializa
ya que hoy en día prácticamente todo se vende con conservantes y aditivos.
Esto sucede no solo por alargar la vida útil del producto, sino que se consigue
mayor cantidad de producto más económicamente.
Una vez tuvimos las dos masas, usamos una máquina para formarla. Cuando
se trata de grandes cantidades, hay máquinas que realizan el proceso
automáticamente.
Para ello pesábamos 100 g del producto, que tras pasarlo por la máquina y
aplastarlo para darle forma de hamburguesa, colocados entre dos tiras de
plástico se situaban en la bandeja correspondiente.
Realizamos 5 muestras de cada tipo y nos sobraron algunas que
posteriormente utilizaríamos para otro realizar un análisis gustativo.
2.4 Fase de envasado
Tras lograr toda la carne, procedimos a envasarla. En primer lugar utilizamos
una máquina de envasado al vacío mediante la que envasamos 10
hamburguesas, 5 con conservantes y 5 sin ellos.
Después envasamos la misma cantidad con atmósfera modificada. Utilizamos
un 70% de oxígeno y un 30% de carbono dióxido. A continuación, envasamos
el mismo número de hamburguesas en una bandeja sellada con atmosfera
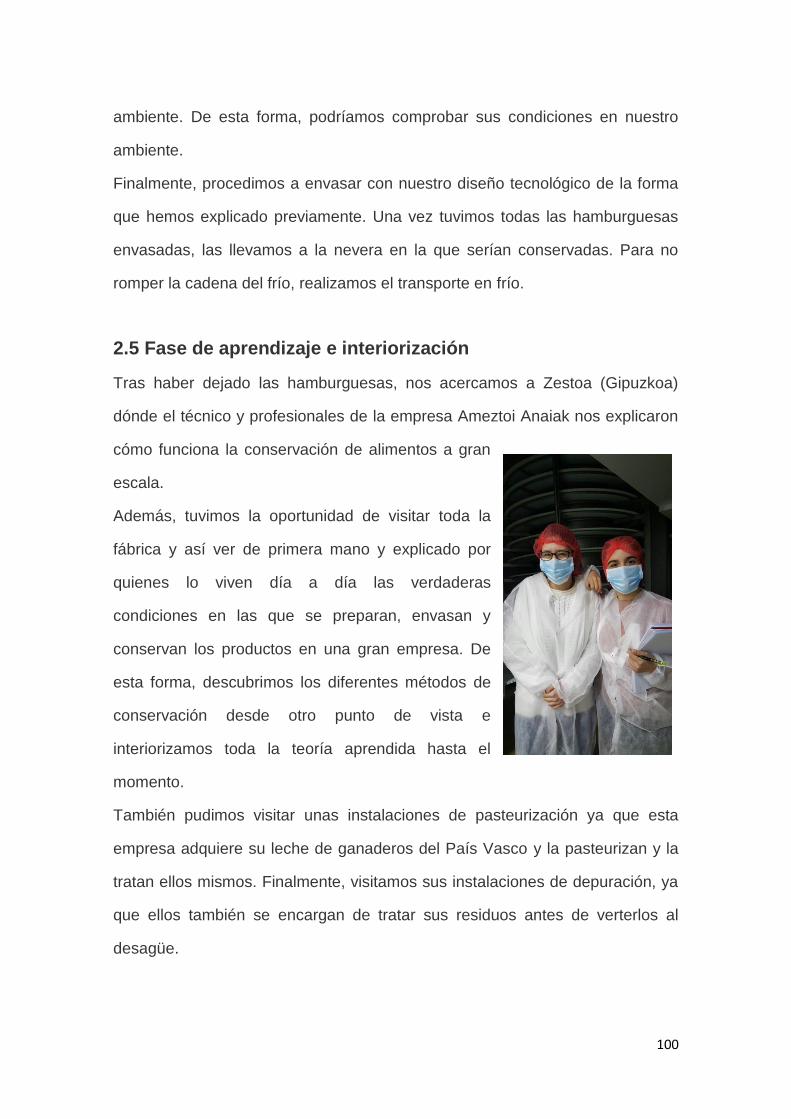
100
ambiente. De esta forma, podríamos comprobar sus condiciones en nuestro
ambiente.
Finalmente, procedimos a envasar con nuestro diseño tecnológico de la forma
que hemos explicado previamente. Una vez tuvimos todas las hamburguesas
envasadas, las llevamos a la nevera en la que serían conservadas. Para no
romper la cadena del frío, realizamos el transporte en frío.
2.5 Fase de aprendizaje e interiorización
Tras haber dejado las hamburguesas, nos acercamos a Zestoa (Gipuzkoa)
dónde el técnico y profesionales de la empresa Ameztoi Anaiak nos explicaron
cómo funciona la conservación de alimentos a gran
escala.
Además, tuvimos la oportunidad de visitar toda la
fábrica y así ver de primera mano y explicado por
quienes lo viven día a día las verdaderas
condiciones en las que se preparan, envasan y
conservan los productos en una gran empresa. De
esta forma, descubrimos los diferentes métodos de
conservación desde otro punto de vista e
interiorizamos toda la teoría aprendida hasta el
momento.
También pudimos visitar unas instalaciones de pasteurización ya que esta
empresa adquiere su leche de ganaderos del País Vasco y la pasteurizan y la
tratan ellos mismos. Finalmente, visitamos sus instalaciones de depuración, ya
que ellos también se encargan de tratar sus residuos antes de verterlos al
desagüe.
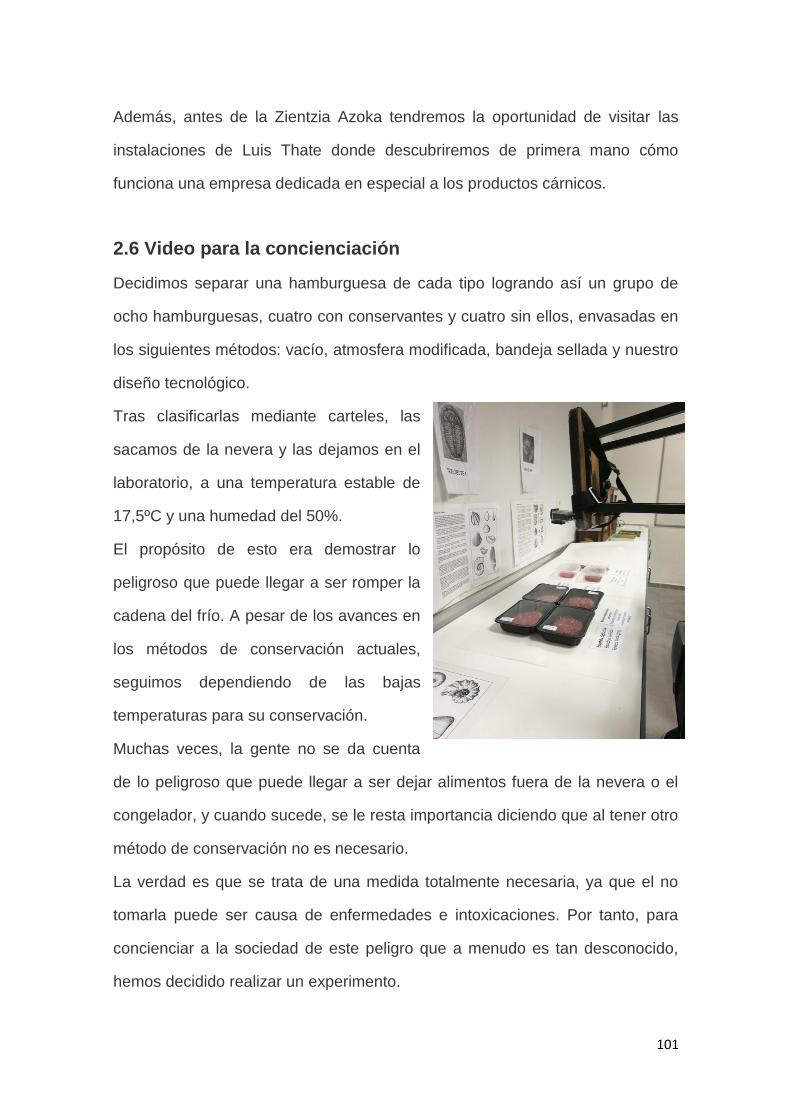
101
Además, antes de la Zientzia Azoka tendremos la oportunidad de visitar las
instalaciones de Luis Thate donde descubriremos de primera mano cómo
funciona una empresa dedicada en especial a los productos cárnicos.
2.6 Video para la concienciación
Decidimos separar una hamburguesa de cada tipo logrando así un grupo de
ocho hamburguesas, cuatro con conservantes y cuatro sin ellos, envasadas en
los siguientes métodos: vacío, atmosfera modificada, bandeja sellada y nuestro
diseño tecnológico.
Tras clasificarlas mediante carteles, las
sacamos de la nevera y las dejamos en el
laboratorio, a una temperatura estable de
17,5ºC y una humedad del 50%.
El propósito de esto era demostrar lo
peligroso que puede llegar a ser romper la
cadena del frío. A pesar de los avances en
los métodos de conservación actuales,
seguimos dependiendo de las bajas
temperaturas para su conservación.
Muchas veces, la gente no se da cuenta
de lo peligroso que puede llegar a ser dejar alimentos fuera de la nevera o el
congelador, y cuando sucede, se le resta importancia diciendo que al tener otro
método de conservación no es necesario.
La verdad es que se trata de una medida totalmente necesaria, ya que el no
tomarla puede ser causa de enfermedades e intoxicaciones. Por tanto, para
concienciar a la sociedad de este peligro que a menudo es tan desconocido,
hemos decidido realizar un experimento.
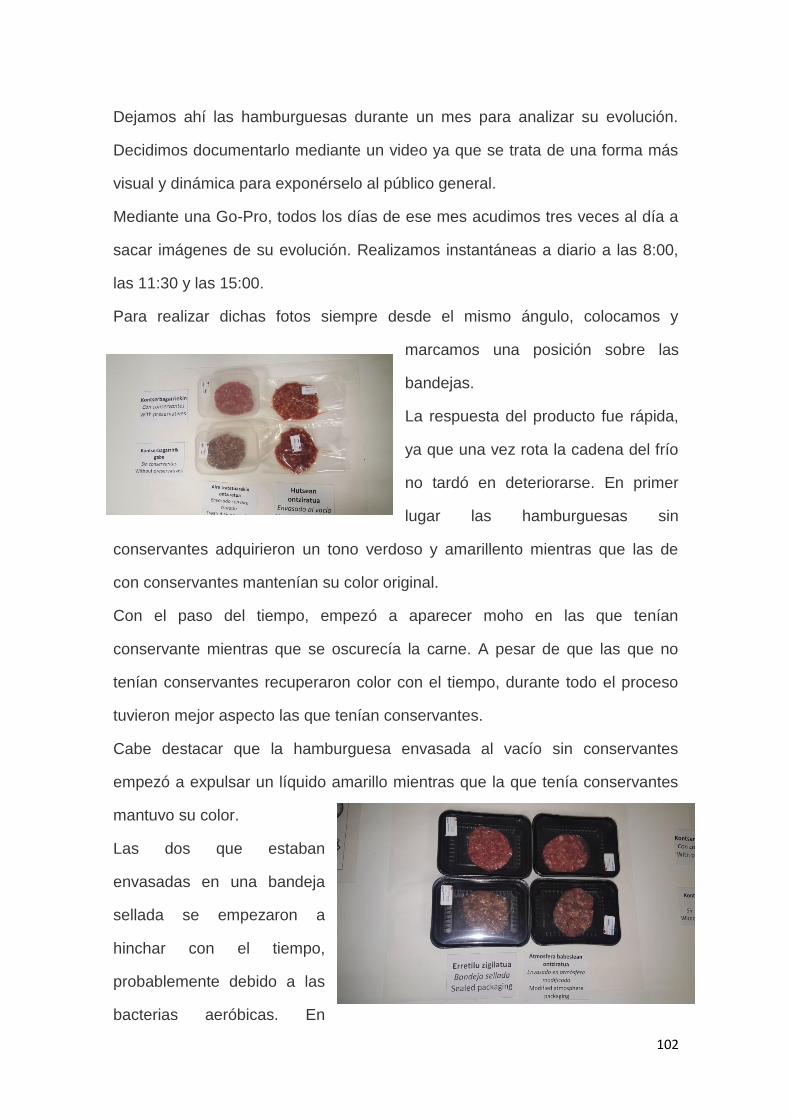
102
Dejamos ahí las hamburguesas durante un mes para analizar su evolución.
Decidimos documentarlo mediante un video ya que se trata de una forma más
visual y dinámica para exponérselo al público general.
Mediante una Go-Pro, todos los días de ese mes acudimos tres veces al día a
sacar imágenes de su evolución. Realizamos instantáneas a diario a las 8:00,
las 11:30 y las 15:00.
Para realizar dichas fotos siempre desde el mismo ángulo, colocamos y
marcamos una posición sobre las
bandejas.
La respuesta del producto fue rápida,
ya que una vez rota la cadena del frío
no tardó en deteriorarse. En primer
lugar las hamburguesas sin
conservantes adquirieron un tono verdoso y amarillento mientras que las de
con conservantes mantenían su color original.
Con el paso del tiempo, empezó a aparecer moho en las que tenían
conservante mientras que se oscurecía la carne. A pesar de que las que no
tenían conservantes recuperaron color con el tiempo, durante todo el proceso
tuvieron mejor aspecto las que tenían conservantes.
Cabe destacar que la hamburguesa envasada al vacío sin conservantes
empezó a expulsar un líquido amarillo mientras que la que tenía conservantes
mantuvo su color.
Las dos que estaban
envasadas en una bandeja
sellada se empezaron a
hinchar con el tiempo,
probablemente debido a las
bacterias aeróbicas. En
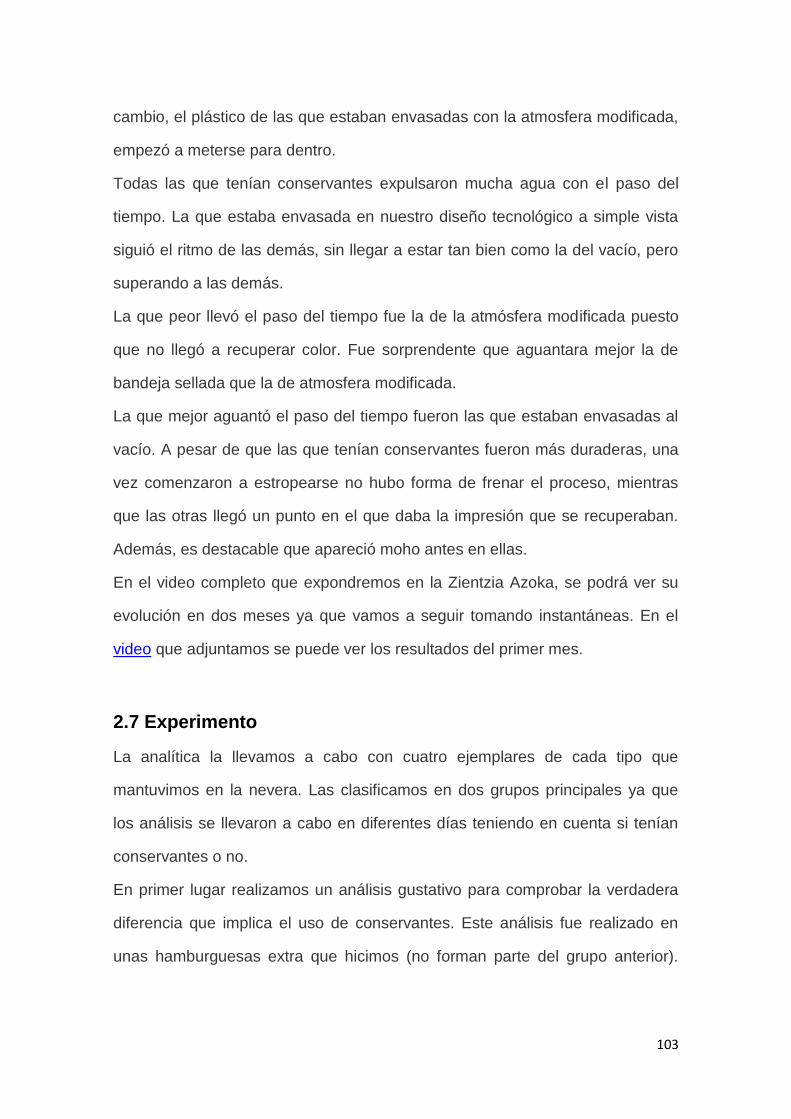
103
cambio, el plástico de las que estaban envasadas con la atmosfera modificada,
empezó a meterse para dentro.
Todas las que tenían conservantes expulsaron mucha agua con el paso del
tiempo. La que estaba envasada en nuestro diseño tecnológico a simple vista
siguió el ritmo de las demás, sin llegar a estar tan bien como la del vacío, pero
superando a las demás.
La que peor llevó el paso del tiempo fue la de la atmósfera modificada puesto
que no llegó a recuperar color. Fue sorprendente que aguantara mejor la de
bandeja sellada que la de atmosfera modificada.
La que mejor aguantó el paso del tiempo fueron las que estaban envasadas al
vacío. A pesar de que las que tenían conservantes fueron más duraderas, una
vez comenzaron a estropearse no hubo forma de frenar el proceso, mientras
que las otras llegó un punto en el que daba la impresión que se recuperaban.
Además, es destacable que apareció moho antes en ellas.
En el video completo que expondremos en la Zientzia Azoka, se podrá ver su
evolución en dos meses ya que vamos a seguir tomando instantáneas. En el
video que adjuntamos se puede ver los resultados del primer mes.
2.7 Experimento
La analítica la llevamos a cabo con cuatro ejemplares de cada tipo que
mantuvimos en la nevera. Las clasificamos en dos grupos principales ya que
los análisis se llevaron a cabo en diferentes días teniendo en cuenta si tenían
conservantes o no.
En primer lugar realizamos un análisis gustativo para comprobar la verdadera
diferencia que implica el uso de conservantes. Este análisis fue realizado en
unas hamburguesas extra que hicimos (no forman parte del grupo anterior).

104
Mientras que al freírlas las hamburguesas que tenían conservantes adoptaron
un tono rosado, las que no tenían eran más bien grisáceas.
Realizamos la prueba con diez comensales. Su totalidad expuso que no había
nada que ver entre el sabor de ambos grupos. Las que carecían de
conservantes tenían mejor sabor y mejor textura. Todos afirmaron que
preferirían comprar esas a pesar de que no están a la venta.
Posteriormente, procedimos al verdadero análisis. La frecuencia de los análisis
empieza siendo de cinco días para las que no tienen conservantes y de siete
para las que sí. Con el tiempo, la espera se ajusta a la evolución del producto.
Hemos basado nuestro estudio en las siguientes variables: pH, olor y aspecto.
Decidimos realizar un análisis físico mediante un medidor de pH digital para ser
lo más exactos posibles al controlar la evolución. Los expertos nos
recomendaron esta prueba ya que es totalmente objetiva y puedes comprobar
el verdadero estado del producto más allá de su aspecto u olor.
Valoramos también el aspecto de la carne ya que a la hora de comprar es en lo
que se fija el cliente y lo que realmente vende. También evaluamos el olor por
su intensa relación con el sabor. No valoramos el sabor por el riesgo de
intoxicación que existe al tomar alimentos pasados.
Ambas magnitudes han sido valoradas por cinco personas diferentes y
puntuadas del uno al diez siendo diez el mejor valor. En todas partimos de un
aspecto y olor ideal (10) ya que al principio todas eran idénticas.
Respecto al pH, partimos de un valor de 5,75. Con el paso de tiempo la carne
tiende a un pH más ácido. Esto sucede de la siguiente manera. Una vez
sacrificado el animal, el músculo se convierte en carne. Denominamos carne al
resultado de los cambios bioquímicos post mortem. En el rigor mortis, el
músculo tiene a acidificarse. Esto sucede porque en un músculo en reposo es
el ATP que mantiene el músculo relajado. Una vez cesado el aporte sanguíneo
y de nutrientes, se activa un metabolismo anaeróbico para transformar las
105
reservas de energía (glucógeno) en ATP para mantener la temperatura e
integridad estructural. Este ATP se obtiene mediante la degradación de
glucógeno en ácido láctico. Al no poder ser retirado por el sistema sanguíneo,
provoca un descenso del pH. Por tanto, en vacunos, desciende desde valores
cercanos a 7 hasta valores entre 5,5 y 5,7 en unas 36 h.
Aun así, el pH varía depende del tipo de músculo. Los que tienen fibras de
contracción blancas alcanzan valores de 5,5; mientras que los que tienes fibras
de contracción rojas no bajan de 6. Los músculos que más trabajo realizan
antes del sacrificio son los que tiene el pH más elevado. El pH cuantifica la
acidez, cómo fue tratado el animal antes de la muerte y sus niveles de energía.
Con el tiempo, el pH tiende a bajar volviéndose la carne cada vez más ácida.
Resultados
Ahora analizaremos los resultados de la analítica completa con todos los
métodos de conservación. Respecto a las hamburguesas que no tenían
aditivos, todas comenzaron con un pH ideal de 5,75 y un olor y aspecto ideal.
Las pruebas fueron realizadas con una diferencia de 5 días entre ellas.
En el primer análisis, todos los valores de pH se mantuvieron entre 5,42 y 5,31.
Todos ellos descendieron. La única que mantuvo su condición fue la que
estaba envasada al vacío. El aspecto de las demás empezó a adquirir un tono
verdoso. La que estaba envasada con nuestro diseño tecnológico estaba
oscurecida, pero no presenta el tono verdoso de las demás.
En el segundo análisis los niveles de pH se mantienen entre 5,02 y 5,14. Todos
ellos descendieron. Tanto la de la bandeja sellada como la de la atmósfera
modificada presentan muy mal aspecto y olor. El olor de la del vacío ha
empeorado, pero mantiene buen aspecto. La envasada con nuestro diseño
tecnológico no presenta mal olor y mantiene un aspecto rojo en el interior.
106
En el tercer análisis los niveles de pH se mantienen entre 5,21 y 4,97. La
envasada al vacío y la envasada con bandeja sellada presentan bajada
mientras que la del ozono y la envasada con atmósfera modificada han
aumentado su pH. La de la bandeja sellada y la de la atmósfera modificada
presentan muy mal olor y mal aspecto. La de nuestro diseño tecnológico ha
empeorado en el aspecto a pesar de mantener un buen aspecto en el interior,
pero sigue sin presentar un mal olor. La envasada al vacío presenta un líquido
amarillo y olor a pasado. El aspecto es oscuro, pero no malo.
En la última analítica han presentado unos valores de pH entre 4,97 y 5,58. La
de nuestro diseño tecnológico ha subido el pH y la del vacío y la atmósfera
modificada han mantenido sus valores. La de bandeja sellada ha bajado el
nivel de pH. Tanto la de la atmósfera modificada como la de la bandeja sellada
presentan muy mal aspecto y olor. El resto han empeorado, pero no tanto.
Respecto a las hamburguesas que tenían conservantes, todas comenzaron
con un pH ideal de 5,75 y un olor y aspecto ideal. Los diferentes análisis en
este caso fueron realizados con siete días de diferencia.
En la primera analítica encontramos valores de pH de entre 5,62 y 5,74. Se ha
producido un descenso de pH en todas. Cabe destacar la envasada con
nuestro diseño tecnológico ya que apenas varió el pH (5,74). En general
mantienen buen aspecto y no presentan mal olor.
En el segundo análisis los valores de pH varían entre 5,86 y 5,75. Se ha
producido una subida de pH en todas. La de la atmósfera modificada y la de la
bandeja sellada presentan un olor fuerte, pero no malo. La del vacío se
mantiene intacta, pero las demás están un poco oscurecidas.
En el tercer análisis el pH varía entre 4,95 y 5,80. Todos los valores han
descendido. Exceptuando la envasada al vacío todas presentan algo de moho.
Todas menos la envasada con nuestro diseño tecnológico presentan un olor
fuerte. Todas ellas tienen un buen aspecto general.
107
En la analítica final, los valores de pH se encuentran entre 5,78 y 4,76. Todos
ellos han bajado. Tanto la de la atmósfera modificada como la de la bandeja
sellada presentan un color bastante claro y moho. La del vacío presenta peor
aspecto ya que está bastante oscura y adquiere un aspecto como si estuviese
plastificada. Su olor es fuerte, pero no es malo. La envasada con nuestro
diseño tecnológico no presenta mal olor, y un muy buen aspecto interior a
pesar de que podemos apreciar algo de moho en el exterior.
Cabe destacar que en ambos grupos las de atmósfera modificada tienden a
hincharse con el tiempo y las de bandeja sellada a deshincharse y pegarse el
plástico para adentro. Todas las que tenían conservantes expulsan mucha
agua.
Los resultados los hemos documentado en documento Excel ya que mediante
tablas y gráficos resulta más sencillo contrastarlos.
Al analizar los resultados nos han parecido llamativas las diferencias entre una
prueba y otra ya que a pesar de que pensábamos que las variantes únicamente
se volverían peores, hay momentos en los que se han dado mejoras.
En una fase inicial no hay multiplicación de gérmenes. Después, en la fase de
aceleración positiva la velocidad de crecimiento y el proceso de división celular
aumenta continuamente. Aparecen las toxinas ya que es la velocidad de
multiplicación máxima.
En la fase de aceleración negativa, la velocidad de multiplicación disminuye a
pesar de que el número de gérmenes aumenta. En la fase estacionaria el
número de microorganismos permanece constante. Finalmente, en las fases de
destrucción, el número de microorganismos decrece.
Esta podría ser una posible explicación a las anomalías que se dan en los
resultados al intercalar mejoras y empeoramientos.

108
Al realizar estas pruebas hemos apreciado que nuestro diseño tiene dos usos
principales. La primera función es la del envasado de alimentos mediante la
cual pretendemos aprovechar los alimentos que de otra forma serían
desechados. No es muy común tener máquinas de envasado en el hogar, por
eso una vez abiertos los alimentos, si no llegan a ser consumidos, acaban
siendo desechados.
Por un lado, con el uso de nuestro producto pretendemos aprovechar la vida
útil de estos alimentos dándoles una segunda oportunidad de ser consumidos
antes de su deterioro. Por otro lado, no descartamos su uso para el primer
envasado de productos.
La segunda función se trata de la de desinfección del material. Mediante esta
función pretendemos eliminar los microorganismos que pueda haber en los
diferentes materiales que usamos en nuestro día a día.
Nuestro ejemplo va lanzado hacía el material de cocina, ya que mucha gente
no se da cuenta de la importancia que tiene un material libre de
microorganismos en la conservación de los alimentos. Este diseño tecnológico
también podría ser utilizado en la desinfección de cualquier tipo de
herramienta.
Además, queríamos destacar que con nuestro diseño tecnológico no solo se
pueden envasar los alimentos de forma industrial, si no que se pueden envasar
en los hogar en los tupper que usamos normalmente. De esta forma, se puede
aprovechar los alimentos no consumidos.
109
Conclusiones
Respecto a nuestro diseño tecnológico pensamos que estamos en el buen
camino ya que ha estado a la altura de los métodos de conservación
comercializados.
Todavía nos quedan cosas para mejorar, como canalizar mejor el flujo de aire.
Estos detalles los intentaremos ultimar para el día de la Zientzia Azoka, el
6/05/2017. Además, nos gustaría realizar un análisis más exhaustivo sobre el
efecto del ozono en los alimentos ya que consideramos que hay un hueco tanto
en el mundo científico como en el mercado laborar para nuestro proyecto.
Nuestro diseño tecnológico ha estado a la altura de los diferentes métodos de
conservación actuales, que es un gran logro para tratarse de una máquina
casera. Si fuera construida a nivel industrial, con alguna modificación, podría
ser una nueva apuesta en este sector.
En las que no tenían conservantes ha logrado un pH superior (menos ácido)
que las demás, lo cual sugiere una mejor condición. Además, el aspecto interior
se ha mantenido intacto. No ha desarrollado tan mal olor como las demás,
probablemente debido al gas.
En las que tenían conservantes, mantiene un pH similar a las demás. Cabe
destacar el olor que es bastante mejor que el de las demás. No presenta mal
aspecto, mejor que las demás, pero debido al desarrollo de algo de moho ha
bajado la puntuación. Este hecho no nos preocupa ya que las demás también
lo han desarrollado puesto que ha sido un largo periodo de tiempo.
Por tanto, lo consideramos un método sostenible, económico y saludable que
se debería tener en cuenta.
110
Tras nuestros análisis concluimos que la mayor diferencia la ha marcado el uso
de conservantes. En relación con los métodos de envasado, nuestra
conclusión es que el mejor método de conservación actual en productos
cárnicos es el envasado al vacío tanto con, como sin conservantes, ya que es
el que mejor mantiene el producto con el paso del tiempo.
Bibliografía
- http://www.alimenta-accion.com/2013/11/metodos-de-conservacion-de-
los_18.html
- http://www.alimenta-accion.com/2013/11/metodos-de-conservacion-de-
los_24.html
- http://www.alimenta-accion.com/2013/08/propiedades-organoque-i.html
- http://www.naturalcastello.com/tecnicas-conservacion-alimentos-metodos-
quimicos/
- http://caebis.cnea.gov.ar/IdEN/CONOC_LA_ENERGIA_NUCX/CAPITULO_5
_Difusion/LA_TECNOLOGIA_NUCLEAR/Preservacion_alimentos.htm
- http://www.produccion-
animal.com.ar/produccion_ovina/produccion_ovina_carne/146carne.pdf
- http://atmosferaprotectora.es/applications/modified-atmosphere-packaging-
fresh-meat
- https://www.boe.es/buscar/doc.php?id=DOUE-L-2011-82261
- https://www.ocu.org/
- http://eur-lex.europa.eu/eli/reg/2008/1333/oj
- https://www.ecured.cu/Conservaci%C3%B3n_de_alimentos#Principios_en_que
_se_basa_la_conservaci.C3.B3n_de_los_alimentos
- http://www.efinde.com/descargas/UNE_400201=1994.pdf
- https://www.boe.es/buscar/doc.php?id=BOE-A-1985-2644
A pesar de que hayamos realizado consultas en las fuentes anteriores, pensamos que
nadie conoce mejor este tema que los que trabajan con ello día a día. Por tanto,
basamos nuestro proyecto con las explicaciones ofrecidas por los siguientes
profesionales.

111
- Servicio técnico de Kilse S.L.
- Profesionales de Harakintza S. COOP.
- Profesionales de Ameztoi Anaiak.