MANUAL DE USUARIO - MundoClima€¦ · MODELO : KJR-12B/DP(T)-E Para una correcta instalación,...
20
MODELO : KJR-12B/DP(T)-E Para una correcta instalación, leer este manual antes de iniciar la instalación. Este manual puede estar sujeto a cambios, sin notificación alguna, con intención de mejora. MANUAL DE USUARIO MANDO CON CABLE
Transcript of MANUAL DE USUARIO - MundoClima€¦ · MODELO : KJR-12B/DP(T)-E Para una correcta instalación,...

MODELO : KJR-12B/DP(T)-E
Para una correcta instalación, leer este manual antes de iniciar la instalación.Este manual puede estar sujeto a cambios, sin notificación alguna, con intención de mejora.
MANUAL DE USUARIOMANDO CON CABLE

1. PRECAUCIONES DE SEGURIDAD 2. RESUMEN 3. RESUMEN DE FUNCIONES 4. NOMBRE Y FUNCIONES DE LOS INDICADORES DEL MANDO 5. MÉTODO DE INSTALACION 6. NOMBRE Y FUNCION DE LOS BOTONES DEL MANDO 7. MODOS DE USO
a. FUNCIONAMIENTO AUTOMATICO b. FRIO/CALOR/VENTILACION c. DESHUMIDIFICACION d. TEMPORIZADOR e. PARO Y MARCHA TEMPORIZADOR f. CAMBIAR TEMPORIZADOR
8. INDICACIONES TECNICAS Y REQUERIMIENTOS
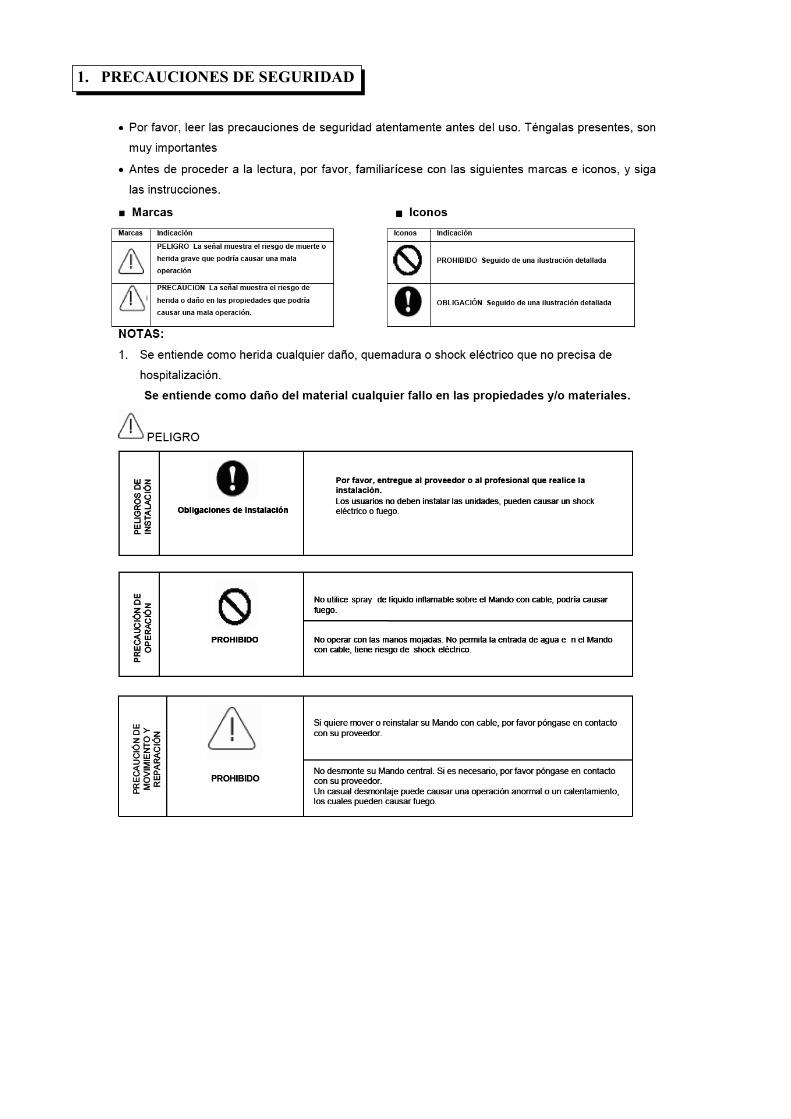
1. PRECAUCIONES DE SEGURIDAD

2. RESUMEN
Condiciones de uso 1. Alimentación: 5V DC 2. Temperatura de funcionamiento: -15ºC a +43ºC 3. Humedad funcionamiento: 40 – 90 % HR 4. Normas de seguridad: GB706.32-2004, GBT7725-2004
3. RESUMEN DE FUNCIONES
Funciones principales: 1. Conectado de unidades interiores por terminales A, B, C, D y E. 2. Botones de selección de funciones 3. Visor LCD 4. Temporizador
4. NOMBRE Y FUNCIONES DE LOS INDICADORES DEL MANDO
1. Modo de funcionamiento: Cuando se pulsa el botón MODE, el modo de funcionamiento puede ser seleccionado en el siguiente order
a. AUTO- COOL (FRIO)- DRY (DESHUM.)- HEAT (CALOR)- FAN (VENTILACION)-AUTO
2. Temporizador: Cuando se programa la hora de encendido o cuando durante el periodo de encendido, la señal “ON” se muestra en la pantalla. Cuando se selecciona la hora de desconexión o cuando esta en el proceso de apagado, la palabra OFF se muestra en el visor. Cuando hemos programado tanto la marcha como el paro del equipo, ambas palabras ON y OFF se muestran en el display.
3. Follow me: Hay un sensor de temperatura en el interior del mando, después de seleccionar la temperatura deseada, se compararán las temperaturas. El objetivo es que el área del mando de pared tenga la misma temperatura que
⑦
⑥ Temporizador OFF/ON
④ Bloqueado
⑤ Temporizador
③
② Velocidad de ventilación
Función Follow Me Temperatura
① Modo de Funcionamiento

la seleccionada. Esta función esta disponible en Frio, Calor y modo automático.
4. Indicador de funcionamiento: Cuando el equipo esta en marcha se muestra el icono. En caso contrario el icono desaparece.
5. Indicador velocidad ventilación: Hay cuatro velocidades de ventilación: Baja, Media, Alta, Auto. En algunos modelos la velocidad media no esta disponible y se muestra como alta.
6. Bloqueo (LOCK): Cuando el botón LOCK se pulsa, el símbolo de bloqueado aparece en la pantalla y el resto de botones no están disponibles, pulsando otra vez, el icono desaparece.
7. Temperatura: Muestra la temperatura deseada, puede ser ajustada utilizando las flechas. En modo ventilación no se muestra ningún valor.
5. MÉTODO DE INSTALACION
Cuando se procede a instalar un mando por cable este ha de ser instalado y conectado al receptor de infrarrojos de la unidad interior.
Cable de 5 hijos apantallado
Conector de 5 pinsEmisor
Unidad Interior
RUN GND
+5V
Mando d
e P
are
d

Los botones 5 y 11 solo están disponibles en algunos modelos.
1. MODE: Cuando se pulsa el botón MODE, el modo de funcionamiento puede ser seleccionado en el siguiente orden
a. AUTO- COOL (FRIO)- DRY (DESHUM.)- HEAT (CALOR)- FAN (VENTILACION)-AUTO
2. TIMER ON: Presione este botón para activar el temporizador de encendido. Cada ve que pulse se incrementara en 0.5h el tiempo a temporizar. Una vez se ha sobrepasado las 10h , se incrementara el tiempo 1h cada vez que se pulse. Para cancelar esta función poner a 0.0.
3. TIMER OFF: Presione este boton para activar el temporizador de parado. Cada ve que pulse se incrementara en 0.5h el tiempo a temporizar. Una vez se ha sobrepasado las 10h , se incrementara el tiempo 1h cada vez que se pulse. Para cancelar esta funcion poner a 0.0.
4. FOLLOW ME: En modo refrigeracion, calefacción o auto, pulse este boton para activar la función follow me. Pulse de nuevo para cancelar dicha función.
5. RESISTENCIA ELECTRICA: Pulse este boton para activar la resistencia (solo algunos modelos)
6. RESET: Botón escondido. Utilice un palito de 1mm para introducirlo por el agujero. Todos los parámetros se borraran y el mando volvera a su situación inicial.
7. ON/OFF: Mientras la maquina esta en marcha pulse este botón para pararla. Cuando la maquina esta parada, pulse este botón para poner la maquina en marcha.
8. Subir: Pulse este boton para subir la temperatura. Si lo mantiene pulsado subira 1 grado cada 0.5 segundos.
Paro Marcha
Subir
Bajar
TIME ON
TIME OFF TEMP
LOCK
MODE FAN SPEED
CLOCK ECONOMICAL
SWING
Boton ahorro
Swing
Bloquear
Temporizador ON
Temporizador OFF
Función Follow Me
Boton MODE Velocidad ventilación
Reser
RESET
OK
Función Resistencia
6. NOMBRE Y FUNCION DE LOS BOTONES DEL MANDO

9. Bajar: Pulse este botón para bajar la temperatura. Si lo mantiene pulsado bajará 1 grado cada 0.5 segundos.
10. Boton de swing: Activa o desactiva el motor swing (lamas o deflector). Solo disponible en algunos modelos.
11. Modo ahorra de energia: Pulse este botón para entrar en el modo de ahorro de energia. Solo disponible en algunos modelos.
12. Velocidad de ventilación: Pulse este boton para cambiar la velocidad de ventilación como sigue:
a. AUTO-BAJO-MEDIO-ALTO 13. Boton LOCK (Escondido): Cuando se pulsa este boton, el mando se queda
bloqueado y no pueden cambiarse ninguno de los parámetros. Pulse este botón cuando quiera que nadie cambio los parámetros. Pulse el boton de nuevo para volver al funcionamiento normal.
7. MODOS DE USO
a. FUNCIONAMIENTO AUTOMATICO b. FRIO/CALOR/VENTILACION c. DESHUMIDIFICACION d. TEMPORIZADOR e. PARO Y MARCHA TEMPORIZADOR f.
CAMBIAR TEMPORIZADOR
8. INDICACIONES TECNICAS Y REQUERIMIENTOS

OWNER’ S MANUALWIRE CONTROLLER OF AIR CONDITIONER
MODEL: KJR-10B/DP(T)-E
Thank you very much for purchasing our product.
Before using your unit, please read this manual carefully and keep it for future reference.


1. SAFETY PRECAUTION
2. WIRE CONTROLLER SUMMARIZE
3. FUNCTION SUMMARIZE
4. NAME AND FUNCTIONS OF LCD ON THE WIRE CONTROLLER
5. INSTALLATION METHOD
6. NAME AND FUNCTIONS OF BUTTONS ON WIRE CONTRO LER
7. THE USING OF WIRE CONTROLLER
AUTOMATIC OPERATION
DEHUMIDIFY OPERATION
TIMER SETTING
ONLY SET THE TIME OF TIMER ON
ONLY SET THE TIME OF TIMER OFF
SET THE TIME OF TIMER ON AND TIMER OFF SIMULTANEOUSLY
8. TECHNIQUE CERTIFICATION AND REQUIREMENT
This manual gives detailed description of the precautions that should be brought to your attention during operation.
In order to ensure correct service of the wired controller please read this manual carefully before using the unit.
For convenience of future reference, keep this manual after reading it.
CONTENTS

The following contents are stated on the product and the operation manual,
including usage, precautions against personal harm and property loss, and the
methods of using the product correctly and safely. After fully understanding the
following contents (identifiers and icons), read the text body and observe the
following rules.
Identifier description
Identifier Meaning
Means improper handling may lead to personal death or severe injury.
Means improper handling may lead to personal injury or property loss.
[Note]: 1. “Harm” means injury, burn and electric shock which need long-term treatment but need no hospitalization
2. “Property loss” means loss of properties and materials.
W
W
arning
arning
Caution
Icon description
Meaning lcon
It indicates forbidding.
The forbidden
subject-matter is indicated in the icon or by
images or characters aside.
Warning
Please entrust the distributor or professionals to install the unit. The installers must have the relevant know-how. Improper installation performed by the user without perm ission may cause fire, electric,shock, personal injury or water leakage.
Delegate
installation
Forbid
Forbid Usage
Warning
Do not spray flammable aerosol to the wire controller directly. Otherwise, fire may occur.
Do not operate with wet hands or let water enter the wire controller. Otherwise, electric shock may occur.
It indicates compulsory implementation.
The compulsory subject-matter is indicated in the icon or by images or characters aside.
1. SAFETY PRECAUTIONS

4. NAME AND FUNCTION OF LCD ON THE WIRE CON TROLLER
MED fan speed, then the MED is regarded as HIGH.
Mode select button (MODE):
Press MODE button to select “COOL”, “DRY”, “HEAT”, or “FAN”mode.
(HEAT is invalid for COOL ONLY wire controller.)
Fan speed button (FAN SPEED)
Press FAN SPEED to select fan speed from "AUTO", "LOW"," MED" , and
“HIGH”.
NOTE: some air conditioners have no
⑦ Temperature display
⑥ OFF/ON display
④
LOCK display
⑤
CLOCK display
③ Economical operation display
② FAN speed
① MODE display
2. WIRE CONTROLLER SUMMARIZE
3. FUNCTION SUMMARIZE
The basic operation conditions of wire controller are as follows:
The wire controller has functions as follows:
1. The range of power supply voltage: the voltage input is 5V DC.
2. Ambient temperature range: - 15℃ +43℃.
3. Ambient humidity range: RH40%~
~
RH90%.
1. Connect with indoor units with five terminals of A,B,C,D,E.
2. Set the mode through buttons.
3. LCD display.
4. Display the timer function of remain time

CLOCK display Usually display the clock set currently. Press the button CLOCK for 4 seconds,
the HOUR part will flash, press button and to adjust HOUR. Press the button CLOCK again, the minute part flash, press button or to adjust MINUTE.
After clock set or clock operation, it must press CONFIRM to complete the set.
TIMER ON/OFF display:
Display ON at the state of TIMER ON adjustment or after only set the TIMER
ON; Display OFF at the state of TIMER OFF adjustment or after only set the
TIMER OFF; Display ON/OFF if simulta neously set the mode of TIMER ON and
TIMER OFF.
Temperature display area:
Usually display the set temperature. Press the buttons of and to set tempera
ture, at the mode of FAN, there is no figure display in the area.
5. INSTALLATION METHOD
5-Core Shield Cable,the length is decided by installation
Wire Joint, 5pInfraed Pipe
Indoor Unit
RUN
+5V
Indoor Unit Switch Board
Wire C
ontr
olle
r
Connection mothod and the principle diagram show as follow
When the air conditioner needs installing the wire controller, an additional 5-terminal is needed to install in indoor unit, fasten a infrared emission (fasten with glue), connect the anode and the cathode respectively to A and B on the end, then connect the +5V GND and RUN respectively to C D and E on the end
Installation interpretation:
Economical operation display:
Press ECONOMICAL to display economical operation, if press ECONOMICAL
again then the display disappears
Lock display Press LOCK to display the icon of LOCK. Press the button
again then the icon of LOCK disappears. In the mode of LOCK, all the buttons
are invalid except for LOCK button.

6. NAME AND FUNCTIONS OF BUTTONS ON WIRE CONTROLLER
ON / OFF button
Adjust button
Adjust button
TIMER ON
TIMER OFF TEMP
REPLACE LOCK COOL HEATING
MODE FAN SPEED
CLOCK
CONFIRM
ECONOMICAL
SWING
Economical button
Swing button
COOL ONLY/COOL and Heating selection button
Lock button
Timer on button
Timer off button
Clock button
confirm button
replace nutton
Mode selection button Fan speed selection
Reset button
RESET
OK
Ok button
Mode selection button:
It is used to select mode, push the button one time, then the operation modes will change in turn as follows:
AUTO→COOLING→DEHUMIDIFY→HEATING→FAN
Remarks: no heating mode if wire controller is set as the cool only.
Timer on button :
Push the button to set TIMER ON, each time you push the button the time
moves forward by o.5 hours. When the set time is over 10 hours, each time
you push the button the time moves forward by 1 hour. If want to cancel the
TIMER ON, then adjust the time of TIMER ON as 0.0.
Timer off button:
Push the button to set TIMER OFF, each time you push the button the time
moves forward by o.5 hours. When the set time is over 10 hours, each time
you push the button the time moves forward by 1 hour. If want to cancel the
TIMER OFF, then adjust the time of TIMER OFF as 0.0.
CLOCK button:
Normally display the clock set currently (display 12:00 for the first electrifying or
resetting). When push the button for 4 seconds, the hour part on the clock
display flashes every 0.5 seconds, then push button and to adjust hour; push
the button CLOCK again, the minute part flashes every 0.5 seconds, then push
and button to adjust minute. When set clock or alter clock setting, must push the confirm button to complete the setting.
1
2
3
4

Ok button:
The button is used at the state of CLOCK adjustment. After select the time, push the button to confirm then exit, the current clock will display
Reset button(hidden):
Use a small stick with a diameter of 1mm to push the RESET button to cancel the current settings and get into the condition of resetting.
ON/OFF button:
Push the button at the condition of OFF, the OPERATION lamp lights, ans the wire controller enters into ON operation, simultaneously sends the information of operation mode set currently, temperature, fan speed, timer etc. Push the button at the conditionof ON, the OPERATION lamp extinguishes, simu-ltaneously sends the OFF. If having set TIMER ON or TIMER OFF, the wire controller will cancel these settings before entering into OFF, close the concern indicator, and then send the OFF information.
Fan speed selection button (FAN SPEED)
Select any one fan speed from "AUTO", "LOW"," MED" , and "HIGH”. Each time push the button, the fan speed will change in turn as fellow.
Adjust button : Set indoor temperature up. If press and hold on, it will increase at 1 degree
per 0.5 second.
Adjust button : Set indoor temperature down . if press per 0.5 second.
Swing button:
Push this button for the first time when operation,it will start the swing function.
Push the button for the second time, cancel the swing function. (The function
is available matched with the concerned unit)
Economical button:
Push the button to set the economical operation mode for air conditioner, push
again then cancel the mode. The opera tion mode is suitable for sleeping time.
Cool only/cooling and heating selec tion button (hidden):
Use a small stick with a diameter of 1mm to push the button to switch modes.For
COOLING ONLY type, it will be no heating mode when pressing MODE.
The uniform mode is COOLING and HEATING at the factory.
Lock button (hidden):
Use a small stick with the diameter of 1mm to push the LOCK button to lock the current setting, push the button again then cancel the setting.
5
6
7
8
9
10
11
12
13
14

AUTOMATIC OPERATION
DEHUMIDIFY OPERATION
Insert the power supply, operation lamp of indoor unit flashes.
Push MODE to select AUTO
Set the desired temperature by push-ing the button and , usually the
temper-ature range is set from 17 ℃ to 30℃
Push ON/OFF, the operation lamp of indoor unit lights, the air conditioner start
operating at the AUTO mode, the fan speed is controlled automatically, wire
controller display screen display “AUTO” the fan speed is un-adjustable. Push the button ON/OFF again, then the air conditioner stops operating.
The ECONOMICAL button is available at the AUTO operation mode.
THE OPERATION OF COOL/HEAT (COOL ONLY unit hasn't the function) / FAN
Push the button MODE to select any "FAN ONLY" mode
Select the desired temperature by pushing the button and, usually the temp- erature range is set from 17℃ to 30℃.
Push the button FAN SPEED to select any one of “AUTO", "LOW”, "MIDDLE", or
"HIGH" fan speed modes.
Push the button ON/OFF, the operation lamp on indoor unit lights, the air conditioner operates according to the mode selected. Push the button ON/OFF again, stop the air conditioner.
Remark: It can not set temperature at FAN mode, and only operate the step 1,3 and
The economical button is invalid at FAN mode.
Press MODE to select DEHUMIDIFY mode.
Select the desired temperature by pushing the button and, usually the temp-
erature range is set from 17℃ to 30℃.
Push the button ON/OFF, the operation lamp of indoor unit lights, and the air
7. THE USING OF WIRE CONTROLLER
TIMER SETTING
Button TIMER ON can set the starting time. Button TIMER OFF can set the stopp-ing time.
conditioner will start to dehumidifying. Press the button ON/OFF again, stop the air conditioner.
The button FAN SPEED and ECONO MICAL are invalid in the mode
DEHUMIDIFY.
ONLY SET THE TIME OF TIMER ON
Push button TIMER ON, the wire controller display SETTING, the icons of HOUR and ON display on the timer setting area. The wire controller enter into the setting of timer on.
Push button TIMER ON again, and then adjust the time of timer on as your
desired.
Continuously push the button, the time of timer will increase 0.5 hours per time.
1
1
1
1
2
3
2
2
3
4
-
-
-
-
-
2
3
4
5
6

ONLY SET THE TIME OF TIMER OFF
Push button TIMER OFF, the wire controller display SETTING, the icons of
HOUR and OFF display on the timer setting area. The wire controller enters
into the setting of timer off.
Push button TIMER OFF again, and then adjust the time of timer off as your desired.
Continuously push the button, the time of timer will increase 0.5 hours per time.
After the time of timer reaches to 10 hours, the time will increase 1 hour each
time.
0.5 seconds later, after finishing the adjustment, the wire conditioner sends
After the time of timer reaches to 10 hours, the time will increase 1hour each time.
0.5 seconds later, after finishing the adjustment, the wire conditioner sends
the information of time on, the timer on setting is completed.
8. TECHNIQUE CERTIFI CATION AND REQUIREMENT
EMC and EMR should conform to the CE certification.
Remark: the time of TIMER ON is the relative time; it is relative to the
standard time of operating wire control ler. If having setting the TIMER ON or
TIMER OFF, then the clock can not be adjusted.
the information of timer off, the timer off setting is completed.
SET THE TIME OF TIMER ON AND TIMER OFF SIMULTANEOUSLY
Refer to step 1 and step 2 of TIMER ON to set the TIMER ON.
Refer to step 1 and step 2 of TIMER OFF to set the TIMER OFF.
When set the TIMER ON and TIMER OFF simultaneously, if the set times of
TIMER ON and TIMER OFF are all over 10 hours, then TIMER OFF is always
later 1 hour than TIMER ON.
0.5 seconds later, after finishing the adjustment, the wire conditioner sends
the information of timer onf, the timer off and timer on setting are completed.
Alter the timer To alter the time of TIMER ON of TIMER OFF, push the timer button to
confirm once more. Adjust the time of TIMER ON and TIMER OFF as 0.0 to
cancel the TIMER ON of TIMER OFF.
4
1
1
2
2
3
3
4
4


SALVADOR ESCODA S.A.®www.sa lvadorescoda.comProvença, 392 pl.1 y 2 - 08025 BarcelonaTel. 93 446 27 80 - Fax 93 456 90 32