MONTAJE PARA MANGUERA DE FIBRA ÓPTICA SOBRE …...MONTAJE PARA MANGUERA DE FIBRA ÓPTICA SOBRE...
4
MONTAJE PARA MANGUERA DE FIBRA ÓPTICA SOBRE BANDEJA DE RACK / RACK MOUNT ENCLOSURE FOR FIBER OPTIC CABLE Ref. 533152 Art. Nr. UFB24SC 1. Instalación de una manguera multifibra/ Installing a multi-fiber cable: 1.1 Entrada de la manguera al interior del Rack (Refs.231603 o 231612) / Cable inlet into the Rack (Refs.231603 or 231612). Introduzca la manguera de fibra óptica en el Rack (por la parte superior o inferior) y deje siempre un excedente de fibra (bobinado) tras la bandeja de FO (imagen 1), permitiendo así extraer la bandeja de FO. Insert the fiber optic cable in the Rack (at the top or bottom) and always leave a surplus of fiber (winding) after the tray FO (figure 1), allowing for removal of the FO tray. Cuerpo de 19” y bandeja FO extraible para 24 conectores SC /19 19“ Body and FO removable tray for 24 SC connectors Bandeja auto-adhesiva porta fusiones / Fusion Splice, Self-adhesive tray 4x Tornillos para sujección del cuerpo 19”al Rack / 4x Screws for mounting the 19 “ body to the Rack Tapa bandeja FO / FO tray cover 4x Tuercas para sujección del cuerpo 19”al Rack / 4x Nuts for mounting the 19 “ body to the Rack Tornillos bloqueo bandeja FO extraible / Lock screws FO removable tray Abrazadera para el guiado de la fibra / Clamp for guiding fiber Bridas para sujección de la manguera de fibra / Flanges for securing the fiber cable imagen 1 / figure 1 1. 2 Introduzca el cuerpo de 19” y la bandeja de FO en el Rack / Enter the 19 “ body and the FO tray in the Rack. Ancle el cuerpo de 19” en sus 4 puntos de anclaje mediante las 4 tuercas y 4 tornillos adjuntos. Anchor the 19 “ body in its 4 anchor points with the 4 nuts and 4 screws provided.
Transcript of MONTAJE PARA MANGUERA DE FIBRA ÓPTICA SOBRE …...MONTAJE PARA MANGUERA DE FIBRA ÓPTICA SOBRE...

MONTAJE PARA MANGUERA DE FIBRA ÓPTICA SOBRE BANDEJA DE RACK /RACK MOUNT ENCLOSURE FOR FIBER OPTIC CABLERef. 533152Art. Nr. UFB24SC
1. Instalación de una manguera multifibra/ Installing a multi-fiber cable:
1.1 Entrada de la manguera al interior del Rack (Refs.231603 o 231612) / Cable inlet into the Rack (Refs.231603 or 231612).
Introduzca la manguera de fibra óptica en el Rack (por la parte superior o inferior) y deje siempre un excedente de fibra (bobinado) tras la bandeja de FO (imagen 1), permitiendo así extraer la bandeja de FO.
Insert the fiber optic cable in the Rack (at the top or bottom) and always leave a surplus of fiber (winding) after the tray FO (figure 1), allowing for removal of the FO tray.
Cuerpo de 19” y bandeja FO extraible para 24 conectores SC /19 19“ Body and FO removable tray for 24 SC connectors
Bandeja auto-adhesiva porta fusiones / Fusion Splice, Self-adhesive tray
4x Tornillos para sujección del cuerpo 19”al Rack / 4x Screws for mounting the 19 “
body to the Rack
Tapa bandeja FO / FO tray cover
4x Tuercas para sujección del cuerpo
19”al Rack / 4x Nuts for mounting the 19 “ body
to the Rack
Tornillos bloqueo bandeja FO extraible
/ Lock screws FO removable tray
Abrazadera para el guiado de la fibra /
Clamp for guiding fiber
Bridas para sujección de la manguera de fibra / Flanges for securing the fiber
cable
imagen 1 / figure 1
1. 2 Introduzca el cuerpo de 19” y la bandeja de FO en el Rack / Enter the 19 “ body and
the FO tray in the Rack.
Ancle el cuerpo de 19” en sus 4 puntos de anclaje mediante las 4 tuercas y 4 tornillos adjuntos.
Anchor the 19 “ body in its 4 anchor points with the 4 nuts and 4 screws provided.

1.3 Introducción de la manguera de FO en la bandeja de FO extraíble / Inserting the FO cable in the FO removable tray.
Extraiga la bandeja de fibra óptica del Rack y acceda con la manguera de FO por la parte trasera de la bandeja. Pele una longitud suficiente de manguera ( ± 80 cm) y fije el extremo de la manguera al cuerpo de la bandeja extraíble (imágenes 2 y 3).
Remove the tray and access to FO cable at the rear of the tray . Strip a sufficient length of cable (± 80 cm) and attach the end of the cable to the body of the removable tray (figures 2 and 3).
imagen 2 / figure 2
imagen 3 / figure 3
Si se desea una fijación extra, además de embridar la maguera de FO puede anudar la guía que posee la manguera a uno de los pilares traseros de la bandeja, ofreciendo así una resistencia extra a la tracción.
If you desire an extra attachment point, besides flange connection attach the guide cable to one of the rear posts of the tray, thus offering additional mechanical support.
1.4. Acomodar las fibras en la bandeja extraíble / Place the fibers in the removable tray.
Proceda a colocar las abrazaderas adhesivas y guíe la fibra por ellas (imagen 4). Comience a realizar las fusiones de la fibra con los pig-tail y vaya colocando las cánulas termo-retráctiles en las ranuras de la bandeja auto-adhesiva (cada ranura admite hasta 2 cánulas), comenzando por la parte trasera de la bandeja y continuando hacia la parte frontal (imagen 5).
Las longitudes de los pig-tails pueden oscilar entre 70 cm para el conector más lejano y 50 cm para el más cercano, debiendo ajustar la medida en base al lugar que ocupe cada conector SC.
Place the adhesive clamps and route the fiber through them as shown (figure 4). Start splicing the fiber with the pigtail making sure to place the heat-shrinkable cannulas into the slots of the self-adhesive clamps (each slot supports up to 2 cannulas), starting from the back of the tray and continuing towards the front (figure 5).
The lengths of the pigtails can range from 70 cm to the farthest connector and 50 cm to the closest; the length should be adjusted based on the placement of each SC connector.
imagen 4 / figure 4
imagen 5 / figure 5

1.5 Guiado de las fibras conectorizadas hacia los adaptadores SC/ Guiding the fibers with connectors to the SC adapters.
Para evitar que las fibras de entrada se sobrepongan sobre los pig-tails de salida (conectores SC), deberá pasar el conector por debajo de las fibras de entrada. De esta manera, si en algún momento necesitamos sustituir un pig-tail o conector, esta tarea será más sencilla (imágenes 6,7 y 8).
For better cable management, make sure to pass the connector below the input fibers. This way, if you ever need to replace a pigtail or connector, this task will be easier (figures 6,7 and 8).
imagen 6 / figure 6
imagen 7 / figure 7
imagen 8 / figure 8
1.6 Adecuación final de la fibra / Final fiber adjustment.
Una vez finalizadas todas las fusiones e introducídas todas las cánulas en sus ranuras, coloque la tapa de la bandeja auto-adhesiva porta-fusiones, cierre las abrazaderas para asegurar la fibra (imagen 9).Once all splices are completed and all cannulas
into their slots, cover the tray with the tray cover and close the clamps to secure the fiber (figure 9).
imagen 9 / figure 9
imagen 10 / figure 10
En este caso, se ha re-colocado una abrazadera para asegurar los pig-tails (imagen 10).
In this case, a clamp was repositioned to clear the pig-tails (figure10).
1.7 Inserción de la bandeja en el Rack / Insert tray into the Rack.
Inserte la bandeja en el Rack (generando cierto ángulo para que entre). Introdúzcala hasta el fondo, con precaución (evitando así poder dañar alguna de las fibras accidentalmente). Inserte los dos tornillos que permiten bloquear la bandeja extraíble (imagen 11).
Insert the tray into the Rack (slight angle may be needed to insert the tray). Push it to the bottom, with caution (avoiding any damage to the fibers). Insert the two screws that allow you to lock the removable tray (figure 11).
2018 © Copyright, Televés S.A.
imagen 11 / figure 11
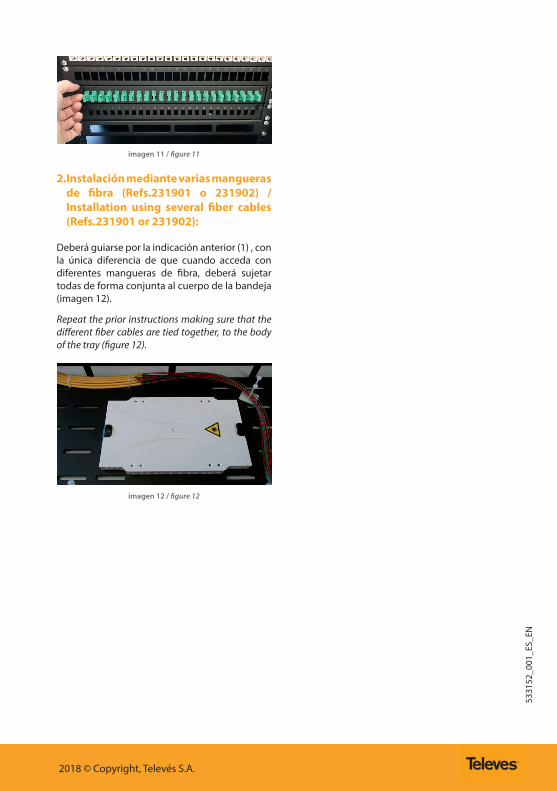
2. Instalación mediante varias mangueras de fibra (Refs.231901 o 231902) / Installation using several fiber cables (Refs.231901 or 231902):
Deberá guiarse por la indicación anterior (1) , con la única diferencia de que cuando acceda con diferentes mangueras de fibra, deberá sujetar todas de forma conjunta al cuerpo de la bandeja (imagen 12).
Repeat the prior instructions making sure that the different fiber cables are tied together, to the body of the tray (figure 12).
imagen 12 / figure 12
5331
52_0
01_E
S_EN