¿Necesita ayuda con su nueva plancha de sublimación? · 2020-02-21 · 6 Cómo calibrar la...
37
Transcript of ¿Necesita ayuda con su nueva plancha de sublimación? · 2020-02-21 · 6 Cómo calibrar la...

1
¿Necesita ayuda con su nueva plancha de sublimación?
Contacto con soporte técnico: (81) 3849 3020
(81) 1306 9219
(81) 1306 9220
Horarios de atención: Lunes a Viernes 9 a.m. a 6 p.m.
Sábado 9 a.m. a 1 p.m.
Correo: [email protected]
Página de internet: www.stmrobotics.com

2
Gracias por comprar nuestra plancha de sublimación. Hay cosas importantes que usted debe saber antes
de utilizar el equipo:
Tiempo de uso continuo: El uso máximo de trabajo continuo de este equipo es de 4 horas de trabajo y 1
hora de descanso entre jornadas.
Uso deseado de esta plancha: Esta plancha está diseñada para la sublimación sobre tazas y/o vasos
cerámicos.
Evite utilizar la plancha para otras actividades como preparación de comida, extracción de material de
plantas u otros usos alternativos al deseado.
Cualquier otro uso distinto al deseado invalidará la garantía, podría dañar el equipo y provocar incendio.
Conserve el embalaje de envío: Por favor no deseche el cartón ni deshaga el poliestireno expandido con el
que se entregó la plancha. Este material fue diseñado para soportar el peso y proteger el equipo durante el
envío y en caso de necesitar reparación puede enviar el equipo dentro de su mismo embalaje.
3
Siga las instrucciones del proveedor de los materiales: Siempre utilice los parámetros recomendados por el
proveedor del material que usará en su plancha.
Pruebe antes de planchar: Le recomendamos siempre hacer pruebas sobre el material antes de producir
grandes cantidades de productos. De ser posible incluya también el lavado en las pruebas para asegurarse
que los parámetros de presión y temperatura son óptimos para el material.
Extreme precauciones: Tenga cuidado mientras opera la plancha. Durante la operación la placa se calienta a
temperaturas altas, por lo que puede causar quemaduras serias si no se tiene cuidado. Por favor informe a
otras personas que comúnmente se encuentran alrededor del equipo las precauciones que deben tener.
Fuente de eléctrica: Esta plancha está diseñada para el mercado mexicano, por lo que debe ser enchufada a
un socket con 3 orificios (línea, neutro y tierra), con un voltaje de 110-120V/60Hz).
No intente enchufar el equipo a un socket sin orificio a tierra.
4
IMPORTANTE
Por favor lea las instrucciones y precauciones de seguridad cuidadosamente antes de utilizar su plancha de
sublimación.
- Tiempo de uso continuo: El uso máximo de trabajo continuo de este equipo es de 4 horas de
trabajo y 1 hora de descanso entre jornadas.
- Evite tocar la placa de sublimación cuando el equipo esté encendido.
- No abra la carcasa o intente reparar el equipo; marque a los teléfonos de soporte técnico de STM
Robotics: (81) 3849 3020 / (81) 1306 9219.
- Evite salpicar líquidos en la superficie de sublimación.
- Asegúrese que la conexión del cable de alimentación tenga línea a tierra.
- Desconecte el cable de alimentación del equipo cuando se deje de utilizar durante periodos largos.
- No se deje al alcance de los niños y evite mantener encendido el equipo sin supervisarlo.
- Evite usar el equipo en entornos húmedos.
- Evite utilizar solventes, gasolina y/o esponjas para limpiar el equipo.
5
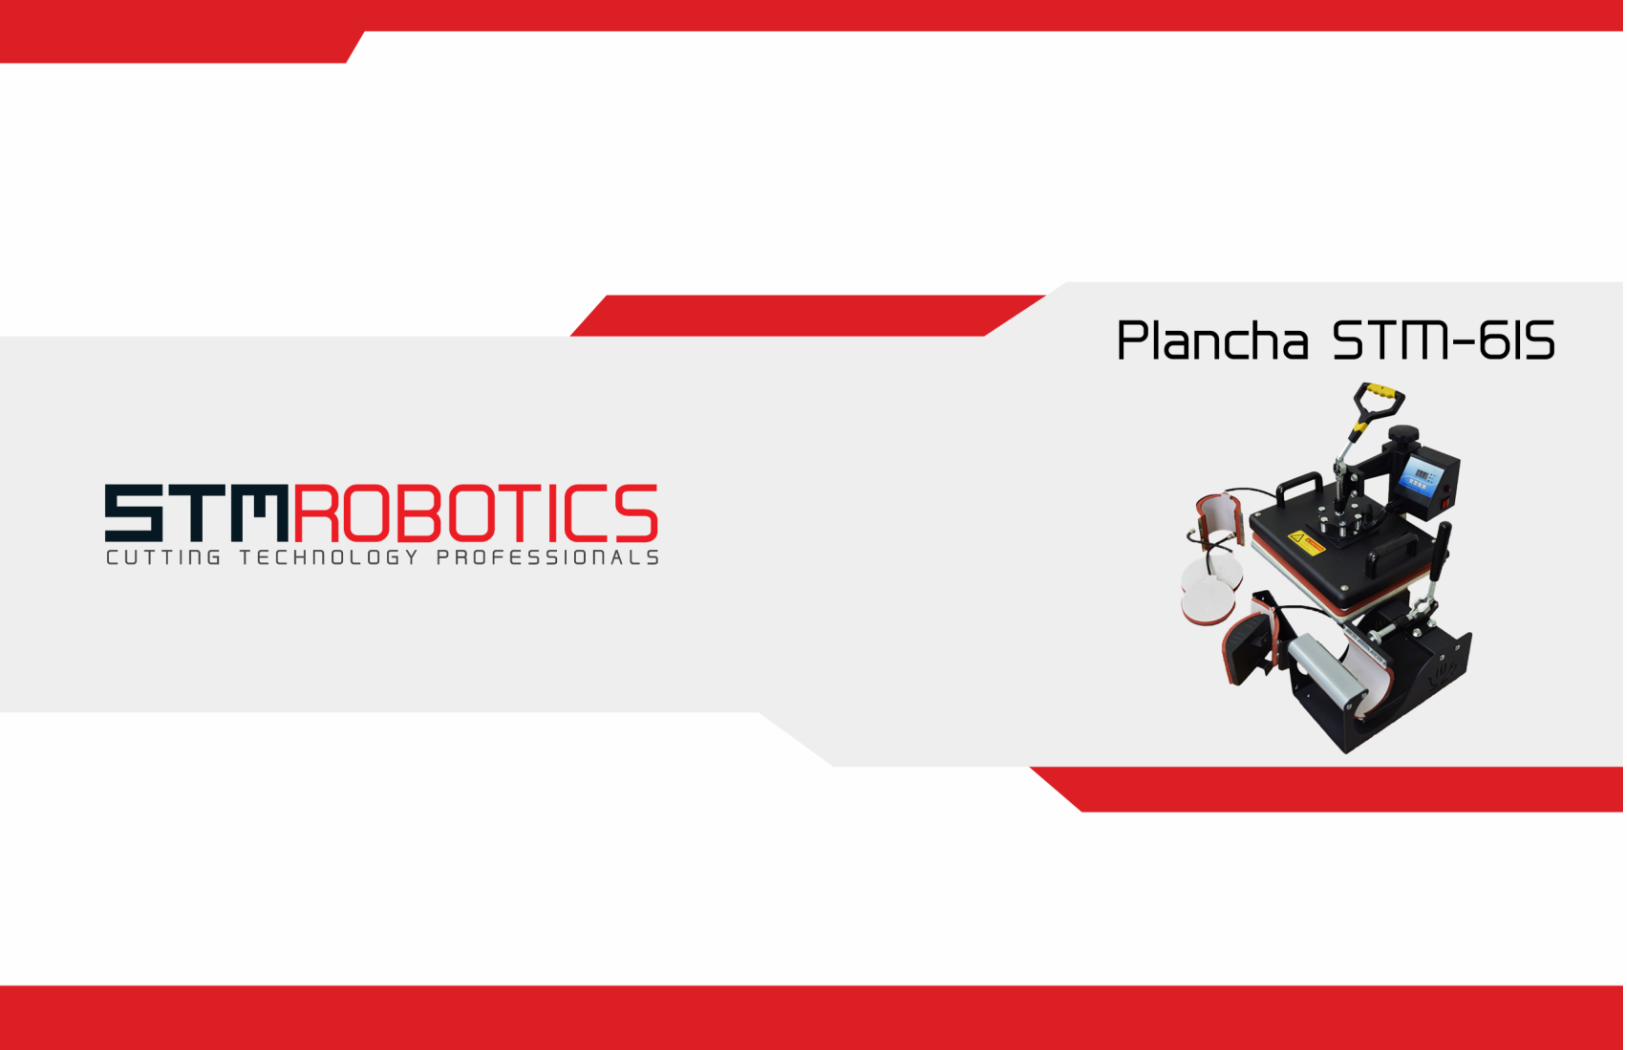
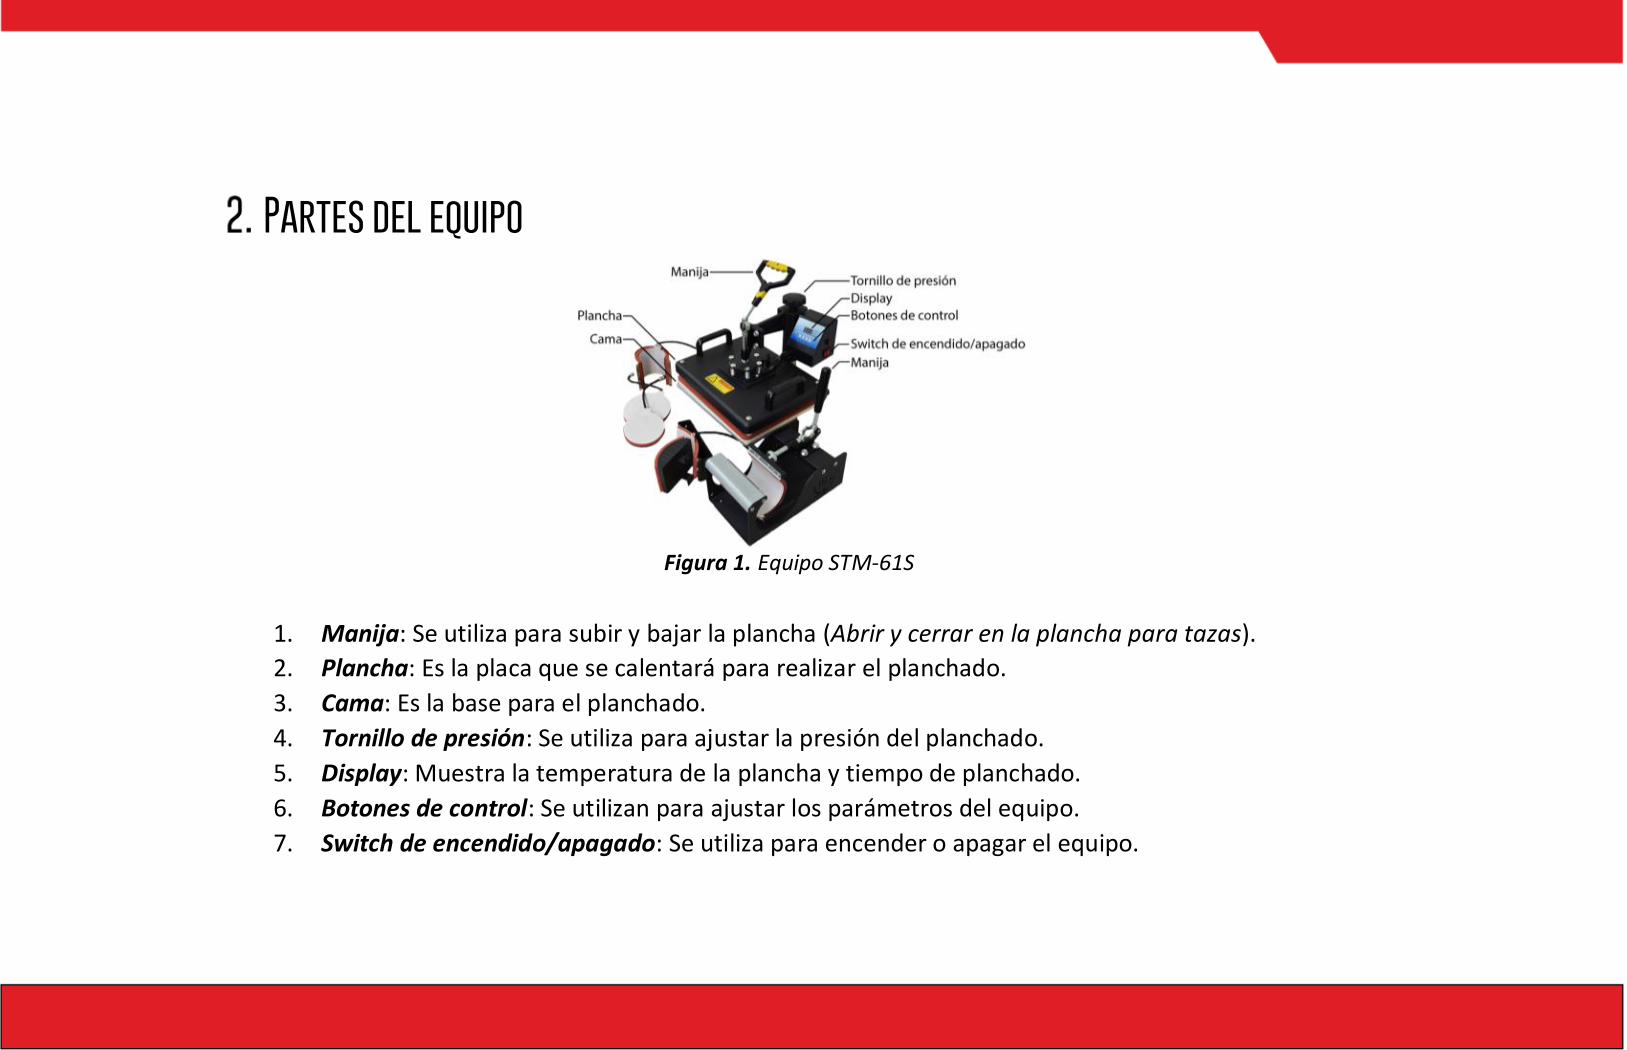
Partes del equipo
Figura 1. Equipo STM-61S
1. Manija: Se utiliza para subir y bajar la plancha (Abrir y cerrar en la plancha para tazas).
2. Plancha: Es la placa que se calentará para realizar el planchado.
3. Cama: Es la base para el planchado.
4. Tornillo de presión: Se utiliza para ajustar la presión del planchado.
5. Display: Muestra la temperatura de la plancha y tiempo de planchado.
6. Botones de control: Se utilizan para ajustar los parámetros del equipo.
7. Switch de encendido/apagado: Se utiliza para encender o apagar el equipo.
6
Cómo calibrar la presión de su nueva plancha 6 en 1
IMPORTANTE: Antes de calibrar la presión asegúrese de apagar la plancha para evitar accidentes.
Las instrucciones de su proveedor de material le indicarán cuanta presión debe aplicar durante el proceso. A
continuación, se explica cómo calibrar su equipo e identificar esos ajustes de presión:
A) Plancha plana
1. Gire el tornillo de presión en sentido contrario a las manecillas del reloj un par de veces para
disminuir la presión.
2. Coloque una hoja de papel en la cama de la plancha (dejando un pedazo fuera) y baje la plancha.
3. Jale la hoja de papel.
4. Si pudo mover la hoja con facilidad, gire el tornillo de presión en sentido a favor de las manecillas
del reloj y vuelva al paso 3.
5. Una vez que jale la hoja y no se mueva fácilmente habrá calibrado bien el nivel de presión “Medio”.
Del ajuste de presión “Medio” puede cambiar al ajuste de presión “Alto” realizando dos giros completos del
tornillo en sentido a favor de las manecillas del reloj. De lo contrario si desea cambiar del ajuste “Medio” al
ajuste “Bajo” realice dos giros completos con el tornillo en sentido contrario a las manecillas del reloj.
7
B) Plancha para tazas
1. Gire el tornillo de presión en sentido contrario a las manecillas del reloj un par de veces para
disminuir la presión.
2. Coloque una taza en la plancha y use la palanca para cerrar la plancha con cuidado.
3. Intente mover el asa (agarradera) de la taza.
4. Si la taza se movió con facilidad, gire el tornillo de presión en sentido a favor de las manecillas del
reloj y vuelva al paso 3.
5. Una vez que trate de mover el asa y no se mueva fácilmente habrá calibrado bien el nivel de
presión “Medio”.
Del ajuste de presión “Medio” puede cambiar al ajuste de presión “Alto” realizando dos giros completos del
tornillo en sentido a favor de las manecillas del reloj. De lo contrario si desea cambiar del ajuste “Medio” al
ajuste “Bajo” realice dos giros completos con el tornillo en sentido contrario a las manecillas del reloj.
8
Instrucciones para configurar parámetros de operación
1. Encienda el equipo mediante el switch de encendido/apagado; el equipo sonará una alarma para
indicar que acaba de encender y encenderá el indicador de OUT.
2. Presione “MODE” y ajuste con las teclas ← → la temperatura mínima a 165°C.
3. Presione “MODE” nuevamente y ajuste con las teclas ← → la temperatura máxima a 180°C.
4. Presione “MODE” por tercera vez y ajuste con las teclas ← → el tiempo de a 15-25 segundos.
5. Presione “MODE” por última vez para guardar los ajustes.
6. El equipo comenzará a calentar la placa y cuando alcance la temperatura máxima establecida
dejará de calentar, el equipo mantendrá la temperatura entre el mínimo y el máximo valor
ajustado.

9
Proceso para sublimar
IMPORTANTE: Los procesos explicados a continuación pueden variar dependiendo del material y su
proveedor; para saber qué proceso debe efectuar, contacte a su proveedor.
A) Plancha plana
1. Imprima el diseño sobre el papel de sublimación.
2. Encienda la plancha para ajustar la temperatura y tiempo.
3. Espere a que la plancha alcance la temperatura deseada.
4. Coloque la prenda en la cama.
5. Utilice la manija para bajar la plancha cuidadosamente.
6. Presione el botón ■ (cuadrado) para comenzar la cuenta de tiempo. Espere a que el contador de
tiempo termine y suene la alarma.
7. Presione nuevamente el botón ■ (cuadrado) para apagar la alarma.
8. Utilice la manija para subir la plancha y retire la prenda.
9. Retire la impresión para finalizar el proceso de sublimación.
10
B) Plancha para tazas
10. Imprima el diseño sobre el papel de sublimación.
11. Pegue con cinta térmica la impresión a la taza (con el lado impreso volteado hacia la taza).
12. Encienda la plancha para ajustar la temperatura y tiempo.
13. Espere a que la plancha alcance la temperatura deseada.
14. Coloque la taza en la plancha.
15. Utilice la manija para cerrar la plancha cuidadosamente.
16. Presione el botón ■ (cuadrado) para comenzar la cuenta de tiempo. Espere a que el contador de
tiempo termine y suene la alarma.
17. Presione nuevamente el botón ■ (cuadrado) para apagar la alarma.
18. Utilice la manija para abrir la plancha y retire la taza.
19. Retire la impresión para finalizar el proceso de sublimación.
11
Notas
1. Evite que la plancha se mantenga calentando por más de 30 minutos sin ser usada.
2. Introduzca un cartón dentro de camisas textiles delgadas para evitar manchar áreas no deseadas y
mantener el área de planchado uniforme.
3. Siempre haga una prueba de color antes de comenzar su producción, especialmente en textiles con
muchos tratamientos químicos.
12
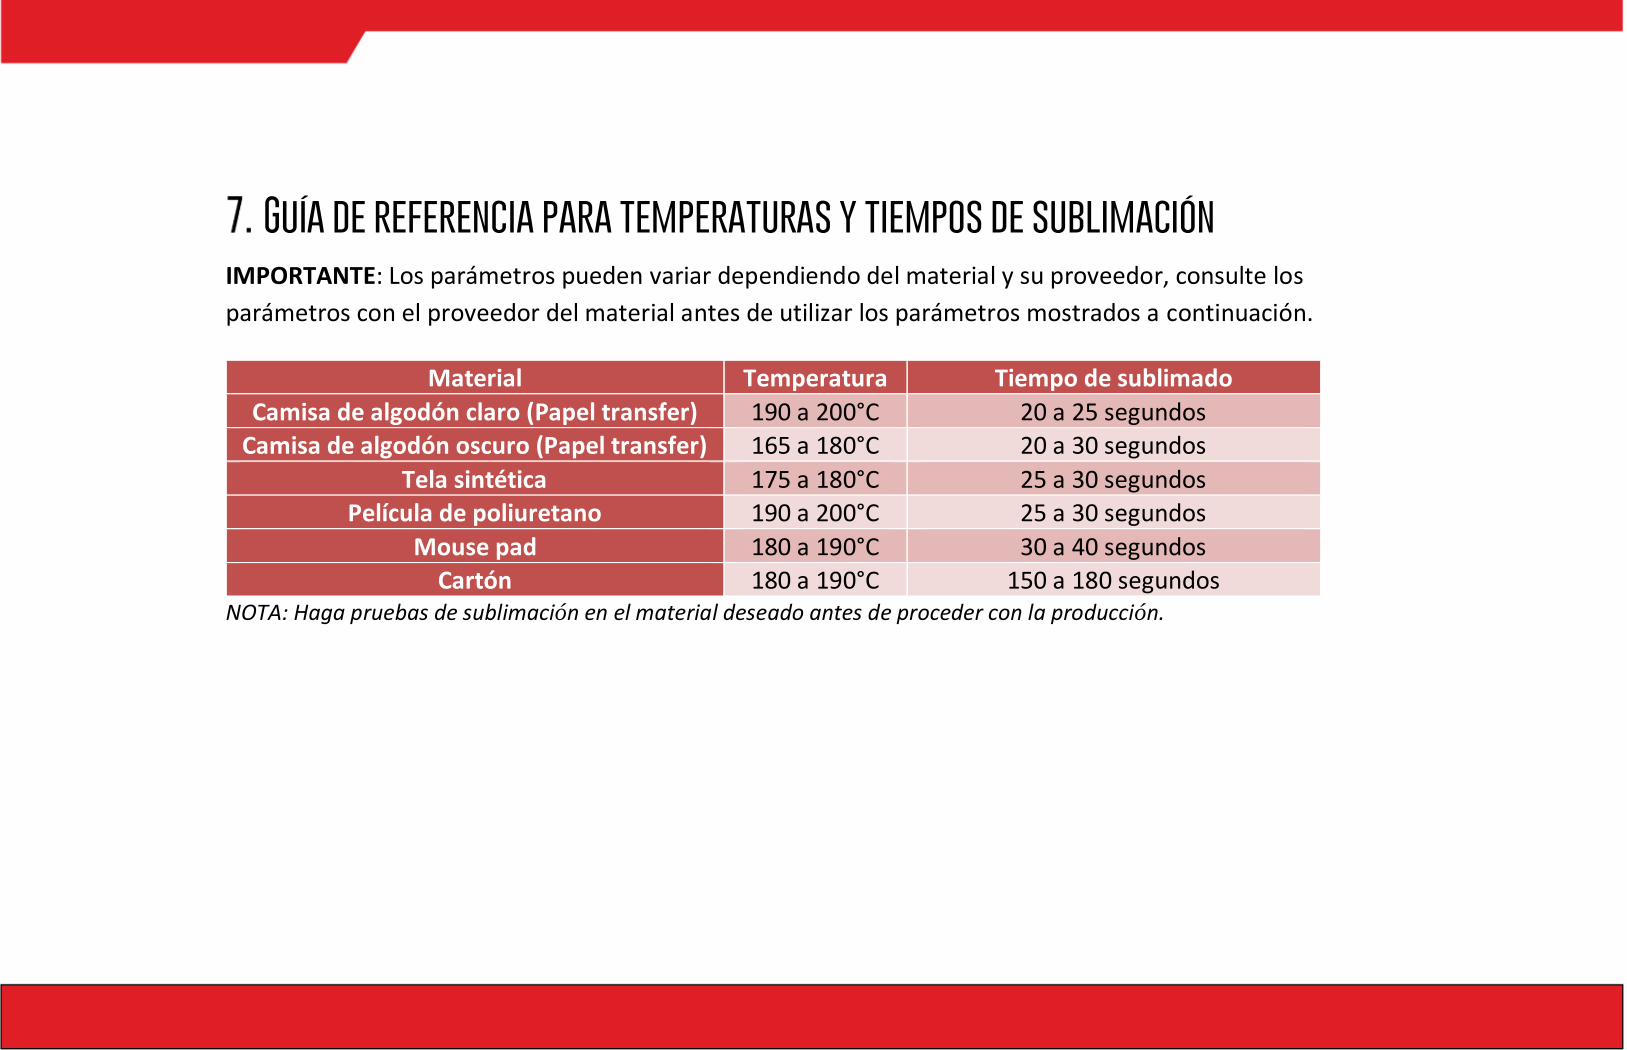
Guía de referencia para temperaturas y tiempos de sublimación
IMPORTANTE: Los parámetros pueden variar dependiendo del material y su proveedor, consulte los
parámetros con el proveedor del material antes de utilizar los parámetros mostrados a continuación.
Material Temperatura Tiempo de sublimado
Camisa de algodón claro (Papel transfer) 190 a 200°C 20 a 25 segundos
Camisa de algodón oscuro (Papel transfer) 165 a 180°C 20 a 30 segundos
Tela sintética 175 a 180°C 25 a 30 segundos
Película de poliuretano 190 a 200°C 25 a 30 segundos
Mouse pad 180 a 190°C 30 a 40 segundos
Cartón 180 a 190°C 150 a 180 segundos NOTA: Haga pruebas de sublimación en el material deseado antes de proceder con la producción.
13
Mantenimiento
1. Para prolongar el tiempo de vida útil, lubrique una vez cada 6 meses las uniones de las partes
móviles.
a. Lubrique el tornillo de presión con grasa de litio para alta temperatura (-20°C a 150°C).
2. Después de terminar de utilizar el equipo permita que se enfríe la placa y si hay virutas quemadas o
restos de tinta, limpie cuidadosamente.
14
Preguntas frecuentes
¿Qué puedo hacer con las planchas de sublimación?
Sublimación, estampado de papel transfer, estampado de vinil textil y serigrafía.
¿Qué es la sublimación?
Es la transferencia de tinta hacia un objeto por medio de calor.
¿Qué objetos y prendas se pueden sublimar?
Tazas, playeras, gorras, platos, cerámica, entre muchos otros.
¿Qué pasa si el objeto o prenda no es sublimable?
No se transferirá la tinta.
15
¿Puedo hacer que un objeto o prenda sea sublimable?
Si, siempre y cuando se utilice un barniz especial para la sublimación.
¿Ustedes venden ese barniz para sublimar?
No, pero puede buscar ese barniz en donde venden materiales para sublimación.
¿Se puede sublimar sobre algodón?
Lo recomendable es que el material sea 100% poliéster claro para un mejor acabado, sin embargo, también
se puede trabajar con cierto porcentaje de algodón.
¿En qué consiste la técnica transfer?
Es la impresión en un papel transfer, para hacer el estampado en materiales de algodón.
¿Con qué tipo de impresora puedo realizar la impresión del transfer?
No hay un tipo de impresora o tinta especial para este tipo de trabajo.
16
¿Se puede realizar una impresión transfer con cualquier tipo de papel?
Para ese tipo de trabajo es necesario utilizar un papel especial llamado “papel transfer”, el cual se puede
adquirir en nuestras sucursales.
¿Cuánto dura un estampado con papel transfer?
Depende de la calidad del papel, la fibra de tela, la temperatura y el tiempo de planchado, para sacar el
máximo provecho contacte a su proveedor para saber los parámetros óptimos de su material.
¿En qué consiste la técnica para transferir el vinil textil?
Es un vinil especial para textiles, previamente cortado con un plotter de corte, para después adherirlo a la
prenda que se desea trabajar.
¿La durabilidad de una impresión en que radica?
Radica en el tipo de tela de la prenda, la calidad de vinil o papel transfer, el tiempo y temperatura que
utilizas en tu plancha.
17
Problemas y soluciones
Cuando presioné mi vinil textil sublimable (VTS) el material no se quedó pegado a la prenda y/o se cayó
durante el lavado. ¿Cómo arreglo esto?
Primero verifique las instrucciones del proveedor del material – especialmente los parámetros de presión y
temperatura. Si está siguiendo las instrucciones al pie de la letra, incremente la presión. Recuerde: durante
el proceso no solo es necesario calentar – también se necesita presionar el vinil contra el material para que
el adhesivo tenga buen agarre. Incrementar la presión es la solución más común.
Cuando retiré la capa protectora de mi VTS, el vinil de color se quitó, pero el adhesivo que estaba debajo
se mantuvo. ¿Qué pasó?
Probablemente retiró el material mientras estaba muy caliente. Se recomienda retirarlo cuando este frío.
Si eso no funciona, verifique que la prenda que está planchando es del material apropiado para el VTS que
está utilizando. Si el material tiene alguna cama de cualquier tipo, es posible que necesite utilizar un VTS
especialmente diseñado para adherirse a materiales cubiertos.
18
Cuando transfiero, la imagen queda descolorida.
Necesitas aumentar el tiempo que presiona y/o incrementar la temperatura +10°C.
El panel de control para tiempo/temperatura muestra “0000”
Si el equipo muestra este mensaje en el display, apague y encienda el equipo. Si eso no resuelve el problema
contacte a soporte técnico de STM Robotics: (81) 3849 3020, (81) 1306 9219, (81) 1306 9220.
19
¿Need help with your new heat press?
Technical support: (81) 3849 3020
(81) 1306 9219
(81) 1306 9220
Monday to Friday 9 a.m. to 6 p.m.
Saturday 9 a.m. to 1 p.m.
E-Mail: [email protected]
Web page: www.stmrobotics.com
20
Thank you for purchasing this heat press from STM Robotics. The following are important things you need
to know before you begin:
Working flow (Max. usage time between works): We strongly recommend using the heat press no more
than 4 hours between rests of 1 hour.
Intended usage of this heat press: This heat press is designed to press heat transfer vinyl, sublimation on
ceramics and garments, and transfer papers onto garments.
Also avoid use of this heat press for other activities such as food preparation or extraction of oils from plant
materials and other alternative uses.
Use of this heat press in a manner other than intended will void the warranty, will damage the machine, and
may constitute a fire hazard.
Preserve the shipping carton: Please do not discard or disassemble the carton this heat press came in. It was
designed to hold the weight of this machine during shipping. Should you need to return the equipment due
to warranty or repair, you will need it. Do not attempt to ship this equipment in a different container.
21
Follow manufacturer instructions on materials you press: Always use recommended settings from the
manufacturer for any material used in this press.
Test before you press: We encourage you to always do a test of your fabric and HTV or transfer paper
together using a small sample of the materials before you do volume production.
Use extreme care during operation: Please also be careful as you operate the heat press. During operation
the platens will get hot enough to do severe injury to you should you touch them, and surrounding metal
parts will also reach high temperatures.
Electrical source: This heat press is designed for the Mexican market and is designed to plug into a standard
household 3 prong outlet (110-120V/60Hz).
Do not attempt to use this press with a two-prong electrical cord or otherwise use it without proper
grounding.

22
IMPORTANT
Please take time to read the instructions and security cautions before using your sublimation heat press:
- Working flow (Max. usage time between works): Use the heat press no more than 4 hours
between rests of 1 hour.
- Avoid touching the heating plate when the press is on.
- Do not open or try to repair the press; please contact technical support at (81) 3849 3020 or (81)
1306 9219.
- Avoid splashing the heating plate or pressing wet garments.
- Make sure electrical connections are secured and there is proper grounding.
- Disconnect the source cable if the heat press will not be used in an extended period.
- Do not leave on the heat press while kids are around.
- Avoid using the heat press on humid environments.
- Avoid using solvents, gasoline and/or sponges to clean the heat press.
23
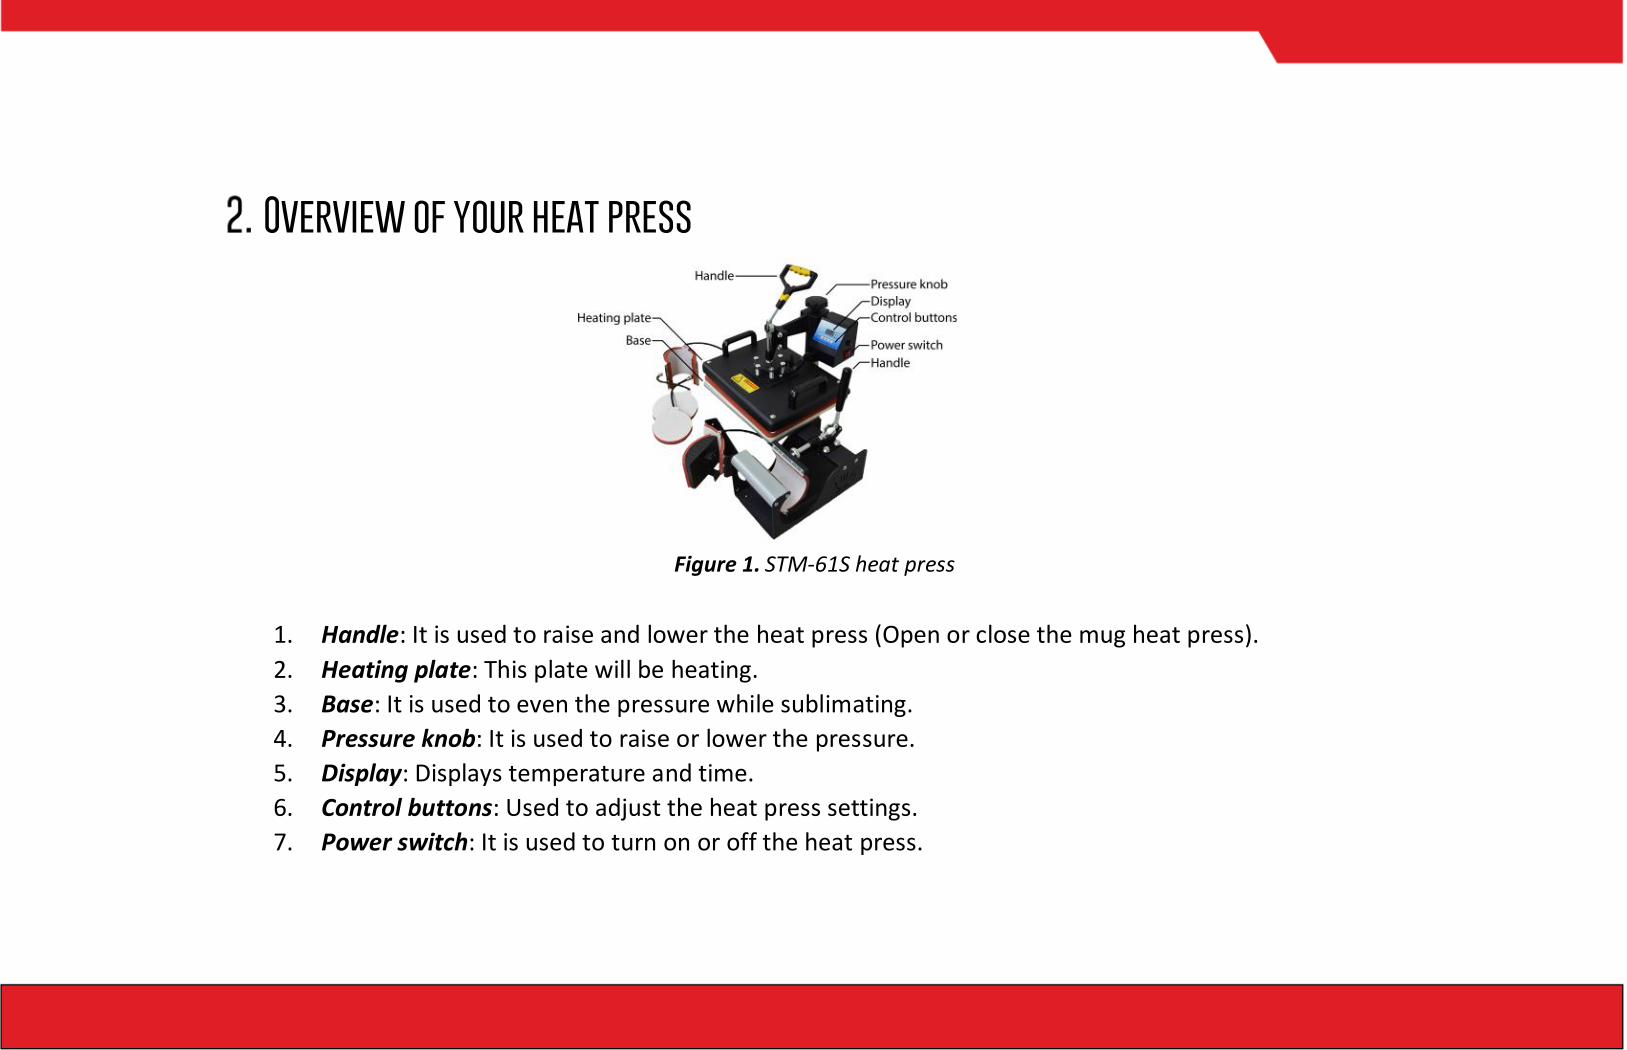
Overview of your heat press
Figure 1. STM-61S heat press
1. Handle: It is used to raise and lower the heat press (Open or close the mug heat press).
2. Heating plate: This plate will be heating.
3. Base: It is used to even the pressure while sublimating.
4. Pressure knob: It is used to raise or lower the pressure.
5. Display: Displays temperature and time.
6. Control buttons: Used to adjust the heat press settings.
7. Power switch: It is used to turn on or off the heat press.
24
How to set pressure in your new heat press
IMPORTANT: Turn off the heat press before adjusting pressure to avoid accidents.
Instructions from manufacturers of heat transfer vinyl and transfer papers will instruct you to use low,
medium or high pressure during the application process. Here’s how to calibrate your machine and identify
those settings.
A) Flat heat press
1. Turn the pressure knob counterclockwise a few times to lower the pressure.
2. Place a piece of paper on the base and lower the heating plate.
3. Pull the paper.
4. If the paper moves easily, turn the knob clockwise and try pulling again until the paper doesn’t
move easily.
5. Once you the paper doesn’t move then that will be your “medium” pressure.
From the “medium” setting, high pressure will be clockwise one to two turns. Low pressure will be
counterclockwise one or two turns. (The number of turns will depend on the thickness of the garment).
25
B) Mug heat press
1. Turn the pressure knob counterclockwise a few times to lower the pressure.
2. Place the mug on the heat press and carefully close the heating plate.
3. Try to move the mug handle.
4. If the mug moves easily, turn the pressure knob clockwise and try moving the handle again until the
mug doesn’t move easily.
5. Once the mug doesn’t move at all the that will be your “medium” pressure.
From the “medium” setting, high pressure will be clockwise one to two turns. Low pressure will be
counterclockwise one or two turns. (The number of turns will depend on the thickness of the garment).
26
Instructions to configure operation settings
1. Turn on the heat press using the power switch, the heat press will make a long beep to indicate it
turned ON.
2. Press “MODE” and adjust minimum temperature to 165 C° using ← → buttons.
3. Press “MODE” again and adjust maximum temperature to 180 C° using ← → buttons.
4. Press “MODE" once again to adjust time to 15-25 seconds using ← → buttons.
5. Press “MODE” for last time to save the settings.
6. The press will start heating until it reaches the maximum temperature and will keep the
temperature between the minimum and maximum temperature set.
27
Sublimation process
IMPORTANT: The process explained below can vary depending on the quality of the material and its
manufacturers.
A) Flat heat press
1. Print the design on sublimation paper.
2. Turn ON the heat press to adjust temperature and time of the process.
3. Wait until the heat press reaches the correct temperature.
4. Place the garment on the base.
5. Use the handle to carefully lower the heating plate.
6. Press the ■ button (square) to start the countdown. Wait until the countdown finishes and the
press turns the time alarm on.
7. Press the ■ button (square) to turn off the countdown alarm.
8. Use the handle to raise the heating plate and remove the garment from the base.
9. Remove the excess material to finish the process.

28
B) Mug heat press
1. Print the design on sublimation paper.
2. Attach the printed design with thermal tape to the mug.
3. Turn ON the heat press to adjust temperature and time.
4. Wait until the heat press reaches the correct temperature.
5. Place the mug on the heat press.
6. Use the handle to close carefully the heating press.
7. Press the ■ button (square) to start the countdown. Wait until countdown finishes and the press
turns the time alarm on.
8. Press the ■ button (square) to turn off the countdown alarm.
9. Use the handle to open the heating plate and remove the mug from the heat press.
10. Remove the excess material to finish the process.
29
Notes
1. Avoid heating the press for more than 30 minutes without it.
2. Always test the materials before starting production.
Maintenance
• To prolong heat press lifetime, lubricate once every six months the joints of moving parts.
o Lubricate the pressure knob screw with lithium grease for high temperature (-20°C to
150°C).
• After using the heat press let it cool and then clean any scrap or burnt material carefully.
30
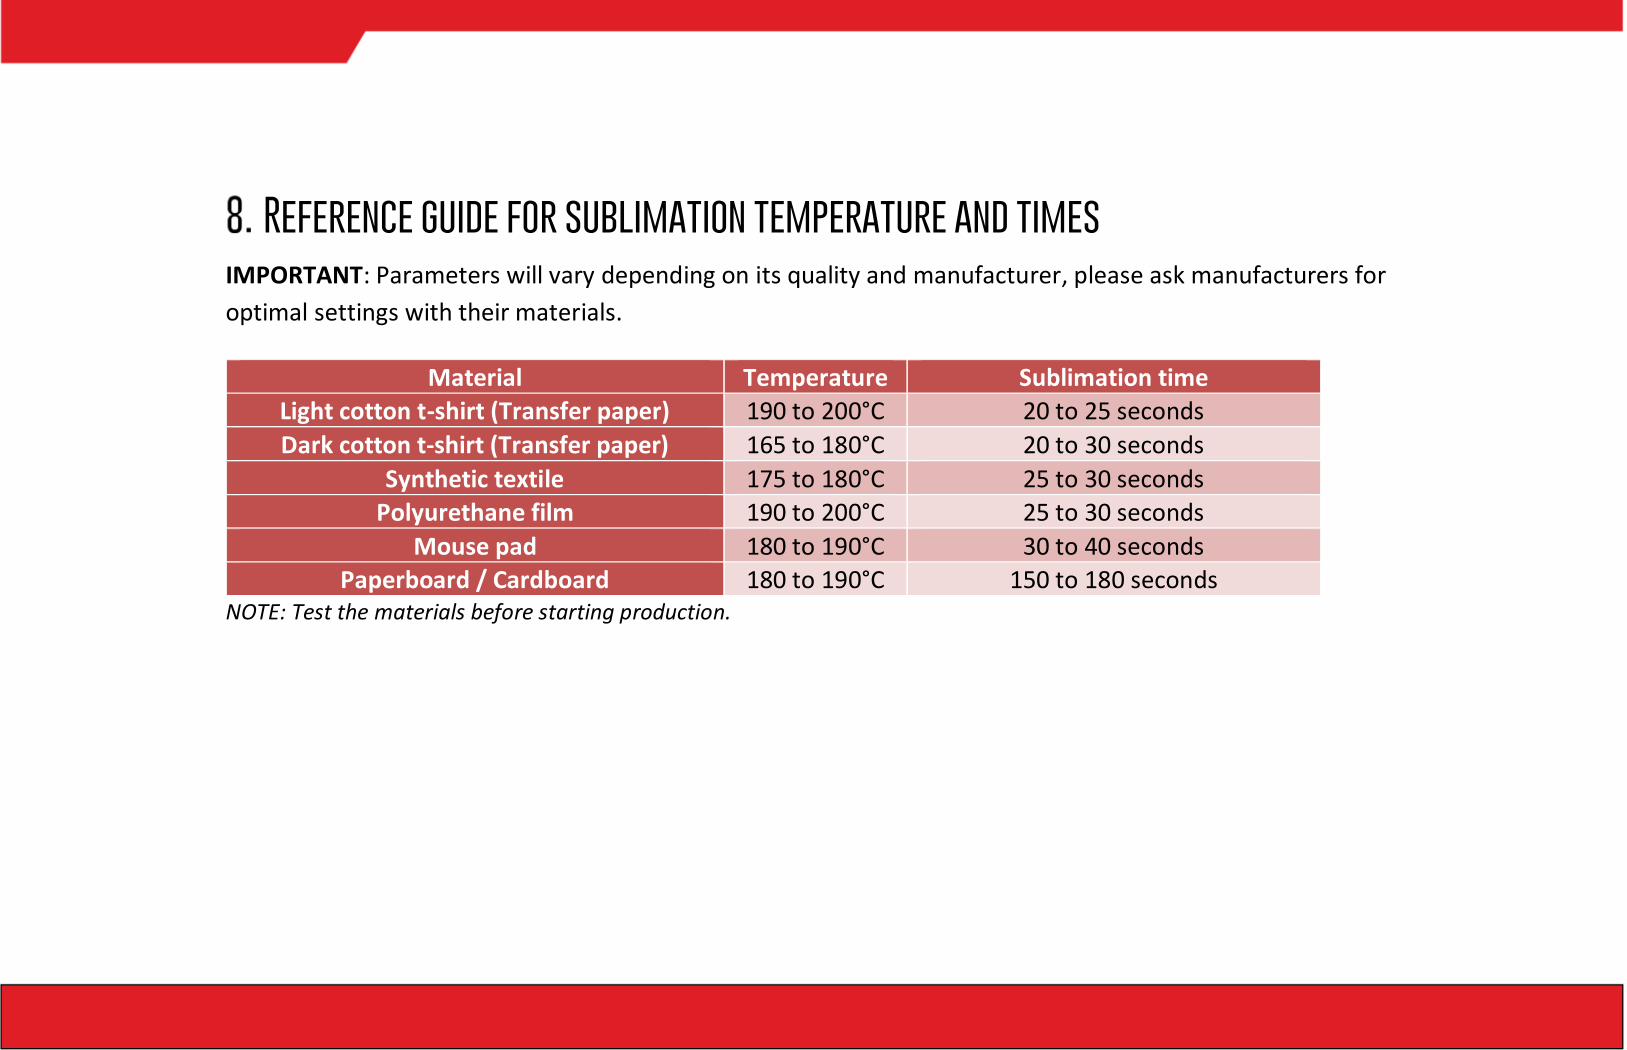
Reference guide for sublimation temperature and times
IMPORTANT: Parameters will vary depending on its quality and manufacturer, please ask manufacturers for
optimal settings with their materials.
Material Temperature Sublimation time
Light cotton t-shirt (Transfer paper) 190 to 200°C 20 to 25 seconds
Dark cotton t-shirt (Transfer paper) 165 to 180°C 20 to 30 seconds
Synthetic textile 175 to 180°C 25 to 30 seconds
Polyurethane film 190 to 200°C 25 to 30 seconds
Mouse pad 180 to 190°C 30 to 40 seconds
Paperboard / Cardboard 180 to 190°C 150 to 180 seconds NOTE: Test the materials before starting production.
31
FAQ
¿What can I do with sublimation heat presses?
Sublimation, heat transfer paper, printing vinyl unto garment and serigraphy.
¿What is sublimation?
It is the process of transferring of ink to an object via heating.
¿What items and garments can be sublimed?
Mugs, t-shirts, caps, plates, ceramics, and much more.
¿What happens if an item can’t be used for sublimation?
The ink won’t transfer to it.
32
¿Can I make an object sublimable?
Yes, as long as a special varnish is used.
¿Do you sell this special varnish?
No, but you can ask on places where you buy materials for sublimation.
¿Can I sublimate on cotton?
It is recommended to sublimate on a 100% polyester garment to get a fine finish, although you can
sublimate on an item with a low percentage of cotton.
¿What is heat transfer?
Is the process of printing on transfer paper to print on cotton materials.
¿Which type of printers/ink I can use for transfer printing?
There’s not a special type of printer or special ink for this kind of technique.
33
¿Any kind of paper can be used for heat transfer?
You need to use a special paper named “transfer paper”, which we sell.
¿How long does the print lasts?
It depends on the quality of the paper, the garment fibers, the temperature and time used during the
process, to get a lasting print ask your material manufacturer for the optimal temperature and times of
sublimation.
¿What is heat transfer vinyl?
It is a special vinyl to print on garments using heat.
¿What affects the durability of a printed garment?
The type of garment, quality of the vinyl or transfer paper, also the time and temperature during the
process.
34
Troubleshooting
When I pressed my heat transfer vinyl (HTV), the material would not stick to the garment and/or fell off
during washing. How do I fix this?
First verify if you are using the optimal setting (from manufacturer) for the material being used, most
important being temperature and pressure settings. If you are using the optimal settings then increase
pressure. Remember: the process is about adhering the material to the garment, so increasing pressure is
often the best solution.
When I peeled the carrier sheet from my HTV, the color vinyl came up off the garment but the adhesive
below it stayed in place. What happened?
You are most likely peeling the material too hot. HTV is like metallic, printed/fashion, and many others are
usually recommended for cold peel.
If that’s not it, double check the garment you are pressing and make sure it’s appropiate for the HTV you are
using. If the material has a coating of any kind, you might need to use special HTV specifically designed for
sticking to coated materials.
35
When I transfer, my colors look faded.
You need to increase the amount of time you’re pressing and/or increase the temperature.
My heat press displays temperature on Fahrenheit instead of Celsius.
Press both arrow buttons ← → for 8 seconds, then use ← → to set the number “001”, press “MODE” to save
the settings.
The heat press displays “0000”.
If you see this, turn the machine off and back on. If that doesn’t fix it, please contact our support group as a
replacement part might be necessary: STM ROBOTICS (81) 3849 3020, (81) 1306 9219, (81) 1306 9220.
The heat press beeps and displays “E2”.
Check if the press connection cable is connected.